DSX-GS80/M80
6
Sony CONFIDENTIAL
For Authorized Servicer
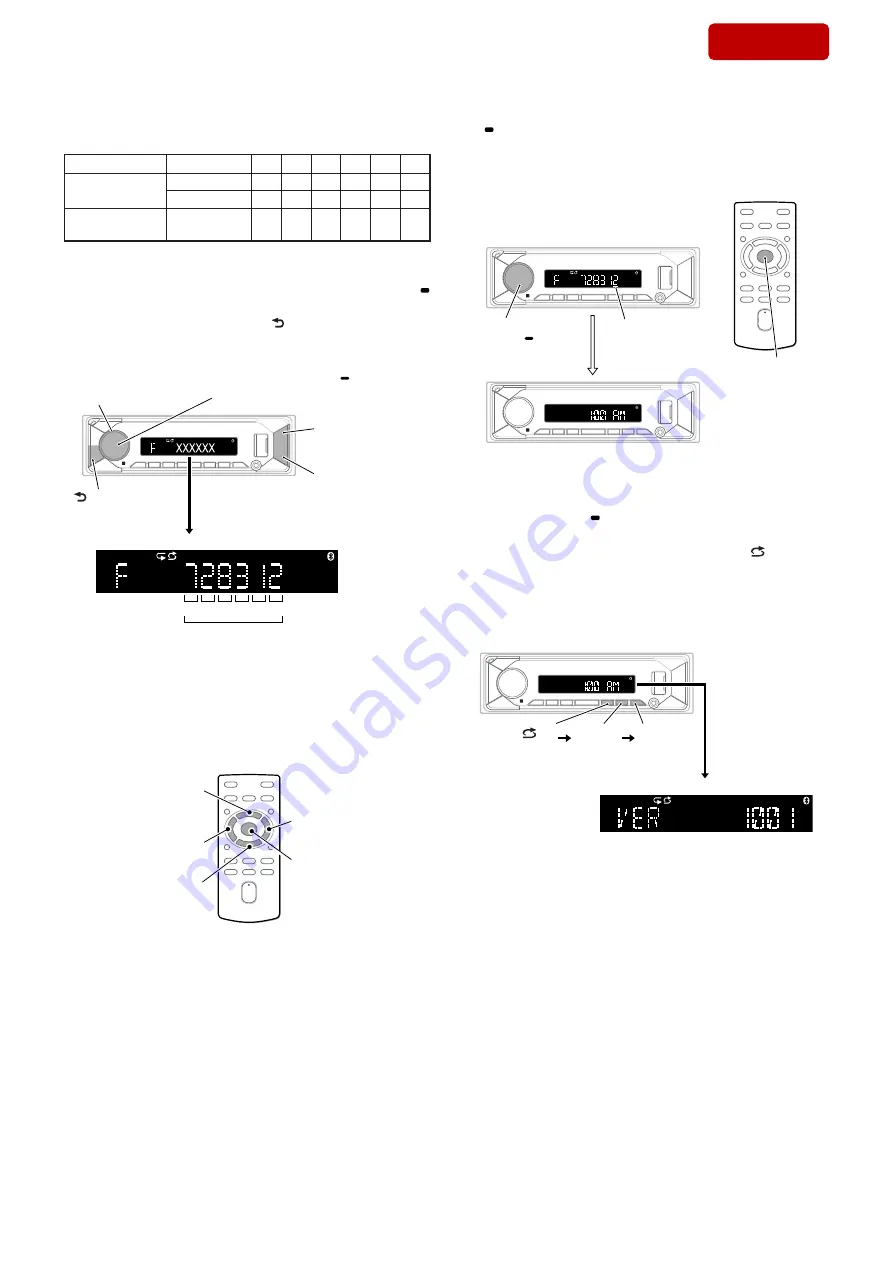
4. Input the 6 digits destination code.
Destination Code
Model
Destination OP5 OP4 OP3 OP2 OP1 OP0
DSX-GS80
US, CND
7
2
8
3
1
2
AEP, UK
3
2
8
1
1
1
DSX-M80
All destina-
tions
F
2
8
3
2
0
Rotate the control dial, and select the alphanumeric character of
“0 to F”.
The digit advances by pressing the [PUSH ENTER MENU/
VOICE] or [
>
M
] button.
The digit returns by pressing the [ MODE] or [
m
.
] but-
ton.
[
m
.
] press
to return the digit.
[
>
M
] press
to advance the digit.
Contorol dial rotate to
select the alphanumeric
characters.
[ MODE] press
to return the digit.
[PUSH ENTER MENU/ VOICE]
press to advance the digit.
Destination code (example: US, CND of GS80)
OP0
OP1
OP2
OP3
OP4
OP5
6 digits
Note 3:
Destination code input can also be done with the remote command-
er supplied with this unit.
Instead of rotating the control dial, press the [
V
] or [
v
] button.
To advance the digit for press the [
b
] or [ENTER] button, to return
the digit for press the [
B
] button.
Note 4:
The model to which the remote commander is not supplied can also
be operated by using the optional remote commander.
[
b
] press to
advance the digit.
[
B
] press to return
the digit.
[
V
] press to select
the alphanumeric
characters.
[
v
] press to select
the alphanumeric
characters.
[ENTER] press to
advance the digit.
5. The setting is completed by pressing the [PUSH ENTER MENU/
VOICE] button on the main unit or [ENTER] button on the re-
mote commander at the state of cursor position of “OP0”, then
the display turns off, the initialization operation is done, and the
display returns to the clock display.
cursor position
of OP0
[PUSH ENTER
MENU/ VOICE]
press
or
[ENTER] press
Note 5:
There is not displayed “AM”, depending on the destination.
6. Perform the check whether there is no mistake in the destination
code.
Press and hold the [ OFF SRC] button to the state of source off
(the clock is displayed on the liquid crystal display), enter the
test mode by pressing the buttons in order of the [ 4]
→
[MIC
5]
→
[
u
6] (press only the [
u
6] button for 2 seconds) and
display the software main version.
(Displayed characters/values in the following
fi
gure are exam-
ple)
Note 6:
There is not displayed “AM”, depending on the destination.
[ 4]
press
[MIC 5]
press
[
u
6]
press for
2 seconds
Software main version
– Continued on next page –
SYS SET
2019/10/17 21:47:35 (GMT+09:00)


