32
DVP-CX995V
SECTION 5
MECHANICAL ADJUSTMENTS
POP UP MECHANISM ADJUSTMENT
1. Connect the AC plug of the set to AC consent, then the set
enters standby mode.
2. Press the
[TOP MENU]
,
[CLEAR]
and
I/
1
keys on the remote
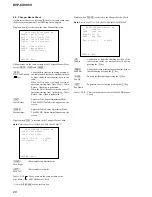
commander in this order, then the set enters the DVD Test
Mode.
3. Select “2. Drive Manual Operation” by pressing the
[2]
key.
4. Select “8. Changer Mecha Check” by pressing the
[8]
key.
5. Press the
[ENTER]
key, then the CDM initializies.
6. Press the
[PAUSE]
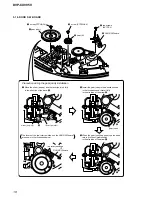
key, then the table rotates to the mechanical
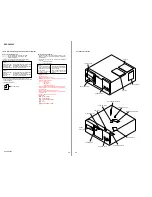
adjustment position, the door opens and the table locks. (Fig.
1)
7. Keep pressing the
[
w
]
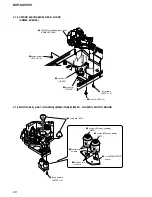
key to raise the pop up part.
8. Loosen the adjusting screw, move the screwdriver left and right
until the lever (POP UP) does not touch the slit wall, and secure
the screw. (Fig. 2)
The following keys have special functions in this mode.
[
Q
]
key : Loading mechanism IN operation
[
q
]
key : Loading mechanism OUT operation
[
w
]
key : Pop up part UP operation
[
W
]
key : Pop up part DOWN operation
TABLE SENSOR ADJUSTMENT
After the Pop Up Mechanism Adjustment, perform this adjustment
continuously.
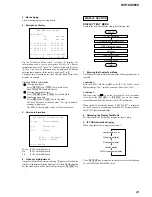
1. Loosen the fixing screw. Moving the holder little by little, stop
it at a boundary point where the PROGRESSIVE LED (blue)
goes off and the SA-CD LED (white) lights up. If the holder
is moved in reverse direction, stop the holder at a point where
the SA-CD LED goes off and the PROGRESSIVE LED lights
up.
2. Moving the table right and left with a hand after the screw is
fixed, the table will move by the play of the table. If the LEDs
light up alternately, the adjustment will be performed correctly.
(Fig. 3)
Fig. 1
Fig. 2
Fig. 3
Holder (table sensor 400)
S tight, screw
(PTTWH3
×
6)
Swing
Table (400) assembly
At this position,this
part will be locked.
Lever (POP-UP 400)
Fix to the center so that the
lever (POP-UP 400) does
not touch the slit.
Cover (chassis 400)

