background image

3

Precautions

On safety

• Caution – The use of optical instruments 

with this product will increase eye hazard.

• Should any solid object or liquid fall into 

the cabinet, unplug the player and have it 
checked by qualified personnel before 
operating it any further.

On power sources

• The player is not disconnected from the AC 

power source (mains) as long as it is 
connected to the wall outlet, even if the 
player itself has been turned off.

• If you are not going to use the player for a 

long time, be sure to disconnect the player 
from the wall outlet. To disconnect the AC 
power cord (mains lead), grasp the plug 
itself; never pull the cord.

On placement

• Place the player in a location with adequate 

ventilation to prevent heat build-up in the 
player.

• Do not place the player on a soft surface 

such as a rug that might block the 
ventilation holes.

• Do not place the player in a location near 

heat sources, or in a place subject to direct 
sunlight, excessive dust, or mechanical 
shock.

• Do not install the appliance in a confined 

space, such as a bookcase or built-in 
cabinet.

On operation

• If the player is brought directly from a cold 

to a warm location, or is placed in a very 
damp room, moisture may condense on the 
lenses inside the player. Should this occur, 
the player may not operate properly. In this 
case, remove the disc and leave the player 
turned on for about half an hour until the 
moisture evaporates.

• When you move the player, take out any 

discs. If you don’t, the disc may be 
damaged.

On adjusting volume

Do not turn up the volume while listening to 
a section with very low level inputs or no 
audio signals. If you do, the speakers may be 
damaged when a peak level section is played.

On cleaning

Clean the cabinet, panel, and controls with a 
soft cloth slightly moistened with a mild 
detergent solution. Do not use any type of 
abrasive pad, scouring powder or solvent 
such as alcohol or benzine.

On cleaning discs

Do not use a commercially available cleaning 
disc. It may cause a malfunction.

If you have any questions or problems 
concerning your player, please consult your 
nearest Sony dealer.

IMPORTANT NOTICE

Caution: This player is capable of holding a 
still video image or on-screen display image 
on your television screen indefinitely. If 
you leave the still video image or on-screen 
display image displayed on your TV for an 
extended period of time you risk permanent 
damage to your television screen. Plasma 
Display Panel televisions and projection 
televisions are susceptible to this.

Summary of Contents for DVP-F250

Page 1: ...3 083 976 11 2 Operating Instructions 2003 Sony Corporation DVP F250 CD DVD Player ...

Page 2: ... ASTA or BSI to BS1362 i e marked with or mark must be used If the plug supplied with this equipment has a detachable fuse cover be sure to attach the fuse cover after you change the fuse Never use the plug without the fuse cover If you should lose the fuse cover please contact your nearest Sony service station Precautions Safety This unit operates on 110 240 V AC 50 60 Hz Check that the unit s op...

Page 3: ... is placed in a very damp room moisture may condense on the lenses inside the player Should this occur the player may not operate properly In this case remove the disc and leave the player turned on for about half an hour until the moisture evaporates When you move the player take out any discs If you don t the disc may be damaged On adjusting volume Do not turn up the volume while listening to a ...

Page 4: ...e You Stopped the Disc Multi disc Resume 30 Using the DVD s Menu 31 Selecting ORIGINAL or PLAY LIST on a DVD RW 32 Playing VIDEO CDs With PBC Functions PBC Playback 33 Playing an MP3 Audio Track 34 Various Play Mode Functions Programme Play Shuffle Play Repeat Play A B Repeat Play 36 Searching for a Scene 41 Searching for a Particular Point on a Disc Scan Slow motion Play Search Freeze Frame 41 Se...

Page 5: ...ntrolling Your TV With the Supplied Remote 61 Settings and Adjustments 62 Using the Setup Display 62 Setting the Display or Sound Track Language LANGUAGE SETUP 63 Settings for the Display SCREEN SETUP 64 Custom Settings CUSTOM SETUP 65 Settings for the Sound AUDIO SETUP 66 Additional Information 69 Troubleshooting 69 Self diagnosis Function When letters numbers appear in the display 71 Glossary 72...

Page 6: ... This system is used to protect copyrights DVD VIDEOs labelled will also play on this player If you try to play any other DVD VIDEO the message Playback prohibited by area limitations will appear on the TV screen Depending on the DVD VIDEO no region code indication may be labelled even though playing the DVD VIDEO is prohibited by area restrictions Example of discs that the player cannot play The ...

Page 7: ...ard Recently various music discs encoded with copyright protection technologies are marketed by some record companies Please be aware that among those discs there are some that do not conform to the CD standard and may not be playable by this product Note on playback operations of DVDs and VIDEO CDs Some playback operations of DVDs and VIDEO CDs may be intentionally set by software producers Since...

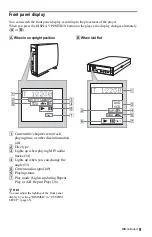
Page 8: ...pages in parentheses Front panel A Front panel display 9 B remote sensor 15 C DISPLAY POSITION button 9 D N play button 28 E x stop button 29 F previous next buttons 29 G 1 on standby button 28 H Z open close button 28 I Disc tray 28 J Stand 24 DISPLAY POSITION ...

Page 9: ...id flat A Current title chapter scene track playing time or other disc information 46 B Disc type C Lights up when playing MP3 audio tracks 34 D Lights up when you can change the angle 53 E Current audio signal 49 F Playing status G Play mode Lights up during Repeat Play or A B Repeat Play 36 z Hint You can adjust the lighting of the front panel display by setting DIMMER in CUSTOM SETUP page 65 DV...

Page 10: ... OUT COAXIAL jack 21 22 23 C COMPONENT VIDEO OUT jacks 16 D S VIDEO OUT jack 16 E LINE OUT VIDEO jack 16 F LINE OUT L R AUDIO jacks 20 21 22 DIGITAL OUT OPTICAL COAXIAL PCM DTS MPEG DOLBY DIGITAL COMPONENT VIDEO OUT LINE OUT S VIDEO OUT Y R AUDIO VIDEO L CB CR ...

Page 11: ... C X x c buttons 31 L DISPLAY button 12 M TOP MENU button 31 N 1 on standby button 28 O 2 volume buttons 61 The button has a tactile dot P t TV video button 61 Q TIME TEXT button 45 R PICTURE MODE button 55 S angle button 53 T SUR surround button 51 U PICTURE NAVI button 44 V REPEAT button 38 W instant search step button 29 41 X instant replay step button 29 41 Y x stop button 29 Z ENTER button 25...

Page 12: ...e scene number for VIDEO CDs PBC is on track number for VIDEO CDs CDs album number for DATA CDs Displays the index number for VIDEO CDs CDs MP3 audio track number for DATA CDs Control Menu display 1 m Control Menu display 2 DVD VIDEO CD only m ADVANCED display DVD only See page 47 m Control Menu display off OFF 1 ENGLISH 2 FRENCH 3 SPANISH OFF 1 8 3 4 1 2 2 7 T 1 3 2 5 5 DVD VIDEO Select Cancel SU...

Page 13: ...e code for picture and music searching Displays the DVD CD text or the DATA CD s track name AUDIO page 49 Changes the audio setting SUBTITLE page 53 Displays the subtitles Changes the subtitle language ANGLE page 53 Changes the angle TVS TV Virtual Surround page 51 Selects the surround functions ADVANCED page 47 Displays the information bit rate or layer of the disc currently playing PARENTAL CONT...

Page 14: ...dom order REPEAT page 38 Plays the entire disc all titles all tracks all albums repeatedly or one title chapter track album repeatedly A B REPEAT page 39 Specifies the parts you want to play repeatedly BNR page 54 Adjusts the picture quality by reducing the block noise or mosaic like patterns that appear on your TV screen CUSTOM PICTURE MODE page 55 Adjusts the video signal from the player You can...

Page 15: ... Screw 1 A EURO AV adapter is included with European models Step 2 Inserting Batteries Into the Remote You can control the player using the supplied remote Insert two R6 size AA batteries by matching the 3 and ends on the batteries to the markings inside the compartment When using the remote point it at the remote sensor on the player Notes Do not leave the remote in an extremely hot or humid plac...

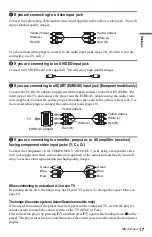
Page 16: ...L COMPONENT VIDEO OUT LINE OUT S VIDEO OUT Y R AUDIO VIDEO L CB CR l Signal flow TV projector or AV amplifier receiver Component video cord not supplied to COMPONENT VIDEO OUT to S VIDEO OUT TV projector or AV amplifier receiver S VIDEO cord not supplied green blue red green blue red green blue red TV projector or AV amplifier receiver TV EURO AV adapter supplied with European models Audio video c...

Page 17: ...ng to a monitor projector or AV amplifier receiver having component video input jacks Y CB CR Connect the component via the COMPONENT VIDEO OUT jacks using a component video cord not supplied or three video cords not supplied of the same kind and length You will enjoy accurate colour reproduction and high quality images When connecting to a standard 4 3 screen TV Depending on the disc the image ma...

Page 18: ...o video input jack connect the player to this jack For European models When you play a disc recorded in the NTSC colour system the player outputs the video signal or the Setup Display etc in the NTSC colour system and the picture may not appear on the PAL colour system televisions In this case open the tray and remove the disc VCR CD DVD player TV Connect directly ...

Page 19: ...r Systems Inc Components to be connected Connection Your setup example TV Surround effects TVS DYNAMIC page 51 TVS WIDE page 51 page 20 Stereo amplifier receiver and two speakers Surround effects TVS STANDARD page 51 or MD deck DAT deck Surround effects TVS STANDARD page 51 page 21 AV amplifier receiver having a Dolby Surround Pro Logic decoder and 3 to 6 speakers Surround effects Dolby Surround P...

Page 20: ... OUT L R AUDIO jacks to the TV s audio input jack A DIGITAL OUT OPTICAL COAXIAL PCM DTS MPEG DOLBY DIGITAL COMPONENT VIDEO OUT LINE OUT S VIDEO OUT Y R AUDIO VIDEO L CB CR A LINE OUT R AUDIO VIDEO L TV l Signal flow CD DVD player Audio video cord supplied to audio input yellow white yellow to LINE OUT L R AUDIO red white red For European models Use the EURO AV adapter supplied to connect to the SC...

Page 21: ... use the supplied audio video cord instead of using a separate audio cord B B 1 B 2 DIGITAL OUT OPTICAL COAXIAL PCM DTS MPEG DOLBY DIGITAL COMPONENT VIDEO OUT LINE OUT S VIDEO OUT Y R AUDIO VIDEO L CB CR B 1 B 2 DIGITAL OUT OPTICAL COAXIAL PCM DTS MPEG DOLBY DIGITAL LINE OUT R AUDIO VIDEO L CD DVD player or Stereo amplifier receiver MD deck DAT deck Front L Front R Speakers white red red white Coa...

Page 22: ...lace the monaural rear speaker with a centre speaker 2 rear speakers and a subwoofer C C 1 C 2 DIGITAL OUT OPTICAL COAXIAL PCM DTS MPEG DOLBY DIGITAL COMPONENT VIDEO OUT LINE OUT S VIDEO OUT Y R AUDIO VIDEO L CB CR C 1 C 2 DIGITAL OUT OPTICAL COAXIAL PCM DTS MPEG DOLBY DIGITAL LINE OUT R AUDIO VIDEO L CD DVD player or Front R Front L Rear R Subwoofer l Signal flow Rear L Amplifier receiver with Do...

Page 23: ...in Quick Setup page 25 If your AV amplifier receiver has an MPEG audio decoder function set MPEG to MPEG page 67 Otherwise no sound or a loud noise will come from the speakers D DIGITAL OUT OPTICAL COAXIAL PCM DTS MPEG DOLBY DIGITAL COMPONENT VIDEO OUT LINE OUT S VIDEO OUT Y R AUDIO VIDEO L CB CR D DIGITAL OUT OPTICAL COAXIAL PCM DTS MPEG DOLBY DIGITAL Front R Front L Rear R AV amplifier receiver ...

Page 24: ...he stand z Hint You can switch the front panel display by pressing DISPLAY POSITION on the player The contents will appear vertically or horizontally page 9 Notes Use the supplied stand only when you use the player in an upright position Do not attach the stand when you use the player laid flat To move the player hold the player itself If you hold the stand it may break Do not use the player in an...

Page 25: ... Switch the input selector on your TV so that the signal from the player appears on the TV screen Press ENTER to run QUICK SETUP appears at the bottom of the screen If this message does not appear select QUICK under SETUP in the Control Menu to run Quick Setup page 63 4 Press ENTER without inserting a disc The Setup Display for selecting the language used in the on screen display appears The avail...

Page 26: ... OUTPUT L R AUDIO Quick Setup is finished and connections are complete Select DIGITAL OUTPUT The Setup Display for DOLBY DIGITAL appears 10Press X x to select the type of Dolby Digital signal you wish to send to your amplifier receiver Choose the signal that matches the audio connection you selected on pages 21 to 23 through D PCM page 67 DOLBY DIGITAL only if the amplifier receiver has a Dolby Di...

Page 27: ... surround sound effects To enjoy the surround sound effects of this player or your amplifier receiver set the following items as described below for the audio connection you selected on pages 21 to 23 through Each of these is the default setting and does not need to be adjusted when you first connect the player See page 62 for using the Setup Display Audio Connection pages 20 to 23 No additional s...

Page 28: ...sc on the disc tray Make sure the disc is held by the groove on the tray Make sure the disc is held within the groove of the tray when using the player in the upright position also 5 Press H The disc tray closes and the player starts playback continuous play Adjust the volume on the TV or the amplifier receiver Depending on the disc a menu may appear on the TV screen For DVD VIDEOs see page 31 For...

Page 29: ... signals are output only through the DIGITAL OUT COAXIAL or OPTICAL jack When you play a DVD VIDEO with DTS sound tracks set DTS in AUDIO SETUP to ON page 67 If you connect the player to audio equipment without a DTS decoder do not set DTS in AUDIO SETUP to ON page 67 A loud noise may come out from the speakers affecting your ears or causing the speakers to be damaged Notes Be sure to use an adapt...

Page 30: ... you stopped the disc for up to 6 discs and resumes playback the next time you insert the same disc When you store a resume playback point for the seventh disc the resume playback point for the first disc is deleted 1 While playing a disc press x to stop playback RESUME appears on the front panel display 2 Press H The player starts playback from the point where you stopped the disc in step 1 z Hin...

Page 31: ... or a music feature called titles When you play a DVD which contains several titles you can select the title you want using the TOP MENU button When you play DVDs that allow you to select items such as the language for the subtitles and the language for the sound select these items using the MENU button 1 Press TOP MENU or MENU The disc s menu appears on the TV screen The contents of the menu vary...

Page 32: ...d 1 Press DISPLAY while the player is in stop mode The Control Menu appears 2 Press X x to select ORIGINAL PLAY LIST then press ENTER The options for ORIGINAL PLAY LIST appear 3 Press X x to select the setting PLAY LIST plays the titles created from ORIGINAL for editing ORIGINAL plays the titles originally recorded 4 Press ENTER To turn off the Control Menu Press DISPLAY repeatedly until the Contr...

Page 33: ...ure may differ depending on the VIDEO CD To return to the menu Press O RETURN z Hint To play without using PBC press or the number buttons while the player is stopped to select a track then press H or ENTER Play without PBC appears on the TV screen and the player starts continuous play You cannot play still pictures such as a menu To return to PBC playback press x twice then press H Notes Dependin...

Page 34: ...The selected track starts playing When a track or album is being played its title is shaded To go to the next or previous page Press c or C To return to the previous display Press O RETURN To turn off the display Press MENU Notes Only the letters in the alphabet and numbers can be used for album or track names Anything else is displayed as an ID3 tags cannot be displayed About MP3 audio tracks You...

Page 35: ...ks contained within a currently selected album take priority over the next album in the same tree Example C contains D so 4 is played before 5 When you press MENU and the list of MP3 albums appears page 34 the albums are arranged in the following order A t B t C t D t F t G Albums that do not contain tracks such as album E do not appear in the list z Hints If you add numbers 01 02 03 etc to the fr...

Page 36: ...en press ENTER The options for PROGRAM appear 3 Press X x to select SET t then press ENTER 4 Press c The cursor moves to the title or track row T in this case 01 5 Select the title chapter or track you want to programme When playing a DVD VIDEO For example select chapter 03 of title 02 Press X x or the number buttons to select 02 under T then press ENTER DISPLAY ENTER CLEAR Number buttons OFF OFF ...

Page 37: ...step 5 for new programming To cancel a programme select under T then press ENTER To cancel all the titles chapters or tracks in the programmed order 1 Follow steps 1 to 3 of Creating your own programme Programme Play 2 Press X and select ALL CLEAR 3 Press ENTER z Hint You can do Repeat Play or Shuffle Play of the programmed titles chapters or tracks During Programme Play follow the steps of Repeat...

Page 38: ...edly Repeat Play You can play all of the titles or tracks on a disc or a single title chapter or track repeatedly You can use a combination of Shuffle or Programme Play modes 1 Press REPEAT during playback The following display appears 2 Press REPEAT repeatedly to select the item to be repeated When playing a DVD VIDEO DISC repeats all of the titles TITLE repeats the current title on a disc CHAPTE...

Page 39: ...ess X x to select SET t then press ENTER The A B REPEAT setting display appears 4 During playback when you find the starting point point A of the portion to be played repeatedly press ENTER The starting point point A is set 5 When you reach the ending point point B press ENTER again The set points are displayed and the player starts repeating this specific portion To return to normal play Press CL...

Page 40: ...40 A B Repeat Play does not work for titles containing still pictures on a DVD RW in VR mode A B Repeat Play does not work across multiple titles on a DVD RW in VR mode ...

Page 41: ...differ depending on the disc type With each press the indication changes as follows Playback direction Opposite direction The 2B 2b playback speed is about twice the normal speed The 3M 3m playback speed is faster than 2M 2m and the 2M 2m playback speed is faster than 1M 1m Watching frame by frame Slow motion Play Press m or M when the player is in pause mode To return to the normal speed press H ...

Page 42: ...ding frame DVD only If you hold the button down you can view the frames in succession To return to normal playback press H Searching for a Title Chapter Track Scene etc You can search a DVD by title or chapter and you can search a VIDEO CD CD DATA CD by track index or scene As titles and tracks are assigned unique numbers on the disc you can select the desired one by entering its number Or you can...

Page 43: ...ep 2 select TIME TEXT T playing time of the current title is selected 2 Press ENTER T changes to T 3 Input the time code using the number buttons then press ENTER For example to find the scene at 2 hours 10 minutes and 20 seconds after the beginning just enter 2 10 20 z Hints When the Control Menu display is turned off you can search for a chapter DVD VIDEO DVD RW or track CD by pressing the numbe...

Page 44: ...ut PBC The PICTURE NAVIGATION is not available when playing Super VCDs Depending on the disc you may not be able to select all functions The sound is muted when using this function Scanning the title chapter or track TITLE VIEWER CHAPTER VIEWER TRACK VIEWER You can divide the screen into 9 subscreens and display the first scene of titles chapters or tracks You can also play back from the selected ...

Page 45: ...apter When playing a VIDEO CD with PBC functions minutes seconds Playing time of the current scene When playing a VIDEO CD without PBC functions or CD T minutes seconds Playing time of the current track T Remaining time of the current track D Playing time of the current disc D Remaining time of the current disc When playing a DATA CD MP3 audio minutes seconds Playing time of the current track When...

Page 46: ...so check the time information and text using the Control Menu page 12 Notes Depending on the type of disc being played the DVD CD text or track name may not be displayed The player can only display the first level of the DVD CD text such as the disc name or title Playing time of MP3 audio tracks may not be displayed correctly Playing time of the current title Remaining time of the current title Pl...

Page 47: ...ther BIT RATE or LAYER whichever was selected in ADVANCED BIT RATE When playing MPEG audio sound tracks Bit rate refers to the amount of video audio data per second in a disc While playing a disc an approximate bit rate of the playback picture is displayed as Mbps Mega bit per second and the audio as kbps kilo bit per second The higher the bit rate the larger the amount of data However this does n...

Page 48: ...tion of a DATA CD By pressing TIME TEXT while playing MP3 audio tracks on a DATA CD you can display the audio bit rate the amount of data per second of the current audio T 17 30 128k JAZZ RIVER SIDE Bit rate Album name Track name ...

Page 49: ...he code represents When the same language is displayed two or more times the DVD VIDEO is recorded in multiple audio formats When playing a DVD RW VR mode The types of sound tracks recorded on a disc are displayed The default setting is underlined Example 1 MAIN main sound 1 SUB sub sound 1 MAIN SUB main and sub sound When playing a VIDEO CD CD or DATA CD MP3 audio The default setting is underline...

Page 50: ...mat display indicate the following sound components L Front left R Front right C Centre LS Rear left RS Rear right S Rear monaural The rear component of the Dolby Surround processed signal and the Dolby Digital signal LFE Low Frequency Effect signal z Hint For Dolby Digital and DTS LFE is always enclosed in a solid line regardless of the LFE signal component being output Note If DTS in AUDIO SETUP...

Page 51: ...Creates virtual rear speakers from the sound of the front speakers L R without using actual rear speakers shown below This mode is effective when the distance between the front L and R speakers is short such as with built in speakers on a stereo TV TVS WIDE Creates virtual rear speakers from the sound of the front speakers L R without using actual rear speakers The virtual speakers are reproduced ...

Page 52: ...r receiver Make sure that your listening position is between and at an equal distance from your speakers and that the speakers are located in similar surroundings Not all discs will respond to the TVS NIGHT function in the same way When you use the DIGITAL OUT COAXIAL or OPTICAL jack to listen to MPEG audio signals and set MPEG in AUDIO SETUP to MPEG no sound will come from your speakers if you se...

Page 53: ... subtitles are recorded on the discs you can change the subtitles or turn them on and off whenever you want while playing a DVD 1 Press subtitle during playback The following display appears 2 Press subtitle repeatedly to select the setting When playing a DVD VIDEO Select the language Depending on the DVD VIDEO the choice of language varies When 4 digits are displayed they indicate a language code...

Page 54: ...educes the block noise 2 reduces the block noise more than 1 3 reduces the block noise more than 2 4 Press ENTER The disc plays with the setting you selected To cancel the BNR setting Select OFF in step 3 To turn off the Control Menu Press DISPLAY repeatedly until the Control Menu is turned off Notes If the outlines of the images on your screen should become blurred set BNR to OFF Depending on the...

Page 55: ...ined STANDARD displays a standard picture DYNAMIC 1 produces a bold dynamic picture by increasing the picture contrast and the colour intensity DYNAMIC 2 produces a more dynamic picture than DYNAMIC 1 by further increasing the picture contrast and the colour intensity CINEMA 1 enhances details in dark areas by increasing the black level CINEMA 2 White colours become brighter and black colours beco...

Page 56: ...e outline more than 1 3 enhances the outline more than 2 SOFT softens the image DVD only 4 Press ENTER The disc plays with the setting you selected To cancel the DIGITAL VIDEO ENHANCER setting Select OFF in step 3 To turn off the Control Menu Press DISPLAY repeatedly until the Control Menu is turned off Note Depending on the disc or the scene being played noise found in the disc may become more ap...

Page 57: ...t to lock If the disc is playing press x to stop playback 2 Press DISPLAY while the player is in stop mode The Control Menu appears 3 Press X x to select PARENTAL CONTROL then press ENTER The options for PARENTAL CONTROL appear 4 Press X x to select ON t then press ENTER If you have not entered a password The display for registering a new password appears Enter a 4 digit password using the number ...

Page 58: ... entering the password may appear again when you insert a different recorded disc Input the password to play the disc Parental Control limited playback Playback of some DVD VIDEOs can be limited according to a predetermined level such as the age of the users The PARENTAL CONTROL function allows you to set a playback limitation level 1 Press DISPLAY while the player is in stop mode The Control Menu...

Page 59: ... The display for entering your password appears 2 Enter your 4 digit password using the number buttons then press ENTER The player starts playback z Hint If you forget your password remove the disc and repeat steps 1 to 3 of Parental Control limited playback When you are asked to enter your password enter 199703 using the number buttons then press ENTER The display will ask you to enter a new 4 di...

Page 60: ...er buttons then press ENTER If you make a mistake entering your password Press C before you press ENTER and input the correct number If you make a mistake Press O RETURN To turn off the display Press DISPLAY repeatedly until the display is turned off Standard Code number Argentina 2044 Australia 2047 Austria 2046 Belgium 2057 Brazil 2070 Canada 2079 Chile 2090 China 2092 Denmark 2115 Finland 2165 ...

Page 61: ...umbers of controllable TVs If more than one code number is listed try entering them one at a time until you find the one that works with your TV European models only Notes Depending on your TV some or all buttons may not function on the TV even after entering the correct manufacturer code If you enter a new code number the code number previously entered will be erased When you replace the batterie...

Page 62: ...elect SETUP then press ENTER The options for SETUP appear 3 Press X x to select CUSTOM then press ENTER The Setup Display appears 4 Press X x to select the setup item from the displayed list LANGUAGE SETUP SCREEN SETUP CUSTOM SETUP or AUDIO SETUP Then press ENTER The Setup item is selected Example SCREEN SETUP Asian Oceanian models 5 Press X x to select an item then press ENTER The options for the...

Page 63: ...in the Setup Display To use the display see Using the Setup Display page 62 OSD On Screen Display Switches the display language on the screen MENU DVD VIDEO only You can select the desired language for the disc s menu AUDIO DVD VIDEO only Switches the language of the sound track When you select ORIGINAL the language given priority in the disc is selected SUBTITLE DVD VIDEO only Switches the langua...

Page 64: ...or DATA CD MP3 audio for more than 15 minutes The screen saver will help prevent your display device from becoming damaged ghosting Press H to turn off the screen saver 16 9 Select this when you connect a wide screen TV or a TV with a wide mode function 4 3 LETTER BOX Select this when you connect a 4 3 screen TV Displays a wide picture with bands on the upper and lower portions of the screen 4 3 P...

Page 65: ... DIMMER Adjusts the lighting of the front panel display JACKET PICTURE The jacket picture still picture appears but only when the jacket picture is already recorded on the disc CD EXTRA etc If the disc does not contain a jacket picture the GRAPHICS picture appears GRAPHICS A preset picture stored in the player appears BLUE The background colour is blue BLACK The background colour is black ON The p...

Page 66: ...ed AUDIO ATT attenuation If the playback sound is distorted set this item to ON The player reduces the audio output level This function affects the output of the LINE OUT L R AUDIO jacks AUDIO DRC Dynamic Range Control DVD VIDEO DVD RW only Makes the sound clear when the volume is turned down when playing a DVD that conforms to AUDIO DRC This affects the output from the following jacks LINE OUT L ...

Page 67: ...s DOLBY SUR ROUND Normally select this position Multi channel audio signals are output to two channels for enjoying surround sounds NORMAL Multi channel audio signals are downmixed to two channels for use with your stereo ON Normally select this position When you select ON see Setting the digital output signal for further settings OFF The influence of the digital circuit upon the analog circuit is...

Page 68: ...68 Note When you use the DIGITAL OUT COAXIAL or OPTICAL jack to listen to MPEG audio signals and set MPEG to MPEG in AUDIO SETUP no sound will come from your speakers if you select one of the TVS mode ...

Page 69: ...The picture does not fill the screen even though the aspect ratio is correctly set in TV TYPE of SCREEN SETUP The aspect ratio of the disc is fixed on your DVD Sound There is no sound Re connect the connecting cord securely The connecting cord is damaged The player is connected to the wrong input jack on the amplifier receiver page 21 22 23 The amplifier receiver input is not correctly set The pla...

Page 70: ...not start playing from the beginning Programme Play Shuffle Play Repeat Play or A B Repeat Play has been selected page 36 Resume play has taken effect page 30 The player starts playing the disc automatically The disc features an auto playback function AUTO PLAY in CUSTOM SETUP is set to ON page 65 Playback stops automatically While playing discs with an auto pause signal the player stops playback ...

Page 71: ...play is broken The data is not MPEG1 Audio Layer 3 data Self diagnosis Function When letters numbers appear in the display When the self diagnosis function is activated to prevent the player from malfunctioning a five character service number e g C 13 50 with a combination of a letter and four digits appears on the screen and the front panel display In this case check the following table First thr...

Page 72: ...ictures even though its diameter is the same as a CD The data capacity of a single layer and single sided DVD is 4 7 GB Giga Byte which is 7 times that of a CD The data capacity of a double layer and single sided DVD is 8 5 GB a single layer and double sided DVD is 9 4 GB and double layer and double sided DVD is 17GB The picture data uses the MPEG 2 format one of the worldwide standards of digital...

Page 73: ...moving pictures and still pictures are divided into sections called scenes Title page 9 The longest section of a picture or music feature on a DVD movie etc in video software or the entire album in audio software Track page 9 Sections of a picture or a music feature on a CD or VIDEO CD the length of a song ...

Page 74: ... frequency Outputs Jack name Jack type Output level Load impedance LINE OUT AUDIO Phono jack 2 Vrms Over 10 kilohms DIGITAL OUT OPTICAL Optical output jack 18 dBm wave length 660 nm DIGITAL OUT COAXIAL Phono jack 0 5 Vp p 75 ohms COMPONENT VIDEO OUT Y CB CR Phono jack Y 1 0 Vp p CB CR 0 7 Vp p 75 ohms LINE OUT VIDEO Phono jack 1 0 Vp p 75 ohms S VIDEO OUT 4 pin mini DIN Y 1 0 Vp p C 0 3 Vp p PAL 0...

Page 75: ...iddish 1283 Javanese 1287 Georgian 1297 Kazakh 1298 Greenlandic 1299 Cambodian 1300 Kannada 1301 Korean 1305 Kashmiri 1307 Kurdish 1311 Kirghiz 1313 Latin 1326 Lingala 1327 Laothian 1332 Lithuanian 1334 Latvian Lettish 1345 Malagasy 1347 Maori 1349 Macedonian 1350 Malayalam 1352 Mongolian 1353 Moldavian 1356 Marathi 1357 Malay 1358 Maltese 1363 Burmese 1365 Nauru 1369 Nepali 1376 Dutch 1379 Norweg...

Page 76: ...ze Frame 42 Front panel display 9 G GRAPHICS 65 H Handling discs 7 Hooking up 15 I INDEX 42 Index 72 Instant Replay 29 Instant Search 29 J JACKET PICTURE 65 L LANGUAGE SETUP 63 LAYER 47 Locating a specific point by watching the TV screen 41 M MENU 63 MP3 6 34 MPEG 23 49 67 72 MULTI DISC RESUME 66 O On screen display Control Menu Display 12 Setup Display 62 ORIGINAL 32 ORIGINAL PLAY LIST 32 OSD 63 ...

Page 77: ......

Page 78: ......

Page 79: ......

Page 80: ...Printed on 100 recycled paper using VOC Volatile Organic Compound free vegetable oil based ink Sony Corporation ...

Reviews: