background image

Intr

oductions

23

Power Connections (continued)

A

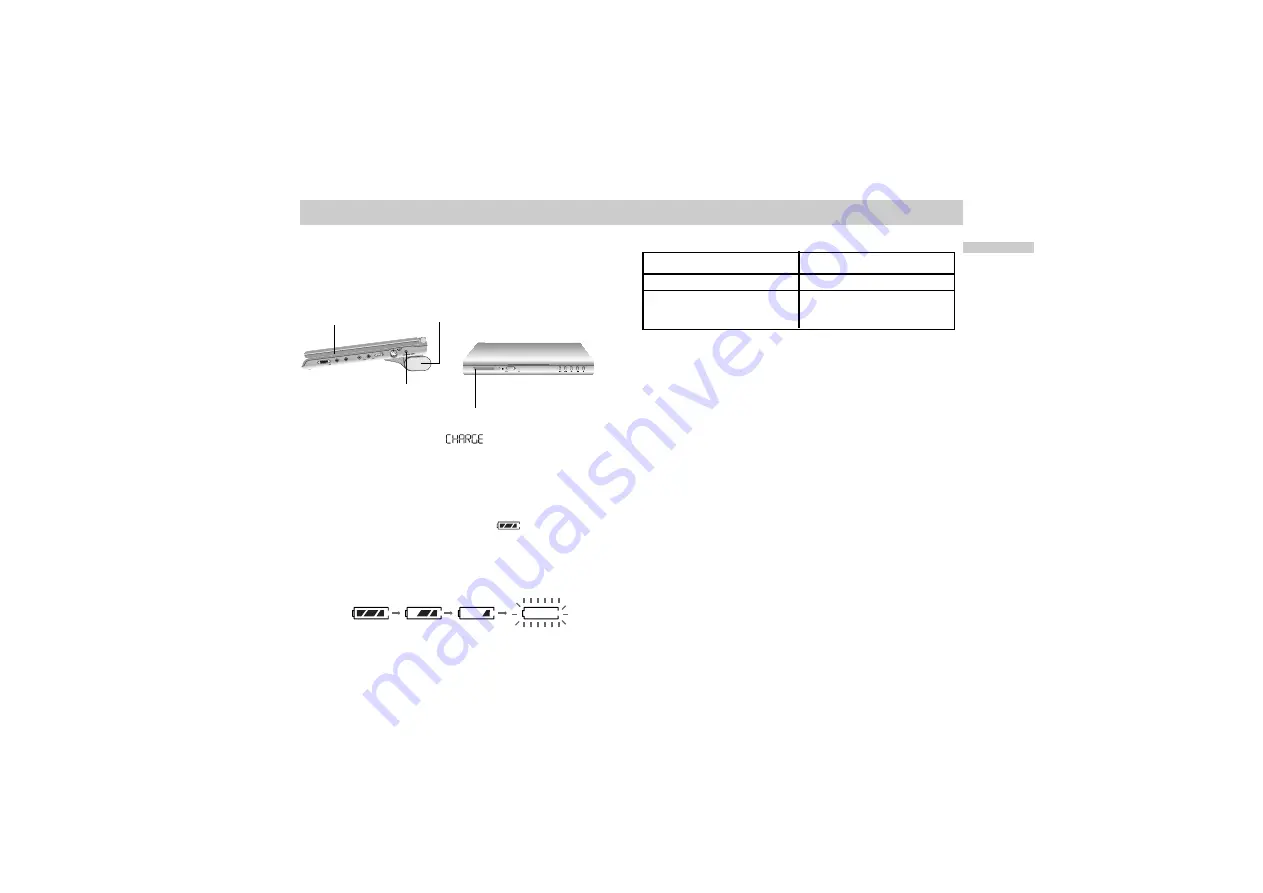
Charging the battery pack

1. Attach the battery pack to the player.
2. Connect the AC power adaptor to the player and

then plug into an AC outlet.

When charging starts, “

” appears on the 

display window.

3. Disconnect the AC power adaptor from the player

and pull out the plug from the AC outlet after
charging.
When charging is complete, “

” appears on

the display window.

A

Confirm the battery charge on the unit’s display

window

• If using the AC adaptor, battery display does not

appear.

A

Recharging and play times

* When Brightness control is set to “ 

”(minimum).

- using the headphones.
- at room temperature (25°C)

NOTES:

• Recharging times shown above depend on operating

conditions.

• When the power is ON, you cannot charge the 

battery.

• Charge the battery at a temperature of +5°C (+41°F)

to +35°C (+95°F).
The charging time may vary, depending on the 
surrounding temperature.

• The battery will not be charged when it is naturally or

purposely discharged. Because the unit cannot 
perceive battery voltage, even if you attached the 
battery.
When you are in this situation, power on the unit and
then power off again. Then battery charging will 
proceed.

V O L U M

E

P H O N E

S

P H O N E

S

A U D I O

V I D E O

  LINE SELECT

 IN

 OUT

POWER /HOLD

Player

AC adaptor cord insert
jack (DC IN 9.8V)

Recharging

Play time (DVD-VIDEO)

with player

LCD On

Approx.

Approx.

4.8 hours

7 hours*

Full

Low

Recharge

Charge indicator

Battery Pack

Summary of Contents for DVP-FX1021 - Portable Dvd Player

Page 1: ... 2004 Sony Corporation DVP FX1021 Operating Instructions Portable CD DVD Player 2 349 874 12 1 ...

Page 2: ...is CD DVD player is CLASS 1 LASER PRODUCT This symbol is intended to alert the user to the presence of uninsulated dangerous voltage within the product s enclosure that may be of suffi cient magnitude to constitute a risk of electric shock to persons This symbol is intended to alert the user to the presence of important operating and maintenance servicing instructions in the literature accompanyin...

Page 3: ...ot fit into your outlet consult an electrician for replacement of the obsolete outlet 10 Protect the power cord from being walked on or pinched particularly at plugs convenience recep tacles and the point where they exit from the apparatus 11 Only use attachments accessories specified by the manufacturer 12 Use only with the cart stand tripod bracket or table specified by the manufacturer or sold ...

Page 4: ...erference in a residential installa tion This equipment generates uses and can radiate radio frequency energy and if not installed and used in accordance with the instructions may cause harmful interference to radio communications However there is no guarantee that interfer ence will not occur in a particular installation If this equipment does cause harmful interference to radio or television rec...

Page 5: ...gh the protective function will turn off the player automatically Leave the player in a cool location for about 30 minutes before using it again On power sources Use only the supplied AC power adaptor Do not use any other AC power adaptor It may cause a malfunction If the AC power adaptor causes interference to radio reception move it away from the radio Do not touch the AC power adaptor with wet ...

Page 6: ... used to power this product Please consult with your local authority To store the rechargeable battery The battery is consumed gradually as time elapses even if is not used In order to prevent the battery from deteriorating store it as follows Remove the battery from the player after use Even if the player is off it still uses some power Use up the battery completely on the player before storing i...

Page 7: ...from the radio or television Keep the player and discs away from equipment with strong magnets such as microwave ovens or large loud speakers Do not install this equipment in a confined space such as a bookshelf or similar unit If the player is brought directly from a cold to warm loca tion or is placed in a very damp place moisture may con dense on the lenses of the player Should this occur the p...

Page 8: ...ring experts advise against continuous loud and extended play If you experience a ringing in your ears reduce the volume or discontinue use Showing consideration for others Keep the volume at a moderate level This will allow you to hear outside sounds and still be considerate to the people around you On adjusting the volume Do not turn up the volume while listening to a section with very low level...

Page 9: ...t you For more information regarding recycling of rechargeable bat teries call toll free 1 800 822 8837 or visit http www rbrc org Caution Do not handle damaged or leaking Lithium Ion batteries Never expose the battery pack to temperatures above 140 F 60 C such as in a car parked in the sun or under direct sunlight For the customers in the United States This product contains mercury Disposal of th...

Page 10: ...hose on the remote The meanings of the icons used in this manual are described below may appear on the LCD screen during operation This icon means the function explained in this instruction manual is not available on that specific DVD video disc The DVD VIDEO is a trademark Icon Meaning CD VCD DVD MP3 MPEG 1 Audio Layer 3 is a standard format defined by ISO International Organization for Standardi...

Page 11: ...igh near CD quality JPEG Joint Pictures Expert Group JPEG is a compressed file format that allows you to save images with no limit on the number of colors Title DVD video discs only A title is generally a distinct section of a DVD disc For example the main feature could be title 1 a documentary describing how the film was made could be title 2 and cast interviews could be title 3 Each title is ass...

Page 12: ...yback only labeled with identical region codes This system is used to protect copyrights DVDs labeled will also play on this player If you try to play any other DVD the message Check Regional Code will appear on the LCD screen Depending on the DVD no region code indication may be labeled even though playing the DVD is prohibited by area restrictions ALL Region code ...

Page 13: ...se authorized by Macrovision Reverse engineering or disassembly is prohibited Copyrights On handling discs To keep the disc clean handle the disc by its edge Do not touch the surface Do not stick paper or tape on the disc On storing discs Do not expose the disc to direct sunlight or heat sources such as air ducts or leave it in a car parked in direct sunlight as the temperature may rise considerab...

Page 14: ... Display 29 30 Advanced Operations General Features 31 33 Title Menu 31 DVD Menu 31 Moving to another TITLE 31 Moving to another CHAPTER TRACK 31 Time Search 32 Changing the Audio Language 32 Changing the Audio Channel 32 Subtitles 32 Camera Angle 32 Repeat A B 33 Repeat 33 Playing an Audio CD or MP3 Disc 34 36 Programmed Playback 37 38 Random Play 39 Viewing a JPEG Disc 40 41 Initial Settings Ini...

Page 15: ... displays the title menu 6 MENU page 31 displays menu programs 7 B V v b button ENTER button 8 RETURN button 9 DISPLAY page 29 30 operation mode display 10 OPEN button page 24 Push this button to open the Disc lid 11 Disc Lid page 24 NOTE Place a disc with the playback side down on the spindle and push gently on the center of the disc so it goes into position 6 7 8 9 10 11 ...

Page 16: ...unction locks the buttons on the DVD player so that they will not work if accidentally touched To enable slide the HOLD switch on the right side of the DVD player to the HOLD position To disable slide the switch back to its original position 3 PREV NEXT buttons page 31 4 PLAY button page 24 5 PAUSE button page 28 6 STOP button 7 VOLUME dial page 24 8 PHONES connector 9 AUDIO IN OUT OPTICAL OUT con...

Page 17: ... Press PLAY button while playing disc Title Chapter number appears for 2 seconds When playing back a VIDEO CD with Playback Control PBC Playing time of the current track When playing back a CD or VIDEO CD without PBC Playing time of the current track and current track number When playing back an MP3 Playing time of the current track and current track number When playing back a JPEG image JPEG Play...

Page 18: ... the remote sensor on the player Insert the end first NOTES Do not leave the remote in an extremely hot or humid place Do not drop any foreign object into the remote casing particularly when replacing the batteries Do not expose the remote sensor to direct light from the sun or lighting apparatus Doing so may cause a malfunction If you do not use the remote for an extended period of time remove th...

Page 19: ...LE ENTER 1 2 3 4 5 6 7 8 10 11 12 13 14 15 16 17 20 1 AUDIO button page 32 2 ANGLE button page 32 3 REPEAT button page 33 4 PROGRAM button page 37 38 5 RANDOM button page 39 6 A B button page 33 7 PREV NEXT button page 31 8 SCAN SLOW button page 28 9 CLEAR button 10 PLAY button 11 TOP MENU button page 31 12 DISPLAY button page 29 30 13 POWER button 14 NUMBER buttons 15 SET UP button page 42 9 18 1...

Page 20: ...nstructions in Using a DVD Menu page 31 18 PAUSE button 19 B V v b button ENTER button up down left right for use in highlighting a selection on a GUI menu screen TOP MENU and MENU screen 20 RETURN button TOP MENU button Use the TOP MENU button to display the title screen included on DVD video discs To operate a menu screen follow the instructions in Using a Title Menu page 31 ...

Page 21: ...E SELECT IN OUT To DC IN 9 8V AC FX101 supplied 1 2 3 AC power cord To AC outlet Follow steps 1 to 3 to connect When disconnecting reverse the order NOTES When you disconnect the AC power cord be sure to stop playback Disconnecting the AC power cord during playback may cause a malfunction ...

Page 22: ... the hooks of the battery pack into the holes on the bottom of the player 2 Press and slide the battery pack until the hooks click NOTES Do not detach the battery pack during playback Be careful not to drop the battery pack A Detaching the battery pack 1 Press the RELEASE switch 2 Slide the battery pack until the hooks click 1 2 RELEASE Switch 1 2 Hooks NOTE If you use the main unit without the ba...

Page 23: ...g the headphones at room temperature 25 C NOTES Recharging times shown above depend on operating conditions When the power is ON you cannot charge the battery Charge the battery at a temperature of 5 C 41 F to 35 C 95 F The charging time may vary depending on the surrounding temperature The battery will not be charged when it is naturally or purposely discharged Because the unit cannot perceive ba...

Page 24: ... then gradually increase it After operation When the unit is not in use remove the disc and slide the POWER switch to the left and hold it there to turn off the DVD player When a menu screen appears on the LCD screen In case of interactive DVDs with control a menu screen appears on the LCD screen Press B V v b and press ENTER or press the number buttons to select the desired item Playback of the s...

Page 25: ...e a region code Your player does not play discs that have a region code different from your player Adjusting the brightness and color intensity Use the COLOR BRIGHT button to adjusting the brightness and color intensity Each time you press the button the adjustment mode changes as follows Brightness Color OFF Adjusting the brightness Select Brightness and then press B b to adjust the brightness b ...

Page 26: ...ge that was recorded in Widescreen 16 9 mode and TV Aspect in SET UP is set to 16 9 Wide then the LCD MODE button will only switch between FULL ZOOM and LCD OFF Only ZOOM works with images output from LINE OUT A The picture mode and size The picture shown on the LCD depends on the display mode and the size recorded on the disc NOTES If you are not using the LCD on this unit select OFF to conserve ...

Page 27: ...OP button RESUME x stop appears on the screen and the player enters the resume mode The current play information will appear on the front panel display Note that this information varies according to the type of disc being played For MP3 JPEG data no information may be displayed depending upon the condition of the disc For Video CDs the information varies if PBC is ON or OFF The Resume function may...

Page 28: ...D the Search speed changes 1m 2m 3m backward or 1M 2M 3M forward 3 To exit SEARCH mode press PLAY NOTE The DVD player does not play back sound during the high speed reverse and forward playback of DVD video discs Slow Motion 1 Press PAUSE X during playback The player will now go into PAUSE mode 2 Use the SCAN SLOW m or M to select the required speed 4 3 2 1 backward or 4 3 2 1 forward 3 To exit sl...

Page 29: ...ss B b to change the setting You can also use the number buttons if appropriate e g inputting the title number For some functions press ENTER to execute the setting NOTES Some discs may not provide all of the features shown next page If no button is pressed for 10 seconds the on screen display disappears AUDIO PREV NEXT CLEAR PLAY PAUSE STOP SET UP SCAN TOP MENU MENU DISPLAY RETURN SLOW REPEAT RAN...

Page 30: ...n Method B b Numbers ENTER B b Numbers ENTER Numbers ENTER B b or AUDIO B b B b or ANGLE 1 3 1 12 0 20 09 1 ENG 1 3 Example On Screen Display during playing of DVD Video Example On Screen Display during playing of VCD Items Track Number or PBC mode Time search Audio Channel Selection Method B b Numbers ENTER Numbers ENTER B b or AUDIO 1 3 0 20 09 STEREO ...

Page 31: ... on the Setup menu Moving to another TITLE When a disc has more than one title you can move to another title Press DISPLAY while playback is stopped then the appropriate number 0 9 or use B b to move to another title You can play any title by inputting its number while playback is stopped Moving to another CHAPTER TRACK When a title on a disc has more than one chapter or a disc has more than one t...

Page 32: ...o soundtrack languages are recorded Changing the Audio Channel Press AUDIO repeatedly during playback to hear a different audio channel STEREO LEFT or RIGHT Subtitles It is possible to change the subtitle language to a different language from the one selected at the initial settings See page 42 for further info This operation works only with discs on which multiple subtitle languages are recorded ...

Page 33: ... will repeat a chapter or title DVD or a track Video CD DVD Video Discs Repeat Chapter Title Off Chapter repeats the current chapter Title repeats the current title Off does not play repeatedly Video CDs Repeat Track All Off Track repeats the current track All repeats all the tracks on a disc Off does not play repeatedly NOTES On a Video CD with PBC you must set PBC to Off on the setup menu to use...

Page 34: ...track titles you can see the information by pressing DISPLAY Title Artist Album Year Comment If there is no information No ID3 TAG appears on the display TIPS If you are in a file list on the AUDIO menu and want to return to the Folder list use the V v to highlight and press ENTER Press MENU to move to the next page On a CD with MP3 and JPEG you can switch MP3 and JPEG Press TOP MENU and AUDIO or ...

Page 35: ...ted on the menu screen 3 To exit SEARCH mode press PLAY Repeat Track All Off You can play a track all on a disc 1 Press REPEAT when playing a disc The repeat icon appears 2 Press REPEAT to select a desired repeat mode Track repeats the current track All CD repeats all the tracks on a disc MP3 repeats all the tracks in a folder Off No display does not play repeatedly NOTE If you press NEXT once dur...

Page 36: ...ate an mp3 extension They should not contain special letters such as l etc The total number of files on the disc should be about 600 This DVD player requires discs and recordings to meet certain technical standards in order to achieve optimal playback quality Pre recorded DVDs are automatically set to these standards There are many different types of recordable disc formats including CD R containi...

Page 37: ...ect a track on the List then press ENTER to place the selected track on the Program list Repeat to place additional tracks on the list 4 Press b Select the track you want to start playing on the Program list 5 Press PLAY or ENTER to start Playback begins in the order in which you programmed the tracks Playback stops after all of the tracks on the Program list have played once 6 To resume normal pl...

Page 38: ...repeatedly NOTE If you press once during Repeat Track playback the repeat playback cancels Erasing a Track from Program List 1 Press PROGRAM 2 Use V v b to select the track that you wish to erase from the Program list 3 Press CLEAR Repeat to erase additional tracks on the list Erasing the Complete Program List 1 Press PROGRAM 2 Press b to move to the Program list 3 Use V v to select Clear All then...

Page 39: ...D movie discs 1 Press RANDOM during playback This player automatically starts random playback and the RANDOM indicator in the display window appears for 2 seconds 2 To return to normal play Press RANDOM again NOTES RANDOM playback may not be possible on certain discs If you press the or button during random playback the DVD player goes to another track randomly and starts playback ...

Page 40: ... STOP to move to the previous menu IMAGE menu TIPS Press MENU to move to the next page There are three Slide Speed options Fast Normal and Slow Use B V v b to highlight the Speed Then use B b to select the option you want to use and press ENTER On a disc with MP3 and JPEG you can switch MP3 and JPEG Press TOP MENU and AUDIO or IMAGE word on top of the menu is highlighted Slide Show Use B V v b to ...

Page 41: ...am the desired tracks from the AUDIO menu and then proceed as above JPEG disc compatibility with this player is limited as follows Depending upon the size and number of JPEG files it could take a long time for the DVD player to read the disc s contents If you don t see an on screen display after several minutes some of the files may be too large reduce the resolution of the JPEG files to less than...

Page 42: ...as alternate setting s 3 Use V v to select the second desired option then press b to move to the third level 4 Use V v to select the desired setting then press ENTER to confirm your selection Some items require additional steps 5 Press SETUP or PLAY to exit the Setup menu LANGUAGE SET UP Menu Language Select a language for the Setup menu and on screen display Disc Audio Subtitle Menu Select the la...

Page 43: ...io output options Set the player s AUDIO SET UP options according to the type of audio system you use Dolby Digital DTS MPEG Bitstream Select Bitstream if you connect the DVD Player s DIGITAL OUT jack to an amplifier or other equipment with a Dolby Digital DTS or MPEG decoder PCM for Dolby Digital MPEG Select when connected to a two channel digital stereo amplifier DVDs encoded in Dolby Digital or...

Page 44: ...it passes each type of signal through without any further processing Check the documentation for your amplifier to verify its capabilities Dynamic Range Control DRC With the DVD format you can hear a program s soundtrack in the most accurate and realistic presentation possible thanks to digital audio technology However you may wish to compress the dynamic range of the audio output the difference b...

Page 45: ...you have not yet entered a security code you are prompted to do so Input a 4 digit code and press ENTER Enter it again and press ENTER to verify If you make a mistake before pressing ENTER press CLEAR 3 Select a rating from 1 to 8 using the V v buttons Rating 1 8 Rating one 1 has the most restrictions and rating eight 8 is the least restrictive Unlock If you select unlock parental control is not a...

Page 46: ...wing steps 1 Open disc lid 2 Press SETUP to display the Setup menu 3 Input the 6 digit number 210499 and the security code is cleared 4 Enter a new code as described above Country Code Enter the code of the country area whose standards were used to rate the DVD video disc based on the list in the reference chapter See Country Code List page55 1 Select Country Code on the PARENTAL CONTROL menu then...

Page 47: ...s continued CUSTOM SET UP The PBC settings can be changed PBC Set Playback Control PBC to On or Off On Video CDs with PBC are played according to the PBC Off Video CDs with PBC are played the same way as Audio CDs VCD PBC OTHERS On ENTER ...

Page 48: ...storted by the copy protection system Video Connect the VIDEO OUT jack on the DVD player to the VIDEO INPUT jack on the TV using the video cable S Video Connect the S VIDEO OUT jack on the DVD Player to the S VIDEO INPUT jack on the TV using the S Video cable Audio Connection to Your TV Connect the AUDIO OUT jack of the DVD Player to the AUDIO L and R INPUT jacks on the TV using the audio cables D...

Page 49: ...our amplifier Use an optional digital audio cable Digital Multi channel sound A digital multi channel connection provides the best sound quality For this you need a multi channel audio video receiver that supports one or more of the audio formats supported by your DVD player such as MPEG 2 Dolby Digital and DTS Check the receiver manual and the logos on the front of the receiver NOTES If the audio...

Page 50: ...ot install the monitor display where viewable by the driver Some states restrict the use of monitors and televisions in vehicles Where use is permitted the units should not be installed or operated so as to be viewable by the driver Keep this unit away from Sony DVP FX1021 if the picture is disturbed Connect the player to the cigarette lighter socket using the supplied car battery charger DCC FX10...

Page 51: ...lockwise 3 Replace the fuse with a new one 4 Reattach the end of the plug by turning it clockwise firmly NOTES To replace the fuse on the car battery cord be sure to use a fuse with the correct amperage 4A 250V length 31mm When replacing the fuse do not substitute any other fuse for the specified one If the fuse blows again soon after replacement consult your nearest Sony dealer Please contact you...

Page 52: ...operate the unit if it has been dropped or damaged Be sure that nothing metallic comes into contact with the metal parts of the unit If it does a short may occur and the unit may be damaged Always keep the metal contacts clean If the car s cigarette lighter socket is dirty with ash etc the plug part will become hot due to a poor connection Be sure to clean it before using Do not disassemble or con...

Page 53: ...Connections 53 Troubleshooting ...

Page 54: ... 7365 Irish 7165 Italian 7384 Japanese 7465 Javanese 7487 Kannada 7578 Kashmiri 7583 Kazakh 7575 Kirghiz 7589 Korean 7579 Kurdish 7585 Laothian 7679 Latin 7665 Latvian Lettish 7686 Language Code Lingala 7678 Lithuanian 7684 Macedonian 7775 Malagasy 7771 Malay 7783 Malayalam 7776 Maltese 7784 Maori 7773 Marathi 7782 Moldavian 7779 Mongolian 7778 Nauru 7865 Nepali 7869 Norwegian 7879 Oriya 7982 Panj...

Page 55: ...HU India IN Indonesia ID Israel IL Italy IT Jamaica JM Japan JP Kenya KE Kuwait KW Libya LY Luxembourg LU Country Code Malaysia MY Maldives MV Mexico MX Monaco MC Mongolia MN Morocco MA Nepal NP Netherlands NL Netherlands Antilles AN New Zealand NZ Nigeria NG Norway NO Oman OM Pakistan PK Panama PA Paraguay PY Philippines PH Poland PL Portugal PT Romania RO Russian Federation RU Country Code Saudi...

Page 56: ...B Harmonic distortion audio 0 008 Operating conditions Temperature 41 F to 95 F Operation status Horizontal Connectors Video input output VIDEO In Out 1 0 V p p 75 Ω negative sync ø3 5mm mini jack x 1 Audio input output AUDIO In Out analog audio 2 0 Vrms 1 KHz 0 dB ø3 5mm mini jack x 1 Earphone terminal ø3 5mm stereo mini jack x 2 Liquid Crystal Display Panel size 10 2 inches wide diagonal Project...

Page 57: ...Sony Corporation Printed in Korea http www sony net ...

Reviews: