background image

Settings and Adjustments

48

Using the Setup Display

Main item

LANGUAGE SETUP

OSD:
DVD MENU:
AUDIO:
SUBTITLE:

To set, press                , then            .
To quit, press            .

ENGLISH
ENGLISH

ORIGINAL

AUDIO FOLLOW

ENTER

SETUP

SCREEN SETUP

TV TYPE:
SCREEN SAVER:
BACKGROUND:
STARTUP SCREEN:

To set, press                , then            .
To quit, press            .

16:9

ON

JACKET PICTURE

STANDARD

ENTER

SETUP

SCREEN SETUP

TV TYPE:
SCREEN SAVER:
BACKGROUND:
STARTUP SCREEN:

To set, press                , then            .
To quit, press            .

16:9

ON

JACKET PICTURE

STANDARD

ENTER

SETUP

SCREEN SETUP

TV TYPE:
SCREEN SAVER:
BACKGROUND:
STARTUP SCREEN:

To set, press                , then            .
To quit, press            .

16:9
16:9

4:3 LETTER BOX
4:3 PAN SCAN

ENTER

SETUP

SCREEN SETUP

TV TYPE:
SCREEN SAVER:
BACKGROUND:
STARTUP SCREEN:

To set, press                , then            .
To quit, press            .

ENTER

SETUP

SCREEN SETUP

TV TYPE:
SCREEN SAVER:
BACKGROUND:
STARTUP SCREEN:

To set, press                , then            .
To quit, press            .

4:3 PAN SCAN

ON

JACKET PICTURE

STANDARD

ENTER

SETUP

16:9

4:3 LETTER BOX

16:9

4:3 PAN SCAN

2

Select the main item you want using 

>

/

.

, and

then press ENTER.

The selected main item is highlighted.

3

Select the item you want using 

>

/

.

, then press 

/

or ENTER.

4

Select the setting you want using 

?

/

>

/

.

/

/

, then

press ENTER.

To cancel using the setup display on the way

Press SET UP on the remote.

Note

Some setup display items require operations other than selecting
the setting.  For details on these items, see the relevant pages.

Summary of Contents for DVP-K880D

Page 1: ...3 867 138 12 1 CD DVD Player Operating Instructions 1999 by Sony Corporation DVP S705D 1 4 7 2 5 8 0 3 6 9 ...

Page 2: ...hecked by qualified personnel before operating it any further The unit is not disconnected from the mains as long as it is connected to the mains outlet even if the unit itself has been turned off Unplug the unit from the wall outlet if you do not intend to use it for an extended period of time To disconnect the cord pull it out by the plug never by the cord Installing Allow adequate air circulati...

Page 3: ...ubtitles 32 Changing the Angles 33 Setting for Digital Cinema Sound 34 Creating Your Own Program Program Play 36 Playing in Random Order Shuffle Play 38 Playing Repeatedly Repeat Play 39 Repeating a Specific Portion A B Repeat 39 Checking the Play Information 41 Reducing the Picture Noise DNR Digital Video Noise Reduction 43 Adjustments for Playback Picture VIDEO EQ Video Equalizer 43 Displaying D...

Page 4: ...s DVDs and VIDEO CDs according to the disc contents the software producers designed some playback features may not be available Also refer to the instructions supplied with the DVDs or VIDEO CDs About This Manual Conventions Instructions in this manual describe the controls on the player You can also use the controls on the remote if they have the same or similar names as those on the player The i...

Page 5: ...0 discs When playing DTS encoded CDs excessive noise will be heard from the analog stereo outputs To avoid possible damage to the audio system the consumer should take proper precautions when the analog stereo outputs of the DVD player are connected to an amplification system To enjoy DTS Digital Surround playback an external 5 1 channel DTS Digital Surround decoder system must be connected to the...

Page 6: ...isture evaporates On adjusting volume Do not turn up the volume while listening to a portion with very low level inputs or no audio signals If you do the speakers may be damaged when a peak level portion is played On cleaning Clean the cabinet panel and controls with a soft cloth slightly moistened with a mild detergent solution Do not use any type of abrasive pad scouring powder or solvent such a...

Page 7: ... the remote in an extremely hot or humid place Do not drop any foreign object into the remote casing particularly when replacing the batteries Do not expose the remote sensor to direct sunlight or lighting apparatuses Doing so may cause a malfunction If you will not use the remote for an extended period of time remove the batteries to avoid possible damage from battery leakage and corrosion Gettin...

Page 8: ...he components Yellow video to Yellow Red right to Red and White left to White Be sure to make connections firmly to avoid hum and noise If your TV has an S video input connector connect the component via the S VIDEO OUT connector using the S video cord You will get a better picture Refer to the instructions supplied with the TV to be connected To S VIDEO OUT To S VIDEO input To AUDIO OUT DIGITAL O...

Page 9: ...tup display For details see page 56 Connect directly VCR TV CD DVD player COMPONENT VIDEO OUT Y R Y B Y CB CR Y CB CR COMPONENT VIDEO IN Setups for the player Some setups are necessary for the player depending on the TV or other components to be connected Use the setup display to change the various settings For details on using the setup display see page 47 If the color system of the TV is NTSC or...

Page 10: ... front speakers L R without using actual rear speakers VES Virtual Enhanced Surround For details see page 34 Required cords Audio connecting cord not supplied 1 S video cord supplied 1 When connecting the cords be sure to match the color coded cord to the appropriate jacks on the components Red right to Red and White left to White Be sure to make connections firmly to avoid hum and noise White L R...

Page 11: ... Connect the component via the DIGITAL OUT OPTICAL or COAXIAL connector using an optical or coaxial digital connecting cord not supplied p When you play a DVD that is recorded in DTS format Set DIGITAL OUT in AUDIO SETUP to ON and then set DTS to ON in the setup display page 56 p When you play a DVD that is recorded in Dolby Digital format Set DIGITAL OUT in AUDIO SETUP to ON and then set DOLBY DI...

Page 12: ...speakers farther away from the listening position than the front speakers Required cords Audio cords not supplied Two for the 5 1CH OUTPUT FRONT and REAR jacks Monaural audio cords not supplied Two for the 5 1CH OUTPUT CENTER and WOOFER jacks S video cord supplied One for the S VIDEO OUT jacks Notes Do not connect the power cord to an AC outlet or press the POWER switch before completing all conne...

Page 13: ...VIDEO IN VIDEO S VIDEO OUT VIDEO S VIDEO OUT VIDEO S VIDEO IN VIDEO S VIDEO OUT VIDEO S VIDEO IN VIDEO IN L R REC OUT AUDIO IN L R L R AUDIO OUT AUDIO IN AUDIO OUT AUDIO IN FRONT REAR WOOFER CENTER TAPE VIDEO 2 DVD VIDEO 1 MONITOR PRE OUT IN CD IN REC OUT MD DAT IN TUNER IN PHONO DVD IN OPT DVD IN COAX TV LDIN AC 3RF SIGNAL GND y DIGITAL TV LD IN OPT CD IN OPT MD DAT OUT OPT MD DAT IN OPT CTRL A1 ...

Page 14: ...UAGE SETUP OSD DVD MENU AUDIO SUBTITLE To set press then To quit press ENGLISH ENGLISH ORIGINAL AUDIO FOLLOW ENTER SETUP LANGUAGE SETUP OSD DVD MENU AUDIO SUBTITLE To set press then To quit press ENGLISH CHINESE 1 CHINESE 2 ENTER SETUP ENGLISH You can select the language for the setup display the Control Menu display or the messages displayed on the screen Default setting is ENGLISH 1 Press SET UP...

Page 15: ...nges to green and the front panel display lights up 3 Press and place the disc on the disc tray 4 Press The disc tray closes and the player starts playback Continuous Play Adjust the volume on the TV or the receiver amplifier After following Step 4 pWhen playing a DVD A DVD menu or title menu may appear on the TV screen see page 19 pWhen playing a VIDEO CD The menu screen may appear on the TV scre...

Page 16: ...ing played the power is automatically turned off Auto Power Off function p P Playing Discs 6 p P To Stop Pause Resume play after pause Go to the next chapter track or scene in continuous play mode Go back to the preceding chapter track or scene in continuous play mode Go to the next index VIDEOCD CD only Go back to the preceding index VIDEOCD CD only Stop play and remove the disc You can play disc...

Page 17: ...ction slower than SLOW1 SLOW1 opposite direction 2 about twice the normal speed FR10 about 10 times the normal speed FR20 about 30 times the normal speed If you turn the click shuttle quickly the playback speed goes to FF2 FR20 at once When you play back a CD VIDEO CD FF2 Faster than FF1 FF1 2 about twice the normal speed PLAY Normal speed SLOW1 playback direction SLOW2 playback direction slower t...

Page 18: ...splay before you start playing press p to reset the playing time then press p Playing at Various Speeds Frame by Frame p To play the disc frame by frame changing the playback speed Jog mode 1 Press JOG JOG lights up during jog mode When you press JOG on the player it pauses 2 Turn the click shuttle Depending on the turning speed the playback goes to frame by frame in the direction that the click s...

Page 19: ...y TITLE ENTER DVD MENU Using the title menu A DVD is divided into long sections of a picture or a music piece called titles When you play a DVD which contains several titles you can select the title you want using the title menu 1 Press TITLE The title menu appears on the TV screen The contents of the menu vary from disc to disc 2 Press to select the title you want to play Depending on the disc yo...

Page 20: ...erations Refer to the instructions supplied with the disc as the operating procedure may differ according to the VIDEO CD ˆ RETURN ENTER Number buttons ˆ RETURN ENTER 1 4 7 2 5 8 0 3 6 9 Using the DVD menu Some DVDs allow you to select the disc contents using the menu When you play these DVDs you can select the language for the subtitles the language for the sound etc using the DVD menu 1 Press DV...

Page 21: ...cancel PBC playback of a VIDEO CD with PBC functions and play the disc in Continuous Play mode There are two ways Before you start playing select the track you want using or then press ENTER or Before you start playing select the track number using the number buttons on the remote then press ENTER or Play without PBC appears on the TV screen and the player starts Continuous Play You cannot play st...

Page 22: ...D Digital MPEG DTS PBC REPEAT 1 PGM A B SHUFFLE ANGLE TRACK INDEX DVD TITLE CHAPTER SEC MIN HOUR DVD TITLE SEC MIN HOUR DISC NTSC CD VIDEOCD Digital MPEG DTS PBC REPEAT 1 PGM A B SHUFFLE ANGLE TRACK INDEX DVD TITLE CHAPTER SEC MIN HOUR DVD TITLE SEC MIN HOUR DVD Remaining time of the current title Playing time and number of the current title Remaining time of the current chapter Playing time and n...

Page 23: ...ENTER Using the Control Menu Display Z Using the Control Menu display you can select the start point label a disc change the angles adjust the picture set for Digital Cinema Sound etc The items are different depending on the kind of disc For details on each Control Menu display item see pages 26 to 46 1 Press DISPLAY to show the Control Menu display on the TV screen 1 8 3 4 1 2 2 7 C 0 1 3 2 5 5 D...

Page 24: ...the first three items from the top are changed to other items ADVANCED display see page 41 Control Menu display off zYou can display some items using the remote Some items can be displayed by pressing the button of the remote In this case only the item you selected is displayed For the item and operations using the remote see the pages of each item Items Items To select press then ENTER To select ...

Page 25: ...you can display all the angles recorded on the disc on the same screen and start playback in continuous mode at the chosen angle directly TITLE DVD only page 26 CHAPTER DVD only page 26 TRACK VIDEO CD CD only page 26 INDEX VIDEO CD CD only page 26 SCENE VIDEO CD during PBC playback only page 26 You can search by selecting the title chapter track index scene TIME TEXT page 27 28 29 TIME MEMO page 2...

Page 26: ... tracks indexes or scenes To select press then ENTER 1 8 3 4 1 2 2 7 C 0 1 3 2 5 5 DVD PLAY STROBE PLAYBACK DVD VIDEO CD only page 45 You can display 9 consecutive sections of the disc on the screen In this case the sections show still images TITLE VIEWER DVD only page 46 CHAPTER VIEWER DVD only page 46 TRACK VIEWER VIDEO CD only page 46 You can check the titles chapters and tracks of the disc on ...

Page 27: ... the total remaining time of the disc Press DISPLAY to select TIME TEXT or TIME MEMO You can also check the DVD TEXT CD TEXT and Disc Memo and label the Disc Memo See page 29 When playing a DVD pTIME TEXT or TIME MEMO C Playing time of the current chapter C Remaining time of the current chapter T Playing time of the current title T Remaining time of the current title When playing a VIDEO CD during...

Page 28: ...3 Input the time code using the number buttons then press ENTER The player starts searching To cancel the number press CLEAR before pressing ENTER To cancel inputting Press ˆRETURN zYou can display TIME TEXT or TIME MEMO display using the remote Press TIME TEXT on the remote Note When you input the time code input the playing time of the title 1 8 3 4 1 2 2 7 T DVD PLAY Enter with number buttons t...

Page 29: ...e on screen display and put a personal title on the disc You can input up to 20 characters per disc each You can also have the player display the Disc Memo each time you select the disc The Disc Memo can be anything you like such as a title musician s name category or date of purchase 1 8 3 4 1 2 2 7 C 0 1 3 2 5 5 BRAHMS SYMPHONY NO 4 DVD PLAY TIME TEXT TIME MEMO DVD CD TEXT or DISC MEMO 1 Select ...

Page 30: ...ssing 2 Select the correct character by pressing or by turning the click shuttle 3 To insert the character press ENTER To overwrite don t press ENTER but move the cursor by pressing zYou can display the Disc Memo input display using the remote Press INPUT on the remote 1 8 3 4 1 2 2 7 C 0 1 3 2 5 5 BRAHMS SYMPHONY NO 4 DVD PLAY DVD CD TEXT or DISC MEMO Note You can label up to 200 discs When you h...

Page 31: ...ong the right channel may output the vocals and the left channel may output the instrumental If you only want to hear the instrumental you can select the left channel and hear it from both speakers Select AUDIO after pressing DISPLAY pAUDIO When playing a DVD Select the language The languages you can select are different depending on the DVD When 4 digits are displayed they represent the language ...

Page 32: ... the remote Each time you press the button the item changes Notes When playing a DVD on which no subtitles are recorded no subtitles appear Depending on the DVD you may not be able to turn the subtitles on even if they are recorded on it Depending on the DVD you may not be able to turn the subtitles off If the language is displayed as a 4 digit number refer to the language code list on page 70 The...

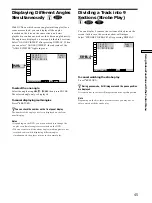
Page 33: ...e remote Press ANGLE on the remote Each time you press the button the angle changes zYou can display different angles simultaneously ANGLE VIEWER You can display all the angles recorded on the disc on the same screen and start playback in continuous mode from the chosen angle directly The angles are displayed on a screen divided in 9 sections For details see page 45 To select press then ENTER 1 8 ...

Page 34: ...ORMAL SURROUND ENHANCED SURROUND VIRTUAL REAR SHIFT VIRTUAL MULTI REAR These settings also effect the output from the AUDIO OUT 1 2 connectors L R L R Setting for Digital Cinema Sound Z To select press then ENTER 1 8 3 4 1 2 2 7 C 0 1 3 2 5 5 OFF OFF VES A VES B DVD PLAY VIRTUAL 3D SURROUND Note The items displayed are different depending on the settings of SPEAKER SETUP page 59 You can select onl...

Page 35: ... the effects may be difficult to hear even if you select VES A or VES B If you connect the front speakers only NORMAL SURROUND ENHANCED SURROUND VIRTUAL REAR SHIFT and VIRTUAL MULTI REAR cannot be selected The sound does not come from the rear speakers when you set VIRTUAL 3D SURROUND to VES A or VES B in the Control Menu display even if you have connected rear speakers Set the front speakers to f...

Page 36: ...the number buttons and ENTER button to select In this case the selected number is displayed on the screen pWhen playing a DVD When both titles and chapters are recorded on the disc select the title then the chapter Title Chapter TRACK is displayed when you play a VIDEO CD or a CD To select press then ENTER OFF OFF SET ON 1 8 3 4 1 2 2 7 C 0 1 3 2 5 5 DVD PLAY PROGRAM PROGRAM 1 TITLE ALL CLEAR 2 TI...

Page 37: ...chapters or tracks During Program Play press REPEAT or SHUFFLE Or set REPEAT or SHUFFLE to ON in the Control Menu display zYou can display PROGRAM display using the remote Press PROGRAM Notes The number of titles chapters or tracks displayed are that of the titles chapters or tracks recorded on a disc The program is canceled when you open or close the disc tray you turn the power off You may not b...

Page 38: ...does not play a disc in random order ON has the player shuffle titles or tracks and play in a random order When playing a VIDEO CD or CD when Program Play is set to OFF OFF does not play a disc in random order TRACK has the player shuffle tracks and play in a random order After selecting the item of SHUFFLE press The player starts Shuffle Play To cancel Shuffle Play Press CLEAR zYou can display th...

Page 39: ... all the tracks on a disc TRACK repeats the current track When Program Play or Shuffle Play is set to ON OFF does not play repeatedly ON repeats Program Play or Shuffle Play To cancel Repeat Play Press CLEAR zYou can display the REPEAT display by pressing the button Press REPEAT Note Repeat play is canceled when you turn the power off To select press then ENTER 1 8 3 4 1 2 2 7 C 0 1 3 2 5 5 CHAPTE...

Page 40: ...e able to set A B Repeat depending on the scene of the DVD or the VIDEO CD Setting a portion for A B repeat 1 Select SET in A B REPEAT The A B REPEAT setting display appears 2 During playback when you find the starting point point A of the portion to be played repeatedly press ENTER The starting point point A is set SET SET OFF To select press then ENTER 1 8 3 4 1 2 2 7 C 0 1 3 2 5 5 A B REPEAT DV...

Page 41: ...lay Checking the Play Information Z 1 8 3 4 1 2 2 7 C 0 1 3 2 5 5 BIT RATE HISTORY DVD PLAY To select press then ENTER ADVANCED Displays of each item BIT RATE When you play MPEG AUDIO sound tracks Bit rate refers to the amount of video audio data per second in a disc The higher the bit rate is the larger the amount of data When the bit rate level is high there is a large amount of data However thi...

Page 42: ...e Control Menu 42 Checking the Play Information LAYER Indicates where the disc is played When the DVD has dual layer the player indicates which layer is being read For details on layer see page 68 Appears when the DVD has dual layer ...

Page 43: ...O EQ Video Equalizer Z You can adjust the video output of the DVD or VIDEO CD from the player not from the TV to obtain the picture quality you want Choose one of the video modes whichever best suits the program you are watching When you select MEMORY in a menu item adjust the value Select VIDEO EQ after pressing DISPLAY pVIDEO EQ Selects the setting of video control STANDARD displays a standard p...

Page 44: ...elect STANDARD in MEMORY Note Only one setting of the picture items you adjusted in MEMORY can be stored When you adjust the items new setting erases the setting adjusted before 1 Select MEMORY in VIDEO EQ The video control display appears 2 Select the picture item you want to adjust using then press ENTER The adjustment bar of the selected item appears To cancel adjusting the picture halfway pres...

Page 45: ...an display all the angles recorded on the disc on the same screen and start playback in continuous mode at the chosen angle directly The angles are displayed on a screen divided in 9 sections Select ANGLE VIEWER after pressing DISPLAY When you can select ANGLE VIEWER the indicator of the ANGLE VIEWER lights in green To select the one angle Select the angle using then press ENTER The selected angle...

Page 46: ...kmark erases the bookmark from those first stored You may not set the bookmark depending on the discs 1 8 3 4 1 2 2 7 C 0 1 3 2 5 5 DVD PLAY BOOKMARK To select press then ENTER Scanning the Title Chapter and Track Z You can check the top picture of titles chapters and tracks of the disc on a screen divided in 9 sections and start playback from the chosen title chapter or track Select TITLE VIEWER ...

Page 47: ...Using the setup display you can do the initial setup adjusting the picture and sound quality setting the various outputs etc You can also set a language for the subtitles and the setup display limit playback by children etc For details on each setup display item see pages 50 to 62 Note You can display the setup display only when the player is in stop mode 1 Press SET UP to display the setup displa...

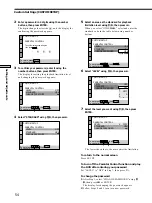
Page 48: ...ress 16 9 16 9 4 3 LETTER BOX 4 3 PAN SCAN ENTER SETUP SCREEN SETUP TV TYPE SCREEN SAVER BACKGROUND STARTUP SCREEN To set press then To quit press ENTER SETUP SCREEN SETUP TV TYPE SCREEN SAVER BACKGROUND STARTUP SCREEN To set press then To quit press 4 3 PAN SCAN ON JACKET PICTURE STANDARD ENTER SETUP 16 9 4 3 LETTER BOX 16 9 4 3 PAN SCAN 2 Select the main item you want using and then press ENTER ...

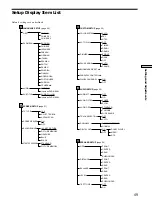
Page 49: ... DTS TRACK SELECTION OFF AUTO DOWNMIX DOLBY SURROUND NORMAL DIGITAL OUT ON OFF ENGLISH ENGLISH SCREEN SETUP page 51 TV TYPE 4 3 LETTER BOX 4 3 PAN SCAN 16 9 BACKGROUND JACKET PICTURE PICTURE MEMORY GRAPHICS BLUE BLACK STARTUP SCREEN STANDARD PICTURE MEMORY SCREEN SAVER ON OFF AUDIO SETUP page 56 SIZE FRONT CENTER DISTANCE FRONT CENTER REAR TEST TONE OFF ON REAR SUBWOOFER BALANCE FRONT REAR LEVEL C...

Page 50: ... SUBTITLE and AUDIO in the Control Menu display when PLAYBACK MEMORY is set to ON The settings of SUBTITLE and AUDIO selected in the setup display may not appear in this case For details on the Playback Memory function see page 53 Select LANGUAGE SETUP after pressing SET UP LANGUAGE SETUP allows you to set various languages for on screen display or sound Default settings are underlined Note When y...

Page 51: ...prevent your display from becoming damaged ON turns on the screen saver OFF turns off the screen saver pBACKGROUND Selects the background color or picture of the TV screen in stop mode or while playing a CD JACKET PICTURE The jacket picture appears in the background but only when the jacket picture is already recorded on the disc PICTURE MEMORY Your favorite picture appears in the background when ...

Page 52: ...2 to start playing TIMER starts playing a disc automatically when you connect the AC power cord to the AC outlet By connecting a timer not supplied you can start playing at any time you want DEMO1 starts playing the demonstration 1 automatically DEMO2 starts playing the demonstration 2 automatically Storing the picture in memory During playback when you find the scene to be stored in memory press ...

Page 53: ...n AUDIO page 31 SUBTITLE page 32 ANGLE page 33 VIRTUAL 3D SURROUND page 34 VIDEO EQ page 43 DNR page 43 Note The player can store in memory the settings of up to 200 discs When you have the player store over 200 discs in memory each new setting erases the setting from those first stored Limiting Playback by Children Parental Control Select CUSTOM SETUP after pressing SET UP Playing some DVDs can b...

Page 54: ...as the standard for playback limitation level using then press When you select OTHERS select and enter the standard code in the table below using number buttons 6 Select LEVEL using then press 7 Select the level you want using then press ENTER The lower the value is the more strict the limitation To return to the normal screen Press SET UP To turn off the Parental Control function and play the DVD...

Page 55: ...PARENTAL CONTROL display appears Enter the password to turn off the Parental Control function When you stop playing the DVD the level returns to the original level zIf you have forgot your password Enter the 6 digits number 199703 in Step 2 to clear the current password To enter a new password follow the procedure from Step 2 again Notes When you play DVDs which do not have the Parental Control fu...

Page 56: ...s especially recommended when you listen to the sound using the speakers of the TV WIDE RANGE It gives you the feeling of being at a live performance When you use high quality speakers it is more effective Notes When you play DVDs without the AUDIO DRC function there may be no effect on the sound When this item is set to WIDE RANGE the sound volume from other than the 5 1CH OUTPUT connectors may b...

Page 57: ...ears or causing the speakers to be damaged AUDIO SETUP AUDIO ATT AUDIO FILTER AUDIO DRC TRACK SELECTION DOWNMIX DIGITAL OUT DOLBY DIGITAL MPEG To set press then To quit press OFF SHARP STANDARD OFF DOLBY SURROUND ON D PCM PCM OFF ENTER SETUP DTS pDOWNMIX Switches the mixing down methods when you play a DVD on which the sound in Dolby Digital format is recorded DOLBY SURROUND when the player is con...

Page 58: ...TS decoder You cannot hear the DTS sound unless you connect the player to an audio component having a built in DTS decoder When you play the DTS sound track on a CD a loud noise may come out from the AUDIO OUT 1 2 5 1CH OUTPUT FRONT L R and PHONES connectors affecting your ears or causing the speakers or headphones to be damaged When you play the DTS sound track on a DVD no sounds will come out fr...

Page 59: ...f the closest speaker Do not place the rear speaker farther away from your listening position than the front speakers Speaker Set Up SPEAKER SETUP SIZE DISTANCE BALANCE LEVEL OFF TEST TONE FRONT CENTER LARGE LARGE REAR YES LARGE REAR SUBWOOFER To set press then To quit press ENTER SETUP 90 20 A B 45 B A Select SPEAKER SETUP after pressing SET UP To obtain the best possible surround sound first spe...

Page 60: ...OFF The test tone is not emitted from speakers ON During adjustment of BALANCE or LEVEL the test tone is emitted from both speakers simultaneously Note While you are playing a disc you cannot hear the test tone Execute the test tone after you stop playback To adjust the volume of all the speakers at one time Use the receiver s amplifier s volume control To return to the default setting Select the ...

Page 61: ...e than one code number is listed try entering them one at a time until you find the one that works with your TV Notes If you enter a new code number the code number previously entered will be erased When you replace the batteries of the remote commander the code number may reset to 01 Sony Reset the appropriate code number Manufacturer Sony default Gold Star Philips Miver Blaupunkt Grundig Saba Pa...

Page 62: ...ou may not be able to control your AV receiver amplifier AV VOL Controlling the TV or the AV Receiver with the Supplied Remote Manufacturer Sony Denon Kenwood Onkyo Pioneer Sunsui Technics Yamaha Code number 91 default 88 89 84 85 86 92 93 81 82 83 99 87 97 98 94 95 96 You can control your TV using the keys below By pressing TV 1 u TV VIDEO WIDE MODE VOL CH Note Depending on the TV you may not be ...

Page 63: ...ise appears Clean the disc If video from your DVD player has to go through your VCR to get to your TV the copy protection applied to some DVD programs could affect picture quality If you still experience problems after checking your connections please try connecting your DVD player directly to your TV s S video input if your TV is equipped with this input page 8 The picture noise appears when the ...

Page 64: ...occurs In the setup display set AUDIO ATT in AUDIO SETUP to ON Troubleshooting The sound loses stereo effect when you play a VIDEO CD or a CD Set AUDIO to STEREO in the Control Menu display page 31 Make sure you connect the player appropriately page 8 10 12 The surround effect is difficult to hear when you are playing a Dolby Digital sound track Check the speaker connections and settings page 12 5...

Page 65: ...age for the on screen display in OSD under LANGUAGE SETUP page 50 The language for the sound cannot be changed when you play a DVD Multilingual sound is not recorded on the DVD Changing the language for the sound is prohibited on the DVD The language for the subtitles cannot be changed when you play a DVD Multilingual subtitles are not recorded on the DVD Changing the language for the subtitles is...

Page 66: ...e following table First three characters C13 C31 Exx xx is any number Cause and or Corrective Action The disc is dirty Clean the disc with a cleaning cloth page 6 The disc is not inserted correctly Open the disc tray and insert the disc correctly To prevent the player from malfunctioning the self diagnosis function has worked When you contact your Sony dealer or local authorized Sony service facil...

Page 67: ...305 mm w h d incl projecting parts Mass approx 4 0 kg Operating temperature 5 C to 35 C Operating humidity 5 to 90 Supplied accessories See page 7 The signals from AUDIO OUT 1 2 connectors and 5 1 ch L R connectors are measured When you play the PCM sound tracks with 96 kHz sampling frequency the output signals from the DIGITAL OUT OPTICAL COAXIAL are converted to 48 kHz sampling frequency Design ...

Page 68: ...o and there is discrete subwoofer channel in this format DTS provides the same 5 1 discrete channels of high quality digital audio found in Dolby Digital cinema audio systems The good channel separation is realized because the all channel data is recorded discrete and processed in digital DVD page 4 A disc that contains up to 8 hours of moving pictures even though its diameter is the same as a CD ...

Page 69: ...pictures The picture data uses the MPEG 1 format one of the worldwide standards of digital compression technology The picture data is compressed to about 1 140 of its original size Consequently a 12 cm VIDEO CD can contain up to 74 minutes of moving pictures VIDEO CDs also contain compact audio data Sounds outside the range of human hearing are compressed while the sounds we can hear are not compr...

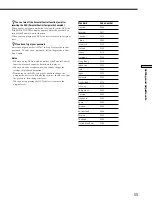
Page 70: ...h 1150 Estonian 1151 Basque 1157 Persian 1165 Finnish 1166 Fiji 1171 Faroese 1174 French 1181 Frisian 1183 Irish 1186 Scots Gaelic 1194 Galician 1196 Guarani 1203 Gujarati 1209 Hausa 1217 Hindi 1226 Croatian 1229 Hungarian 1233 Armenian 1235 Interlingua 1239 Interlingue 1245 Inupiak 1248 Indonesian 1253 Icelandic 1254 Italian 1257 Hebrew 1261 Japanese 1269 Yiddish 1283 Javanese 1287 Georgian 1297 ...

Page 71: ... the DVD menu on the TV screen ˆ RETURN button 20 24 Press to return to the previously selected screen etc 1 g remote sensor 7 Accepts the remote control signals 2 1 u POWER button and indicator 15 Turns on and off the power of the player 3 VIRTUAL 3D SURROUND button indicator 35 Selects the item of VIRTUAL 3D SURROUND Each time you press the button the item changes When you do not set VIRTUAL 3D ...

Page 72: ...cts to the S video input connector on the TV or VCR 5 COMPONENT VIDEO OUT connectors 9 Connects to a monitor or projector having component video input connectors Y CB B Y CR R Y that conform to output signals from the player 6 AUDIO OUT 1 2 connectors 8 10 Connects to the audio input connector on the TV or receiver amplifier 7 5 1CH OUTPUT connectors 13 Connects to a receiver amplifier having 5 1 ...

Page 73: ...a disc ENTER button Executes the items or settings DNR button 43 Displays the DNR display on the TV screen PICTURE MEMORY button 52 Press to store a picture in memory BOOK MARK button 46 Press to set a bookmark Amplifier operation buttons 62 Controls AV amplifiers pSTOP button 16 18 Stops playing a disc ª PPAUSE button 16 Pauses playing a disc º JOG button indicator 17 Press to play a disc frame b...

Page 74: ... K Handling discs 6 Hi speed search 17 Hooking up 8 10 12 INDEX 26 L LANGUAGE SETUP 50 LETTER BOX 51 LEVEL 60 Locating a specific point 16 by observing the TV screen 17 M N O MPEG 58 On screen display Control Menu display 23 Setup display 47 OSD 50 P Q PAN SCAN 51 PARENTAL CONTROL 53 PBC functions 20 PBC Playback 20 68 PLAYBACK MEMORY 53 PROGRAM 36 PRO LOGIC 34 Program Play 36 R Remote 7 61 REPEAT...

Page 75: ...Additional Information 75 ...

Page 76: ...Sony Corporation Printed in Japan ...

Reviews: