background image

32

Resuming Playback from
the Point Where You
Stopped the Disc 

(Resume

Play/Multi-disc Resume)

The player remembers the point where you
stopped the disc.

Resuming playback for the
current disc (Resume Play) 


The player remembers the point where you
stopped the disc even if the player enters
standby mode by pressing 

[

/

1

.

1

While playing a disc, press 

x

 to stop

playback.

“RESUME” appears on the front panel
display.

2

Press 

H

.

The player starts playback from the point
where you stopped the disc in Step 1.

z

Hint

To play from the beginning of the disc, press 

x

twice, then press 

H

.

Notes

• The point where you stopped playing is cleared

when:

– you change the play mode.
– you change the settings on the Setup Display.
– you open the disc tray (DVP-NS305 only).
– you disconnect the power cord (mains lead).
• When playing a CD, the point where you

stopped is cleared when the disc tray is opened
or the power cord (mains lead) is disconnected.

• When playing a DATA CD, the point where you

stopped is cleared when the player enters
standby mode, the disc tray is opened, or the
power cord (mains lead) is disconnected.

• This function may not work with some discs.

Storing the point where you
stopped the disc (Multi-disc
Resume) (DVP-NS415 only) 

The player stores the point where you
stopped the disc and resumes playback from
the same point the next time you insert the
same disc. Resume playback points for up to
6 different DVD/VIDEO CD discs remain in
memory even if you disconnect the power
cord (mains lead). When you store a resume
playback point for the seventh disc, the
resume playback point for the first disc is
deleted.

z

Hints

• To play from the beginning of the disc, press 

x

twice, then press 

H

.

• To turn off the Multi-disc Resume function, set

“MULTI-DISC RESUME” in “CUSTOM
SETUP” to “OFF” (page 62). Playback restarts
at the resume point only for the current disc in
the player.

Notes

• The point where you stopped playing is cleared

when:

– you change the play mode.
– you change the settings on the Setup Display.
• This function may not work with some discs.

DVP-NS305

DVP-NS415

Summary of Contents for DVP-NS305

Page 1: ...3 073 381 E1 1 2002 Sony Corporation DVP NS305 DVP NS415 CD DVD Player Operating Instructions ...
Page 2: ...ing this Sony CD DVD Player Before operating this player please read this manual thoroughly and retain it for future reference Precautions Safety The power requirements and power consumption of this unit are indicated on the back of the unit Check that the unit s operating voltage is identical with your local power supply To prevent fire or shock hazard do not place objects filled with liquids suc...

Page 3: ...p room moisture may condense on the lenses inside the player Should this occur the player may not operate properly In this case remove the disc and leave the player turned on for about half an hour until the moisture evaporates When you move the player take out any discs If you don t the disc may be damaged On adjusting volume Do not turn up the volume while listening to a section with very low le...

Page 4: ... Power Cord 25 Step 4 Quick Setup 25 Playing Discs 28 Playing Discs 28 Searching for a Particular Point on a Disc Scan Slow motion Play Search Freeze Frame 30 Resuming Playback from the Point Where You Stopped the Disc Resume Play Multi disc Resume 32 Using the DVD s Menu 33 Playing VIDEO CDs with PBC Functions PBC Playback 33 Playing an MP3 Audio Track 34 Various Play Mode Functions Programme Pla...

Page 5: ...TOM PARENTAL CONTROL PARENTAL CONTROL 52 Controlling Your TV with the Supplied Remote 56 Settings and Adjustments 58 Using the Setup Display 58 Setting the Display or Sound Track Language LANGUAGE SETUP 59 Settings for the Display SCREEN SETUP 60 Custom Settings CUSTOM SETUP 61 Settings for the Sound AUDIO SETUP 62 Additional Information 65 Troubleshooting 65 Self diagnosis Function When letters n...

Page 6: ...ng discs All CD ROMs including PHOTO CDs CD Rs CD RWs other than those recorded in the following formats music CD format video CD format MP3 format that conforms to ISO9660 Level 1 Level 2 or its extended format Joliet Data part of CD Extras DVD RWs in VR mode DVD ROMs DVD Audio discs HD layer on Super Audio CDs A logical format of files and folders on CD ROMs defined by ISO International Standard...

Page 7: ...rding device Furthermore the disc will not play if it has not been correctly finalized For more information see the operating instructions for the recording device Note that discs created in the Packet Write format cannot be played Note on playback operations of DVDs and VIDEO CDs Some playback operations of DVDs and VIDEO CDs may be intentionally set by software producers Since this player plays ...

Page 8: ... up in green when the power is on and lights up in red when the player is in standby mode 2 Disc tray 28 3 A open close button 28 4 Front panel display 9 5 remote sensor 15 6 Playback Dial DVP NS305 29 31 Multi mode Playback Dial DVP NS415 29 31 7 MODE CHANGE button DVP NS415 only 31 8 x stop button 29 9 X pause button 29 q SURROUND button 45 qa PICTURE MODE button 50 ...
Page 9: ... status Lights up during A B Repeat Play 39 Current scene or playing time 43 Playing status Lights up during Repeat Play 38 Current track 43 Disc type Lights up when playing MP3 audio tracks 34 Playing time 43 Front panel display When playing back a DVD When playing back a VIDEO CD with Playback Control PBC 33 When playing back a CD DATA CD MP3 audio or VIDEO CD without PBC continued ...

Page 10: ...Y DIGITAL S VIDEO OUT COMPONENT VIDEO OUT COAXIAL R AUDIO L VIDEO DIGITAL OUT LINE OUT CR CB Y OPTICAL Rear panel DVP NS305 DVP NS415 1 DIGITAL OUT COAXIAL jack 22 23 24 2 DIGITAL OUT OPTICAL jack DVP NS415 only 22 23 24 3 LINE OUT L R AUDIO jacks 21 22 23 4 LINE OUT VIDEO jack 18 5 S VIDEO OUT jack 18 6 COMPONENT VIDEO OUT jacks 18 ...
Page 11: ... The H button has a tactile dot qa C X x c buttons 33 qs DISPLAY button 13 qd TOP MENU button 33 qf TV 1 on standby button 56 qg 1 on standby button 28 qh PICTURE MODE button 50 qj VOL buttons 56 The button has a tactile dot qk TV VIDEO button 56 ql SEARCH MODE button 41 w REPLAY button 29 wa x STOP button 29 ws ENTER button 25 wd O RETURN button 33 wf MENU button 33 34 Use the tactile dot as a re...

Page 12: ... qa C X x c buttons 33 qs DISPLAY button 13 qd TOP MENU button 33 qf 1 on standby button 28 qg VOL buttons 56 The button has a tactile dot qh TV VIDEO button 56 qj ENTER button performs the same function as wh qk PICTURE MODE button 50 ql ANGLE button 48 w SUR surround button 45 wa TIME TEXT button 42 ws REPEAT button 38 wd REPLAY button 29 wf SEARCH MODE button 41 wg x STOP button 29 wh ENTER but...

Page 13: ...an be set The indicator lights up in blue when activated Example When Repeat Play is selected The display will differ when A B Repeat Play is set 1 Repeat Play 38 2 Shuffle Play 38 3 Program Play 36 4 A B Repeat Play 39 5 Unit being repeated in this example 6 Playback status NPlayback XPause xStop etc m Display 2 The following functions 7 q can be set The indicator lights up in blue when activated...

Page 14: ... the minimum number of basic adjustments for using the player Select CUSTOM to make a full range of adjustments Select RESET to return the SETUP adjustments to the default settings 2 PARENTAL CONTROL 52 Set this to limit the playback of selected discs on this player m Display 2 Shows the same information as Display 1 during playback m Display 3 Shows the same information as Display 2 during playba...

Page 15: ...A batteries 2 A plug adaptor is included with some models Step 2 Inserting Batteries into the Remote You can control the player using the supplied remote Insert two R6 size AA batteries by matching the 3 and ends on the batteries to the markings inside the compartment When using the remote point it at the remote sensor on the player Notes Do not leave the remote in an extremely hot or humid place ...

Page 16: ... TV change the colour system of the player PAL or NTSC so that a picture appears on your TV To change the colour system hold 1 down while pressing X on the player The power indicator lights up in green and changes to red Then release X Step 3 TV Hookups Connect the supplied audio video cord and power cord mains lead in the order 1 3 shown below Be sure to connect the power cord mains lead last PCM...

Page 17: ...acing down 6 Press H The disc tray closes and the player begins playing the disc Step 4 Playing a Disc With the playback side facing down After Step 6 Depending on the disc a menu may be displayed on the TV screen If so select the item you want from the menu and play the DVD page 33 or VIDEO CD disc page 33 To stop playing Press x To remove the disc Press A To turn off the player Press 1 The playe...

Page 18: ...mplifier receiver using a video cord Select one of the patterns A through C according to the input jack on your TV monitor projector or AV amplifier receiver B A C INPUT S VIDEO CR CB Y COMPONENT VIDEO IN VIDEO AUDIO INPUT L R PCM DTS MPEG DOLBY DIGITAL S VIDEO OUT COMPONENT VIDEO OUT COAXIAL R AUDIO L VIDEO DIGITAL OUT LINE OUT CR CB Y OPTICAL yellow Audio video cord supplied Component video cord...

Page 19: ...h quality images Notes This player switches the colour system PAL or NTSC according to the connected TV page 16 Do not connect the player to a VCR If you pass the player signals via the VCR you may not receive a clear image on the TV screen If your TV only has one audio video input jack connect the player to this jack C If you are connecting to a monitor projector or AV amplifier receiver having c...

Page 20: ...lby Digital MPEG audio or DTS decoder and a digital input jack 6 speakers front L and R centre rear L and R subwoofer Connection A page 21 B page 22 B page 22 C page 23 D page 24 Step 2 Connecting the Audio Cords Refer to the chart below to select the connection that best suits your system Be sure to also read the instructions for the components you wish to connect Select a connection Select one o...

Page 21: ...d surround sound effects for this connection TVS DYNAMIC page 46 TVS WIDE page 46 z Hint When connecting to a monaural TV use a stereo mono conversion cord not supplied Connect the LINE OUT L R AUDIO jacks to the TV s audio input jack A Connecting to your TV This connection will use your TV speakers for sound CD DVD player to LINE OUT L R AUDIO red yellow white red yellow white TV to audio input A...

Page 22: ...ITAL COAXIAL OPTICAL DIGITAL OUT R AUDIO L VIDEO LINE OUT Note If you select one of the TVS effects page 45 while playing a disc no sound will come from your speakers with the B 2 connection l Signal flow Recommended surround sound effects for the B 1 connection only TVS STANDARD page 46 z Hint In connection B 1 you can use the supplied audio video cord instead of using a separate audio cord CD DV...

Page 23: ...ers and a subwoofer PCM DTS MPEG DOLBY DIGITAL S VIDEO OUT COMPONENT VIDEO OUT COAXIAL R AUDIO L VIDEO DIGITAL OUT LINE OUT CR CB Y OPTICAL C 2 C 1 PCM DTS MPEG DOLBY DIGITAL COAXIAL OPTICAL DIGITAL OUT R AUDIO L VIDEO LINE OUT l Signal flow CD DVD player Coaxial digital cord not supplied Optical digital cord not supplied Remove jack cap before connecting DVP NS415 only Speakers to coaxial or opti...

Page 24: ... DOLBY DIGITAL COAXIAL OPTICAL DIGITAL OUT Note After you have completed the connection be sure to set DOLBY DIGITAL to DOLBY DIGITAL and DTS to ON in Quick Setup page 25 If your AV amplifier receiver has an MPEG audio decoder function set MPEG to MPEG page 63 Otherwise no sound or a loud noise will come from the speakers l Signal flow CD DVD player Optical digital cord not supplied Remove jack ca...

Page 25: ...ENTER to run QUICK SETUP appears at the bottom of the screen If this message does not appear select QUICK under SETUP in the Control Bar to run Quick Setup page 59 4 Press ENTER without inserting a disc The Setup Display for selecting the language used in the on screen display appears The available languages differ depending upon the player model 5 Press X x to select a language The player uses th...

Page 26: ... DRC DIGITAL OUT DOLBY DIGITAL MPEG OFF STANDARD ON DOWNMIX DOLBY SURROUND D PCM DTS DOLBY DIGITAL D PCM D DOLBY DIGITAL only if the amplifier receiver has a Dolby Digital decoder page 63 11Press ENTER DTS is selected AUDIO SETUP AUDIO ATT AUDIO DRC DIGITAL OUT DOLBY DIGITAL MPEG OFF STANDARD ON DOWNMIX DOLBY SURROUND D PCM PCM DTS OFF OFF ON 12Press X x to select whether or not you wish to send a...

Page 27: ...A No additional settings are needed B 1 C 1 Set DOWNMIX to DOLBY SURROUND page 63 If the sound distorts even when the volume is turned down set AUDIO ATT to ON page 62 B 2 C 2 D Set DOWNMIX to DOLBY SURROUND page 63 Set DIGITAL OUT to ON page 63 ...

Page 28: ...Ds see page 33 For VIDEO CDs see page 33 To turn off the player Press 1 The player enters standby mode z Hint You can have the player turn off automatically whenever you leave it in stop mode for more than 30 minutes To turn on this function set AUTO POWER OFF in CUSTOM SETUP to ON page 61 Notes on playing DTS sound tracks on a CD When playing DTS encoded CDs excessive noise will be heard from the...

Page 29: ...he player or the remote does not work while the Child Lock is set To unlock the disc tray When the player is in standby mode press O RETURN ENTER and then 1 again and may affect your ears or cause your speakers to be damaged Notes on playing DVDs with a DTS sound track DTS audio signals are output only through the DIGITAL OUT COAXIAL or OPTICAL jack When you play a DVD with DTS sound tracks set DT...

Page 30: ... the operations described Locating a point quickly by playing a disc in fast forward or fast reverse Scan Press m or M while playing a disc When you find the point you want press H to return to normal speed Each time you press m or M during scan the playback speed changes Three speeds are available With each press the indication changes as follows Note Even if you select RESET under SETUP in the C...

Page 31: ...ng the Multi mode Playback Dial on the player DVP NS415 only You can search for a particular point on a disc in various ways using the MODE CHANGE button To go to the next chapter track scene During playback and with the MODE CHANGE indicator turned off briefly turn the Multi mode Playback Dial clockwise to skip to the next chapter track scene or counterclockwise to skip to the previous ones The s...

Page 32: ...hen playing a DATA CD the point where you stopped is cleared when the player enters standby mode the disc tray is opened or the power cord mains lead is disconnected This function may not work with some discs Storing the point where you stopped the disc Multi disc Resume DVP NS415 only The player stores the point where you stopped the disc and resumes playback from the same point the next time you...

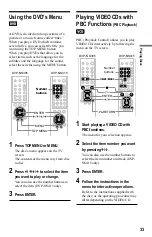
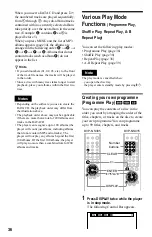
Page 33: ...x c to select the item you want to play or change You can also use the number buttons to select the item DVP NS415 only 3 Press ENTER Playing VIDEO CDs with PBC Functions PBC Playback PBC Playback Control allows you to play VIDEO CDs interactively by following the menu on the TV screen 1 Start playing a VIDEO CD with PBC functions The menu for your selection appears 2 Select the item number you wa...

Page 34: ...with this player Super VCDs are played in continuous play mode only Playing an MP3 Audio Track You can play back DATA CDs CD ROMs CD Rs CD RWs recorded in MP3 MPEG 1 Audio Layer 3 format 1 Press Z and place a DATA CD on the disc tray 2 Press H The disc tray closes and the player starts to play the first MP3 audio track in the first album on the disc Notes This player can play MP3 audio tracks reco...

Page 35: ...ng format To play a Multi Session CD This player can play Multi Session CDs when an MP3 audio track is located in the first session Any subsequent MP3 audio track recorded in later sessions can also be played back When audio tracks and images in music CD format or video CD format are recorded in the first session only the first session will be played back Notes If you put the extension MP3 to data...

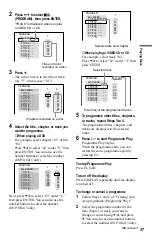
Page 36: ...re are more than a total of 200 albums and tracks in the DATA CD The player can recognize up to 100 albums the player will count just albums including albums that do not contain MP3 audio tracks The player will not play any albums beyond the first 100 albums Of the first 100 albums the player will play no more than a combined total of 200 albums and tracks Various Play Mode Functions Programme Pla...

Page 37: ...ber buttons to select the number DVP NS415 only Next press X x to select 03 under C then press ENTER You can also use the number buttons to select the number DVP NS415 only TRACK is displayed when you play a VIDEO CD or CD Titles or tracks recorded on a disc When playing a VIDEO CD or CD For example select track 02 Press X x to select 02 under T then press ENTER 5 To programme other titles chapter...

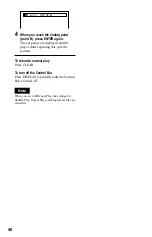
Page 38: ...1 Press DISPLAY during playback The following Control Bar appears 2 Press C c to select SHUFFLE then press ENTER repeatedly to select the item to be shuffled When playing a DVD TITLE CHAPTER When playing a VIDEO CD or CD TRACK When Programme Play is activated ON shuffles titles chapters or tracks selected in Programme Play To return to normal play Press CLEAR or select OFF in Step 2 To turn off th...

Page 39: ...ay Press CLEAR or select OFF in Step 2 To turn off the Control Bar Press DISPLAY repeatedly until the Control Bar is turned off z Hints You can set Repeat Play while the player is stopped After selecting the REPEAT option press H Repeat Play starts You can select REPEAT directly by pressing REPEAT DVP NS415 only Repeating a specific portion A B Repeat Play You can play a specific portion of a titl...

Page 40: ...the player starts repeating this specific portion To return to normal play Press CLEAR To turn off the Control Bar Press DISPLAY repeatedly until the Control Bar is turned off Note When you set A B Repeat Play the settings for Shuffle Play Repeat Play and Programme Play are cancelled A13 0 27 34 B ...

Page 41: ...inputting the time code When playing a VIDEO CD TRACK or INDEX When playing a VIDEO CD with PBC Playback SCENE When playing a CD TRACK or INDEX When playing a DATA CD MP3 audio ALBUM or TRACK 3 Select the number of the title track scene time code etc you want by pressing X x to select the digit followed by C c to move the cursor For example to find the scene at 2 hours 10 minutes and 20 seconds af...

Page 42: ...urrent chapter C Remaining time of the current chapter When playing a VIDEO CD with PBC functions Playing time of the current scene When playing a VIDEO CD without PBC functions or CD T Playing time of the current track T Remaining time of the current track D Playing time of the current disc D Remaining time of the current disc When playing a Super VCD The remaining time cannot be displayed T Play...

Page 43: ...nctions or CD z Hints When playing VIDEO CDs with PBC functions the scene number or the playing time are displayed Long text that does not fit in a single line will scroll across the front panel display You can also check the time information and text by pressing TIME TEXT repeatedly DVP NS415 only Notes Depending on the type of disc being played the DVD CD text or track name may not be displayed ...

Page 44: ...e displayed they indicate a language code Refer to Language Code List on page 70 to see which language the code represents When the same language is displayed two or more times the DVD is recorded in multiple audio formats When playing a VIDEO CD CD or DATA CD MP3 audio The default setting is underlined STEREO The standard stereo sound 1 L The sound of the left channel monaural 2 R The sound of th...

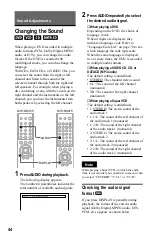
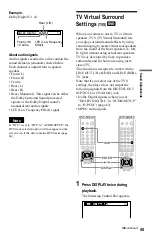
Page 45: ...front speakers TVS TV Virtual Surround lets you enjoy surround sound effects by using sound imaging to create virtual rear speakers from the sound of the front speakers L left R right without using actual rear speakers TVS was developed by Sony to produce surround sound for home use using just a stereo TV This function is designed to work with the LINE OUT L R AUDIO and LINE RGB TV jacks Note that...

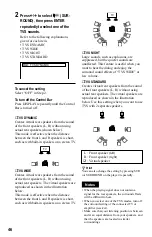
Page 46: ...h as with built in speakers on a stereo TV TVS DYNAMIC TV TVS NIGHT Large sounds such as explosions are suppressed but the quieter sounds are unaffected This feature is useful when you want to hear the dialog and enjoy the surround sound effects of TVS WIDE at low volume TVS STANDARD Creates virtual rear speakers from the sound of the front speakers L R without using actual rear speakers The virtu...

Page 47: ...s However not all discs will respond to the TVS NIGHT function in the same way If you use the DIGITAL OUT OPTICAL or COAXIAL jack and set DOLBY DIGITAL to DOLBY DIGITAL or DTS to ON in AUDIO SETUP sound will come from your speakers but it will not have the TVS effect ...

Page 48: ...ubtitles are recorded on the discs you can change the subtitles or turn them on and off whenever you want while playing a DVD SUBTITLE 1 Press SUBTITLE during playback The following display appears The number in parentheses indicates the total number of available subtitles 1 8 ENGLISH 2 Press SUBTITLE repeatedly to select the language Depending on the DVD the choice of language varies When 4 digit...

Page 49: ...C c to select BNR then press ENTER repeatedly to select a level 1 reduces the block noise 2 reduces the block noise more than 1 3 reduces the block noise more than 2 1 To cancel the BNR setting Select OFF in Step 2 To turn off the Control Bar Press DISPLAY repeatedly until the Control Bar is turned off Notes If the outlines of the images on your screen should become blurred set BNR to OFF Dependin...

Page 50: ...ys a standard picture DYNAMIC 1 produces a bold dynamic picture by increasing the picture contrast and the colour intensity DYNAMIC 2 produces a more dynamic picture than DYNAMIC 1 by further increasing the picture contrast and the colour intensity CINEMA 1 enhances details in dark areas by increasing the black level CINEMA 2 White colours become brighter and black colours become richer and the co...

Page 51: ...atedly to select a level 1 1 enhances the outline 2 enhances the outline more than 1 3 enhances the outline more than 2 SOFT softens the image DVD only To cancel the DIGITAL VIDEO ENHANCER setting Select OFF in Step 2 To turn off the Control Bar Press DISPLAY repeatedly until the Control Bar is turned off Note Depending on the disc or the scene being played noise found in the disc may become more ...

Page 52: ...isc is cancelled 1 Insert the disc you want to lock If the disc is playing press x to stop playback 2 Press DISPLAY while the player is in stop mode The Control Bar appears 3 Press X x to select PARENTAL CONTROL then press ENTER The options for PARENTAL CONTROL appear 4 Press X x to select ON t then press ENTER If you have not entered a password The display for registering a new password appears E...

Page 53: ...se the number buttons to enter your password DVP NS415 only The player is ready for playback z Hint If you forget your password enter the 6 digit number 199703 using X x to select the digit followed by C c to move the cursor when the CUSTOM PARENTAL CONTROL display asks you for your password then press ENTER Press c after the 4th digit to allow the entire 6 digit number to be entered The display w...

Page 54: ...ly The display for setting the playback limitation level appears 5 Press X x to select STANDARD then press ENTER The selection items for STANDARD are displayed 6 Press X x to select a geographic area as the playback limitation level then press ENTER The area is selected When you select OTHERS t select and enter a standard code in the table on page 55 7 Press X x to select LEVEL then press ENTER Th...

Page 55: ...entering your password appears enter your new password You can also use the number buttons to enter the digits DVP NS415 only Note When you play DVDs which do not have the Parental Control function playback cannot be limited on this player Area Code Changing the password 1 Press DISPLAY while the player is in stop mode The Control Bar appears 2 Press X x to select PARENTAL CONTROL then press ENTER...

Page 56: ...ER and input the correct number If you make a mistake Press O RETURN To turn off the display Press DISPLAY repeatedly until the display is turned off Controlling Your TV with the Supplied Remote You can control the sound level input source and power switch of your Sony TV with the supplied remote You can control your TV using the buttons below By pressing You can TV 1 Turn the TV on or off VOL Adj...

Page 57: ...s code see the table below 2 Release TV 1 Code numbers of controllable TVs If more than one code number is listed try entering them one at a time until you find the one that works with your TV Manufacturer Code number Sony default 01 JVC 33 LG 06 Panasonic 17 49 Philips 06 08 Samsung 23 Sharp 29 Toshiba 38 Notes If you enter a new code number the code number previously entered will be erased When ...

Page 58: ... X x to select SETUP then press ENTER 3 Press X x to select CUSTOM then press ENTER The Setup Display appears 4 Press X x to select the setup item from the displayed list LANGUAGE SETUP SCREEN SETUP CUSTOM SETUP or AUDIO SETUP Then press ENTER The Setup item is selected Example SCREEN SETUP 5 Select an item using X x then press ENTER The options for the selected item appear Example TV TYPE ENTER D...

Page 59: ...e Display or Sound Track Language LANGUAGE SETUP LANGUAGE SETUP allows you to set various languages for the on screen display or sound track Select LANGUAGE SETUP in the Setup Display To use the display see Using the Setup Display page 58 OSD On Screen Display Switches the display language on the screen MENU DVD only You can select the desired language for the disc s menu AUDIO DVD only Switches t...

Page 60: ...he colour system for DVDs You can change the colour system of this player according to the connected TV See page 16 SCREEN SAVER The screen saver image appears when you leave the player in pause or stop mode for 15 minutes or when you play back a CD or DATA CD MP3 audio for more than 15 minutes The screen saver will help prevent your display device from becoming damaged ghosting Press H to turn of...

Page 61: ...layer is connected to a timer not supplied DIMMER Adjusts the lighting of the front panel display OFF ON Switches this function off The player enters standby mode when left in stop mode for more than 30 minutes OFF ON Switches this function off Automatically starts playback when the player is turned on BRIGHT DARK OFF Makes the lighting bright Makes the lighting dark Turns off the lighting CUSTOM ...

Page 62: ... resume setting in memory for up to six discs The settings remain in memory even if you select OFF Does not store the resume setting in memory Playback restarts at the resume point only for the current disc in the player Settings for the Sound AUDIO SETUP AUDIO SETUP allows you to set the sound according to the playback and connection conditions Select AUDIO SETUP in the Setup Display To use the d...

Page 63: ...s an amplifier receiver or MD deck with a digital input jack For connection details see page 20 Select DOLBY DIGITAL MPEG and DTS after setting DIGITAL OUT to ON AUDIO SETUP AUDIO ATT AUDIO DRC DOLBY DIGITAL MPEG OFF STANDARD DOWNMIX DOLBY SURROUND D PCM PCM DTS OFF DIGITAL OUT ON If you connect a component that does not conform to the selected audio signal a loud noise or no sound will come out f...

Page 64: ... following signals from the DIGITAL OUT OPTICAL or COAXIAL jack Dolby Digital signals when you set DOLBY DIGITAL in AUDIO SETUP to D PCM page 63 MPEG audio signals OFF ON Select this when the player is connected to an audio component lacking a built in DTS decoder Select this when the player is connected to an audio component with a built in DTS decoder ...

Page 65: ... the DVD disc itself Even though you set the aspect ratio in TV TYPE of SCREEN SETUP the picture does not fill the screen The aspect ratio of the disc is fixed on your DVD Sound There is no sound Re connect the connecting cord securely The connecting cord is damaged The player is connected to the wrong input jack on the amplifier receiver page 22 23 24 The amplifier receiver input is not correctly...

Page 66: ...tion AUTO PLAY in CUSTOM SETUP is set to ON page 61 Playback stops automatically While playing discs with an auto pause signal the player stops playback at the auto pause signal You cannot perform some functions such as Stop Search Slow motion Play Repeat Play Shuffle Play or Programme Play Depending on the disc you may not be able to do some of the operations above See the operating manual that c...

Page 67: ...lay is broken The data is not MPEG1 Audio Layer 3 data Self diagnosis Function When letters numbers appear in the display When the self diagnosis function is activated to prevent the player from malfunctioning a five character service number e g C 13 50 with a combination of a letter and four digits appears on the screen and the front panel display In this case check the following table First thre...

Page 68: ... up to 8 hours of moving pictures even though its diameter is the same as a CD The data capacity of a single layer and single sided DVD is 4 7 GB Giga Byte which is 7 times that of a CD The data capacity of a double layer and single sided DVD is 8 5 GB a single layer and double sided DVD is 9 4 GB and double layer and double sided DVD is 17GB The picture data uses the MPEG 2 format one of the worl...

Page 69: ...E OUT AUDIO Phono jack 2 Vrms Over 10 kilohms DIGITAL OUT OPTICAL Optical output jack 18 dBm wave length 660 nm DIGITAL OUT COAXIAL Phono jack 0 5 Vp p 75 ohms LINE OUT VIDEO Phono jack 1 0 Vp p 75 ohms S VIDEO OUT 4 pin mini DIN Y 1 0 Vp p C 0 3 Vp p PAL 0 286 Vp p NTSC 75 ohms COMPONENT VIDEO OUT Y CB CR Phono jacks Y 1 0 Vp p CB CR 0 7 Vp p 75 ohms DVP NS415 only General Power requirements 220 ...

Page 70: ...itan 1528 Thai Bangla 1253 Icelandic 1403 Afan Oromo 1529 Tigrinya 1067 Tibetan 1254 Italian 1408 Oriya 1531 Turkmen 1070 Breton 1257 Hebrew 1417 Punjabi 1532 Tagalog 1079 Catalan 1261 Japanese 1428 Polish 1534 Setswana 1093 Corsican 1269 Yiddish 1435 Pashto 1535 Tonga 1097 Czech 1283 Javanese Pushto 1538 Turkish 1103 Welsh 1287 Georgian 1436 Portuguese 1539 Tsonga 1105 Danish 1297 Kazakh 1463 Que...

Page 71: ...splay 9 H Handling discs 7 Hooking up 18 I INDEX 41 Index 68 L LANGUAGE SETUP 59 Locating a specific point by watching the TV screen 30 M MENU 59 Menu DVD s menu 33 top menu 33 MODE CHANGE 31 MP3 6 34 MPEG 24 44 63 68 MULTI DISC RESUME 32 62 Multi mode Playback Dial 31 N NUMBER INPUT 41 O On screen display Control Bar display 13 Setup Display 58 OSD 59 P PARENTAL CONTROL 52 PAUSE MODE 62 PBC Playb...

Page 72: ...Sony Corporation Printed in Malaysia ...

Reviews: