background image

Locating a Scene or Track You Want

33

EN

Locating a Scene or Track You Want

Locating a Scene or Track You Want

Settings and Adjustments

Settings and Adjustments

p

AUDIO

Switches the language for the sounds.
• ORIGINAL : the language given the priority in the disc
• ENGLISH
• CHINESE
• SPANISH
• PORTUGUESE
• JAPANESE
• FRENCH
• GERMAN
• ITALIAN
• DUTCH
• OTHERS

/

When you select “OTHERS,” select and enter the
language code from the list using the number buttons
(page 52).

p

SUBTITLE

Switches the language for the subtitles.
• AUDIO FOLLOW*
• ENGLISH
• CHINESE
• SPANISH
• PORTUGUESE
• JAPANESE
• FRENCH
• GERMAN
• ITALIAN
• DUTCH
• OTHERS

/

When you select “OTHERS,” select and enter the
language code from the list using the number buttons
(page 52).
* When you select “AUDIO FOLLOW,” the language for the

subtitles change according to the language for the sound.

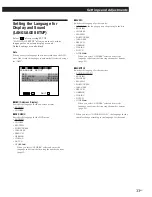
L A N G U A G E     S E T U P

O S D :

E N G L I S H
E N G L I S H

D V D     M E N U :
A U D I O :
S U B T I T L E :

O R I G I N A L

A U D I O     F O L L O W

ENTER

Q U I T

SETUP

1

2

1

2

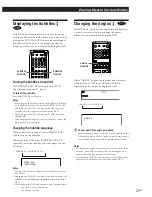
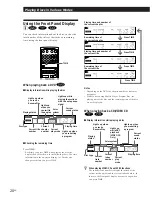
Setting the Language for
Display and Sound
(LANGUAGE SETUP)

Select “

” after pressing SET UP.

“LANGUAGE SETUP” allows you to set various
languages for on-screen display or sound.
Default settings are underlined.

Note

When you select a language that is not recorded on the DVD,
one of the recorded languages is automatically selected except
for “OSD”.

p

OSD (On-Screen Display)

Switches the language for the on-screen display.
• ENGLISH
• CHINESE

p

DVD MENU

Switches the language for the DVD menu.
• ENGLISH
• CHINESE
• SPANISH
• PORTUGUESE
• JAPANESE
• FRENCH
• GERMAN
• ITALIAN
• DUTCH
• OTHERS

/

When you select “OTHERS,” select and enter the
language code from the list using the number buttons
(page 52).
Summary of Contents for DVP-S505D

Page 1: ...n It is designed to be operated in a horizontal position only Keep the unit and discs away from equipment with strong magnets such as microwave ovens or large loudspeakers Do not place heavy objects on the unit If the unit is brought directly from a cold to a warm location moisture may condense inside the CD DVD player and cause damage to the lenses When you first install the unit or when you move...

Page 2: ...miting Playback by Children Parental Control 28 Controlling the TV or the AV Amplifier Receiver with the Supplied Remote 30 Settings and Adjustments Using the Setup display 32 Setting the Language for Display and Sound LANGUAGE SETUP 33 Settings for Display INITIAL SETUP 1 34 Settings for Sound INITIAL SETUP 2 35 Dolby Digital Surround What is Dolby Digital Surround 36 Speaker System Hookups 36 Sp...

Page 3: ...d on the back of the unit and will only play DVDs that are labeled with identical region codes DVDs labeled ALL will also play on this unit If you try to play any other DVD the message Playing this disc prohibited by area limits will appear on the TV screen Depending on the DVD no region code indication may be labeled even though playing the DVD is prohibited by the area limits Note on playback op...

Page 4: ...CD A number that divides a track some sections to easily locate the point you want on a VIDEO CD or a CD Depending on the disc no indexes may be recorded Scene On a VIDEO CD with PBC functions the menu screens moving pictures and still pictures are divided into sections called scenes Each scene is assigned a scene number enabling you to locate the scene you want Note on PBC Playback Control VIDEO ...

Page 5: ... AC outlet Amplifier Receiver Unpacking Check that you have the following items Audio video connecting cord 1 S video cable 1 Remote commander remote RMT D102E 1 Size AA R6 batteries 2 Inserting batteries into the remote You can control the player using the supplied remote Insert two R6 size AA batteries by matching the and on the batteries When using the remote point it at the remote sensor g on ...

Page 6: ... high In this case set AUDIO ATT in INITIAL SETUP 2 to ON in the setup display For details see page 35 z If your TV has an S video input connector Connect the component via the S VIDEO OUT connector using the S video cable supplied instead of the video connecting cord You will get a better picture z If you connect the player to a monitor or projector with component video input connectors that conf...

Page 7: ...he component to be connected You cannot make digital audio recordings of discs recorded in Dolby Digital AC 3 format directly using an MD deck or DAT deck When you make the connections above do not set DIGITAL OUT in INITIAL SETUP 2 to DOLBY DIGITAL PCM If you do a loud noise will suddenly come out from the speakers affecting your ears or causing the speakers to be damaged Optical digital connecti...

Page 8: ... setting pTo enjoy Dolby Digital surround sound by connecting the player to an amplifier with 5 1 ch inputs In the setup display set MODE in 5 1 OUTPUT SETUP 2 to OFF This is default setting See page 36 to hookup the speaker system and page 38 to set each speaker position or distance etc pTo connect the player to an audio component with a built in Dolby Digital decoder In the setup display set DIG...

Page 9: ... details see pages 14 to 17 z You can turn on the player using the remote Press POWER when the indicator above the POWER button on the front panel is lit in red The DOLBY DIGITAL indicator lights up except for the case as follows you insert a CD or a VIDEO CD the current audio format is PCM or MPEG Audio Notes If you leave the player or the remote in pause or stop mode for 15 minutes the screen sa...

Page 10: ...HAPTER SEARCH TITLE SEARCH and TIME SEARCH appear on the TV screen z When RESUME appears on the front panel display You can resume playback from the point where you stopped the DVD For details on playing from the beginning of the disc see page 25 Note You may not be able to do Resume Play depending on the DVD p P Press p P P or 1 SEARCH MODE repeatedly until CHAPTER SEARCH appears on the TV screen...

Page 11: ...or you can playback a DVD with various speed or frame by frame Each time you press JOG it changes between shuttle mode and jog mode pTo change the playback speed Shuttle mode Turn the click shuttle The playback speed changes depending on the turning direction and angle as follows FF2 about 30 times the normal speed FF1 about 10 times the normal speed 2 about twice the normal speed PLAY Normal spee...

Page 12: ...e language for the subtitles the language for the sound etc using the DVD menu Press DVD MENU The DVD menu appears on the TV screen The contents of the menu vary from disc to disc Press to select the item you want to change Depending on the disc you can use the number buttons to select the item To change other items repeat Step 2 Press ENTER 1 2 3 TITLE ENTER ENTER TITLE Notes Depending on the DVD...

Page 13: ... using the remote Press POWER when the indicator above the POWER button on the front panel is lit in red 2 Connect headphones Adjust the headphone volume 2 4 3 3 4 With the label side facing up z After following Step 4 The menu screen may appear on the TV screen depending on the VIDEO CD You can play the disc interactively following the instructions on the menu screen PBC Playback see page 17 Note...

Page 14: ...nd remove the disc If you have made a mistake when you press the number button Press CLEAR then the correct number button 6 P p z When RESUME appears on the front panel display You can resume playback from the point where you stopped the CD VIDEO CD For details on playing from the beginning of the disc see page 25 p P ENTER ENTER Number buttons SEARCH MODE ENTER CLEAR z What is a track See page 5 ...

Page 15: ... changes between shuttle mode and jog mode pTo change the playback speed Shuttle mode Turn the click shuttle The playback speed changes depending on the turning direction and angle as follows FF2 Faster than FF1 FF1 2 about twice the normal speed PLAY Normal speed SLOW1 playback direction VIDEO CD Only SLOW2 playback direction Slower than SLOW1 VIDEO CD Only PAUSEP FR10 FR20 Faster than FR10 If yo...

Page 16: ...nteractive operations Refer to the instructions supplied with the disc as the operating procedure may differ according to the VIDEO CD Going back to the menu screen Press ˆ or z When playing VIDEO CDs with PBC functions PBC playback starts automatically z To cancel PBC playback of a VIDEO CD with PBC functions and play the disc in Continuous Play mode There are two ways Before you start playing se...

Page 17: ...e playback picture is always displayed by Mbps Mega bit per second z What is bit rate Bit rate refers to the amount of video data per second in a disc The higher the bit rate is the larger the amount of data However this does not always mean that you can get higher quality pictures Current title number total number of titles Playing time of the current chapter Current language for the subtitles to...

Page 18: ...the current track Playing time of the disc Remaining time of the disc While you are doing Shuffle Play Program Play or PBC Playback the playing time of the disc and the remaining time of the disc are not displayed pDisplay information of the on screen display off mode No information is displayed Messages etc will be displayed Current index number TRACK 11 12 07 TRACK REPEAT PLAY INDEX 8 TRACK Disc...

Page 19: ... TIME Each time you press TIME while playing the disc the display changes as shown in the following chart The time information in the on screen display 1 or 2 mode also changes each time you press TIME TIME Remaining time of the current title Press TIME Press TIME Playing time and number of the current title Press TIME Press TIME Remaining time of the current chapter Playing time and number of the...

Page 20: ...information in the on screen display 1 and 2 mode also changes each time you press TIME Note While you are doing Shuffle Play Program Play or PBC playback the playing time of the disc and the remaining time of the disc are not displayed Playing time and number of the current track Remaining time of the current track Remaining time of the disc Press TIME Press TIME Press TIME Playing time of the di...

Page 21: ...ats the current track To cancel repeating the current track Press CLEAR Note Repeat play is canceled when you turn the power off CLEAR The player repeats All the titles all the tracks All the titles or tracks in random order Programmed titles chapters tracks TRACK REPEAT CHAPTER is displayed when you select the current chapter T REPEAT T L E I 1 2 3 4 5 6 7 8 9 0 Playing Repeatedly Repeat Play You...

Page 22: ... the player starts repeating this specific portion REPEAT A B appears on the front panel display during A B repeat play To cancel A B Repeat Press CLEAR To cancel setting halfway Press CLEAR Notes A B Repeat is canceled when you open or close the disc tray you turn the power off When you set A B Repeat the settings for Shuffle Play and Program Play are canceled You may not be able to set A B Repea...

Page 23: ...M CLEAR ENTER PROGRAM PLAY ENTER A L L CLEAR 1 T T L E I 2 T T L E I 3 T T L E I 4 T T L E I 5 T T L E I 6 T T L E I 7 T T L E I 8 T T L E I 9 T T L E I PROGRAM T 0 1 0 2 0 3 0 4 0 5 0 6 0 7 PROGRAM PLAY ENTER A L L CLEAR 1 T T L E 0 2 I 2 T T L E I 3 T T L E I 4 T T L E I 5 T T L E I 6 T T L E I 7 T T L E I 8 T T L E I 9 T T L E I PROGRAM C T 0 1 A L L 0 1 0 2 0 2 0 3 0 3 0 4 0 4 0 5 0 6 0 7 PROG...

Page 24: ...T T L E 1 5 I 3 T T L E 0 3 I 4 T T L E 0 5 I 5 T T L E 0 7 1 4 I 6 T T L E I 7 T T L E I 8 T T L E I 9 T T L E I PROGRAM T 0 1 0 2 0 3 0 4 0 5 0 6 0 7 Resuming Playback from the Point Where You Stopped a Disc Resume Play The player stores the point where you stopped a disc if RESUME appears on the front panel display In this case you can resume playback from that point As long as you do not open ...

Page 25: ...ge the languages even if multilingual sounds are recorded on the DVD While playing the CD VIDEO CD the standard stereo playback will be resumed when you open or close the disc tray you turn the power off While playing the DVD the sound may be changed when you open or close the disc tray you change the title If the language is displayed as 4 digits number refer to the language code list in page 52 ...

Page 26: ...til the subtitles you want appear on the TV screen SUBTITLE 1 n SUBTITLE 2 n Notes The type and number of languages for subtitles vary from disc to disc Depending on the DVD you may not be able to change the subtitles even if multilingual subtitles are recorded on the DVD While playing the DVD the subtitle may be changed when you open or close the disc tray you change the title SUBTITLE ON OFF n C...

Page 27: ...R SYSTEM 16 9 2 INITIAL SETUP 1 TV TYPE OFF AUTO PLAY DIMMER BACKGROUND BRIGHT BLUE ENTER QUIT SETUP 1 2 SCREEN SAVER ON PARENTAL CONTROL 1 AUTO COLOR SYSTEM 16 9 1 2 INITIAL SETUP 1 Enter password then 1 2 PARENTAL CONTROL press ENTER 1 2 INITIAL SETUP 1 Entry password Enter 1 2 PARENTAL CONTROL a number in 4 figures then press ENTER Number buttons 2 Select INITIAL SETUP 1 using then press or ENT...

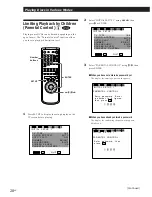
Page 28: ...itation To return to the normal screen Press SET UP To turn off the Parental Control function and play the DVD after entering your password Set LEVEL to OFF in Step 9 then press 1 2 1 2 INITIAL SETUP 1 PARENTAL CONTROL OFF LEVEL STANDARD CHANGE PASSWORD ENTER QUIT SETUP USA INITIAL SETUP 1 PARENTAL CONTROL OFF LEVEL STANDARD CHANGE PASSWORD NC17 ENTER QUIT SETUP R PG13 PG 7 6 5 4 3 2 1 2 1 2 8 4 E...

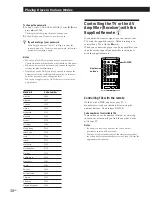
Page 29: ... Hong Kong 2219 Indonesia 2238 Italy 2254 Japan 2276 Malaysia 2363 Netherlands 2376 Norway 2379 Philippines 2424 Singapore 2501 Spain 2149 Sweden 2499 Switzerland 2086 Taiwan 2543 Thailand 2528 United Kingdom 2184 Controlling the TV or the AV Amplifier Receiver with the Supplied Remote Z If you adjust the remote signal you can control your TVs with the supplied remote Default setting is to control...

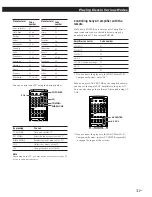
Page 30: ...bishi Code number 01 03 04 06 08 09 10 21 11 12 13 17 49 23 24 25 26 27 28 50 Code number 29 32 33 38 39 43 45 47 48 52 66 67 68 69 TV POWER 1 2 3 4 5 6 7 8 9 0 AV CENTER AV VOL Code number 91 92 93 94 95 96 97 Controlling Sony AV amplifier with the remote Hold down POWER and enter your AV amplifier s input connector code in the table below using the number buttons Then release POWER Amplifier con...

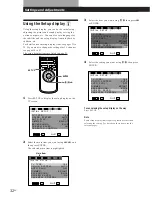
Page 31: ...ess or ENTER 4 Select the setting you want using then press ENTER To cancel using the setup display on the way Press SET UP Note Some setup display items require operations other than selecting the setting For details on these items see the relevant pages SET UP ENTER INITIAL SETUP 1 TV TYPE OFF AUTO PLAY DIMMER BACKGROUND BRIGHT BLUE ENTER QUIT SETUP SCREEN SAVER OFF ON PARENTAL CONTROL 1 2 1 2 A...

Page 32: ...ns page 52 When you select AUDIO FOLLOW the language for the subtitles change according to the language for the sound LANGUAGE SETUP OSD ENGLISH ENGLISH DVD MENU AUDIO SUBTITLE ORIGINAL AUDIO FOLLOW ENTER QUIT SETUP 1 2 1 2 Setting the Language for Display and Sound LANGUAGE SETUP Select after pressing SET UP LANGUAGE SETUP allows you to set various languages for on screen display or sound Default...

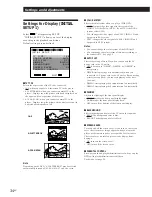
Page 33: ...L VIDEO CD and outputs it in NTSC system Notes You cannot change the color system of the DVD itself You can change the color system of this unit according to the connected TV See page 9 pAUTO PLAY Selects the setting of Auto Play when you connect the AC power cord to the AC outlet OFF does not use TIMER DEMO1 or DEMO2 to start playing TIMER starts playing a disc automatically when you connect the ...

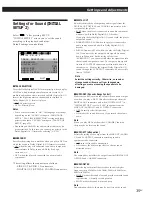
Page 34: ...the player is connected to audio component with a built in Dolby Digital AC 3 decoder D PCM Downmix PCM when you play the Dolby Digital AC 3 sound tracks the output audio signals are mixed down to 2 channels By the settings of the item SURROUND you can select whether the signals contain the surround component or not The output audio signals from the 5 1 OUTPUT connectors are also mixed down in the...

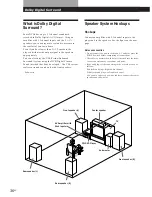
Page 35: ...r white cables to connect the center speaker and sub woofer Dolby Digital Surround What is Dolby Digital Surround Some DVDs have up to 5 1 channel soundtrack recorded in Dolby Digital AC 3 format Using an amplifier with 5 1 channel inputs and the 5 1 speakers you can enjoy more real audio presence in the comfort of your own home Even if you have fewer than 5 1 speakers the player distributes the o...

Page 36: ...T CENTER REAR SIGNAL GND WOOFER AUDIO IN L R L R AUDIO OUT AUDIO IN AUDIO OUT AUDIO IN y PHONO TAPE MD MONITOR VIDEO 1 VIDEO 2 TV LD L L CENTER TUNER CD COMPONENT VIDEO OUT Y B Y FRONT REAR R WOOFER CENTER R AUDIO 2 L VIDEO 2 R AUDIO 1 L VIDEO 1 1 2 OPTICAL COAXIAL DOLBY DIGITAL AC 3 PCM L INPUT 5 1 INPUT MONITOR OUTPUT 5 1 OUTPUT LINE OUT S VIDEO OUT DIGITAL OUT R Y S VIDEO IN TV CD DVD Player AV...

Page 37: ...Rear speaker Normally select this symbol This is default setting When the sound cracks or the effects of the surround is difficult to hear select this symbol This activates the Dolby Digital AC 3 bass redirection circuitry and outputs the bass frequencies of the speaker from some other speakers If you will not connect the speaker select this symbol You cannot select this symbol for the front speak...

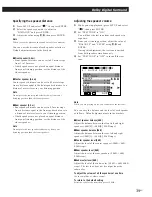
Page 38: ...placed an equal distance from your listening position set the distance of the closest speaker Note Do not place the rear speaker farther away from your listening position than the front speakers Adjusting the speaker volume 1 While you stop playback press SET UP and select 2 then press ENTER 2 Set TEST TONE to ON You will hear the test tone from each speaker in sequence 3 From your listening posit...

Page 39: ...al rear speakers The virtual speakers are reproduced as shown in Ill 2 SET UP ENTER These settings also affect the output from the LINE OUT AUDIO 1 2 connectors Notes When you select an item the sound cuts off for a moment When you select PRO LOGIC the sound may only come from the center speaker depending on the disc When the playing signal does not contain the surround component the effects may b...

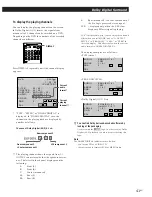
Page 40: ...component of the Pro Logic processed stereo signal LFE displayed only when the LFE Low Frequency Effects signal is playing If S is displayed in gray you can enjoy the surround effect when you set MODE under 5 1 OUTPUT SETUP 2 to PRO LOGIC VES A or VES B in the setup display This affects only when the current audio format is DOLBY DIGITAL 2 0 The display examples are as follows PCM stereo PRO LOGIC...

Page 41: ...lead need to be changed have it done at a qualified service shop only On placement Place the player in a location with adequate ventilation to prevent heat build up in the player Do not place the player on a soft surface such as a rug that might block the ventilation holes on the bottom Do not place the player in a location near heat sources or in a place subject to direct sunlight excessive dust ...

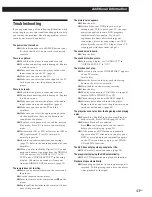
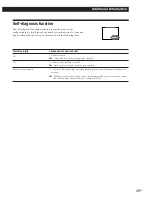
Page 42: ...e auto pause signal is recorded While playing such a disc the player stops playback at the signal Troubleshooting If you experience any of the following difficulties while using the player use this troubleshooting guide to help you remedy the problem Should any problem persist consult your nearest Sony dealer The power is not turned on If the indicator above the POWER button is not lit check that ...

Page 43: ...etup display select the language for the on screen display in OSD under LANGUAGE SETUP page 33 The language for the sound cannot be changed when you play a DVD Multilingual sound is not recorded on the DVD Changing the language for the sound is prohibited on the DVD The language for the sound changes automatically When you set the TRACK SELECTION in INITIAL SETUP 2 to ON in the setup display the l...

Page 44: ... the following table First three digits C13 C31 Exx xx is any number Cause and or Corrective Action The disc is dirty Clean the disc with a cleaning cloth page 42 The disc is not inserted correctly Open the disc tray and insert the disc correctly To prevent the player from operating malfunctioning the self diagnosis function has worked When you contact your Sony dealer or local authorized Sony ser...

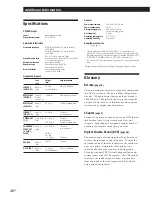
Page 45: ...35 C Operating humidity 5 to 90 Supplied accessories See page 6 The signals from LINE OUT AUDIO 1 2 connectors are measured When you play the PCM sound tracks with 96 kHz sampling frequency the output signals from the DIGITAL OUT OPTICAL COAXIAL and 5 1 OUTPUT connectors are converted to 48 kHz sampling frequency 16 bits quantization bits Design and specifications are subject to change without not...

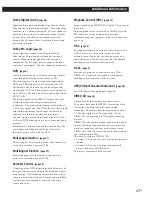
Page 46: ...hannel is stereo and there is discrete subwoofer channel in this format The good channel separation is realized because the all channel data is recorded discrete and processed in digital Dolby Pro Logic page 40 Audio signal processing technology that Dolby Laboratories Corporation developed for surround sound When the input signal has the surround component the Pro Logic process outputs the front ...

Page 47: ...he playback speed º ENTER button Selects and executes the items or settings JOG button indicator 12 16 Press to play a disc frame by frame PHONES connector 10 14 Connect the headphones to this connector PHONE LEVEL control 10 14 Adjusts the headphone volume DNR button 26 Reduces the picture noise PROGRAM button 24 Press to execute the program play CLEAR button 11 15 22 23 24 Press to return to the...

Page 48: ...5 1 channel input connectors 3 LINE OUT AUDIO 1 2 connectors 7 Connects to the audio input connector on the TV or amplifier 4 LINE OUT VIDEO 1 2 connectors 7 Connects to the video input connector on the TV or monitor 5 S VIDEO OUT 1 2 connectors 7 Connects to the S video input connector on the TV or VCR 6 DIGITAL OUT OPTICAL connector 8 Connects to an audio component using the optical digital conn...

Page 49: ...isc SET UP button 32 Displays the setup display on the TV screen to set or adjust the items TITLE button 13 Displays the title menu on the TV screen Click shuttle 12 16 Changes the playback speed ENTER button Selects and executes the items or settings POWER button 10 14 Turns on and off the power of the player ª TV operation buttons 30 Controls Sony TVs º CLEAR button 22 24 Cancels the number sele...

Page 50: ...ge 34 COLOR SYSTEM TV TYPE PAL NTSC AUTO 16 9 4 3 LETTER BOX 4 3 PAN SCAN AUTO PLAY OFF TIMER DEMO1 DEMO2 DIMMER BRIGHT DARK OFF BACKGROUND BLUE BLACK SCREEN SAVER ON OFF PARENTAL CONTROL page 28 1 INITIAL SETUP 2 page 35 TRACK SELECTION OFF AUTO SURROUND ON OFF DIGITAL OUT PCM DOLBY DIGITAL PCM D PCM AUDIO DRC OFF ON AUDIO ATT OFF ON 2 ENGLISH CHINESE SPANISH PORTUGUESE JAPANESE FRENCH GERMAN ITA...

Page 51: ...ish 1283 Javanese 1287 Georgian 1297 Kazakh 1298 Greenlandic 1299 Cambodian 1300 Kannada 1301 Korean 1305 Kashmiri 1307 Kurdish 1311 Kirghiz 1313 Latin 1326 Lingala 1327 Laothian 1332 Lithuanian 1334 Latvian Lettish 1345 Malagasy 1347 Maori 1349 Macedonian 1350 Malayalam 1352 Mongolian 1353 Moldavian 1356 Marathi 1357 Malay 1358 Maltese 1363 Burmese 1365 Nauru 1369 Nepali 1376 Dutch 1379 Norwegian...

Page 52: ...P 1 34 INITIAL SETUP 2 35 L LANGUAGE SETUP 33 Locating a specific point 11 15 by observing the TV screen 12 16 M N O On screen display usage 18 language 9 33 P Q Parental control 28 PBC functions 17 PBC Playback 17 47 Playback at various speeds 12 16 Continuous Play 10 14 frame by frame 12 16 Program Play 24 Repeat Play 22 Shuffle Play 23 PRO LOGIC 40 Program Play 24 R Remote 6 30 Repeating a spec...

Reviews: