41
Using V
arious Functions with the Contr
ol Menu
2
Press
,
.
“01” is highlighted. It is ready to set the first title or
track for Program Play.
3
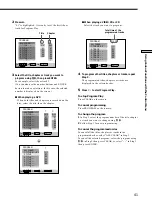
Select the title, chapter or track you want to
program using
M
/
m
, then press ENTER.
For example, select title or track 2.
(You can also use the number buttons and ENTER
button to make a selection. In this case, the selected
number is displayed on the screen.)
x
When playing a DVD
When both titles and chapters are recorded on the
disc, select the title, then the chapter.
Title
Chapter
PROGRAM
1. TITLE – –
ALL CLEAR
2. TITLE – –
3. TITLE – –
4. TITLE – –
5. TITLE – –
6. TITLE – –
7. TITLE – –
T
C
ALL
01
02
03
04
05
06
– –
01
02
03
04
05
Set: Quit:
ENTER
Start:
PLAY
DISPLAY
PROGRAM
1. TITLE – –
ALL CLEAR
2. TITLE – –
3. TITLE – –
4. TITLE – –
5. TITLE – –
6. TITLE – –
7. TITLE – –
C
ALL
02
03
04
05
06
T
– –
01
02
03
04
05
T
– –
01
02
03
04
05
PROGRAM
1. TITLE 0 1 – 0 2
ALL CLEAR
2. TITLE
3. TITLE – –
4. TITLE – –
5. TITLE – –
6. TITLE – –
7. TITLE – –
01
Set: Quit:
ENTER
Start:
PLAY
Set: Quit:
ENTER
Start:
PLAY
DISPLAY
DISPLAY
x
When playing a VIDEO CD or CD
Select the track you want to program.
4
To program other titles, chapters or tracks, repeat
Step 3.
The programmed titles, chapters or tracks are
displayed in the selected order.
5
Press
H
to start Program Play.
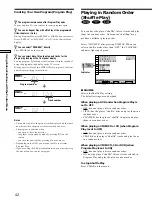
To stop Program Play
Press CLEAR on the remote.
To cancel programming
Press PROGRAM on the remote.
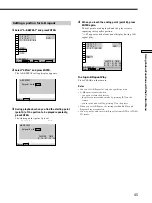
To change the program
1
In Step 2, select the program number of the title, chapter
or track you want to change using
M
/
m
.
2
Follow Step 3 for new programming.
To cancel the programmed order
To cancel all the titles, chapters or tracks in the
programmed order, select “ALL CLEAR” in Step 2.
To cancel the selected program, select the program using
M
/
m
in Step 2 then press CLEAR, or select “– –” in Step 3
then press ENTER.
Total time of the
programmed tracks
Set: Quit:
ENTER
Start:
PLAY
PROGRAM
1. TRACK 0 2
ALL CLEAR
2. TRACK
3. TRACK – –
4. TRACK – –
5. TRACK – –
6. TRACK – –
7. TRACK – –
0:15:30
– –
01
02
03
04
05
T
DISPLAY
Summary of Contents for DVP-S535D
Page 75: ...75 Additional Information ...

