background image

41

Pla

ying with AIBO

When not playing with AIBO

We recommend that you charge the battery pack (page 30) so that AIBO will
be ready to play at any time.

Pausing AIBO

Press the pause button on AIBO’s back.
The back light flashes green, and then
turns off after a while. Place AIBO on the
supplied stand at this time.

Notes

• Before placing AIBO on the stand, be sure to press the pause button on AIBO’s back

to make it pause. If AIBO is in active mode when placed on the stand, it may move,
tumble off and damage itself.

• The battery pack will not charge if you merely place AIBO on the stand without

pressing the pause button.

Pause button

Stand

Summary of Contents for ERS-311 AIBO Life

Page 1: ...Entertainment Robot AIBO ERS 311 312 English Français Deutsch 2001 Sony Corporation Operating Instructions 4 657 307 11 1 Printed in Japan 4 6 5 7 3 0 7 1 1 1 ...

Page 2: ...ntact the AIBO Customer Link page 8 Periodically examine the AC adapter for conditions that may result in the risk of fire electrical shock or injury to persons such as damage to the cords blades housing and in the event of such conditions the AC adapter should not be used until properly repaired or replaced Not Intended for Children Under 8 Years Vérifiez périodiquement si l adaptateur secteur ne...

Page 3: ...nt a risk of fire or explosion Discard used batteries according to the manufacturer s instructions The battery pack used in this device may present a fire or chemical burn hazard if mistreated Do not disassemble heat above 140 F 60 C or incinerate Dispose of used battery promptly Keep away from children Do not disassemble and do not dispose of in fire RECYCLING LITIUM ION RECHARGEABLE BATTERIES Li...

Page 4: ...rence to radio or television reception which can be determined by turning the equipment off and on the user is encouraged to try to correct the interference by one or more of the following measures Reorient or relocate the receiving antenna Increase the separation between the equipment and receiver Connect the equipment into an outlet on a circuit different from that to which the receiver is conne...

Page 5: ...C adapter should not be used until properly replaced The robot is not intended or recommended for children under 8 years old The robot must be used only with the recommended AC adapter ERA 201P1 The AC adapter is not a toy Small parts can be swallowed If the external flexible cable or cord is damaged it must be replaced or repaired only by the manufacturer an authorised service agent or a similar ...

Page 6: ...F or incinerate Dispose of used battery promptly Keep away from children Do not disassemble and do not dispose of in fire Voor de Klanten in Nederland For customers in the Netherlands Gooi de batterij niet weg maar lever hem in als KCA Regulatory Information This product has been tested and found to conform to the following Safety Standards Toy Directive 88 378 EEC EN50088 96 A1 96 A2 97 EN71 1 98...

Page 7: ...0065 98 EN61558 1 97 A1 98 EN61558 2 7 97 CE EMC Marking Conformity Remarks a This equipment complies with EN55022 Class B digital for use in following areas residential business and light industrial b This product conforms with the following European Directive 89 336 EEC EMC directive Sony Corporation 6 7 35 Kitashinagawa Shinagawa ku Tokyo 141 0001 JAPAN Please keep all information for future re...

Page 8: ...69 9508 6309 French line 33 0 1 5569 5117 Email address aibo sonystyle europe com In Australia 1300 36 2426 toll free within Australia Email address cicci ap sony com In Hong Kong 852 2345 2966 Email address aibo_helpdesk shk sony com hk In Singapore 65 473 8500 E mail address AIBO Link ap sony com 2001 Sony Corporation Reproduction in whole or in part without written permission is prohibited All ...

Page 9: ...9 ...

Page 10: ...10 ...

Page 11: ...11 ...

Page 12: ...12 ...

Page 13: ...13 ...

Page 14: ...21 Index to parts and controls 22 AIBO exterior 22 AIBO s inner unit 24 Stand 26 Charging the battery pack Inserting the battery pack 28 Charging the battery pack 30 Playing with AIBO Inserting or removing a Memory Stick 36 Inserting a Memory Stick 36 Removing the Memory Stick 38 Starting up AIBO 39 ...

Page 15: ...on use 48 On handling AIBO 48 Moisture condensation 49 On handling the AC adapter 50 On handling the battery pack 50 On cleaning 50 Troubleshooting 51 Clinic mode 51 Changing AIBO to clinic mode 51 Check list for clinic mode 52 Symptoms and remedies 55 Limited warranty for the U S A only 59 Service procedure for the U S A only 62 Specifications 63 Index 66 ...

Page 16: ...16 ...

Page 17: ...17 Introduction Introduction This chapter introduces you to the Entertainment Robot AIBO ERS 311 312 ...

Page 18: ...an and robot interaction AIBO creates and introduces you to new pleasures and lifestyles The name AIBO is coined from the words A I Artificial Intelligence eye and robot In Japanese the word aibou means partner or pal For the newest information on AIBO go to the following homepage http www aibo com ...

Page 19: ...tandard interface for the entertainment robot system that Sony is actively promoting This interface expands the capability of the entertainment robot through a flexible combination of hardware and interchangeable software to suit various applications AIBO ERS 311 312 conforms to the OPEN R version 1 1 1 AIBO the AIBO logo OPEN R and the OPEN R logo are registered trademarks of Sony Corporation Mem...

Page 20: ... Memory Stick is a Memory Stick created just for AIBO containing application software for operating AIBO Before purchasing an AIBO ware Memory Stick make sure the AIBO ware is compatible with your AIBO model AIBO AIBO ware Memory Stick not supplied You can select different AIBO ware depending on the way you want to enjoy AIBO For example there is AIBO ware for raising AIBO or for giving it a diffe...

Page 21: ...r conversion plug 1 xLithium ion battery pack ERA 301B1 1 xStand 1 xPink ball 1 xDocumentation AIBO Operating Instructions Congratulations on becoming a new AIBO owner Keep cards with magnetic data strips or magnetic recording media away from the AC adapter conversion plug The data on such magnetic media may be erased by the magnet within the conversion plug ...

Page 22: ...ch stickers onto or insert anything into AIBO s joints or other movable parts When lifting AIBO firmly grasp it by its back page 39 Never lift it by its head ears collar legs or tail The gray area between AIBO s chin and collar is not a switch Do not insert your fingers into this area as they may get caught and cause damage to AIBO ...

Page 23: ... and movement 7 Speaker Emits various musical tones and sound effects 8 Paw switches Located on the bottom of each paw 9 Back light Lights up green when AIBO is in active mode Flashes green when AIBO is preparing for pause mode Lights up orange when the internal battery pack is being charged Flashes orange when an error has occurred during charging Turns off when AIBO is in pause mode or the batte...

Page 24: ...tion shows AIBO with its cover removed Note Do not touch the charging terminal with your hand Doing so may soil the terminal and cause poor contact Shutter for charging terminal Serial number sticker inside the battery pack compartment ...

Page 25: ...tor is lit do not attempt to remove the Memory Stick 4 RESERVED switch This switch is reserved for functions to be added in the future 5 BATT Z latch Flip this latch towards AIBO s tail to remove the battery pack 6 Memory Stick insertion slot Insert the AIBO ware Memory Stick not supplied into this slot 7 Battery pack insertion slot Insert the supplied or an optional lithium ion battery pack into ...

Page 26: ...BO on the stand while it is in pause mode or while it is charging 2 Decoration plate Remove this plate when the optional Energy Station Core is attached to the stand Note The supplied stand is for use with AIBO ERS 311 312 only ...

Page 27: ...27 Charging the battery pack Charging the battery pack This chapter explains how to charge AIBO s battery pack ...

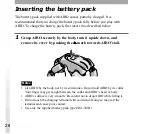
Page 28: ...body turn it upside down and remove its cover by pushing the mark towards AIBO s tail Notes Lift AIBO by the body not by its extremities Do not hold AIBO by its collar Your finger may get caught between the collar and AIBO s head or body AIBO s surface is very smooth Be careful not to drop AIBO while lifting it Do not touch the charging terminal with your hand Doing so may soil the terminal and ca...

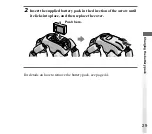
Page 29: ...ging the battery pack 2 Insert the supplied battery pack in the direction of the arrow until it clicks into place and then replace the cover For details on how to remove the battery pack see page 44 Push here ...

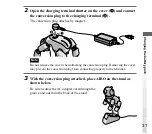
Page 30: ... pack while it is inserted into AIBO It is recommended that you charge the battery pack at room temperature 10 to 30 C 50 to 86 F At room temperature it takes about 2 hours to fully charge the battery pack 1 Connect the AC adapter to the AC adapter conversion plug securely AC adapter conversion plug AC adapter ...

Page 31: ...rsion plug attaches by magnet Note Do not remove the cover when attaching the conversion plug Removing the cover may prevent the conversion plug from connecting properly to the terminal 3 With the conversion plug attached place AIBO on the stand as shown below Be sure to draw the AC adapter cord through the groove and out from the back of the stand ...

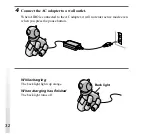
Page 32: ... a wall outlet When AIBO is connected to the AC adapter it will not enter active mode even when you press the pause button While charging The back light lights up orange When charging has finished The back light turns off Back light ...

Page 33: ...ve mode AIBO will change to pause mode automatically and charging of the battery pack starts When you remove the AC adapter conversion plug from AIBO be sure to grasp the plug as you pull it out After removing the conversion plug be sure to close the charging terminal shutter xUsing the Energy Station Core ERA 301P2 not supplied When the optional Energy Station Core is attached to the stand you ca...

Page 34: ...34 ...

Page 35: ...ter explains procedures that are necessary for playing with AIBO such as inserting the AIBO ware Memory Stick adjusting the volume of the musical tones and replacing the battery pack Note that optional AIBO ware is required in order to play with AIBO ...

Page 36: ... you start up AIBO without inserting an AIBO ware Memory Stick it enters clinic mode in which AIBO s sensors and other parts are checked page 51 Inserting a Memory Stick Be sure to insert the Memory Stick only after pausing AIBO When AIBO is in pause mode the back light turns off 1 Grasp AIBO securely by the body turn it upside down and remove its cover by pushing the mark towards AIBO s tail ...

Page 37: ...ce is very smooth Be careful not to drop AIBO while lifting it Do not touch the charging terminal with your hand Doing so may soil the terminal and cause poor contact 2 Insert the Memory Stick and replace the cover With the mark pointed downward and the rounded corner facing the tail insert the Memory Stick into the Memory Stick insertion slot until it clicks into place Rounded corner ...

Page 38: ...emove the cover to confirm that the Memory Stick access indicator is turned off Press the Z button on AIBO s inner unit and then remove the Memory Stick Note The Memory Stick cannot be removed while the Memory Stick access indicator lights up red Do not try to remove the Memory Stick by force during this time Memory Stick access indicator ...

Page 39: ... with a short nap Notes If you place AIBO on a slippery floor or a carpet with a long nap it may tend to fall often fail to go forward or have a tendency to jam up Be sure to place AIBO on the floor as shown above This will prevent AIBO from moving unexpectedly and being damaged when you press and release the pause button to start AIBO ...

Page 40: ...it for a while until AIBO starts to move under the control of the inserted AIBO ware Memory Stick Note If an abnormality occurs or if you catch your finger in one of AIBO s joints press the pause button on AIBO s back For details on playing with AIBO from this point on Refer to the User s Guide supplied with the AIBO ware ...

Page 41: ...t flashes green and then turns off after a while Place AIBO on the supplied stand at this time Notes Before placing AIBO on the stand be sure to press the pause button on AIBO s back to make it pause If AIBO is in active mode when placed on the stand it may move tumble off and damage itself The battery pack will not charge if you merely place AIBO on the stand without pressing the pause button Pau...

Page 42: ...wn and remove its cover by pushing the mark towards AIBO s tail Notes Lift AIBO by the body not by its extremities Do not hold AIBO by it collar Your finger may get caught between the collar and AIBO s head or body AIBO s surface is very smooth Be careful not to drop AIBO while lifting it Do not touch the charging terminal with your hand Doing so may soil the terminal and cause poor contact ...

Page 43: ...crease the volume level slide the switch towards the position to decrease the volume level slide it towards the position When you release the switch it returns to the center position There are four volume levels including mute Each time you slide the switch the level increases or decreases by one level ...

Page 44: ... Use only the supplied battery pack type ERA 301B1 1 Press the pause button and wait until the back light turns off Note While AIBO is accessing the Memory Stick the Memory Stick access indicator lights up red During this time the BATT Z latch and Z button are deactivated and the battery pack and Memory Stick cannot be removed until the data saving procedure has been completed Do not try to remove...

Page 45: ...ts extremities Do not hold AIBO by its collar Your finger may get caught between the collar and AIBO s head or body AIBO s surface is very smooth Be careful not to drop AIBO while lifting it Do not touch the charging terminal with your hand Doing so may soil the terminal and cause poor contact 3 Flip the BATT Z latch towards AIBO s tail to remove the battery pack BATT Z latch ...

Page 46: ...ly at this time may damage AIBO 4 Insert the charged battery pack in the direction of the arrow until the pack clicks into place then replace the cover 5 Place AIBO on the floor as shown below Note Be sure to place AIBO on the floor as shown to the right This will prevent AIBO from moving unexpectedly and being damaged when you press and release the pause button to start AIBO Push here ...

Page 47: ...47 Additional information Additional information This chapter provides notes on usage a troubleshooting guide and other information concerning AIBO ...

Page 48: ... your hand Doing so may soil the terminal and cause poor contact Lift AIBO by the body and not by its extremities such as the head ears collar tail or legs Do not swing or twist AIBO Do not leave AIBO in very hot places such as a car parked in the sun as this may deform or damage it Do not allow foreign things such as paper clips to get into AIBO or its joints Do not use AIBO outdoors If you do mo...

Page 49: ...ad tail and legs from damage Do not use AIBO in a place subject to strong electromagnetic waves or X rays Do not place a card with a magnetic strip or a magnetic recording medium close to the AC adapter conversion plug The magnet inside the conversion plug may erase the data recorded on the magnetic medium The AIBO ware applications designed for ERS 110 111 cannot be used with ERS 311 312 ERS 311 ...

Page 50: ...n Be careful not to let foreign matter like dust or sand get into the terminals If you are not going to play with AIBO for a long period remove the battery pack from AIBO and store it in a dry cool place The battery pack is constantly discharging even when it is not in use Charge the battery pack right before using AIBO Do not drop the battery pack or place heavy object on it Do not apply strong p...

Page 51: ...ware Memory Stick AIBO enters clinic mode in which its sensors and other parts are checked The mode indicator turns off at this time If afterwards the problem persists contact the AIBO Customer Link page 8 Changing AIBO to clinic mode 1 Remove the AIBO ware Memory Stick from AIBO page 36 2 Place AIBO on the floor as shown below and then press the pause button on its back page 40 AIBO enters clinic...

Page 52: ... walks backward kicks with its right hind leg kicks with its left hind leg AIBO s horn light lights up in three colors during this time AIBO then resumes the repetition of the original sequence of actions stands up sits down lies down 2 Push the tail switch to AIBO s left for three seconds AIBO does the following sequence of actions sits waves with its right front paw waves with its left front paw...

Page 53: ...es down You can rotate in either direction Sensitivity of AIBO s head switch 1 Push the head gently to make AIBO look down The horn light lights up green 2 Push the head gently to make AIBO look up The horn light lights up orange Sensitivity of the color camera 1 Move the supplied pink ball close to the color camera AIBO s mouth When the camera detects the ball the horn light lights up blue If the...

Page 54: ...able to detect it Adjust the distance between the object and the sensor 3 Rotate the tail switch again AIBO resumes the repetition of the original sequence of actions stands up sits down lies down Pick up mode 1 Pick AIBO up from the floor AIBO stops moving its legs become loose and the mode indicator turns on If you pick it up too slowly the legs may not become loose In this case keep holding AIB...

Page 55: ...tch towards AIBO s head for three seconds AIBO stops moving whenever it is picked up from the floor the mode indicator lights up or an object is caught in one of AIBO s joint the mode indicator flashes The battery pack is drained c Charge the battery pack page 30 When the battery pack is completely drained the back light turns off and AIBO stops moving AIBO s ear came off c Align the center of AIB...

Page 56: ... press the pause button again When you press the pause button the back light flashes in orange and green alternately and the beep sound is emitted Heat may have built up in the battery pack c Wait for a while until the battery pack becomes cool AIBO continues to emit a sad melody and does not move when the pause button is released The insertion of a Memory Stick without any AIBO ware The insertion...

Page 57: ...up from the floor c Check that the mode indicator is on place AIBO on the floor and then push up the tail switch towards the head for three seconds The mode indicator is on or flashing and AIBO emits musical tones but it does not walk AIBO stops moving whenever it is picked up from the floor or an object is caught in one of AIBO s joints c Place AIBO on the floor and then push up the tail switch t...

Page 58: ...lly c Remove the battery pack page 44 Re insert the battery pack and press the pause button again page 41 If the BATT Z latch is inoperable use the emergency release hole page 25 AIBO soon asks for charging even with a fully charged battery pack When the battery pack s operating time has become noticeably short it may have reached its end of life Replace it with a new battery pack page 44 No music...

Page 59: ...original Product or accessory or b for 90 days after the date of repair replacement of Products or for 30 days after the date of repair replacement of accessories SONY will repair or replace defective parts accessories and or Products used in the repair or replacement of Products or accessories under this Limited Warranty with new or rebuilt replacements To obtain warranty service you must first o...

Page 60: ...sults from use of the Product in conjunction with accessories products or ancillary or peripheral equipment not manufactured by SONY and where it is determined by SONY that there is no fault with the Product itself SONY will pay shipping charges for all in warranty service However if no trouble is found with the Product or accessory if the trouble is from a non covered charge or if it is determine...

Page 61: ...S LIMITED WARRANTY Some states do not allow the exclusion or limitation of incidental or consequential damages or allow limitations on how long an implied warranty lasts so the above limitations or exclusions may not apply to you This warranty gives you specific legal rights and you may have other rights which vary from state to state For your convenience SONY ELECTRONICS INC has established telep...

Page 62: ...al cost will be charged to you after the warranty period c Mark your event number on the top of the box and send it to the designated address The AIBO Customer Link will designate the shipping method and pay the shipping charges within the warranty period after the warranty period you must pre pay the shipping charges d As soon as the repair is completed your AIBO will be sent back to you After th...

Page 63: ...udio output Speaker Internal sensors Infrared distance sensor Acceleration sensor Switches in the head on the tail and on the paws Inclination sensor Vibration sensor Power consumption Approx 5 W in normal mode Operable duration Approx 2 5 hours when operated with a fully charged ERA 301B1 in normal mode Dimensions Approx 177 280 240 mm 7 11 1 8 9 1 2 inches w h d Mass Approx 1 5 kg 3 lb 5 oz incl...

Page 64: ...er countries Output 16 V DC 2 5 A Operating temperature 5 C to 35 C 41 F to 95 F temperature gradient less than 10 C 50 F hour Operating humidity 20 to 80 not condensed provided that humidity is less than 65 at 35 C 95 F wet bulb temperature less than 29 C 84 F Storage temperature 20 C to 60 C 4 F to 140 F temperature gradient less than 10 C 50 F hour Storage humidity 10 to 90 not condensed Dimens...

Page 65: ...ity 10 to 80 not condensed Operating wet bulb temperature Less than 29 C 84 F Storage temperature 20 C to 60 C 4 F to 140 F temperature gradient less than 10 C 50 F hour Storage humidity 10 to 90 not condensed Storage wet bulb temperature Less than 35 C 95 F Dimensions Approx 72 53 6 21 mm Approx 2 7 8 2 1 8 27 32 inches w h d Mass Approx 112 g 4 oz Design and specifications are subject to change ...

Page 66: ...0 Handling 50 Inserting 28 Insertion slot 25 Replacing 44 C Charging terminal 25 31 Clinic mode 51 Color camera 23 D Decorative plate 26 Distance sensor 23 E Emergency release hole 25 Energy Station Core 33 H Head 23 Head switch 52 Horn light 23 M Memory Stick Access indicator 25 38 Inserting 36 Insertion slot 25 Z button 25 38 Removing 38 Mode indicator 23 P Pause button 23 40 41 Pause mode 36 40...

Page 67: ...67 Additional information S Shutter for charging terminal 24 31 Speaker 23 Stand 21 26 Stereo microphone 23 T Tail switch 23 V Volume level 42 VOLUME switch 25 43 ...

Page 68: ...ut plus être utilisé avant son remplacement Ce robot n est pas destiné ou n est pas recommandé pour les enfants de moins de 8 ans Le robot doit uniquement être utilisé avec l adaptateur secteur recommandé ERA 201P1 L adaptateur secteur n est pas un jouet Les petites pièces peuvent être avalées Si le câble flexible externe ou le cordon est endommagé il doit être remplacé ou réparé par le fabricant ...

Page 69: ...tions du fabricant La batterie utilisée dans ce robot présente un risque d incendie ou de brûlure par des substances chimiques si elle est manipulée de manière inappropriée Ne la désassemblez pas ne l exposez pas à des températures supérieures à 60 C 140 F et ne l incinérez pas Eliminez la batterie usagée rapidement Ne la laissez pas à la portée des enfants Ne la désassemblez pas et ne la jetez pa...

Page 70: ...1 97 L adaptateur secteur et la batterie ion lithium ont été testés ensemble en tant que système et se sont révélés conformes aux normes de sécurité suivantes LVD 73 23 EEC 93 68 EEC EN60950 92 A1 93 A2 93 A3 95 A4 97 A11 97 EN60065 98 EN61558 1 97 A1 98 EN61558 2 7 97 Remarques concernant la conformité du marquage EMC a Cet appareil est conforme à EN55022 Classe B numérique pour une utilisation d...

Page 71: ...ope Contact français 33 0 1 5569 5117 Contact anglais 44 0 20 7365 2937 Contact allemand 49 0 69 9508 6309 Adresse E mail aibo sonystyle europe com En Australie 1300 36 2426 appel gratuit en Australie Adresse E mail cicci ap sony com A Hong Kong 852 2345 2966 Adresse E mail aibo_helpdesk shk sony com hk A Singapour 65 473 8500 Adresse E mail AIBO Link ap sony com 2001 Sony Corporation Toute reprod...

Page 72: ... fournis 13 Index des composants et commandes 14 Apparence d AIBO 14 Intérieur d AIBO 16 Support 18 Charge de la batterie Insertion de la batterie 20 Charge de la batterie 22 Jouer avec AIBO Insérer ou retirer un Memory Stick 28 Insérer un Memory Stick 28 Retirer le Memory Stick 30 Démarrage d AIBO 31 ...

Page 73: ...nformations complémentaires Remarques sur l utilisation 40 Manipulation d AIBO 40 Condensation d humidité 41 Manipulation de l adaptateur secteur 42 Manipulation de la batterie 42 Nettoyage 42 Dépannage 43 Mode clinique 43 Passage d AIBO en mode clinique 43 Liste de contrôle pour le mode clinique 44 Symptômes et remèdes 47 Spécifications 51 Index 54 ...

Page 74: ...8 ...

Page 75: ...9 Introduction Introduction Ce chapitre vous présente le robot de compagnie AIBO ERS 311 312 ...

Page 76: ... et vous initie à de nouveaux plaisirs et à de nouveaux modes de vie Le nom AIBO est un acronyme formé avec les mots A I Artificial Intelligence intelligence artificielle en français eye yeux et robot En japonais le terme aibô signifie partenaire ou copain Consultez la page d accueil http www aibo com pour prendre connaissance des nouveautés concernant AIBO ...

Page 77: ... R est l interface standard du robot de compagnie pour lequel Sony mène une campagne active Cette interface étend les capacités du robot de compagnie par le biais d une combinaison flexible de matériel et de logiciels interchangeables en vue de diverses applications L AIBO ERS 311 312 est conforme à OPEN R version 1 1 1 AIBO le logo aibo OPEN R et le logo OPEN R sont des marques de fabrique de Son...

Page 78: ...é uniquement pour AIBO contenant un logiciel d application pour son fonctionnement Avant d acheter un Memory Stick AIBO ware vérifiez que l AIBO ware est compatible avec votre modèle AIBO AIBO Memory Stick AIBO ware non fourni Vous pouvez sélectionner différents AIBO ware selon la manière dont vous souhaitez jouer avec AIBO Par exemple il y a un AIBO ware qui permet d éduquer AIBO ou pour lui donn...

Page 79: ...ur 1 xBatterie ion lithium ERA 301B1 1 xSupport 1 xBalle rose 1 xDocumentation Instructions relatives au fonctionnement d AIBO Félicitations pour le nouveau propriétaire d un AIBO Conservez des cartes avec bande magnétique ou supports d enregistrement magnétiques loin de la fiche de conversion de l adaptateur secteur Les données sur de tels supports pourraient être effacées par l aimant dans la fi...

Page 80: ...nsérez rien dans les articulations d AIBO ou toute autre pièce mobile Saisissez fermement AIBO par le dos page 31 pour le soulever Ne le prenez jamais par sa tête ses oreilles son collier ses jambes ou sa queue La zone grise entre le menton d AIBO et le collier n est pas un commutateur N insérez pas les doigts dans cette zone car ils pourraient être coincés et causer des dommages à AIBO ...

Page 81: ...vements 7 Haut parleur Emet différentes tonalités musicales et des effets sonores 8 Commutateurs de patte Placés sur le dessous de chaque patte 9 Rétro éclairage S allume en vert quand AIBO est en mode actif Clignote en vert quand AIBO se prépare pour le mode pause S allume en orange pendant la charge de la batterie interne Clignote en orange si une erreur est survenue pendant la charge S éteint q...

Page 82: ...e AIBO son couvercle retiré Remarque Ne touchez pas la borne de charge avec les doigts Elle pourrait être salie ce qui entraînerait un mauvais contact Volet de la borne de charge Autocollant de numéro de série dans le logement de la batterie ...

Page 83: ...rer le Memory Stick quand ce témoin est allumé 4 Commutateur RESERVED Ce commutateur est réservé pour des fonctions à ajouter dans l avenir 5 Verrou BATT Z Basculez ce verrou vers la queue d AIBO pour retirer la batterie 6 Fente d insertion pour Memory Stick Insérez le Memory Stick AIBO ware non fourni dans cette fente 7 Fente d insertion de batterie Insérez la batterie ion lithium fournie ou une ...

Page 84: ... support quand il est en mode pause ou pendant la charge 2 Plaque décorative Retirez cette plaque quand la station d alimentation centrale en option est fixée au support Remarque Le support fourni est prévu uniquement pour l AIBO ERS 311 312 ...

Page 85: ...19 Charge de la batterie Charge de la batterie Ce chapitre explique comment charger la batterie d AIBO ...

Page 86: ...cle en poussant la marque vers sa queue Remarques Soulevez AIBO en le saisissant par le corps et non par ses extrémités Ne tenez pas AIBO par son collier Vos doigts pourraient être coincés entre le collier et la tête ou le corps d AIBO La surface d AIBO est très lisse Prenez garde de ne pas faire tomber AIBO en le soulevant Ne touchez pas la borne de charge avec les doigts Elle pourrait être salie...

Page 87: ...e la batterie 2 Insérez la batterie fournie dans le sens de la flèche jusqu au déclic de mise en place puis remettez le couvercle en place Voir la page 36 pour les détails sur le retrait de la batterie Poussez ici ...

Page 88: ...d elle est insérée dans AIBO Il est recommandé de charger la batterie à température ambiante 10 à 30 C 50 à 86 F A température ambiante la charge complète exige environ 2 heures 1 Raccordez fermement l adaptateur secteur à la fiche de conversion de l adaptateur secteur Fiche de conversion de l adaptateur secteur Adaptateur secteur ...

Page 89: ...ersion se fixe par aimant Remarque Ne retirez pas le couvercle quand la fiche de conversion est attachée Cela pourrait empêcher son raccordement correct à la borne 3 La fiche de conversion fixée placez AIBO sur le support comme indiqué ci dessous N oubliez pas de passer le cordon de l adaptateur secteur par la cannelure et de le sortir à l arrière du support ...

Page 90: ...rale Quand AIBO est raccordé à l adaptateur secteur il ne passera pas en mode actif même si vous appuyez sur la touche pause Pendant la charge Le rétro éclairage s allume en orange Quand la charge est terminée Le rétro éclairage s éteint Rétro éclairage ...

Page 91: ...omatiquement en mode pause et la charge de la batterie commencera En retirant la fiche de conversion de l adaptateur secteur d AIBO saisissez bien la fiche pour la retirer Après le retrait de la fiche de conversion refermez bien le volet de la borne de charge xEmploi de la station d alimentation centrale ERA 301P2 non fournie Quand la station d alimentation centrale en option est fixée au support ...

Page 92: ...26 ...

Page 93: ...re explique les procédures requises pour jouer avec AIBO telles qu insertion du Memory Stick AIBO ware ajustement du volume des tonalités musicales et remplacement de la batterie Notez que l AIBO ware en option est nécessaire pour jouer avec AIBO ...

Page 94: ...Si vous démarrez AIBO sans insérer de Memory Stick AIBO ware AIBO passe en mode clinique de contrôle de ses capteurs et autres pièces page 43 Insérer un Memory Stick Insérez le Memory Stick seulement après avoir mis AIBO en pause Le rétro éclairage s éteint quand AIBO est en mode pause 1 Saisissez fermement AIBO par le corps retournez le et retirez son couvercle en poussant la marque vers sa queue...

Page 95: ...AIBO est très lisse Prenez garde de ne pas faire tomber AIBO en le soulevant Ne touchez pas la borne de charge avec les doigts Elle pourrait être salie ce qui entraînerait un mauvais contact 2 Insérez le Memory Stick et remettez le couvercle en place La marque pointée vers le bas et le coin arrondi face à la queue insérez le Memory Stick dans la fente d insertion pour Memory Stick jusqu au déclic ...

Page 96: ...z le couvercle pour confirmer que le témoin d accès Memory Stick est éteint Appuyez sur la touche Z à l intérieur d AIBO puis retirez le Memory Stick Remarque Le Memory Stick ne peut pas être retiré quand le témoin d accès Memory Stick est allumé en rouge N essayez pas de retirer le Memory Stick de force pendant ce temps Témoin d accès Memory Stick ...

Page 97: ...tte rase Remarques Si vous placez AIBO sur un sol glissant ou une moquette à longs poils il aura tendance à tomber souvent à ne pas avancer ou à se bloquer Placez bien AIBO sur le sol comme indiqué ci dessus Vous éviterez ainsi qu AIBO ne bouge de façon imprévue et ne subisse de dommages quand vous appuyez et libérez la touche pause pour le démarrer ...

Page 98: ...dez un peu qu AIBO se mette à bouger sous le contrôle du Memory Stick AIBO ware inséré Remarque Appuyez sur la touche pause sur le dos d AIBO si une anomalie a lieu ou si vous coincez le doigt dans une articulation d AIBO Pour les détails pour jouer avec AIBO à partir de maintenant Voir le Guide de l utilisateur fourni avec l AIBO ware ...

Page 99: ...lignote en vert puis s éteint un moment Placez AIBO sur le support à ce moment là Remarques Avant de placer AIBO sur le support n oubliez pas d appuyer sur la touche pause sur son dos pour le mettre en pause Si AIBO est en mode actif quand il est placé sur le support il peut bouger se renverser et s endommager La batterie ne se chargera pas si vous placez simplement AIBO sur le support sans appuye...

Page 100: ...en poussant la marque vers sa queue Remarques Soulevez AIBO en le saisissant par le corps et non par ses extrémités Ne tenez pas AIBO par son collier Vos doigts pourraient être coincés entre le collier et la tête ou le corps d AIBO La surface d AIBO est très lisse Prenez garde de ne pas faire tomber AIBO en le soulevant Ne touchez pas la borne de charge avec les doigts Elle pourrait être salie ce ...

Page 101: ...en place Pour augmenter le niveau sonore glissez le curseur vers la position pour le diminuer glissez le vers la position A sa libération le curseur revient en position centrale Il y a quatre niveaux sonores assourdissement y compris A chaque glissement du curseur le niveau sonore augmente ou diminue d un niveau ...

Page 102: ... uniquement la batterie ERA 301B1 fournie 1 Appuyez sur la touche pause et attendez que le rétro éclairage s éteigne Remarque Quand AIBO accède au Memory Stick le témoin d accès Memory Stick s allume en rouge Pendant ce temps le verrou BATT Z et la touche Z sont désactivés et la batterie et Memory Stick ne peuvent pas être retirés jusqu à l achèvement de la procédure de sauvegarde des données N es...

Page 103: ...tés Ne tenez pas AIBO par son collier Vos doigts pourraient être coincés entre le collier et la tête ou le corps d AIBO La surface d AIBO est très lisse Prenez garde de ne pas faire tomber AIBO en le soulevant Ne touchez pas la borne de charge avec les doigts Elle pourrait être salie ce qui entraînerait un mauvais contact 3 Basculez le verrou BATT Z vers la queue d AIBO pour retirer la batterie Ve...

Page 104: ...mmager AIBO 4 Insérez la batterie fournie dans le sens de la flèche jusqu au déclic de mise en place puis remettez le couvercle en place 5 Placez AIBO sur le sol comme indiqué ci dessous Remarque Placez bien AIBO sur le sol comme indiqué à droite Vous éviterez ainsi qu AIBO ne bouge de façon imprévue et ne subisse de dommages quand vous appuyez et libérez la touche pause pour le démarrer Poussez i...

Page 105: ...39 Informations complémentaires Informations complémentaires Ce chapitre présente des remarques sur l utilisation d AIBO un guide de dépannage et d autres informations concernant AIBO ...

Page 106: ...AIBO en le saisissant par le corps et non par ses extrémités comme la tête les oreilles le collier la queue ou les pattes Ne pas balancer ni tordre AIBO Ne pas laisser AIBO à un emplacement surchauffé comme une voiture garée en plein soleil car il pourrait se déformer ou se détériorer Ne laisser aucun corps étranger comme des trombones pénétrer dans AIBO ou ses articulations Ne pas utiliser AIBO e...

Page 107: ...placement soumis à de puissantes ondes électromagnétiques ou des rayons X Ne pas placer une carte avec bande magnétique ou un support d enregistrement magnétique près de la fiche de conversion de l adaptateur secteur L aimant à intérieur de la fiche de conversion pourrait effacer les données enregistrées sur le support magnétique Les applications AIBO ware conçues pour l ERS 110 111 ne sont pas ut...

Page 108: ...n plein soleil Ne pas laisser des matières étrangères comme la poussière ou le sable pénétrer dans les bornes Si AIBO doit rester inutilisé pendant une période prolongée en retirer la batterie et la ranger à un endroit sec et frais La batterie se décharge en continu même si elle n est pas utilisée La charger juste avant d utiliser AIBO Ne pas faire tomber la batterie ni placer d objet lourd dessus...

Page 109: ...mory Stick AIBO ware AIBO passe en mode clinique où ses capteurs et autres pièces sont contrôlés Le témoin de mode s éteint à ce moment là Si le problème persiste par la suite contactez la liaison clients AIBO page 5 Passage d AIBO en mode clinique 1 Retirez le Memory Stick AIBO ware d AIBO page 28 2 Placez AIBO sur le sol comme indiqué ci dessous puis appuyez sur la touche pause sur son dos page ...

Page 110: ...atte arrière droite donne un coup de la patte arrière gauche La corne lumineuse d AIBO s allume en trois couleurs pendant ce temps AIBO répète alors la séquence d actions d origine se lever s asseoir et se coucher 2 Poussez le commutateur de la queue vers la gauche d AIBO pendant trois secondes AIBO effectue la séquence d actions suivante il s asseoit fait signe de la patte avant droite fait signe...

Page 111: ...ez le tourner dans n importe quelle direction Sensibilité du commutateur de la tête d AIBO 1 Appuyez légèrement sur la tête pour faire baisser la tête à AIBO La corne lumineuse s allume en vert 2 Appuyez légèrement sur la tête pour faire relever la tête à AIBO La corne lumineuse s allume en orange Sensibilité de la caméra couleur 1 Amenez la balle rose fournie près de la caméra couleur bouche d AI...

Page 112: ... distance entre l objet et le capteur 3 Tournez à nouveau le commutateur de la queue AIBO répète alors la séquence d actions d origine se lever s asseoir et se coucher Vous pouvez le tourner dans n importe quelle direction Mode de ramassage 1 Ramassez AIBO sur le sol AIBO s arrête de bouger ses pattes se desserrent et le témoin de mode s allume Si vous le ramassez trop lentement les pattes peuvent...

Page 113: ...endant trois secondes AIBO s arrête de bouger quand il est ramassé au sol le témoin de mode s allume ou quand un objet est coincé dans une de ses articulations le témoin de mode clignote La batterie est épuisée c Chargez la batterie page 22 Quand la batterie est complètement épuisée le rétro éclairage s éteint et AIBO s arrête de bouger Une oreille d AIBO s est détachée c Alignez le centre du micr...

Page 114: ...puyez à nouveau sur la touche pause A la pression de la touche pause le rétro éclairage clignote alternativement en orange et vert et un bip retentit Il peut y avoir accumulation de chaleur dans la batterie c Attendez un moment que la batterie refroidisse AIBO continue à émettre une mélodie triste et ne bouge pas à la libération de la touche pause Insertion d un Memory Stick sans AIBO ware Inserti...

Page 115: ...iez que le témoin de mode est allumé placez AIBO sur le sol puis poussez le commutateur de la queue vers la tête pendant trois secondes Le témoin de mode est allumé ou clignote et AIBO émet des tonalités musicales mais ne marche pas AIBO s arrête de bouger chaque fois qu il est ramassé au sol ou qu un objet est coincé dans une de ses articulations c Placez AIBO sur le sol puis poussez le commutate...

Page 116: ...6 Réinsérez la batterie et appuyez à nouveau sur la touche pause page 33 Si le verrou BATT Z est inopérable utilisez le trou de libération d urgence page 17 AIBO demande rapidement la charge même si la batterie est entièrement chargée Quand le temps de fonctionnement de la batterie est devenu remarquablement court elle a peut être atteint la fin de sa durée de service Remplacez la par une batterie...

Page 117: ...tie audio Haut parleur Capteurs internes Capteurs de distance infrarouges Capteur d accélération Commutateurs sur la tête sur la queue et sur les pattes Capteur d inclinaison Capteur de vibration Consommation d énergie Env 5 W en mode normal Durée de fonctionnement Env 2 5 heures sur batterie ERA 301B1 entièrement chargée en mode normal Dimensions Env 177 280 240 mm 7 11 1 8 9 1 2 pouces l h p Poi...

Page 118: ...s pays Sortie 16 V CC 2 5 A Température de fonctionnement 5 à 35 C 41 à 95 F gradient thermique inférieur à 10 C 50 F heure Humidité de fonctionnement 20 à 80 pas de condensation à condition que l humidité soit inférieure à 65 à 35 C 95 F Température au thermomètre mouillé moins de 29 C 84 F Température de stockage 20 à 60 C 4 à 140 F gradient thermique inférieur à 10 C 50 F heure Humidité de stoc...

Page 119: ...80 pas de condensation Température de fonctionnement au thermomètre mouillé Moins de 29 C 84 F Température de stockage 20 à 60 C 4 à 140 F gradient thermique inférieur à 10 C 50 F heure Humidité de stockage 10 à 90 pas de condensation Température de stockage au thermomètre mouillé Moins de 35 C 95 F Dimensions Env 72 53 6 21 mm 2 7 8 2 1 8 27 32 pouces l h p Poids Env 112 g 4 onces La conception e...

Page 120: ...5 Capteur de distance 15 Commutateur de la queue 15 Commutateur de la tête 44 Commutateurs de patte 15 Corne lumineuse 15 Curseur VOLUME 17 35 F Fiche de conversion de l adaptateur secteur 13 22 H Haut parleur 15 L Liaison clients AIBO 5 M Memory Stick Fente d insertion 17 Insertion 28 Retrait 30 Témoin d accès 17 30 Touche Z 17 30 Microphone stéréo 15 Mode clinique 43 Mode pause 28 32 34 N Niveau...

Page 121: ...émentaires R Rétro éclairage 15 24 S Station d alimentation centrale 25 Support 13 18 T Témoin de mode 15 Tête 15 Touche pause 15 32 33 Trou de libération d urgence 17 V Verrou BATT Z 17 37 Volet pour borne de charge 16 23 ...

Page 122: ...gungen können zu Feuergefahr der Gefahr eines elektrischen Schlags oder Verletzungen führen Ist der Netzadapter beschädigt darf er nicht mehr benutzt und muss ausgetauscht werden Dieser Spielroboter ist nicht für Kinder unter 8 Jahren gedacht und wird für Kinder unter 8 Jahren nicht empfohlen Der Roboter darf ausschließlich mit dem empfohlenen Netzadapter ERA 201P1 verwendet werden Der Netzadapter...

Page 123: ...S Berühren Sie beschädigte oder auslaufende Lithium Ionen Akkus nicht Bei einem falschen oder falsch eingelegten Akku besteht Explosionsgefahr Tauschen Sie den Akku nur gegen einen Akku ERA 301B1 aus Entsorgen Sie gebrauchte Akkus nach den Angaben des Herstellers Bei unsachgemäßem Gebrauch des Akkus besteht Feuergefahr oder die Gefahr von Verätzungen Zerlegen Sie den Akku nicht erhitzen Sie ihn ni...

Page 124: ...0082 1 97 Netadapter und Lithium Ionen Akkus wurden zusammen als System geprüft und erfüllen folgende Sicherheitsstandards LVD 73 23 EWG 93 68 EWG EN60950 92 A1 93 A2 93 A3 95 A4 97 A11 97 EN60065 98 EN61558 1 97 A1 98 EN61558 2 7 97 Hinweise zur Konformität mit dem CE Zeichen EMV a Dieses Gerät entspricht der europäischen Norm EN55022 Klasse B digital für die Verwendung in folgenden Gebieten Wohn...

Page 125: ...um späteren Nachschlagen auf Kundendienst Europa Für Deutschland 49 0 69 9508 6309 Für Großbritannien 44 0 20 7365 2937 Für Frankreich 33 0 1 5569 5117 E Mail aibo sonystyle europe com 2001 Sony Corporation Die Reproduktion ganz oder auszugsweise ist ohne schriftliche Genehmigung untersagt Alle Rechte vorbehalten ...

Page 126: ...lieferten Zubehörs 13 Bezeichnung der Teile 14 AIBOs Äußeres 14 AIBOs Innenleben 16 Ständer 18 Laden des Akkus Einlegen des Akkus 20 Laden des Akkus 22 Spielen mit AIBO Einsetzen und Entnehmen des Memory Stick 28 Einsetzen eines Memory Stick 28 Entnehmen des Memory Stick 30 Starten von AIBO 31 ...

Page 127: ...tere Information Hinweise zum Umgang mit AIBO 40 Umgang mit AIBO 40 Feuchtigkeitskondensation 41 Umgang mit dem Netzadapter 42 Umgang mit dem Akku 42 Reinigung 42 Störungssuche 43 Klinikmodus 43 AIBO in den Klinikmodus schalten 43 Checkliste für den Klinikmodus 44 Fehlersuchtabelle 47 Technische Daten 51 Index 54 ...

Page 128: ...8 ...

Page 129: ...9 AIBO stellt sich vor AIBO stellt sich vor Dieses Kapitel gibt eine Einführung zum Spielroboter AIBO ERS 311 312 ...

Page 130: ...lig neue Spiel und Unterhaltungsmöglichkeiten Der Name AIBO wurde aus den Begriffen AI Artificial Intelligence Künstliche Intelligenz dem englischen Eye Auge ausgesprochen wie Ai und dem BO von RoBOter gebildet Außerdem bedeutet das Wort Aibo im Japanischen Freund oder Partner Die aktuellsten Informationen zu AIBO finden Sie auf der folgenden Website http www aibo com ...

Page 131: ...R ist eine Standardschnittstelle für das Spielrobotersystem das Sony aktiv unterstützt Ziel dieser Schnittstelle ist es die Funktionen und Merkmale von Spielrobotern mit Hilfe einer flexiblen Kombination von Hardware und austauschbarer Software für unterschiedliche Anwendungsmöglichkeiten zu erweitern AIBO ERS 311 312 entspricht OPEN R Version 1 1 1 AIBO das AIBO Logo OPEN R und das OPEN R Logo si...

Page 132: ...hne Geist Memory Sticks mit AIBO ware enthalten Applikationsprogramme und wurden speziell für AIBO konzipiert Vergewissern Sie sich vor dem Kauf eines Memory Sticks dass die enthaltene AIBO ware für Ihr spezielles AIBO Modell geeignet ist AIBO Memory Stick mit AIBO ware nicht mitgeliefert Sie haben die Auswahl aus unterschiedlicher AIBO ware darunter Programme zum Großziehen von AIBO oder Software...

Page 133: ...etzadapter ERA 201P1 1 xAdapterstecker für den Netzadapter 1 xLithium Ionen Akku ERA 301B1 1 xStänder 1 xRosaroter Ball 1 xDokumentation Bedienungsanleitung zu AIBO Glückwunsch dem stolzen Besitzer des neuen AIBO Halten Sie Karten mit Magnetstreifen und sonstige magnetischen Speichermedien vom Adapterstecker fern Andernfalls kann der Magnet im Stecker gespeicherte Daten löschen ...

Page 134: ...Os Gelenken oder anderen beweglichen Teilen an und führen Sie auch keine Fremdkörper ein Wenn Sie AIBO anheben fassen Sie ihn stets um den Körper Seite 31 und nicht etwa an Kopf Halsband Beinen oder Schwanz Der graue Bereich zwischen AIBOs Kinn und Halsband ist kein Schalter Stecken Sie hier keine Finger ein Sie könnten sich verklemmen und AIBO beschädigen ...

Page 135: ... zu erkennen 7 Lautsprecher Erzeugt Tonkombinationen und Toneffekte 8 Pfotenschalter Diese befinden sich an der Unterseite aller vier Pfoten 9 Rückenlampe Leuchtet grün wenn AIBO aktiv ist Blinkt grün wenn AIBO sich auf den Pausemodus vorbereitet Leuchtet orangerot wenn der Akku in AIBO geladen wird Blinkt orangerot wenn während des Ladens ein Fehler auftritt Erlischt wenn sich AIBO im Pausemodus ...

Page 136: ...O mit geöffneter Bauchklappe Hinweis Berühren Sie den Ladekontakt nicht mit der Hand Ein verschmutzter Kontakt kann zu einer Beeinträchtigung der Verbindung führen Verschlussklappe für Ladekontakt Serien nummer Aufkleber im Innern des Akkufachs ...

Page 137: ...y Stick zu entnehmen wenn diese Anzeige leuchtet 4 RESERVED Schalter Dieser Schalter ist für künftige Funktionen reserviert 5 Akkuriegel BATT Z Zum Entnehmen des Akkus klappen Sie diesen Riegel in Schwanzrichtung 6 Einschub für Memory Stick Setzen Sie hier den Memory Stick mit AIBO ware nicht mitgeliefert ein 7 Akkufach Setzen Sie hier den mitgelieferten oder einen zusätzlich erhältlichen Lithium ...

Page 138: ...enn er sich im Pausemodus befindet oder sein Akku aufgeladen wird 2 Dekorationsscheibe Entfernen Sie diese Scheibe wenn Sie die Energiestation am Ständer anbringen Hinweis Der mitgelieferte Ständer eignet sich ausschließlich für den AIBO ERS 311 312 ...

Page 139: ...19 Laden des Akkus Laden des Akkus Dieser Abschnitt beschreibt die Bedienungsanleitung zum Laden des Akkus in AIBO ...

Page 140: ...in Richtung von AIBOs Schwanz drücken Hinweise Wenn Sie AIBO anheben fassen Sie ihn stets um den Körper und nicht etwa an Kopf Halsband Beinen oder Schwanz Achten Sie darauf die Finger nicht zwischen AIBOs Halsband und Kopf oder Körper einzuklemmen AIBOs Außenflächen sind relativ glatt Vermeiden Sie dass AIBO nicht versehentlich aus den Händen rutscht Berühren Sie den Ladekontakt nicht mit der Han...

Page 141: ...21 Laden des Akkus 2 Legen Sie den mitgelieferten Akku in Pfeilrichtung bis zum Einrasten ein und schließen Sie wieder die Bauchklappe Einzelheiten zum Entnehmen des Akkus siehe Seite 36 Hier drücken ...

Page 142: ...tgelieferten Netzadapter und den Adapterstecker wenn der Akku in AIBO eingelegt ist Sorgen Sie für Zimmertemperatur 10 C bis 30 C Die Ladedauer beträgt ca 2 Stunden 1 Bringen Sie den Adapterstecker sicher am Netzadapter an Adapterstecker Netzadapter ...

Page 143: ...rd mit Magnetkraft gesichert Hinweis Zum Anbringen des Adaptersteckers die Bauchklappe nicht entfernen Andernfalls ist eine korrekte Verbindung von Stecker und Ladekontakt nicht gewährleistet 3 Mit angebrachtem Adapterstecker setzen Sie AIBO nun wie gezeigt auf den Ständer Führen Sie das Netzkabel sauber durch die Einsparung an der Rückseite des Ständers ...

Page 144: ...teckdose an Solange AIBO an den Netzadapter angeschlossen ist kann er selbst durch Drücken der Pausetaste nicht aktiviert werden Während des Ladens Die Rückenlampe leuchtet orangerot Nach Ende des Ladevorgangs Die Rückenlampe erlischt Rückenlampe ...

Page 145: ...ich AIBO im aktiven Modus befindet wechselt AIBO automatisch auf Pausemodus und das Laden des Akkus beginnt Zum Trennen des Adaptersteckers von AIBO greifen Sie den Stecker sicher und ziehen ihn ab Schließen Sie nach dem Abziehen des Adaptersteckers wieder die Verschlussklappe des Ladekontakts xEnergiestationskern ERA 301P2 Sonderzubehör Wenn dieser Stationskern am Ständer angebracht wird können S...

Page 146: ...26 ...

Page 147: ...eitungen und Prozeduren zum Spielen mit AIBO Hierzu gehören das Einlegen des Memory Sticks mit AIBO ware das Einstellen der Lautstärke und das Auswechseln des Akkus Denken Sie bitte daran dass zum Spielen mit AIBO ein Memory Stick mit AIBO ware Sonderzubehör erforderlich ist ...

Page 148: ... eingelegten Memory Stick starten schaltet er in den Klinikmodus in welchem sich alle seine Sensoren und weitere Teile einer Untersuchung unterworfen lassen Seite 43 Einsetzen eines Memory Stick Sorgen Sie dafür dass sich AIBO im Pausemodus befindet bevor Sie einen Memory Stick einsetzen Im Pausemodus ist die Rückenlampe erloschen 1 Fassen Sie AIBO um den Körper und drehen Sie ihn auf den Rücken E...

Page 149: ...ativ glatt Vermeiden Sie dass AIBO nicht versehentlich aus den Händen rutscht Berühren Sie den Ladekontakt nicht mit der Hand Ein verschmutzter Kontakt kann zu einer Beeinträchtigung der Verbindung führen 2 Setzen Sie den Memory Stick ein und schließen Sie die Bauchklappe Setzen Sie den Memory Stick wie gezeigt mit der Pfeilmarke nach unten und der abgerundeten Ecke zum Schwanz hin weisend bis zum...

Page 150: ...e und vergewissern Sie sich dass die Memory Stick Anzeige erloschen ist Drücken Sie Freigabetaste Z in AIBOs Innenleben und entnehmen Sie den Memory Stick Hinweis Bei rot leuchtender Memory Stick Anzeige ist die Freigabetaste gesperrt Versuchen Sie nicht den Memory Stick gewaltsam zu entnehmen Memory Stick Anzeige ...

Page 151: ...e Fläche vorzugsweise einen kurzhaarigen Teppichboden Hinweise Rutschige Böden oder Langhaarteppiche führen dazu dass AIBO hinfällt nicht vorwärts kommt oder sich verheddert AIBO unbedingt wie oben gezeigt auf den Boden setzen Andernfalls sind unvorhersehbare Bewegungen möglich wenn Sie AIBO mit der Pausetaste starten ...

Page 152: ...iner kurzen Weile beginnt AIBO sich zu bewegen und zwar gemäß dem Programm der AIBO ware im Memory Stick Hinweis Wenn ein Fehler auftriff oder Sie Ihre Finger in seinen Gelenken einklemmen drücken Sie die Pausetaste auf seinem Rücken Für Einzelheiten zum Spielen mit AIBO Machen Sie sich bitte mit der Gebrauchsanleitung der AIBO ware vertraut ...

Page 153: ...IBOs Rücken Die Rückenlampe blinkt grün und erlischt dann Setzen Sie AIBO auf den mitgelieferten Stand Hinweise Bevor Sie AIBO auf den Ständer setzen vergewissern Sie sich bitte dass er sich im Pausemodus befindet Wenn Sie AIBO im aktiven Modus auf den Ständer setzen kann er sich bewegen fallen und sich verletzen Der Akku wird nicht geladen wenn Sie AIBO ohne vorheriges Drücken der Pausetaste auf ...

Page 154: ...ierung in Richtung von AIBOs Schwanz drücken Hinweise Wenn Sie AIBO anheben fassen Sie ihn stets um den Körper und nicht etwa an Kopf Halsband Beinen oder Schwanz Achten Sie darauf die Finger nicht zwischen AIBOs Halsband und Kopf oder Körper einzuklemmen AIBOs Außenflächen sind relativ glatt Vermeiden Sie dass AIBO nicht versehentlich aus den Händen rutscht Berühren Sie den Ladekontakt nicht mit ...

Page 155: ...wieder an Zum Erhöhen der Lautstärke schieben Sie den Regler in Plusrichtung zum Verringern in Minusrichtung Bei Loslassen des Reglers kehrt er in Mittelstellung zurück Es stehen vier Lautstärkestufen zur Verfügung einschließlich Stummschaltung Bei jedem Schieben des Reglers wird der Pegel um eine Stufe erhöht bzw verringert ...

Page 156: ...tauschen Hinweis Verwenden Sie ausschließlich den mitgelieferten Akku des Typs ERA 301B1 1 Drücken Sie die Pausetaste und warten Sie bis die Rückenlampe erlischt Hinweis Wenn AIBO auf die AIBO ware im Memory Stick zugreift leuchtet die Memory Stick Anzeige rot In einem solchen Fall sind die Freigabetaste Z und der Akkuriegel BATT Z gesperrt Versuchen Sie nicht den Akku zu entnehmen wenn diese Anze...

Page 157: ...an Kopf Halsband Beinen oder Schwanz Achten Sie darauf die Finger nicht zwischen AIBOs Halsband und Kopf oder Körper einzuklemmen AIBOs Außenflächen sind relativ glatt Vermeiden Sie dass AIBO nicht versehentlich aus den Händen rutscht Berühren Sie den Ladekontakt nicht mit der Hand Ein verschmutzter Kontakt kann zu einer Beeinträchtigung der Verbindung führen 3 Klappen Sie den Akkuriegel BATT Z in...

Page 158: ... gewaltsam versuchen den Akku zu entnehmen kann AIBO beschädigt werden 4 Setzen Sie den frischen Akku in Pfeilrichtung bis zum Einrasten ein und schließen Sie wieder die Bauchklappe 5 Setzen Sie AIBO wie gezeigt auf den Boden Hinweis Setzen Sie AIBO unbedingt wie gezeigt auf den Boden Andernfalls sind unvorhersehbare Bewegungen möglich wenn Sie AIBO mit der Pausetaste starten Hier drücken ...

Page 159: ...39 Weitere Information Weitere Information Dieses Kapitel enthält Hinweise zum Umgang mit AIBO Hinweise zur Störungsbehebung und andere Information zu AIBO ...

Page 160: ...rbindung führen Wenn Sie AIBO anheben fassen Sie ihn stets um den Körper und nicht etwa an Kopf Halsband Beinen oder Schwanz Schwingen oder verdrehen Sie AIBO nicht Schützen Sie AIBO vor hohen Temperaturen wie sie z B in einem in der Sonne geparkten Fahrzeug entstehen können Andernfalls könnte AIBO sich verformen oder anderweitig beschädigt werden Achten Sie darauf dass keine Fremdkörper z B Bürok...

Page 161: ...hwertig gepolsterten Karton damit es nicht zu Beschädigungen an Körper Kopf Schwanz oder Beinen kommt Schützen Sie AIBO vor starken elektromagnetischen Wellen oder Röntgenstrahlen Halten Sie Karten mit Magnetstreifen und sonstige magnetische Speichermedien vom Adapterstecker fern Andernfalls kann der Magnet im Stecker gespeicherte Daten löschen Die AIBO ware Anwendungen für den ERS 110 111 können ...

Page 162: ...g auftreten können Schützen Sie die Kontakte vor Fremdkörpern wie Staub oder Sand Wenn Sie längere Zeit nicht mit AIBO spielen nehmen Sie den Akku heraus und bewahren ihn kühl und trocken auf Der Akku entlädt sich auch bei Nichtbenutzung Laden Sie den Akku vor dem Spielen stets vollständig auf Lassen Sie den Akku nicht fallen und stellen Sie keine schweren Gegenstände darauf Drücken Sie nicht zu f...

Page 163: ...chaltet AIBO in den Klinikmodus in dem sich alle Sensoren und anderen Teile ausgiebig prüfen lassen Die Modusanzeige bleibt dabei ausgeschaltet Kontaktieren Sie die AIBO Kundendienst Hotline Seite 5 wenn sich ein Problem nicht beheben läßt AIBO in den Klinikmodus schalten 1 Entnehmen Sie den Memory Stick mit AIBO ware aus dem AIBO Seite 28 2 Setzen Sie AIBO wie gezeigt auf den Boden und drücken Si...

Page 164: ...wärts tritt mit rechtem Hinterbein tritt mit linkem Hinterbein Während dieser Zeit leuchtet AIBOs Hörnchenlampe in drei Farben Anschließend führt AIBO wieder die Grundbewegungen aus Aufstehen Hinsetzen Hinlegen 2 Drücken Sie den Schalter am Schwanz 3 Sekunden lang nach links AIBO führt die folgenden Bewegungen der Reihe nach aus setzt sich hin winkt mit der rechten Pfote winkt mit der linken Pfote...

Page 165: ...ehrichtung ist egal Sensitivität von AIBOs Kopfsensor 1 Drücken Sie sanft den Kopf so dass AIBO nach unten schaut Die Hörnchenlampe leuchtet grün 2 Drücken Sie sanft den Kopf so dass AIBO nach oben schaut Die Hörnchenlampe leuchtet orangerot Sensitivität der Farbkamera 1 Bringen Sie den rosaroten Ball nahe an die Farbkamera AIBOs Maul Wenn die Kamera den Ball erkennt leuchtet die Hörnchenlampe bla...

Page 166: ... Sie in einem solchen Fall den Abstand zwischen Objekt und Sensor 3 Drehen Sie den Schalter am Schwanz erneut AIBO führt wieder die Grundbewegungen aus Aufstehen Hinsetzen Hinlegen Aufhebemodus 1 Nehmen Sie AIBO vom Boden auf AIBO stoppt jede Bewegung seine Beine werden locker und die Modusanzeige leuchtet auf Wenn Sie AIBO zu langsam aufheben bleiben seine Beine starr Halten Sie AIBO in einem sol...

Page 167: ...n und drücken Sie den Schalter am Schwanz 3 Sekunden lang in Richtung AIBOs Kopf AIBO bewegt sich nicht sobald er aufgehoben wird Modusanzeige leuchtet oder ein Fremdkörper in die Gelenke gerät Modusanzeige blinkt Akku erschöpft c Laden Sie den Akku Seite 22 Bei vollständig erschöpftem Akku erlischt die Rückenlampe und AIBO bewegt sich nicht mehr AIBO hat ein Ohr verloren c Richten Sie die Mitte v...

Page 168: ...n Sie den Netzadapter und drücken Sie die Pausetaste erneut Bei Drücken der Pausetaste blinkt die Rückenlampe abwechselnd orangerot und grün gefolgt von einem Signalton Der Akku ist zu heiß geworden c Lassen Sie den Akku abkühlen AIBO singt eine traurige Melodie und bewegt sich nicht wenn Sie die Pausetaste freigeben Ein Memory Stick ohne AIBO ware ist eingelegt Ein Memory Stick der sich nicht für...

Page 169: ...ich dass die Modusanzeige leuchtet setzen Sie AIBO auf den Boden und drücken Sie den Schalter am Schwanz 3 Sekunden lang in Richtung AIBOs Kopf Die Modusanzeige leuchtet oder blinkt und AIBO gibt Tonfolgen von sich aber er läuft nicht AIBO bewegt sich nicht wenn er aufgehoben wird oder Fremdkörper seine Gelenke versperren c Setzen Sie AIBO auf den Boden und drücken Sie den Schalter am Schwanz 3 Se...

Page 170: ...Seite 36 Setzen Sie den Akku wieder ein und drücken Sie die Pausetaste nochmals Seite 33 Wenn sich der Akku nicht über den Akkulösehebel BATT Z auswerfen lässt führen Sie einen spitzen Gegenstand in die Notfriegabe ein Seite 17 AIBO bittet trotz voll aufgeladenem Akku bereits nach kurzer Zeit um Aufladung Wenn die Betriebsdauer des Akkus sehr kurz wird hat der Akku in der Regel das Ende seiner Nut...

Page 171: ...0 000 Pixel Audioeingang Stereomikrofone Audioausgang Lautsprecher Interne Sensoren Infrarot Distanzsensor Beschleunigungssensor Drucksensoren in Kopf Schwanz und Pfoten Neigungssensor Vibrationssensor Leistungsaufnahme ca 5 W im normalen Modus Betriebsdauer ca 2 5 Stunden bei vollständig geladenem Akku ERA 301B1 im normalen Modus Abmessungen ca 177 280 240 mm B H T Gewicht ca 1 5 kg einschl Akku ...

Page 172: ...annung 16 V Gleichstrom 2 5 A Betriebstemperatur 5 C bis 35 C Temperaturschwankungen unter 10 C Stunde Luftfeuchtigkeit bei Betrieb 20 bis 80 nicht kondensierend Bei einer Temperatur von 35 C muss die Luftfeuchtigkeit unter 65 liegen Feuchtkugeltemperatur unter 29 C Lagertemperatur 20 C bis 60 C Temperaturschwankungen unter 10 C Stunde Luftfeuchtigkeit bei Lagerung 10 bis 90 nicht kondensierend Ab...

Page 173: ...it bei Betrieb 10 bis 80 nicht kondensierend Feuchtkugeltemperatur bei Betrieb unter 29 C Lagertemperatur 20 C bis 60 C Temperaturschwankungen unter 10 C Stunde Luftfeuchtigkeit bei Lagerung 10 bis 90 nicht kondensierend Feuchtkugeltemperatur bei Lagerung unter 35 C Abmessungen ca 72 53 6 21 mm B H T Gewicht ca 112 g Änderungen die dem technischen Fortschritt dienen bleiben vorbehalten Mitgeliefer...

Page 174: ...0 Einschub 17 Laden 22 Umgang 42 Akkuriegel BATT Z 17 37 D Dekorationsscheibe 18 Distanzsensor 15 E Energiestationkern 25 F Farbkamera 15 H Hörnchenlampe 15 K Klinikmodus 43 Kopf 15 Kopfsensor 44 L Ladekontakt 17 23 Lautsprecher 15 Lautstärke 34 Lautstärkeregler 17 35 M Memory Stick Anzeige 17 30 Einschub 17 Einsetzen 28 Entnehmen 30 Freigabetaste Z 17 30 Modusanzeige 15 ...

Page 175: ...rmation N Notfreigabe 17 Netzteil 13 22 P Pausetaste 15 32 33 Pausemodus 28 32 34 Pfotenschalter 15 R Rückenlampe 15 24 S Schalter am Schwanz 15 Ständer 13 18 Stereomikrofon 15 V Verschlussklappe für Ladekontakt 16 23 ...

Page 176: ......

Page 177: ......

Page 178: ......

Page 179: ...es années 1980 Il a produit des travaux de pointe très originaux au Japon et à l étranger dans une grande variété de domaines incluant les pochettes CD les magazines musicaux la publicité la conception de produits la conception d emballages et la production de vidéo musicales Il a publié des collections incluant Moshino s Works for Girls Studio Kawade Shobo Katsura Moshino Künstler Illustrator Vis...

Page 180: ...Entertainment Robot AIBO ERS 311 312 English Français Deutsch 2001 Sony Corporation Operating Instructions 4 657 307 11 1 Printed in Japan 4 6 5 7 3 0 7 1 1 1 ...

Reviews: