


Summary of Contents for FD TRINITON VEGA KV-20FS120
Page 2: ...User Guide KV 20FS120 KV 24FS120 4 101 452 22 1 ...
Page 6: ......
Page 8: ...User Guide KV 20FS120 KV 24FS120 4 101 452 22 1 ...
Page 12: ...KV 20FS120 KV 24FS120 4 101 452 22 1 ...
Page 26: ......
Page 40: ......
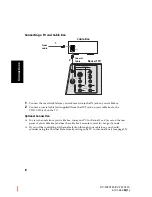
Page 46: ......
Page 47: ......