16
GB
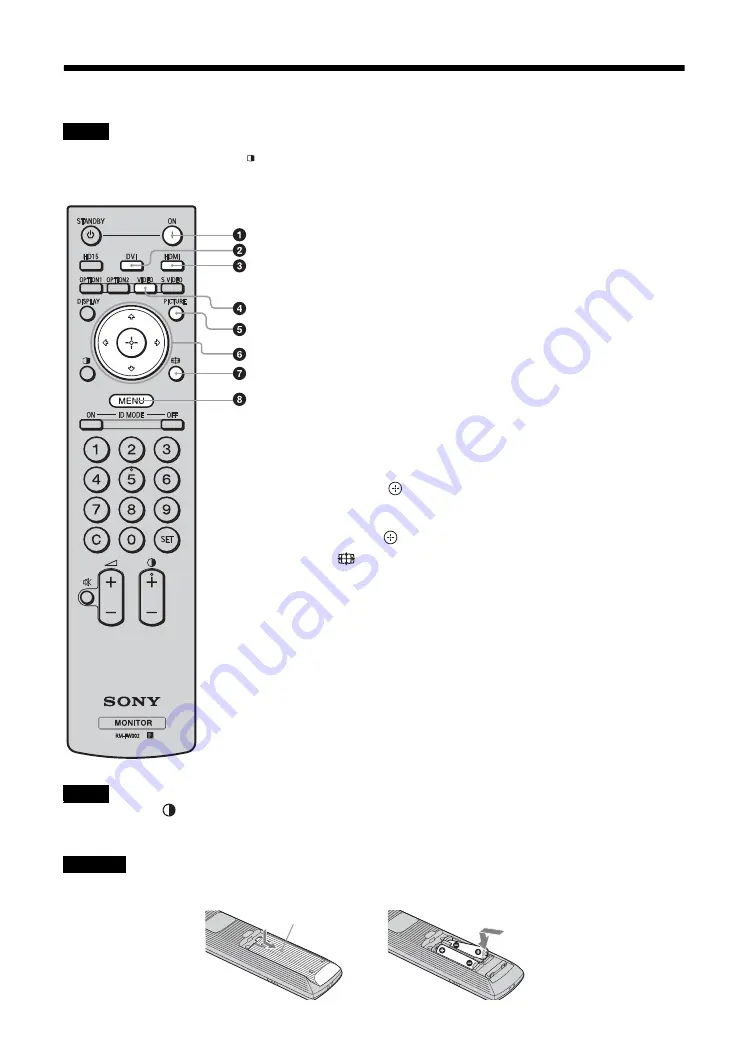
Remote Control
You cannot use the S VIDEO button, button, the OPTION1 button and the OPTION2 button on this display.
Button Description
• The 5 button and
button have a tactile dot. Use the tactile dot as a reference when operating the display.
• Insert two size AA (R6) batteries (supplied) by matching the
3
and
#
on the batteries to the diagram inside the remote control’s
battery compartment.
Danger of explosion if battery is incorrectly replaced. Replace only with the same or equivalent type recommended by the
manufacturer. When you dispose of the battery, you must obey the law in the relative area or country.
Note
1
ON (power-on) button
Press to turn the display on.
Operate when the main power switch on the rear of the display is
“ON.”
2
DVI button
Press to select the signal input to the DVI port.
3
HDMI button
Press to select the signal input to the HDMI IN connector from a
piece of video equipment.
4
VIDEO button
Press to switch between the input signals from VIDEO IN and
COMPONENT IN
5
PICTURE button
Selects “Picture Mode”. Each press toggles between “Vivid”,
“Standard”, “Custom”, and “Conference”.
6
F
/
f
/
G
/
g
/
buttons
Press the
F
/
f
/
G
/
g
buttons to move the selected menu item and set
the values.
Pressing
sets the selected menu or setting items.
7
button
Press to change the aspect ratio (page 18).
8
MENU button
Press to show the menu on the screen. Press again to hide the menu
(page 22).
Notes
Caution
,
Push and slide to open
Summary of Contents for FWD-32B1
Page 13: ...13JP JP 後面 FWD 55B2 46B2 42B2 FWD 32B1 2 ...
Page 47: ......
Page 53: ...7GB GB ...
Page 57: ...11GB GB Rear FWD 55B2 46B2 42B2 FWD 32B1 2 ...
Page 97: ...9FR FR Arrière FWD 55B2 46B2 42B2 FWD 32B1 2 ...
Page 137: ...9DE DE Rückseite FWD 55B2 46B2 42B2 FWD 32B1 2 ...
Page 177: ...9ES ES Parte posterior FWD 55B2 46B2 42B2 FWD 32B1 2 ...
Page 217: ...9 IT IT Parte posteriore FWD 55B2 46B2 42B2 FWD 32B1 2 ...
Page 253: ...5CS CS ...


