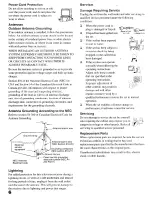
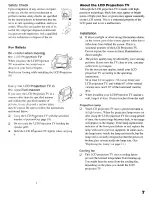
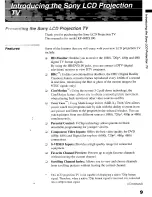
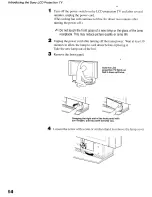
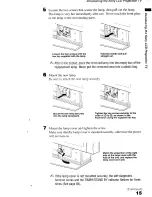
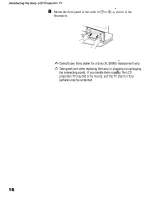
background image

Summary of Contents for GRAND WEGA KF 60DX100

Page 1: ......

Page 2: ...ing and in particular specifies that the cable ground shall be connected to the grounding system of the building as close to the point of cable entry aspractical Use of this television receiver for other than private viewing of programs broadcaston UHF VHF transmitted by cable companies or satellite for the useof the generalpublic may require authorization from the broadcaster cablecompany and or ...

Page 3: ...nto direct illumination 05direct sunlight It is recommended to us pot lighting directed down from the ceiling or to cover the windows that face the screenwith opaque drapery It is desirable to install the LCD Projection TV in a room where the floor and walls are not of a reflective material Sony Corporation has determined p gjzi ENERGY STAR is a U S registered mark TruSurround and the 0 symbol are...

Page 4: ...s not operate normally or has been dropped 15 Apparatus shall not be exposed to dripping or splashing and no objects filled with liquids such as vases shall be placed on the apparatus For your protection pleaseread theseinstructions completely and keep this manual for future reference Carefully observe and comply with all warnings cautions and instructions placed on the set or described in the ope...

Page 5: ...sthinner or benzine for cleaning If the picture becomesdark after using the LCD Projection TV for a long period of time it may be necessaryto clean the inside of the LCD Projection TV Consult qualified service personnel Do not use power line operated sets near water for example near a bathtub washbowl kitchen sink or laundry tub in a wet basement or near a swimming pool etc Do not place the set on...

Page 6: ...g electrode system NEC Art 250 Part H Lightning For added protection for this television receiver during a lightning storm or when it is left unattended and unused for long periods of time unplug it from the wall outlet and disconnect the antenna This will prevent damage to the receiver due to lightning and power line surges 6 e i i ervic Unplug the set from the wall outlet and refer servicing to ...

Page 7: ... illumination shines on the screen part of the screenappearswhite due to reflections from behind the screen This is a structural property of the LCD Projection TV Do not expose the screento direct illumination or direct sunlight Cl The picture quality may be affected by your viewing position If you view the TV close to you you may suffer from eye fatigue For the best picture quality install your L...

Page 8: ...ctions Connecting Cable TV or Antenna 25 Connecting a VCR and Cable 29 Connecting a VCR and Cable Box 30 Connecting Two VCRs for Tape Editing 32 Connecting a Satellite Receiver 33 Connecting a Satellite Receiver with a VCR 3 4 Connecting an Audio Receiver 35 Connecting a DVD Player with Component Video Connectors 36 Connecting a DVD Player with A V Connectors 37 Connecting a Digital TV Receiver 38...

Page 9: ...ilm Twin ViewTM Using Multi Image Driver MID X Twin View allows you to watch two programs side by side with the ability to zoom in on one picture and listen to the program in the selectedwindow You can watch pictures from two different sources 108Oi 72Op 480 or 480i simultaneously Parental Control V Chip technology allows parentsto block unsuitable programming for younger viewers Component Video I...

Page 10: ...stalling and Connecting the LCD Projection TV This section guides you through your initial setup It shows you how to install your LCD projection TV to connect your new components and to connect the antennaand cable 2 Using the Features This section shows you how to begin using your new LCD projection TV It also shows you how to useyour remote control functions 3 Using the menus This section teache...

Page 11: ...magethe finishing Your LCD projection TV usesaprojection lamp asits light source Note the following U After turning on your LCD projection TV it may take awhile before the normal screenappears 1 minute or less I 3 When the projection lamp wears out the screenimage becomesdark Replacethe lamp with a new Sony XL 2000U replacementlamp not supplied n Besureto attachthelampcoversecurely otherwise your ...

Page 12: ...e LJtx dfor a mq p i r i 0 Turn off the main power of your LCD projection 7 before going to sleepor going out chap 0 Be sure to turn off the power switch on the main unit or on the remote control After turning off the power the fan will continue to blow for about two minutes Be sureto wait for severalminutes after turning the power off when unplugging from the outlet or switching the breaker off U...

Page 13: ...placing the lamp let it cool down completely asthe surfaceof the lamp remains extremely hot for at least 30 minutes after the power hasbeenturned off Do not leave the removed lamp nearflammable materials or within the reachof children Do not pour water onto the removed lamp or put any object inside the lamp Doing so may causethe lamp to burst Do not put flammable materials and metal objects inside...

Page 14: ...the lamp receptacle Thismayreducepicturequalityor lamplife 2Ul h np ug t epower cord after turning off the main power Wait at least30 minutes to allow the lamp to cool down before replacing it Take the new lamp out of the box 3 Remove the front panel Hold the LCD projection TV fiamly so that it does noFrnove Grasping the right end of the front panel with your fingers pull the panel towards you 4L ...

Page 15: ...sticbag 2 6 Mount the new lamp Be sureto attach the new lamp securely Mount the new lamp securely into the lamp receptacle Tighten the two screws securely in the order of 0 to 0 as shown in the illustration using the supplied hex key 7 Mount the lamp cover and tighten the screw Make surethat the lamp cover is mounted securely otherwise the power will not turn on Match the projection of the right s...

Page 16: ...to 0 as shown in the illustration 18 Consultyour Sonydealerfor aSonyXL 2000Urkplacement lamp n Takegreatcarewhenreplacingthelampor pluggingin unplugging theconnectingcords If you handlethemroug ly the LCD projectionTVmayfall or bemoved andtheTVstandor floor surfacesmaybescratched 16 ...

Page 17: ...p properly s 2 8 4 f i s Insert two size AA batteries supplied by matching the and on the batteries to the diagram inside the battery compartment 6 h Remove the batteriesto avoiddamagefrom possiblebatteryleakage wheneveryouanticipatethatthe remotecontrolwill not beusedfor an extendedperiod 6 Handlethe remotecontrolwith care Avoiddroppingit gettingit wet or placingit in directsunlight neara heater ...

Page 18: ...talor the front panel of the LCD projection TV otherwise these parts might break off When moving the LCD projection TV support the screenbottom with one hand while grasping the top part with the other hand asshown in the illustration below Do not grasp the pedestal or the front panel of the LCD projecttion TV _ c 18 ...

Page 19: ...Mount the two brackets with the screws supplied to the upper rear 3 sidesof the LCD projection TV left and right sides 2 3 Passa strong cord or chain not supplied through eachbracket andthen secure it to a wall or a pillar etc 2 r ii _ _ r the Lx roje j r TV a with support belts 0 You can also usethe LCD projection TV standSU 60DX not supplied with support belts Keep your LCD projection TV at leas...

Page 20: ...tpicture quality install your LCD projection TV within the areas shown below Sit at least 2 2 m approx 7 ft away from your LCD projection TV and within 60 of the vertical viewing area and 130 of the horizontal viewing area c li zxszs Horizontal Viewing Area Vertical Viewing Area 20 ...

Page 21: ...h quality video cable for enhancedpicture quality Align guides and push into s b CD connection e m Push into connection Video Yellow Audio Left White Audio Right Red SomeDVD Players areequipped with the following three video connectors Y Green PB CB Chor B Y Blue PR CR Cl or R Y Red T c fable CONTROL S connections areexclusive to Sony products and allow greater control of all Sony equipment m 8 Pu...

Page 22: ...ols allow accessto the on screenmenus without the useof a remote control Pressing MENU brings up the on screenmenus The arrow buttons move the on screencursor in the menus and by pressing the Select button i selectsthe menu item TVNIDEO VOLUME CHANNEL c 0 ...

Page 23: ...LCD Projection TV Rear and Side Panel Connectors on ec j the LGD Projection TV Rear of LCD projection TV Left side of LCD projection TV VIDEO 2 IN s I q Continued 23 ...

Page 24: ...other S VIDEO equipped video component Provides better picture quality than the VHF UHFUjacks or the Video IN jack n Connects to the audio and video OUT jacks on your VCR or other video component A fourth video input VIDEO 2 is located on the side panel of the LCD projection TV Connects to your DVD player s or Digital Set top box s component video Y PB PR and audio L R jacks Connects to an AV rece...

Page 25: ...ion TV VHF UHF 3 300 ohm twin lead cable d Rear of LCD projection TV 75 ohm co Rear of LCD projection TV HI U V Splitter VHF UHF 300 ohm twin lead Q not supplied 3 car En It is stronglyrecommended to connecttheantennausinga75 ohm coaxialcableto getoptimumpicturequality A300 ohmtwin leadcable canbeeasilyaffectedby radionoiseandthelike resultingin signal deterioration If you usea 300 ohmtwin leadcab...

Page 26: ... Use the LCD projection TV remote control to changechannels using your cable box when the signal is scrambled 0 Use the LCD projection TV remote control to changechannels using your LCD projection TV when the signal is not scrambled Your LCD projection TV s tuner provides a better signal than the cable box Cl Use the Twin View feature When all channelsarerouted through your cable box only one chan...

Page 27: ...tion TV s AUX jack Cable box Rear of LCD projection TV AUX 75 ohm coaxial cable not supplied CATV cable unscrambled channels VHF UHF 6 PressingANTonthe remotecontrolswitchesbetween thechannels cominginthroughthecablebox scrambled andthosecomingdirectly to theTV unscrambled 27 ...

Page 28: ... your cable service to the cable box s IN jack Using a coaxial cable connect the cable box s OUT jack to the LCD projection TV s VHF UHF jack I I Cable box Also setCable to ON in the Channel menu seepage62 kYourSonyremotecontrolcanbeprogrammed to operateyourcablebox see Programmingthe RemoteControl on page77 kTochangechannelsusingthecablebox setyour LCDprojectionTVto channel3 or 4 dependingontheca...

Page 29: ...al cable connect the VCR s OUT jack to the LCD 3 projection TV s VHF UHF jack 3 Using AUDIO and S VIDEO cables connect the VCR s Audio and 5 S Video OUT jacks to the LCD projection TV s AUDIO and S VIDEO 3 p IN jacks Lb Rear of LCD projection TV 1 2 Coaxial cable S VIDFO VMC 810W820S not supplied Cable YC 15V 3OV inot supplied d 6 If yourVCRis notequippedwith SVIDEO useaVIDEO cable yellow insteado...

Page 30: ...the LCD proj tion TV so you cannot usethe Twin View feature IJjsp Jnnect all pow Sr uf e j i ie yQ g g 3 l i r 3 _ 1 Connect the Cable TV cable to the LCD projection TV s VHF UHF jack 2 Using a coaxial cable connect the LCD projection TV s TO CONVERTER jack to the cable box s IN jack The LCD projection TV s internal converter allows you to switch between unscrambled signals coming straight into th...

Page 31: ...DEO useaVIDEO cable yellow insteadof theSVIDEO cable nYouwill notbeableto changechannelsontheVCR Setyour LCD projectionTVandVCRto channel3 or 4 dependingonyourcablebox channeloutput 5 PressingANTonthe remotecontrolswitchesbetween thechannels cominginthroughthecablebox scrambled andthosecomingdirectly to the LCDoroiectionTV unscrambled ...

Page 32: ...UDIO and VIDEO IN jacks Rear of LCD projection TV VCR playback VCR recording AUDIO L white VMG81OW820S not supplied nToperformtapeediting setthe LCDprojectionTVto thevideoinput intendedfor playbackbypressingTV VIDEO onthe remotecontrol Youmayneedto changethevideoinputonyourVCR Consultyour VCR soperatingmanualfor instructions 66 If yourVCRshaveanSVIDEO jack Forbestpicturequality usean SVIDEO connec...

Page 33: ...e receiver s z AUDIO and S VIDEO OUT jacks to the LCD projection TV s AUDIO J and S VIDEO IN jacks 3 3 Connect a coaxial cable from your cable or antennato the LCD s projection TV s VHF UHF jack 3 8 6 Ifyoursatellitereceiveris notequippedwithSVIDEO useaVIDEO cable 2 yellow insteadoftheSVIDEO cable Coaxial cable Rear of LCD projection TV VIDEO yellow AUDIO L white AUDIO R red Satellite receiver VMG...

Page 34: ... 5 Using AUDIO and S VIDEO cables connect the VCR s AUDIO and S VIDEO OUT jacks to the LCD projection TV s AUDIO and S VIDEO IN jacks Rear of LCD projection TV I n Satellite antenna 1 Satellite receiver cable x not supplied 1 1 VMC f310S 820s not supplied Fi e m_ 5 VI lz AUDIO L white Coaxial cable YC 15W3OV not supplied nBesureyourVCR svideoinputissetcorrectly ConsultyourVCR s operatingmanualfor ...

Page 35: ...ing audio cables connect the LCD projection TV s AUDIO OUT VAW FIX jacks to the audio receiver s audio LINE IN jacks Rear of LCD projection TV r Y AUDIO R red RK 74A not supplied I AUDIO L white Line input s _I ...

Page 36: ...B YandR Yjacksonyour DVDplayeraresometimeslabeled Y CBandCR or Y PBandPR If so connectthecablesto likecolors 2 Using an audio cable connect the DVD player s Au o OUT jacks to the LCD projection TV s AUDIO IN jacks Be sureto usethe samerow of inputs that you usedfor the video connection tEQ DVD IN 5 or 6 If T I I T I I PR I I VMC IOHG not supplied PB Y Rear of LCD projection TV DVD player I d kD O ...

Page 37: ...DIO IN jacks s m 2 Using an S VIDEO cable connect the DVD player s S VIDEO jack the LCD projection TV s S VIDEO jack Rear of LCD projection TV Yc 15v 3ov not supplied 2 r S VIDEO DVD player t _ _ AUDIO R red AUDIO L white to I RK 74A not supplied A Totakeadvantage oftheWideScreenmodes settheTV saspectratioto 16 9onyour DVDplayer Fordetails referto theoperatinginstructions suppliedwithyour DVDplaye...

Page 38: ... and108Oiformats YoumayalsousetheSVIDEOor Composite Videoconnections however componentvideo Y PB PR will providethe bestpicturequalityfor allformattypes 2 Using an audio cable connect the Digital TV Set toAbox s Audio OUT jacks to the LCD projection TV s AUDIO IN jacks Digital TV Set top box AUDIO R red Y 2 RK 74A not supplied AUDIO L white I 661Youcannotrecordthesignalfromanyequipmentconnectedint...

Page 39: ...udio andVideo IN jacks Using AUDIO and S VIDEO cables connect the camcorder s Audio and S VIDEO OUT jacks to the LCD projection TV s AUDIO and S VIDEO IN jacks 6 If you havea monocamcorder connectits leftaudiooutputto the LCD projectionTV sAUDIOL MONO jack fi If yourcamcorderis notequippedwith SVIDEO useaVIDEOcable yellow insteadof theSVIDEOcable VIDEO 2 IN YC 15V 3OV not supplied AN output ...

Page 40: ...ction TV to MONITOR OUT on the AV receiver 4 Using an AUDIO VIDEO cable connect TV OUT on the LCD projection TV to AUDIO VIDEO 2 IN on the AV rewseiver 5 Using anAUDIO VIDEO cable connect the video equipment to the AV receiver 6 Select the Setup menu and set Video Label to Receiver to fix youi LCD projection TV s input to AV receiver see Video Label on page Rear of LCD projection TV Coaxial cable ...

Page 41: ...pment with one remote control In addition to allowing you to control multiple devices with one remote control the CONTROL S feature allows you to always point your remote control at your LCD projection TV insteadof having to point it at the other equipment which might be hidden or out of direct line of sight Rear of LCD projection TV ...

Page 42: ...yfor installationsthat usea cable boxfor allchannelselection Using Auto Setup 1 PressPOWERon the front panel of your LCD projection TV or on the remote control to turn on the LCD projection TV 2 Pressthe TV FUNCTION button on your remote cohtrol Red light will briefly appear 3 PressCH on your LCD projection TV to run AutoSetup or pressCH to exit If you usethe channel buttons on your rem e control ...

Page 43: ... UHF input and the AUX input Pressonce to display the current time and channel label if set and channel number Pressagain to turn Display off Seepage 66 for details on setting the time Pressto jump back and forth between two channels The LCD projection TV alternates between the current channel and the last channel that was selected Freezesthe window picture Pressagain to restore the picture Presst...

Page 44: ...hich device the remote control is operating Cycles through the video equipment connectedto your LCD projection TV s video inputs TV VIDEO 1 VIDEO 2 VlDEO3 VlDEO4 VlDEO5andY IDEO6 Press0 9 to select a channel the channel changesafter 2 seconds Press ENTER to select immediately Turns on off Twin View For detail see Using Twin View on page 50 Displays the program guide of your satellite Pressto displ...

Page 45: ...sed for programming the remote control to operate non Sony video equipment For details see Programming the Remote Control on page 77 Pressto turn on the DVDNCR player you have programmed into the remote control For instructions see Programming the Remote Control on page 77 Fast forward Use to switch control for connected video equipment You can program one video source for eachswitch position For ...

Page 46: ... 1 and0 The channel will changeafter 2 seconds or you can press ENTER for immediate selection E CH Pressto scanthrough the channels up or down ifl VOL Pressto adjust the volume up or down a JUMP Pressto alternateor jump back and forth betweentwo channels The LCD projection TV will jump between the current channel and the last channel selected Pressto mute the sound MUTING will appearon the screena...

Page 47: ...ITS SAP iif Pressto scroll through the Multi channel TV Sound MTS options see P MT9 on page61 s 3 v PIC MODE PressPIC MODE repeatedly to directly chooseone of four different video modes that best suits the program you are watching Vivid Select for enhancedpicture contrast and sharpness Standard Select to display a standardpicture for normal viewing environments Movie Select to smooth the outline o...

Page 48: ...isplayinganative720 format signal Therefore whenanative720 formatsignalis received it isconverted intoa480pformatsignal To view a digital TV program 1 Connect the DTV receiver to HD DVD IN 5 or 6 on the LCD projection TV for details seepage38 2 PressTV VIDEO to selectHD DVD IN 5 or 6 3 Sl e ect a digital channel on the DTV receiver For details seethe Operating Manual of the DTV receiver 4 Adjust t...

Page 49: ...ettingfor FavoriteChannelisAuto WhenFavoriteChannelis setto Auto thelasteightchannelsselected g with O 9buttonswill besetasFavoriteChannel options If youwantto 1 inputyourownselectionsasFavoriteChannel settings see Favorite t Channel on page62 8 P 1 PressFAVORITES The Favorite Channel options appear Previewwindow 2 Move thejoystick up or down to highlight the channel you want to watch The program ...

Page 50: ...cancel twin pictures 0 Press f J again or press Activating the Picture Although two pictures appearon the screenat the sametime only one picture is active Changethe picture size by using thejoystick For an active picture you can Cl Changechannels 0 Adjust the volume Cl Switch the input sourcesfrom VHF UHF to cable by pressingANT or TV VIDEO to switch the video input To activate the right picture C...

Page 51: ...sothe right picturewill bethesameastheleft picture Youcanwatcha scrambledcablechannelandanothervideo II source Besureyour DVDplayer VCRor satellitereceiverare connected to oneof theVIDEOINl 6 andAUXinputsonthe rear F of theLCDprojectionTV Picturesfrom equipmentconnected to 1 HD DVD IN5 and6 andAUXwill onlyappearintheleftpicture notinthe right t 8 JTheactivepictureis highlightedin cyan d ...

Page 52: ...2 Move the joystick up to enlarge the picture andmove thejoystick down to reducethe picture To enlarge the right picture reduce the left 1 Move thejoystick right to activate the right picture if not already activated 2 Move thejoystick up to enlarge the 1picture and move thejoystick down to reducethe picture b Whenyouadjustthetwinscreensizes theLCDprojectionTVmemorizes thechange Thenexttimeyou use...

Page 53: ...function 1 2 When the program information you want to capture is displayed press c FREEZE The LCD projection TV switches to Twin View mode and displays the 3 y frozen picture on the right while the current program continues on the 9 3 To cancel and return to normal viewing press FREEZE 6 Freeze featureis notavailableif youarealreadyin FavoriteChannel see page49 TwinViewTM seepage50 or ChannelIndex...

Page 54: ...e anddisplayed on the left in normal motion picture format The first channel is briefly displayed on the bottom right sideof the screen then frozen It scrolls up andthe next channel appearson the bottom right and the processis repeatedwith the other channels 2M h ove t ejoystick up and down so that the channel you wish to view is displayed in the cyan frame and press To return to scrolling move th...

Page 55: ...t frame press again The selectedchannel will be displayed in normal motion picture and the sound also switches to this channel 4 Press fJ The selectedchannel will be enlarged for normal viewing To cancel Scrolling Channel Index Press a again to resumenormal viewing ...

Page 56: ...he 16 9 screen keeping the original image as much aspossible Normal returns thea picture to its original size Full Mode stretchesthe 4 3 picture horizontally only to fill the 16 9 screen Zoom Mode enlargesthe 4 3 picture horizontally and vertically to an equal aspectratio that fills the 16 9 screen Useful for watching Letterbox movies m When you change channels or inputs the Screen Mode settings r...

Page 57: ...r picture settings 58 It also allows you to customize the Picture Mode basedon the type of program you are viewing Offers enhancedaudio options such aslistening to second 60 audio programming SAP or customizing the Effect of the sound on your LCD projection TV Allows you to set up a Favorite Channel list run the Auto 62 Program function and more Allows you to set the wide screen mode adjust the ve...

Page 58: ...ng options Option Description Mode Vivid Select for enhancedpicture contrast and Customized sharpness picture Standard Recommended for Normal viewing conditions viewing Movie Select for soft film like picture Mild Select to smooth the outline of digital image J You can alter the Video menu settings Picture Brightness Color etc for each Mode q To quickly and easily change from one Video Mode to ano...

Page 59: ...t Warm Select to give the white colors a red tint Obtains a smooth picture movement that approachesthe original film like quality when reproducing movies or other video sources on 24 frame per second films ON The LCD projection TV automatically detects the signal type of a film and processesit appropriately OFF Select to turn off the CineMotion mode 6 When the Video Mode is set to Mild page 58 you...

Page 60: ...enu The Audio menu includes the following options Option Description Treble Adjust to increase or decreasehigher pitched sounds Bass Adjust to increase or decreaselower pitched sounds Balance Adjust to emphasize left or right speakerbalance Steady ON Select to stabilize the volume Sound OFF Select to turn off Steady Sound Effect III Virtual Select for surround sound for stereo programs only A virt...

Page 61: ...o turn on the LCD projection TV speakers I Speaker ON OFF Select to turn off the LCD projection TV speakers g and listen to the LCD projection TV s sound only 4 through your external audio system speakers Audio Out 3 Variable The LCD projection TV s speakersare turned off L Easy control but the volume output from your audio system can 2 qf I olwne still be controlled by the LCD projection TV s E o...

Page 62: ...includes the following options Option Description FavoriteChannel Auto Manual Select if you want Favorite Channel options to be set automatically to the last eight channels selected with the O 9buttons Select if you want to input your own selections asFavorite Channel options 1 rreeyto select a favorite channel Cable ON 2 Use thejoystick to scroll through the channels until you find the channel yo...

Page 63: ...as2 6 except you select one of these settings if you have connected the device to the AUX jack seepage 24 VIDEO 1 Use when connecting a cable box TV output m should be connected through the cable box Automatically programs the LCD projection TV for all E receivable channels 2 3 Removes and adds viewable channels 0 s 1 Use thejoystick to scroll through the channels until you 3 find the channel you ...

Page 64: ...he following options i To change from one Screen Mode to another use WIDE MODE on the remote control Option Description Wide Mode Wide Zoom Selecttoenlargethe42 picture tofill the 16 9 Select n Screen screen keepingtheoriginalimageasmuchas Mode to usefor possible 4 3 sources Normal Selectto returnthe4 3pictureto normal mode Full Zoom Selectto enlargethe4 3picturehorizontally only to fill thewidesc...

Page 65: ...t to continue using the current Screen 8 Mode setting when the channel or input is changed if s q The 43 Default functions only when the LCD projectron TV receives 480i signals m If 4 3 Default is set to anything but Off the Screen Mode settrng changes only for the current channel When you change channels or inputs Screen Mode is automatically replaced with the 4 3 Default setting To retain the cu...

Page 66: ...imer 1 or Timer 2 then press 2 Use thejoystick to enter your day time and channel preferences then press to select eachone 3 PressMENU to exit the menu screen To reset the Clock or Timers 0 PressRESET on the remote control after selecting that option in the Timer menu Selecting Timer Options The Timer menu includes the following options Option Description Timer 1 Program Select to set the Timer by...

Page 67: ...ms according to their content and rating levels For details about setting see Using the Parent Menu on page 69 Caption Vision Allows you to select from three closed caption modes for programs that are broadcast with closed captioning OFF Turns off Caption Vision ccl cc2 Displays a printed version of the cc3 cc4 dialog or sound effects of a program Should be set to CC1 for most programs TEXTl TEXT2...

Page 68: ...not have a component connected to a particular set of input jacks VIDEO l 2 3 4 VHS Smm Beta LD Game SAT DVD Web Receiver DTV Skip VIDEO 5 6 DVD DTV HD kip If you select Skip your LCD projection TV skips this connection when you pressTV VIDEO n When you select Receiver on Videoaabel your LCD projection TV s input is fixed for VIDEO1 only Select to display all on screen menus in your language of ch...

Page 69: ...notfunctionwhenParental Lockisactivated To select the rating 1 PressMENU 2 Move thejoystick to the Setup icon andpress 3 Make surethat Parental Control is selected andpress 4 Use the O 9buttons on the remote control to enter your four digit password 5 Confirm your password by entering it again Your password is stored and the Parentmenu options appear nYouneedthepasswordenteredherefor anyfutureacce...

Page 70: ...ejoystick down to select Parental Lock and press I Move thejoystick up or down to selecta desired rating and press If you selectChild Youth Young Adult or Custom the ParentalControl is activated automatically If you want to selectthe ratings from Custom see Using Custom Rating Options on page72 10 PressMENU to exit the menu screen ...

Page 71: ...anst Maximum ratings permitted are Lt US TV 14 PC 13 Lt Canada TV 14 14 13ans Select to set ratings manually U US Seepage 75 for details U Canada Seepage76 for details Change Password For changing your password seebelow To e c k aren ntr atwx 0 Set Parental Lock to OFF when in the Parentmenu 1 Select Change Password option when in the Parentmenu using the joystick and press 2E ntet a new four digi...

Page 72: ... select Custom and press 3 Make surethat Movie Ratings is selected andpress 4 Move thejoystick up or down to selectthe rating to be blocked and press The B indicator automatically appearsbesidethe selectedrating and all higher ratings indicating that the programs that match the ratings will be blocked To unblock a rating select it by moving thejoystick up or down then press The indicator B changes...

Page 73: ...ocked L To unblock a rating select it by moving thejoystick up or down then press The indicator B changesinto and all lower ratings are unblocked SomeTV ratings haveadditional content ratings called extenders The extendersare defined asfollows D sexually suggestiveDialog FV FantasyViolence L CoarseLanguage S Sexual situations and V Violence By setting the extenders you can define additional viewin...

Page 74: ...hat the programs that match the extender can be viewed If you press again B is displayed to show that the programs that match the extender will be blocked again 1 9 Repeatstep 8 for other extenders All programs that match the ratings you selectan higher except for the extendersthat were canceled will be blocked 10 PressMENU to exit the menu screen ...

Page 75: ... Age Based Options TV Y All children TV Y7 Directed to older children TV G General Audience TV PG Parental Guidance suggested TV 14 Parents Strongly cautioned TV MA Mature Audience only Content Based Options FV Fantasy Violence D Suggestive Dialogue L Strong Language S Sexual situations V Violence Block Blocks all programs and movies that are broadcast without a rating Allow Allows programs and mo...

Page 76: ...iption English Rating C All children C8 Children 8 years and older G General programming PG Parental Guidance 14 Viewers 14and older 18 Adult programming French Rating G General programming 1 8 ans Not recommended for young children 13 ans Not recommended for agzs under 13 16 ans Not recommended for ag under 16 18 ans Programming restricted to adults USA Rating See TV Rating on page 75 for details...

Page 77: ... three digit code number for the manufacturer s code for your component If more than one code number is listed start with the number listed first Use the code 2 number to complete the following procedure To r rarn a cable box or a s teili receiver 1 Open the panel of the remote control 2 PressCODE SET inside the panel 3 Close the panel andpress SAT CABLE FUNCTON 4 Enter the three digit manufacture...

Page 78: ...LCD projection TV s remote control at the component open the panel and pressthe green POWER button If it responds the programming is completed If not try using the other codeslisted for that manufacturer 78 4 5 0 If more than one code number is listed try entering them one by one until you come to the correct code for your component 0 If you enter a new code number the code number you previously e...

Page 79: ...ure 2000 M Ward sv2000 Sylvania Symphonic Tashiro Tatung Teat Technics Toshiba COd 305 304 323 324 325 326 325 338 321 314 336 331 309 308 327 308 309 306 307 305 304 308 309 308 309 3 10 308 308 309 306 304 305 308 309 311 312 313 310 329 309 330 328 335 324 338 314 322 313 321 330 335 312 313 321 335 323 324 325 326 327 328 315 338 327 338 308 309 338 310 338 332 314 336 337 314 336 338 337 309 ...

Page 80: ...ring playback releaseto resume normal playback Slide switch Operating a DVD Player Open the panel and move the slide switch to the DVD input you coded for this device TO00 This I rt ss Turn on off green POWER button inside the panel Play b stop n Pause II press again to resume normal playback Step through different tracks of m to step forward or 44 to step backward an audio disc Step through diffe...

Page 81: ... This _ Turn on off Select Satellite Receiver Select a channel Change channels Back to previous channel Display channel number Display DBS guide Display DBS menu Move highlight cursor Select item SAT CABLE POWER SAT CABLE FUNCTION O 9 buttons ENTER CH iI JUMP ress SAT CABLE POWER SAT CABLE FUNCTION O 9 buttons ENTER CH I JUMP DISPLAY GUIDE MENU Joystick or arrows ...

Page 82: ...rent Menu on page 69 If your LCD projection TV does not turn on and a red light keeps flashing your LCD projection TV may need service Call your local Sony Service Center Batteries could be weak Replace the batteries PressTV FUNCTION when operating your LCD projec Jon TV Make sure the LCD projection TV s power cord is connected securely to the wall outlet It is strongly recommended to connect the ...

Page 83: ...l menu to add receivable channels that are not presently in TV memory see page63 Check your cable settings Make sure Cable is set to ON in the Channel menu seepage 62 Increase the volume of the cable box using the cable box s remote control Then pressTV FUNCTION and adjust the LCD projection TV s volume Make sure Cable is set to ON in the Channel menu see Cable on page 62 Use Auto Program in the C...

Page 84: ...you have connected a VCR DVD player or satellite receiver to the AUX input on the LCD projection TV it will not show in the secondpicture Both may be set to the samechannel Try changing channels in either the main picture or the window picture You may be running all your channels through a cable box The cable box will only unscramble one signal at a time so you cannot use the Twin View feature If ...

Page 85: ...or the light sourceis ready to turn on d n cato 1 s three times 0 The lamp cover is not attachedsecurely When you correct the TIMER STAND BY indicator goesout andthe LCD projection TV entersthe standby mode seepage 13 MP i c t flashes CI The lamp for the light sourceburns out Replaceit with new one seepage 13 If the LCD projection TV is not recovered after correcting the problems contact with qual...

Page 86: ...OV 60 Hz 4 3 1 1 CONTROL S IN OUT I Component Video Input 2 y PB PR RF Inputs Converter Speaker Output Dimensions W x H x D Mass Power Consumption In Use In Standby 86 I Vp p 75 ohms unbalanced sync negative Y 1 Vp p 75 ohms unbalanced sync negative C 0 286 Vp p Burst slgnal 75 ohms 500 mVrms 100 modulation Impedance 47 kiloohms 500 mVrms at the maximum volume setting Variable 500 mVrms Fixed Impe...

Page 87: ...onal Accessories TV Stand Lamp AV Cable Audio Cable Control S Cable Component Video Cable AV Receiver RM Y910 2 supplied for remote control 1 1 2 SU 60DX XL 2ooou VMC 810 820 830 HG RKC 5 15HG RK G69HG VMC lo 30 HG STR V555ES or equivalent Design and specifications are subject to change without notice 87 ...

Page 88: ...44 CINEMOTION button 44 Cleaning Cloth 12 Closed caption modes 67 CODE SET button 45 Color temperature adjusting 59 Color adjusting 58 88 Connecting Audio receiver35 AV receiver40 Cablebox 26 28 30 31 Cableor antenna25 Camcorder39 Digital TV Receiver 38 DVD player 36 37 Satellite receiver 33 34 VCR 30 32 34 Connector Types 21 Contents of box 17 CONTROL S 41 Digital TV receiver connecting 38 Daylig...

Page 89: ...2 Problems troubleshooting 82 85 Ratings setting 69 71 viewing blocked programs 71 Rear panel controls and connections 23 24 Remote control buttons inside panel 45 Function of buttons 46 inserting batteries 17 programming 77 79 Remote control operating other components with Cable box 81 DVD player 80 Satellite receiver 81 VCR 80 Removing channelsfrom the channel list 63 RESET button 44 Resetting A...

Page 90: ...activatingapicture50 described9 using50 VCR usingwith TV remotecontrol80 with cablebox connecting30 with cable connecting29 with satellitereceiver connecting34 Video inputs labeling 68 Video menu 57 58 Video Modes selecting 58 Viewing area recommended 20 VOL button 43 Wide menu 57 64 Zoom feature with Twin View 52 ...

Page 91: ......

Page 92: ......

Page 93: ...S or consumables such as fuses or batteries This warranty is valid only in the United States This wal rant is invalid if the factory applied serial number has been altered or removed fmrn the Pmdu REPAIR OR P AC T AS PROVIDED UNDER THIS W A IS THE EXCLUSIVE REMEDY OF THE CO S J SObY SI IALL NOT 13CLIABLE FOR ANY I Cl TA OR C S U TlAL DAMAGES FOR BREACI I OF ANY EXPRESS OR IMPLIED WARRANT Oh THiS P...

Page 94: ... must be returned The repaired unit will be returnedto customer freight prepaid All accessories that are enclosed with the unit must be listed individually on the packing slip for the shippingdo ut ei tation Sony shall haveno liabilitywhatsoeverfor lossor damage to such accessories ifthey are not listed Defectiveaccessories should be returned to Sony as a separate repair item We offer on site serv...

Page 95: ...or check ups This warranty is valid only in Cana EXCEPT TO TIlE I XTl NI l O lBlT D BY APPLICABLE LAW Sony EXPRESSLY DISCLAIMS ALL OTl lER WARRANTIES AND CONDITIONS EXPRESS OR IMPLIED AND WI IETHER ARISING BY LAW BY STATUTE BY COURSE OF DEALING OR USAGE OF TRADE INCLUDING WiTHOlJT LIMITATION IMPLIEI WARRANTIES OR CONDITIONS OF MERCHANTABLE QUALITY AND F ITNESS FUf4 A PARTICULAR PURPOSE UNDER NO CI...

Reviews: