background image

54

E:\SONY\2659812111\01GB05BAS_E.fm

DCR-HC23E/HC24E/HC26E/HC35E

2-659-812-

11

(1)

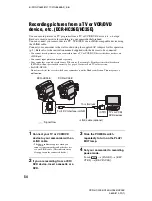
Recording pictures from a TV or VCR/DVD 
device, etc. (DCR-HC26E/HC35E)

You can record pictures or TV programs from a TV or VCR/DVD device, etc., on a tape.
Be sure to insert a cassette for recording in your camcorder beforehand.
You can connect your camcorder to a TV, VCR/DVD or an i.LINK-compatible device using 
the i.LINK cable.
Connect your camcorder to the wall socket using the supplied AC Adaptor for this operation 
(p. 9). Refer also to the instruction manuals supplied with the devices to be connected.

1

Connect your TV or VCR/DVD 
device to your camcorder with an 
i.LINK cable.

• The 

 indicator appears when you 

connect your camcorder and other devices 
via an i.LINK cable. (This indicator may 
also appear on the connected device.)

2

If you are recording from a VCR/
DVD device, insert a cassette or a 
DVD.

3

Slide the POWER switch 
repeatedly to turn on the PLAY/
EDIT lamp.

4

Set your camcorder to recording 
pause mode.

Touch  

t

 [PAGE3] 

t

 [REC 

CTRL] 

t

 [REC PAUSE].

• You cannot record pictures on your camcorder from a TV or VCR/DVD device that does not have an 

i.LINK jack.

• You cannot input picture and sound separately.
• Your camcorder can only record from a PAL source. For example, French system video/broadcasts 

(SECAM) will not be recorded correctly. See page 83 for details on TV color systems.

• For DCR-HC35E:

Do not insert/eject the cassette while your camcorder is on the Handycam Station. This may cause a 
malfunction.

DV

: Signal flow

To i.LINK jack

To   DV Interface (i.LINK)

TVs or VCR/
DVD devices

DCR-HC26E

i.LINK cable (optional)

DCR-HC35E

Summary of Contents for Handycam DCR-HC23E

Page 1: ...659 812 11 1 2 659 812 11 1 2006 Sony Corporation Digital Video Camera Recorder Operating Guide DCR HC23E HC24E HC26E HC35E Getting Started 8 Recording Playback 20 Using the Menu 36 Dubbing Editing 51 Using a Computer 58 Troubleshooting 68 Additional Information 83 ...

Page 2: ...ce If static electricity or electromagnetism causes data transfer to discontinue midway fail restart the application or disconnect and connect the communication cable USB etc again Disposal of Old Electrical Electronic Equipment Applicable in the European Union and other European countries with separate collection systems This symbol on the product or on its packaging indicates that this product s...

Page 3: ...corder from it About menu items LCD panel viewfinder and lens A menu item that is grayed out is not available under the current recording or playback conditions The LCD screen and the viewfinder are manufactured using extremely high precision technology so over 99 99 of the pixels are operational for effective use However there may be some tiny black points and or bright points white red blue or g...

Page 4: ...ra and therefore may appear different The on screen displays in each local language are used for illustrating the operating procedures Change the screen language before using your camcorder if necessary p 49 The illustrations used on this manual are based on the model DCR HC35E The model name is indicated on the bottom of your camcorder Design and specifications of recording media and accessories ...

Page 5: ...rd in dark places NightShot plus To adjust the exposure for backlit subjects BACK LIGHT To adjust the focus for an off center subject SPOT FOCUS To fix the exposure for the selected subject Flexible spot meter To record in mirror mode To use a tripod To use a Shoulder Belt Playback To play back the images with added special effects Picture effect Recording playback To check the remaining battery B...

Page 6: ...5 D ZOOM WIDE SEL STEADYSHOT etc PLAYER SET VCR SET menu 47 HiFi SOUND AUDIO MIX LCD VF SET menu 47 LCD B L LCD COLOR VF B L etc TAPE SET menu 48 REC MODE AUDIO MODE REMAIN SETUP MENU menu 49 CLOCK SET USB STREAM LANGUAGE etc OTHERS menu 50 WORLD TIME BEEP etc Dubbing to VCR DVD device etc 51 Recording pictures from a TV or VCR DVD device etc DCR HC26E HC35E 54 Dubbing sound to a recorded tape 55 ...

Page 7: ...9 812 11 1 Troubleshooting 68 Warning indicators and messages 80 Using your camcorder abroad 83 Usable cassette tapes 83 About the InfoLITHIUM battery pack 84 About i LINK 86 Maintenance and precautions 87 Specifications 90 Index 94 Troubleshooting Additional Information ...

Page 8: ...Commander 1 DCR HC24E HC35E p 30 A button type lithium battery is already installed A V connecting cable 1 p 33 52 USB cable 1 DCR HC24E HC35E p 57 58 A USB cable is not supplied with the DCR HC23E HC26E models If necessary buy a USB 2 0 cable Type A to Type B mini A Sony product is recommended Lens cap 1 p 14 22 To attach the lens cap Attach the lens cap to the metal fittings of the grip belt as ...

Page 9: ...r For DCR HC35E For DCR HC23E HC24E HC26E 1 Align the terminals of the battery pack and your camcorder 1 then attach the battery pack and click it into place 2 2 Slide the POWER switch in the direction of the arrow to OFF CHG The default setting POWER switch DC IN jack DC plug AC Adaptor Mains lead To the wall socket Handycam Station POWER switch DC IN jack DC plug AC Adaptor Mains lead To the wal...

Page 10: ...ll socket Insert the camcorder into the Handycam Station securely all the way to the bottom The CHG charge lamp lights up and charging starts When inserting the camcorder into the Handycam Station close the DC IN jack cover For DCR HC23E HC24E HC26E Connect the mains lead to the AC Adaptor and the wall socket The CHG charge lamp lights up and charging starts With the v mark facing up DC IN jack Wi...

Page 11: ...t as shown in the illustration The battery pack will not lose its charge in this case For DCR HC35E To remove your camcorder from the Handycam Station Turn off the power then remove the camcorder from the Handycam Station holding both your camcorder and the Handycam Station For DCR HC23E HC24E HC26E To use an outside power source You can operate your camcorder using the power from the wall socket ...

Page 12: ... viewfinder while the LCD panel closed Typical recording time shows the time when you repeat recording start stop turning the power on off and zooming Playing time Approximate time min available when you use a fully charged battery pack Battery pack Charging time NP FP30 supplied 115 NP FP50 125 NP FP70 155 NP FP71 170 NP FP90 220 2 1 POWER switch V BATT battery release lever Battery pack Continuo...

Page 13: ...t On the charging recording playback time Times measured with the camcorder at 25 C 77 F 10 to 30 C 50 F to 86 F is recommended The recording and playback time will be shorter when you use your camcorder in low temperatures The recording and playback time will be shorter depending on the conditions under which you use your camcorder On the AC Adaptor Use the nearby wall socket when using the AC Ad...

Page 14: ...rd on a tape PLAY EDIT To play or edit pictures After you have set the date and time CLOCK SET p 18 the next time you turn on the power of your camcorder the current date and time will be displayed on the LCD screen for a few seconds 3 Hold the camcorder correctly 4 Ensure a good grip then fasten the grip belt To turn off the power 1 Slide the POWER switch to OFF CHG 2 Attach the lens cap At the t...

Page 15: ...CD panel with the LCD screen facing out This is convenient during playback operations See LCD BRT p 41 to adjust the brightness of the LCD screen You can view pictures using the viewfinder to avoid wearing down the battery or when the picture seen on the LCD screen is poor You can adjust the brightness of the viewfinder backlight by selecting LCD VF SET VF B L p 47 You can adjust the FADER and the...

Page 16: ... 88 Dots in lines may appear on the LCD screen but this is not a malfunction These dots are not recorded To hide the screen indicators Press DISP BATT INFO to toggle the screen indicators such as time code on or off You can change the on screen displays to show messages in a specified language Select the screen language in LANGUAGE on the SETUP MENU p 36 49 You can easily check the meaning of each...

Page 17: ...want to check The meanings of the indicators in the area are listed on the screen If you cannot find the indicator you want to check touch PAGE r PAGE R to toggle When you touch RET the screen returns to the area selecting display To finish the operation Touch END DISP GUIDE END FOCUS MANUAL PROGRAM AE SPOTLIGHT P EFFECT SEPIA 1 2 RET PAGE PAGE ...

Page 18: ...attery and then set the date and time again p 89 Skip to step 4 when you set the clock for the first time 1 Touch t MENU 2 Select SETUP MENU with then touch EXEC 3 Select CLOCK SET with then touch EXEC 4 Set Y year with then touch You can set any year up to the year 2079 5 Set M month D day H hour and M minute then touch The clock starts The date and time are not displayed while recording but they...

Page 19: ...with its window facing outwards then press The cassette compartment automatically slides back in Do not force the cassette compartment closed by pressing the portion marked while it is sliding in It may cause a malfunction 3 Close the lid To eject the cassette Open the lid following the same procedure as described in Step 1 and remove the cassette For DCR HC35E Do not insert eject the cassette whi...

Page 20: ... mode on a cassette You can also start stop recording by pressing the button E on the LCD frame Recording A B E D C With this Easy Handycam operation most of the camera settings are automatically optimally adjusted which frees you from detailed adjustments The screen font size increases for easy viewing Remove the lens cap p 14 If the POWER switch A is set to OFF CHG slide it while pressing the gr...

Page 21: ...eturn to the default setting automatically p 43 Cancel Easy Handycam operation if you want to add any effects or settings to the images Almost all the settings are returned to the previous situation x Unavailable buttons during Easy Handycam During Easy Handycam operation the following buttons are unavailable since the items are set automatically Invalid during Easy Handycam operation appears if o...

Page 22: ...ng does not work Movies Still images Press REC START STOP A or B The indicator A changes STBY to REC Press and hold PHOTO lightly to check the image A then press it fully B A shutter sound is heard and the image is recorded with sound for 7 seconds Lens cap Remove the lens cap by pressing both knobs on the sides of the cap PHOTO REC START STOP B POWER switch REC START STOP A If the POWER switch is...

Page 23: ...o the desired point then touch to start playback To adjust the volume Touch t PAGE1 t VOL then to adjust the volume To search for a scene during playback Touch and hold during playback Picture Search or while fast forwarding or rewinding the tape Skip Scan You can play back in various modes V SPD PLAY p 42 A B C A Stop B Play Pause toggles as you touch it Playback automatically stops if pause is e...

Page 24: ...peration sound of the power zoom lever may also be recorded To record in dark places NightShot plus 2 Set the NIGHTSHOT PLUS switch 2 to ON and NIGHTSHOT PLUS appear The NightShot plus function uses infrared light Therefore do not cover the infrared port 3 with your fingers or other objects Remove the conversion lens optional if it is attached Adjust the focus manually FOCUS p 38 when it is hard t...

Page 25: ...age 44 To check the remaining battery Battery Info 8 Set the POWER switch to OFF CHG then press DISP BATT INFO 8 The battery information appears for about 7 seconds You can view the battery information for up to 20 seconds by pressing DISP BATT INFO again while the battery information is displayed To turn off the operation confirmation beep BEEP qa See BEEP on page 50 To initialize the settings RE...

Page 26: ...photo recording 22 Playback Tape counter hour minute second Time code hour minute second frame E Recording capacity of the tape approx 49 F Function button 36 The date time during recording and the camera setting data will be recorded automatically They do not appear on the screen during recording but you can check them as DATA CODE during playback p 41 G Tape transport indicator H Video operation...

Page 27: ...de changes Indicator Meaning AUDIO MODE 48 Indicator Meaning DV input 54 Zero set memory 30 Indicator Meaning Self timer recording 41 NightShot plus 24 Z Warning 80 0 00 00 STBY FN E D I T 60min 60min Upper left Upper right Bottom Center Indicator Meaning Flexible spot meter 38 Manual exposure 40 9 Manual focus 38 Backlight 24 PROGRAM AE 44 Picture effect 44 n White balance 40 Wide select 46 Stead...

Page 28: ...n the tape This operation is also available when the POWER switch is set to PLAY EDIT You can search for the start point to start the next recording while viewing the pictures on the screen The sound is not played back during the search 1 Touch t PAGE1 t MENU 2 Select CAMERA SET with then touch EXEC 3 Select EDITSEARCH with then touch EXEC 4 Select ON with then touch EXEC t 5 Touch and hold to go ...

Page 29: ...u stopped the tape 1 Touch t PAGE1 t MENU 2 Select CAMERA SET with then touch EXEC 3 Select EDITSEARCH with then touch EXEC 4 Select ON with then touch EXEC t 5 Touch The last few seconds of the most recently recorded scene are played back Then your camcorder is set to the standby Reviewing the most recently recorded scenes Rec review 0 00 00 STBY 60min EDIT FN ...

Page 30: ...e Remote Commander towards the remote sensor to operate your camcorder p 25 To change the battery see page 89 1 During playback press ZERO SET MEMORY 5 at a point you want to locate later on The tape counter is reset to 0 00 00 and appears on the screen If the tape counter is not displayed press DISPLAY 9 2 Press STOP 4 when you want to stop playback 3 Press mREW 4 The tape stops automatically whe...

Page 31: ...s on the tape Your camcorder can search for the still image automatically regardless of the recording date 1 Slide the POWER switch repeatedly to turn on the PLAY EDIT lamp 2 Press SEARCH M 2 to select PHOTO SEARCH 3 Press previous next 3 to select a photo Each time you press or your camcorder searches for the still image before or after the current point on the tape To cancel the operation Press ...

Page 32: ... HC35E 2 659 812 11 1 2 Press SEARCH M 2 to select PHOTO SCAN 3 Press previous next 3 To cancel the operation Press STOP 4 The Photo scan will not function correctly if there is a blank section between recorded sections on the tape Remote Commander Continued ...

Page 33: ...onnect your camcorder to the wall socket using the supplied AC Adaptor for this operation p 9 Refer also to the instruction manuals supplied with the devices to be connected For DCR HC35E Do not insert eject the cassette while your camcorder is on the Handycam Station This may cause a malfunction A V OUT 2 1 A V OUT jack Yellow White Red Signal flow VCRs or TVs DCR HC23E HC24E HC26E A V OUT 2 1 A ...

Page 34: ... code on the TV screen by setting DISP OUT to V OUT LCD p 50 For DCR HC35E Do not connect A V connecting cable to both the Handycam Station and your camcorder at the same time as image disturbance may occur When connecting your camcorder to a TV through a VCR Connect your camcorder to the LINE IN input on the VCR Set the input selector on the VCR to LINE VIDEO 1 VIDEO 2 etc if the VCR has an input...

Page 35: ...35 DCR HC23E HC24E HC26E HC35E 2 659 812 11 1 Recording Playback E SONY 2659812111 01GB03BAS_E fm ...

Page 36: ...n For details of the button items see page 38 1 Touch 2 Touch the desired page 3 Touch the desired button 4 Select the desired setting then touch t Close With some settings you do not have to touch x To use menu items For details of the items see page 44 1 Touch t MENU on PAGE1 The menu index screen appears 2 Select the desired menu Touch to select the item then touch EXEC The process in step 3 an...

Page 37: ... Easy Handycam operation 1 Touch 2 Select the desired menu Touch MENU then select the desired menu 3 Change your item setting After finishing the settings touch close to hide the menu screen Each touch of RET takes you to the previous screen Cancel Easy Handycam operation to use menu items normally 0 00 00 STBY FN 60min ...

Page 38: ...bjects to sharpen the focus appears when the focus cannot be adjusted any closer and appears when the focus cannot be adjusted farther away To adjust the focus automatically touch AUTO in step 1 It is easier to focus on the subject by moving the power zoom lever towards T telephoto to adjust the focus then towards W wide angle to adjust the zoom for recording When you want to record a subject at c...

Page 39: ...START STOP once the setting is canceled WHITE BLACK MOSC FADER MONOTONE When fading in the picture gradually changes from black and white to color When fading out it gradually changes from color to black and white Using the viewfinder You can adjust EXPOSURE and FADER while using the viewfinder by having the LCD panel rotated 180 degrees and closed with the screen facing out 1 Make sure that the C...

Page 40: ...e lighting conditions change quickly Under video lamps in a studio or under sodium lamps or incandescent like color lamps ONE PUSH The white balance will be adjusted according to the ambient light 1 Touch ONE PUSH 2 Frame a white object such as a piece of paper to fill the screen under the same lighting conditions as you will shoot the subject 3 Touch flashes quickly When the white balance has bee...

Page 41: ...ee page 43 See page 23 See page 28 See page 16 PAGE2 During playback displays information data code recorded automatically at the time of recording B OFF Data code is not displayed DATE TIME Displays the date and time CAM DATA below Displays camera setting data ASteadyShot off BExposure CWhite balance DGain EShutter speed FAperture value In the DATE TIME data display the date and time are displaye...

Page 42: ...de touch Play Pause twice once from frame playback You will not hear the recorded sound You may see mosaic like images of the previously played picture See page 56 See page 54 BURN DVD BURN VCD V SPD PLAY Various speed playback To Touch change the playback direction frame play back slowly ySLOW To reverse direction frame t ySLOW play back 2 times faster double speed double speed To reverse directi...

Page 43: ... z z OFF AUTO SHTR z ON CAMERA SET menu p 45 D ZOOM z OFF WIDE SEL z 4 3 STEADYSHOT z ON EDITSEARCH z OFF N S LIGHT z ON PLAYER SET DCR HC23E HC24E VCR SET DCR HC26E HC35E menu p 47 HiFi SOUND z STEREO AUDIO MIX z LCD VF SET menu p 47 LCD B L z z BRT NORMAL LCD COLOR z z VF B L z z BRT NORMAL WIDE DISP z z TAPE SET menu p 48 REC MODE DCR HC23E HC24E z SP REC MODE DCR HC26E HC35E z z SP AUDIO MODE ...

Page 44: ...ke when shooting fast moving subjects BEACH SKI Select to prevent people s faces from appearing dark in strong light or reflected light such as at a beach in midsummer or on a ski slope PROGRAM AE SUNSETMOON Select to maintain the atmosphere of situations such as sunsets general night views or fireworks LANDSCAPE Select to shoot distant subjects clearly This setting also prevents your camcorder fr...

Page 45: ...playback AUTO SHTR Auto shutter CAMERA SET menu D ZOOM WIDE SEL STEADYSHOT etc The default settings are marked with B The indicators in parentheses appear when the items are selected See page 36 for details on selecting menu items You can select the maximum zoom level in case you want to zoom to a level greater than 20 the default setting while recording on a tape Note that the image quality decre...

Page 46: ...nables the EDIT SEARCH function and Rec review p 28 When using the NightShot plus p 24 function to record you can record clearer pictures by setting N S LIGHT which emits infrared light invisible to ON the default setting Do not cover the infrared port with your fingers or other objects p 24 Remove the conversion lens optional if it is attached The maximum shooting distance using N S LIGHT is abou...

Page 47: ...B L LCD COLOR VF B L etc The default settings are marked with B The indicators in parentheses appear when the items are selected See page 36 for details on selecting menu items You can adjust the brightness of the LCD screen s backlight The recorded picture will not be affected by this operation BBRT NORMAL Standard brightness BRIGHT Brightens the LCD screen When you connect your camcorder to outs...

Page 48: ...entheses appear when the items are selected See page 36 for details on selecting menu items BSP SP Records in the SP Standard Play mode on a cassette LP LP Increases the recording time to 1 5 times the SP mode Long Play You can record about 510 still images in the SP mode and about 765 still images in the LP mode on a 60 minutes tape If you record in the LP mode a mosaic like noise may appear or s...

Page 49: ... the screen of your camcorder on your computer USB Streaming via the USB cable See First Step Guide in the supplied CD ROM for details p 64 You can select the language to be used on the LCD screen Your camcorder offers ENG SIMP simplified English for when you cannot find your native tongue among the options The default setting is ON allowing you to view the demonstration in about 10 minutes after ...

Page 50: ...e touch panel OFF Cancels the melody B 5min The camcorder is automatically turned off when you do not operate your camcorder for more than approximately 5 minutes NEVER The camcorder is not automatically turned off When you connect your camcorder to a wall socket A SHUT OFF is automatically set to NEVER The default setting is ON allowing you to use the Remote Commander p 30 Set to OFF to prevent y...

Page 51: ...the A V connecting cable with S VIDEO 2 or the i LINK cable 3 Connect your camcorder to the wall socket using the supplied AC Adaptor for this operation p 9 Refer also to the instruction manuals supplied with the devices to be connected For DCR HC35E Do not insert eject the cassette while your camcorder is on the Handycam Station This may cause a malfunction DV A V OUT 2 1 3 A V OUT jack Yellow Wh...

Page 52: ...case the yellow standard video plug connection is not necessary S VIDEO connection only will not output audio C i LINK cable optional Use an i LINK cable to connect your camcorder to another device equipped with an i LINK jack The video and audio signals are transmitted digitally producing high quality pictures and sound Note that you cannot output picture and sound separately When you are connect...

Page 53: ...r to the input jacks of a VCR or a DVD device 4 Start playback on the camcorder and recording on the VCR DVD device Refer to the operating instructions supplied with your recording device for details 5 When dubbing is complete stop your camcorder and the VCR DVD device To record the date time and camera settings data when connected by the A V connecting cable display them on the screen p 41 50 The...

Page 54: ...ur camcorder and other devices via an i LINK cable This indicator may also appear on the connected device 2 If you are recording from a VCR DVD device insert a cassette or a DVD 3 Slide the POWER switch repeatedly to turn on the PLAY EDIT lamp 4 Set your camcorder to recording pause mode Touch t PAGE3 t REC CTRL t REC PAUSE You cannot record pictures on your camcorder from a TV or VCR DVD device t...

Page 55: ...can record audio by using the internal stereo microphone You cannot record additional audio When the tape has been recorded in the 16 bit mode p 48 When the tape has been recorded in the LP mode When your camcorder is connected via an i LINK cable When the tape has been recorded in 4CH MIC mode On blank sections of the tape When the tape has been recorded in a TV color system other than that of yo...

Page 56: ...ecorded on other camcorders including other camcorders DCR HC23E HC24E HC26E HC35E For DCR HC24E HC35E To set the end point for audio dubbing beforehand press ZERO SET MEMORY on the Remote Commander at the scene at which you want to stop audio dubbing during playback After step 2 to 4 the recording stops automatically at the selected scene To check the recorded sound 1 Play back the tape on which ...

Page 57: ... USB jack p 58 B For DCR HC23E HC24E DV OUT Interface i LINK p 51 65 For DCR HC26E HC35E DV Interface i LINK p 51 54 65 C A V audio video OUT jack p 33 51 For DCR HC35E The Handycam Station and your camcorder are both equipped with A V OUT jacks D DC IN jack p 9 E For DCR HC35E Interface connector 1 2 3 3 DCR HC35E DCR HC23E HC24E HC26E 4 5 1 4 Open the jack cover 5 1 4 2 3 ...

Page 58: ...ction see First Step Guide Viewing video and pictures on PC You can view the video and still images copied from your camcorder by selecting from thumbnails Video and still images are saved in folders by date Music Video Slideshow Producer You can select your favorite video and still images from video and still images saved on your computer and easily create an original short video or original slid...

Page 59: ...sary to have DirectX installed Windows Media Player 7 0 or later Macromedia Flash Player 6 0 or later Sound system 16 bit stereo sound card and stereo speakers Memory 64 MB or more Hard disk Available memory required for installation 500 MB or more Available free hard disk space recommended 6 GB or more depending on the size of the image files edited Display 4 MB VRAM video card Minimum 800 600 do...

Page 60: ...l be necessary The software to be used varies depending on the computer s operating system you are using Windows computer Picture Package including ImageMixer VCD2 Macintosh computer ImageMixer VCD2 For the details on the software refer to First Step Guide Log on as Administrators for installation for Windows 2000 Windows XP 1 Confirm that your camcorder is not connected to the computer 2 Turn on ...

Page 61: ...uide cannot be installed automatically with the InstallShield Wizard In such a case manually copy First Step Guide to your computer according to the message instructions 5 Select the language for the application to be installed then click Next 6 Click Next 7 Read License Agreement check I accept the terms of the license agreement if you agree then click Next The software version of Picture Package...

Page 62: ... be displayed In such a case skip to step 11 11Click Next then follow the on screen instructions to install ImageMixer VCD2 12If the Installing Microsoft R DirectX R screen is displayed follow the steps below to install DirectX 9 0c If not skip to step 13 1 Read License Agreement then click Next 2 Click Next 3 Click Finish 13Make sure Yes I want to restart my computer now is checked then click Fin...

Page 63: ... computer 2 Turn on the computer Close all applications running on the computer before installing the software 3 Place the supplied CD ROM in the disc drive of your computer 4 Double click CD ROM icon 5 Copy FirstStepGuide pdf stored in the desired language in the FirstStepGuide folder to your computer 6 Copy IMXINST SIT in the MAC folder of the CD ROM to a folder of your choice 7 Double click IMX...

Page 64: ...Telephone Toll Free UK Germany France and Spain 800 1532 4865 Other countries 44 1489 564 764 Asia Philippines Telephone 63 2 438 0090 On Copyrights Music works sound recording or other third party musical contents you may acquire from CDs the Internet or other sources the Music Contents are the copyrighted work of the respective owners thereof and are protected by copyright laws and other applica...

Page 65: ...SB cable For DCR HC35E Do not insert eject the cassette while your camcorder is on the Handycam Station This may cause a malfunction Note that you need a computer equipped with a DVD drive that can write DVDs Using the Direct Access to Click to DVD function for the first time The Direct Access to Click to DVD function enables you to copy pictures recorded on a tape to a DVD easily if your camcorde...

Page 66: ... drive of the computer 8 Touch EXEC on the screen of your camcorder The status of the operation on your computer is displayed on the LCD screen of your camcorder CAPTURING The picture recorded on the tape is being copied to the computer CONVERTING The picture is being converted to the MPEG2 format WRITING The picture is being written onto the DVD If you use a DVD RW RW which has other data stored ...

Page 67: ...pictures has already finished Even if you disconnect the i LINK cable or turn off the camcorder at this stage DVD creation will continue on your computer If any of the following occurs copying of the picture is canceled A DVD containing the data up to the point the operation was canceled is created Refer to the help files of Click to DVD for details The tape contains a 10 second blank portion The ...

Page 68: ... not all buttons are functional p 21 You cannot turn Easy Handycam operation on or off During recording or communicating with another device via USB cable you cannot turn Easy Handycam operation on or off Settings change during Easy Handycam operation During Easy Handycam operation the settings of the functions that are not displayed on the screen return to their defaults Previously made settings ...

Page 69: ... Fully charge the battery again to correct the indication p 9 The remaining battery time indicator does not indicate the correct time Ambient temperature is too high or too low or the battery pack has not been charged enough This is not a malfunction Fully charge the battery again If the problem persists the battery may be worn out Replace it with a new one p 9 84 The indicated time may not be cor...

Page 70: ...tly or do not work at all Adjust the screen CALIBRATION p 88 The picture in the viewfinder is not clear Move the viewfinder lens adjustment lever until the picture appears clearly p 15 The picture in the viewfinder has disappeared Close the LCD panel The picture is not displayed in the viewfinder when the LCD panel is open p 15 Dots in lines appear on the LCD screen This is not a malfunction These...

Page 71: ...ct tab to REC or insert a new cassette p 84 The tape is stuck to the drum due to moisture condensation Remove the cassette and leave your camcorder for at least 1 hour then re insert the cassette p 87 You cannot record a smooth transition on a tape from the last recorded scene to the next Perform END SEARCH p 28 Do not remove the cassette The picture will be recorded continuously without a break e...

Page 72: ...oo high This is not a malfunction A vertical band appears when recording a bright subject This phenomenon is called the smear effect This is not a malfunction The color of the picture is not correctly displayed Deactivate the NightShot plus function p 24 The screen picture is bright and the subject does not appear on the screen Deactivate the NightShot plus function p 24 or cancel the BACK LIGHT f...

Page 73: ...ssette optional p 88 is displayed on the screen The tape you are playing was recorded without setting the date and time A blank section on the tape is being played The data code on a tape with a scratch or noise cannot be read Noises appear and is displayed on the screen The tape was recorded in a TV color system other than that of your camcorder PAL This is not a malfunction p 83 is displayed on ...

Page 74: ...commander mode other than VTR 2 for your VCR Cover the sensor of your VCR with black paper Menu items are grayed out You cannot select grayed items in the current recording playback situation You cannot use SPOT FOCUS You cannot use SPOT FOCUS together with PROGRAM AE You cannot use SPOT METER You cannot use SPOT METER together with NightShot plus If you set PROGRAM AE SPOT METER is automatically ...

Page 75: ...our camcorder p 51 New sound added to a recorded tape is not heard Adjust AUDIO MIX from the ST1 original sound side until the sound is heard appropriately p 56 Pictures from connected devices are not displayed correctly The input signal is not PAL p 83 The picture gets disturbed or dark or the sounds get distorted DCR HC35E A V connecting cables are connected to both your camcorder and the Handyc...

Page 76: ...uter When you connect your camcorder to a Macintosh computer using a USB cable you cannot copy pictures recorded on a tape to the computer To copy recordings from a tape connect your camcorder to the computer with an i LINK cable and use the standard software in the OS The image on tape does not appear on the screen of the Windows computer during USB Streaming The USB driver has been registered in...

Page 77: ...ight click them then click Uninstall to delete them USB Composite Device in the Universal Serial Bus Controller folder USB Audio Device in the Sound video and game controller folder Composite USB Device in the Other devices folder 5 When the Confirm Device Removal screen appears click OK 6 Turn off the power of your camcorder disconnect the USB cable then restart the computer 7 Place the supplied ...

Page 78: ... and USB Device may cause a malfunction of your computer Cannot start Easy Handycam with USB connected appears on the screen of your camcorder You cannot start the Easy Handycam settings while the USB cable is connected Disconnect the USB cable from your camcorder first There is no sound when the camcorder is connected to the Windows computer via a USB cable Change the settings for your computer e...

Page 79: ...Auto Video Producer CD Backup or VCD Maker For compatible drives visit the following URL http www ppackage com First Step Guide is not displayed correctly Follow the procedure below and refer to First Step Guide FirstStepGuide pdf 1 Place the supplied CD ROM in the disc drive of your computer 2 Double click My Computer 3 Right click PICTUREPACKAGE Disc drive Drive names such as E may vary dependin...

Page 80: ...nsation has occurred p 87 Remove the power source Reconnect it and operate your camcorder again Change the cassette Press RESET p 25 and operate your camcorder again E 61 ss E 62 ss Contact your Sony dealer or local authorized Sony service facility Inform them of the 5 digit code which starts from E E Battery level warning The battery pack is nearly used up Depending on the operating environment o...

Page 81: ... tab p 84 Q The tape has reached the end p 19 23 Rewind or change the tape x Others Cannot record due to copyright protection p 83 Cannot add audio Disconnect the i LINK cable p 55 Not recorded in SP mode Cannot add audio p 55 Not recorded in 12 bit audio Cannot add audio p 55 Cannot add audio on the blank portion of a tape p 55 Cannot add audio p 55 You cannot add sound to a tape recorded on othe...

Page 82: ...that recorded it HDV recorded tape Cannot add audio Your camcorder does not allow you to add audio on a section of a tape recorded in HDV format p 55 Disconnect one AV cable A V connecting cables are connected to both the camcorder and the Handycam Station Disconnect one of them When the A V connecting cable is connected only to your camcorder your camcorder is not attached to the Handycam Station...

Page 83: ...have used EDIT SEARCH Copyright signal x When you play back If the cassette you play back on your camcorder contains copyright signals you cannot copy it to a tape in another video camera connected to your camcorder x For DCR HC26E HC35E When you record You cannot record software on your camcorder that contains copyright control signals for copyright protection of software Cannot record due to cop...

Page 84: ... battery pack An InfoLITHIUM battery pack is a lithium ion battery pack that has functions for communicating information related to operating conditions between your camcorder and an optional AC Adaptor charger The InfoLITHIUM battery pack calculates the power consumption according to the operating conditions of your camcorder and displays the remaining battery time in minutes To charge the batter...

Page 85: ...ted correctly Note however that the battery indication will not be restored if it is used in high temperatures for a long time or if left in a fully charged state or when the battery pack is frequently used Use the remaining battery time indication as a rough guide only The E mark that indicates low battery flashes even if there are still 5 to 10 minutes of battery time remaining depending on the ...

Page 86: ...tute of Electrical and Electronics Engineers About the i LINK Baud rate i LINK s maximum baud rate varies according to the device There are 3 types S100 approx 100Mbps S200 approx 200Mbps S400 approx 400Mbps The baud rate is listed under Specifications in the operating instructions of each piece of equipment It is also indicated near the i LINK interface on some devices The baud rate may differ fr...

Page 87: ...rate it Doing so might cause heat to build up inside When disconnecting the mains lead pull it by the plug and not the lead Do not damage the mains lead such as by placing anything heavy on it Keep metal contacts clean Keep the Remote Commander supplied with the DCR HC24E HC35E and button type battery out of children s reach If the battery is accidentally swallowed consult a doctor immediately If ...

Page 88: ...the screen during recording playback The video heads will wear after long use If you cannot obtain a clear image even after using a cleaning cassette optional it might be because the video heads are worn Please contact your Sony dealer or local authorized Sony service facility to have the video heads replaced LCD screen Do not exert excessive pressure on the LCD screen as it may cause damage If yo...

Page 89: ...s described above It is recommended that you operate your camcorder about once a month to keep it in optimum state for a long time On charging the pre installed rechargeable battery Your camcorder has a pre installed rechargeable battery to retain the date time and other settings even when the POWER switch is set to OFF CHG The pre installed rechargeable battery is always charged while your camcor...

Page 90: ...zation 12 bits Fs 32 kHz stereo 1 stereo 2 16 bits Fs 48 kHz stereo Video signal PAL color CCIR standards Usable cassette Mini DV cassette with the mark printed Tape speed SP Approx 18 81 mm s LP Approx 12 56 mm s Recording playback time SP 60 min using a DVM60 cassette LP 90 min using a DVM60 cassette Fast forward rewind time Approx 2 min 40 s using a DVM60 cassette and rechargeable battery pack ...

Page 91: ...E i LINK Interface IEEE1394 4 pin connector S100 LCD screen Picture 6 2 cm 2 5 type Total dot number 123 200 560 220 General Power requirements DC 7 2 V battery pack DC 8 4 V AC Adaptor Average power consumption During camera recording using the viewfinder 1 8 W During camera recording using the LCD 2 1 W Operating temperature 0 C to 40 C 32 F to 104 F Storage temperature 20 C to 60 C 4 F to 140 F...

Page 92: ... 31 100 mm 2 1 4 1 1 4 4 in w h d excluding the projecting parts Mass approx 190 g 6 7 oz excluding the mains lead 2 See the label on the AC Adaptor for other specifications Rechargeable battery pack NP FP30 Maximum output voltage DC 8 4 V Output voltage DC 7 2 V Capacity 3 6 Wh 500 mAh Dimensions approx 31 8 18 5 45 0 mm 1 5 16 3 4 1 13 16 in w h d Mass approx 40 g 1 5 oz Operating temperature 0 ...

Page 93: ...and Power Mac are trademarks of Apple Computer Inc in the U S and other countries QuickTime and the QuickTime logo are trademarks of Apple Computer Inc Adobe the Adobe logo and Adobe Acrobat are either registered trademarks or trademarks of Adobe Systems Incorporated in the United States and or other countries Roxio is a registered trademark of Roxio Inc Toast is a trademark of Roxio Inc Macromedi...

Page 94: ...tery pack 9 Pre installed rechargeable battery 89 Charging time 12 CHG charge lamp 10 Click to DVD 65 CLOCK SET 18 COMMANDER 50 Computer 58 60 Connect Computer 58 TV 33 VCR 33 51 54 D D ZOOM Digital zoom 45 DATA CODE 26 41 Date search 31 DATE TIME 18 26 41 DC IN jack 9 DC plug 9 DEMO MODE 49 68 DISP GUIDE Display guide 16 DISP OUT Display output 50 Display indicators 26 DISP BATT INFO button 16 25...

Page 95: ...OT PLUS switch 24 NTSC 83 N S LIGHT NightShot Light 46 O ONE PUSH 40 OPEN EJECT lever 19 Operation button 36 Operation confirmation beep See BEEP OTHERS menu 50 OUTDOOR 40 P P EFFECT Picture effect 44 PAL 73 83 PASTEL 45 PHOTO button 22 30 Photo scan 31 Photo search 31 Picture Package 58 Picture Search 23 Pixela user support center 64 Playback 23 Double speed 42 Frame 42 Reverse 42 Slow 42 PLAYER ...

Page 96: ...irements 59 T Tape counter 26 Tape photo recording 22 TAPE SET menu 48 Tape See Cassette Telephoto 24 Time code 26 Touch panel 16 Trademark 93 Transmitter 30 Tripod 25 TV 33 TV color systems 83 U USB jack 57 USB STREAM 49 USB Streaming 49 Using abroad 83 V V SPD PLAY Various speed playback 42 VCR SET menu 47 VF B L Viewfinder back light 47 Video control buttons 30 Video head 88 Video operation but...

Reviews: