background image

95

Network Operation

To delete bookmarks

You can delete bookmarks. We recommend that you delete unnecessary bookmarks
since you can only store up to 30 bookmarks.

(

1

)

Tap 

 (Bookmark).

The bookmark list appears.

,

(

2

)

Tap the bookmark you want to delete.

,

(

3

)

Tap [Delete].
The message “Delete This Bookmark?” used for verification appears.

,

(

4

)

Tap [OK].
The selected bookmark is deleted.

,

To cancel deleting the bookmark

Tap [Cancel] in step 4.

Viewing web pages

Summary of Contents for Handycam DCR-IP220

Page 1: ...3 078 153 11 1 Network Function Operating Instructions 2002 Sony Corporation Registration code for a detailed explanation of this cord see page 27 ...

Page 2: ...er If you use the network function without setting the clock you may not be able to send receive email or view a web page Do not remove the battery pack or disconnect the AC power adaptor while operating in NETWORK mode The setup for the NETWORK mode may be lost Also exit the NETWORK mode when setting the POWER switch to CHG OFF or switching the mode These are to prevent the NETWORK mode setup fro...

Page 3: ...ly 32 Setting network preferences 33 Setting your provider preferences for So net 33 Setting your provider preferences for AOL 37 Setting your provider preferences for other providers 43 Setting other preferences 49 Network Operation Making your Album on the Web 52 Uploading images to your Album on the Web 52 Viewing or editing your Album on the Web 59 Deleting images from your Album on the Web 64...

Page 4: ...ess the Internet via a compatible communicating device allowing you to do the following Introduction The network function on the camcorder Easy access to the Internet Sending receiving email Showing your still images and moving pictures on the Web Easy network preferences So net ...

Page 5: ...ee Using the recommended provider So net p 31 or refer to the supplied flyer Getting Online with your Sony Network Handycam camcorder Set your camcorder s clock setting before using the Network functions The default setting is off If you do not set the clock setting you cannot send and receive email or view web pages You also have to set up your camcorder and the peripheral device and complete req...

Page 6: ...e operating instructions supplied with your camcorder a For sending and or receiving email tap this button p 65 b For viewing a web page through the Internet tap this button p 89 c For uploading still images and moving pictures to your Album on the Web and storing them on the Internet and for showing them to your friends tap this button p 52 d For exiting the Network Menu tap this button e For mak...

Page 7: ...The selected button turns orange Notes Use the stylus supplied to tap the LCD screen Do not tap the LCD screen too hard Do not make the LCD screen wet When the LCD screen gets dirty use the supplied cleaning cloth You cannot drag icons like on a computer by touching and sliding across your camcorder screen with the stylus Refer to the operating instructions supplied with your camcorder for the sty...

Page 8: ...nction This section describes how to input characters 1 1 Open the Network Menu For details on how to open the Network Menu refer to Accessing the network in the operating instructions supplied with your camcorder 2 Tap Mail The Send screen appears 3 Tap To 4 Tap New The character input screen appears Basic operations in the NETWORK mode ...

Page 9: ...bc When inputting alphabetical characters 123 When inputting numerical characters When you selected abc When you selected 123 3 Inputting characters 1 Tap the character you want to input 2 After you input the characters tap Enter The Send screen appears again Basic operations in the NETWORK mode ...

Page 10: ...ge the keyboard type for alphabet input 5 Text area When the text is long you can scroll up or down the area by tapping v or V scroll button to display the hidden text 6 Enter button Tap this button to decide or close the input screen 7 button The cursor moves to a new line 8 Back space button Tap this button and the letter right before the cursor is deleted If you tap the button for about three s...

Page 11: ...tical order Key Character ˆ a à t á t â t a t A À t Á t  t A t e è t é t ê t e t E È t É t Ê t E t i ì t í t î t i t I Ì t Í t Î t I t o ò t ó t ô t o t O Ò t Ó t Ô t O t u ù t ú t û t u t U Ù t Ú t Û t U t y y t y t Y Y t Y t a ä t ã t a t A Ä t à t A t e ë t e t E Ë t E t i ï t i t I Ï t I t n ñ t n t N Ñ t N t o ö t õ t o t O Ö t Õ t O t u ü t u t U Ü t U t y ÿ t y t t t t t t t t t t çÇß ç t ...

Page 12: ... Move the cursor with the stylus to the right of the character at which you want to delete tap Back space The character at the left of the cursor is deleted To add a character Move the cursor with the stylus to the position at which you want to add a character then input characters To start a new line Tap When selecting 123 Symbol characters Numerical order 1 2 3 C 4 5 6 ˆ 7 8 9 0 _ ...

Page 13: ...end screen 1 1 Open the Network Menu For details on how to open the Network Menu refer to Accessing the network in the operating instructions supplied with your camcorder 2 Tap Mail The Send screen appears 2 Entering the subject of a message 1 Tap Subject 2 Tap New The character input screen appears ...

Page 14: ...14 Basic operations in the NETWORK mode 3 1 Tap abcy123 then tap abc 2 Tap a A to be able to enter upper case letters 3 Tap H H is entered 4 Tap a A to enter lower case letters ...

Page 15: ...15 Introduction Basic operations in the NETWORK mode 5 Tap e e is entered 6 Tap l l and o llo is entered 7 Tap Enter Hello is entered and the Send screen appears again ...

Page 16: ...nto a setup you want when you input characters 1 Tap in the character input screen 2 Tap the desired setting You can set as the following two displays when abcy123 is set as abc PC Style is the default setting PC Style PC arrangement keyboard Alphabetical order ABC arrangement keyboard To switch the setting tap on the upper right LCD screen Alphabetical order PC Style ...

Page 17: ...der To fully use the function in the NETWORK mode you have to complete the following registrations and setup tasks via your camcorder 1 Bluetooth device registration p 19 2 DI customer registration p 27 3 Album registration p 30 4 So net registration p 32 5 Network Setup p 33 So net registration is not necessary to use other providers The above registrations can also be done on the web site using ...

Page 18: ...data encryption Authentication The authentication routine can block unspecified users access to this network When attempting communication with an unregistered Bluetooth device the devices must first be registered with each other by entering a common passkey to each device When connecting with a previously registered Bluetooth device communication starts without entering the passkey Tip on Passkey...

Page 19: ... Modem Adaptor with Bluetooth Function Connecting your camcorder to a Bluetooth device by Bluetooth wireless technology and communicating Notes When using Sony BTA NW1 BTA NW1A Modem Adaptor with Bluetooth Function place it at a location that has no obstacles between your camcorder and the device The distance between the devices must be within 10 m 33 feet The connection may be interrupted dependi...

Page 20: ...h Function as the connection device 1 Open the Network Menu For details on how to open the Network Menu refer to Accessing the network in the operating instructions supplied with your camcorder 2 Tap Setup The Setup screen appears 3 Tap Bluetooth Setup The Bluetooth Setup screen appears ...

Page 21: ...rts searching for your Bluetooth devices When the searching is completed the available Bluetooth devices list appears When some Bluetooth devices with the same name appear display each Bluetooth device address by tapping More info Notes The search takes from about 10 to 60 seconds The time depends on the number of Bluetooth devices around your camcorder If the Bluetooth device you want to register...

Page 22: ...e permitted after entering the passkey This Passkey is also referred to as a Bluetooth passkey PIN Bluetooth PIN etc For details refer to the operating instructions supplied with your Bluetooth adaptor 8 Tap Enter After the registration is completed the Bluetooth Setup screen appears again Bluetooth Registration Complete message is displayed 9 Tap OK The selected Bluetooth device is specified Note...

Page 23: ...tor with Bluetooth Function 11 Tap Exit The Network Menu appears again The registration is complete and your camcorder can communicate with your Bluetooth device Displaying information on your camcorder 1 Open the Network Menu For details on how to open the Network Menu refer to Accessing the network in the operating instructions supplied with your camcorder Communicating with Bluetooth devices ...

Page 24: ...ion screen appears To return Bluetooth Setup screen Tap Return Communicating with Bluetooth devices The model name This is the unique address assigned to each camcorder at the factory This address is used when exchanging information between devices This address cannot be modified The number indicated on the illustration is an example number ...

Page 25: ...ered Bluetooth device from the list When deleting a Bluetooth device from the list follow the procedure below 1 Open the Network Menu For details on how to open the Network Menu refer to Accessing the network in the operating instructions supplied with your camcorder 2 Tap Setup The Setup screen appears 3 Tap Bluetooth Setup The Bluetooth Setup screen appears Communicating with Bluetooth devices ...

Page 26: ...Bluetooth devices 4 Tap Select The Bluetooth devices list appears 5 Tap the device you want to delete The device name and address of the selected device are indicated 6 Tap Delete The selected device is deleted from the list ...

Page 27: ...an make your DI customer registration using your computer The URL of the web site for online registration is http www myimagecam com Tip We recommend the online registration with your computer if you have a computer and you want to reduce inputting characters on your camcorder Online registration with your camcorder You can make your DI customer registration with your camcorder For online registra...

Page 28: ...camcorder starts connecting to the site Once the connection is completed the online registration screen appears Set the Bluetooth device to connection standby using the camcorder beforehand For details refer to the operating instructions supplied with your Bluetooth device 4 Register your information following the on screen guidance When registering for the first time tap Registration link from th...

Page 29: ... page 117 You can continue to register your Album on the Web and or So net after DI customer registration Before the registering your Album on the Web be sure to read Online Privacy Policy p 118 and Membership Agreement p 123 Before the registering So net refer to the supplied flyer Getting Online with your Sony Nework Handycam camcorder You can also register your Album on the Web and or So net af...

Page 30: ...egistration screen following the procedure described in Online registration with your camcorder p 27 2 Tap Login link 3 Enter your DI customer ID and password and log in 4 Tap Album sign up link 5 Complete the album registration following the on screen guidance Tip on Member name Your member name is a nickname used on the ImageStation web site Once you register your member name that member name is...

Page 31: ...ndycam camcorder The So net option makes it easy to set the Internet and email preferences Once you complete your DI customer registration you can get your DI customer ID and password Entering your DI customer ID password and the telephone number of an access point you can access the Internet right away For details on setup see Setting your provider preferences for So net p 33 Using America Online...

Page 32: ...registration with your camcorder p 27 2 Tap Login link 3 Enter your DI customer ID and password and log in 4 Tap So net sign up link 5 Input necessary items for registering So net as following message on the screen You can search information about access point on the registration web site For details refer to the supplied flyer Getting Online with your Sony Network Handycam camcorder Tips Be sure ...

Page 33: ...cess the Internet Setting your provider preferences for So net 1 Entering your DI customer ID and password 1 Open the Network Menu For details on how to open the Network Menu refer to Accessing the network in the operating instructions supplied with your camcorder 2 Tap Setup The Setup screen appears 3 Tap Network Setup The Network Setup screen appears Setting network preferences ...

Page 34: ...n appears again 7 Tap Password The character input screen appears 8 Enter your password For details on how to input characters see How to input characters p 8 Note When you check the item Verify Password in the Network Options screen you cannot enter your password If you try to enter it the message Password Already Set Check the Password Profile appears Setting network preferences ...

Page 35: ... However after it has been entered each character is indicated as If you enter your password again delete all before entering the password 2 So net settings 1 Confirm So net is checked If So net is not checked tap So net to be checked a is changed to 2 Tap Setting The Provider Setting So net screen appears Setting network preferences ...

Page 36: ...w to input characters p 8 Note Do not insert hyphens or spaces in the telephone number e g 0312345678 3 Tap Enter The Provider Setting So net screen appears again Tip You can also register the telephone numbers of access points into TEL2 and TEL3 If necessary enter the numbers into TEL2 and TEL3 4 Tap Exit The telephone number registration is complete and the Network Setup screen appears again 5 T...

Page 37: ...1 described below go to 2 AOL settings Before setting your provider preferences for AOL go to keyword Handycam on your computer to learn how to simplify your setup procedure 1 Open the Network Menu For details on how to open the Network Menu refer to Accessing the network in the operating instructions supplied with your camcorder 2 Tap Setup The Setup screen appears 3 Tap Network Setup The Network...

Page 38: ...n appears again 7 Tap Password The character input screen appears 8 Enter your password For details on how to input characters see How to input characters p 8 Note When you check the item Verify Password in the Network Options screen you cannot enter your password If you try to enter it the message Password Already Set Check the Password Profile appears Setting network preferences ...

Page 39: ...d characters they are visible as they are However after it has been entered each character is indicated as If you enter your password again delete all before entering the password 2 AOL settings 1 Tap AOL a is changed to 2 Tap Setting AOL Network Setup screen appears Setting network preferences ...

Page 40: ...twork Setup screen appears again 4 Tap Password The character input screen appears 5 Enter your password For details on how to input characters see How to input characters p 8 Note When you check the item Verify Password in the Network Options screen you cannot enter your password If you try to enter it the message Password Already Set Check the Password Profile appears Setting network preferences...

Page 41: ...password 7 Tap TEL No The telephone number list appears 8 Tap TEL No 1 The character input screen appears 9 Enter the telephone number of the access point For details on how to input characters see How to input characters p 8 Notes Before setting your provider preferences with AOL go to keyword Handycam on your computer to learn how to simplify your setup procedure Do not insert hyphens or spaces ...

Page 42: ...EL No 2 and TEL No 3 If necessary enter the numbers into TEL No 2 and TEL No 3 11 Tap Exit The setup of AOL option is complete and the Network Setup screen appears again 12 Tap Exit The setup is complete and the Setup screen appears again For more detailed setup go to Setting other preferences p 49 Setting network preferences ...

Page 43: ... on the Web after completing the procedure from step 1 to step 3 of 1 described below go to 2 Selecting your provider 1 Open the Network Menu For details on how to open the Network Menu refer to Accessing the network in the operating instructions supplied with your camcorder 2 Tap Setup The Setup screen appears 3 Tap Network Setup The Network Setup screen appears Setting network preferences ...

Page 44: ...n appears again 7 Tap Password The character input screen appears 8 Enter your password For details on how to input characters see How to input characters p 8 Note When you check the item Verify Password in the Network Options screen you cannot enter your password If you try to enter it the message Password Already Set Check the Password Profile appears Setting network preferences ...

Page 45: ...s they are visible as they are However after it has been entered each character is indicated as If you enter your password again delete all before entering the password 2 Selecting your provider 1 Tap Custom a is changed to 2 Tap Setting The Provider Setup Custom screen appears Setting network preferences ...

Page 46: ...also referred to as a PPP password network password connection password etc DNS1 Enter the DNS Domain Name System server address of your provider Tips This DNS1 is also referred to as a name server primary DNS server primary name server etc This entry may be unnecessary depending on your provider For details consult your provider DNS2 Enter the secondary DNS server address of your provider if nece...

Page 47: ...rred to as a mail address email address etc POP Enter the POP Post Office Protocol server address of your provider The POP server is for receiving email Tip This POP Server is also referred to as a mail server POP3 server etc SMTP Enter the SMTP Simple Mail Transfer Protocol server address of your provider The SMTP server is for sending email Tip This SMTP Server is also referred to as a mail serv...

Page 48: ...erver of your provider Tip These entries may be unnecessary depending on your provider For details consult your provider 7 Tap Exit The setup is completed and the Network Setup screen appears again 8 Tap Exit The Setup screen appears again For more detailed setup go to Setting other preferences p 49 Setting network preferences ...

Page 49: ...the PPP screen You still have to enter your provider access password each time you connect to prevent anyone else from connecting with your ID Note When this item is checked you cannot set the following passwords Password for DI Customer Setup when using So net Password for AOL Network Setup when using AOL Password for PPP screen when using Custom Time Out Select whether the connection is automati...

Page 50: ...pt a cookie When you do not want to send your personal information do not check this item This item is checked at the default setting Image Display Select whether to display images on the screen when viewing a web page This item is checked at the default setting Reset Reset all the items on the Network Options screen except Signature and Modem Init Note A verification message does not appear when ...

Page 51: ...ak the number of available characters is less than 4 000 You tried to download email when the Memory Stick is already full 2 c Delete the email and delete unnecessary email messages or image files in the Memory Stick then download your email again c Insert another Memory Stick that has sufficient memory then download your email again You tried to download email whose size is over the size set in t...

Page 52: ...ading images to your Album on the Web Once you have an Album on the Web you can upload images to the album and send invitation cards email to your friends This section describes how to upload your images and send invitation cards email As for moving images upload within the file size constraints of ImageStation For details access the ImageStation web site http www imagestation com us PC Before ope...

Page 53: ...n appears 3 Tap Upload The Album Upload screen appears 4 Tap Album No The album list page appears 5 Tap the desired album Selecting the album is complete The number of available albums You can use 10 albums Album 01 to 10 Making your Album on the Web ...

Page 54: ...ist Tap or The next or previous page that contains six images appears 3 Repeat step 2 to select other images Notes The number of images you can upload once is up to 99 and the total file size is up to 3MB You can upload images to only one album once 4 Tap OK The Album Upload screen appears again The total number of selected images and the total file size are indicated When you only want to upload ...

Page 55: ...red in the address book For details on the address book see Using the address book p 76 When you have selected the address listed in the address book go to step 6 Tips The most recently used address is listed next to New Addresses are listed in historical order 3 Tap New The character input screen appears 4 Enter the email address of the destination address For details on how to input characters s...

Page 56: ...d by the checkmark 7 Tap Return The Album Invitation screen appears again Note You can register up to 50 addresses in the address book If you register the 51st address the least recently used address is overwritten The message Address Book Full Overwrite the Data with Current Address appears for verification To overwrite it tap OK Otherwise you tap Cancel and delete the unnecessary address from th...

Page 57: ...ly Tap the message to use from the list When desired text is selected tap OK After you select the message go to 5 Uploading images p 58 If you want to edit text tap Edit The character input screen appears Go to step 3 2 Tap New The character input screen appears 3 Enter your text For details on how to input characters see How to input characters p 8 Note The maximum number of characters you can en...

Page 58: ... for verifying the connection appears 2 Check the telephone number of the access point When dialing other telephone numbers Tap TEL No The list of the registered telephone number s appears Tap the desired telephone number to select it To connect to an outside line for example in a hotel check the item Prefix No and enter the prefix number 3 Tap Connect Your camcorder starts dialing the selected te...

Page 59: ...mail p 55 4 Entering the text of a message p 57 5 Uploading images p 58 After the invitation card has been sent the message Invitation Mail Complete appears Viewing or editing your Album on the Web You can view or download p 114 images from your Album on the Web 1 Viewing images 1 Open the Network Menu For details on how to open the Network Menu refer to Accessing the network in the operating inst...

Page 60: ...n outside line for example in a hotel check the item Prefix No and enter the prefix number 5 Tap Connect Your camcorder starts dialing the selected telephone number After the connection is completed the album list page appears 6 Tap the album number that you want to view or edit The index page appears To view other images tap or To view other albums tap To see a description of each function button...

Page 61: ...p 62 Selecting one image displayed on the single image page You can select one image displayed on the single image page and download it For details see To select one image displayed on the single image page p 63 2 Check the number of images and the total file size When you selected When you selected one image two or more images To cancel downloading the images Tap Cancel 3 Tap OK The message Downl...

Page 62: ... images You can download JPG and MPG files When you download images modified with your computer or images recorded with other devices your camcorder may not be able to play back the images properly To select images from the index page 1 Tap the check box of the desired image The check box under the selected image is indicated by the checkmark 2 When you select other images repeat step 1 3 Tap The ...

Page 63: ...ull screen and download it 1 When the index page is displayed tap the image to be enlarged The image is indicated on the single image page 2 When you want to view other image tap or 3 Tap The screen for verification appears To return to the index page Tap To return to the album list page Tap Making your Album on the Web ...

Page 64: ...he album is empty The message There is no picture in this album appears To return to the Album list page tap Finishing viewing or editing your Album on the Web To finish viewing or editing your Album on the Web and to disconnect the phone line 1 When the menu bar is not displayed tap menu on the upper right LCD screen The menu bar appears 2 Tap END Your Album on the Web is closed then the line is ...

Page 65: ...fic attributes go to keyword Handycam on your computer Sending email By entering the email address of the destination you can send a message instantly by email 1 Specifying the destination address Be careful to enter the address correctly Tip You can select the email address from the address book For details see Selecting the destination address from the address book p 81 1 Open the Network Menu F...

Page 66: ...character input screen appears 5 Enter the email address of an addressee For details on how to input characters see How to input characters p 8 When addressing email including to other AOL members the recipients entire email address must be entered into the To field e g johndoe aol com 6 Tap Enter The Send screen appears again The new email address is listed and its check box is indicated by the c...

Page 67: ...e Send screen appears again Note You can register up to 50 addresses in the address book If you register the 51st address the least recently used address is overwritten The message Address Book Full Overwrite the Data with Current Address appears for verification To overwrite it tap OK Otherwise you tap Cancel and delete the unnecessary address from the address book then enter and register a new a...

Page 68: ...he subject go to 3 Entering the text of a message p 69 Tip The most recently used subject is listed under Return and New You cannot edit or delete the subject 2 Tap New The character input screen appears 3 Enter the subject For details on how to input characters see How to input characters p 8 Note The maximum number of characters you can enter is 24 4 Tap Enter The Send screen appears again Using...

Page 69: ...wrote previously tap the message from the list When you do not edit message tap OK After you select the message go to 4 Sending email p 70 If you edit the selected text tap Edit The character input screen appears Go to step 3 2 Tap New The character input screen appears 3 Enter your message For details on how to input characters see How to input characters p 8 Note The maximum number of characters...

Page 70: ...mcorder beforehand For details refer to the operating instructions supplied with your Bluetooth device 4 Check the telephone number of the access point When dialing other telephone numbers Tap TEL No The list of the registered telephone number s appears Tap the desired telephone number to select it To connect to an outside line for example in a hotel check the item Prefix No and enter the prefix n...

Page 71: ...ncel Tip You can set to check the email inbox automatically after sending email For details see Setting other preferences p 49 Checking or editing a message 1 Display the Send screen 2 Tap Message The message list appears 3 Tap the message you want to check or edit The following screen appears Using email ...

Page 72: ...ge When you only check the message After checking the message tap OK The Send screen appears again When you edit the message Go to step 5 5 Tap Edit The character input screen appears 6 Edit the message For details on how to input characters see How to input characters p 8 7 Tap Enter The Send screen appears again Using email ...

Page 73: ... 2 Entering the subject of a message p 68 and 3 Entering the text of a message p 69 The Send screen appears 2 Tap Attach The images recorded in the Memory Stick appear 3 Tap the desired images to attach The selected image is indicated by the checkmark To page up or down the index list Tap or The next or previous page appears To cancel selecting image Tap the image again The checkmark will disappea...

Page 74: ...scribed in 4 Sending email p 70 from step 3 Note Sending procedure may take long depending on the file size of the image Attaching your signature to a message You can attach your signature to the last column of the email message You can enter information such as your name address and phone number as a signature 1 Open the Network Menu For details on how to open the Network Menu refer to Accessing ...

Page 75: ...Network Options The Network Options screen appears 4 Tap Signature The character input screen appears 5 Enter your signature For details on how to input characters see How to input characters p 8 Note The maximum number of characters you can enter is 256 Using email ...

Page 76: ...sed email addresses in the address book you can send email without entering the email address manually Registering destination addresses in the address book You can register frequently used email addresses in the address book You can register up to 50 addresses Be careful to enter the address correctly 1 Open the Network Menu For details on how to open the Network Menu refer to Accessing the netwo...

Page 77: ...ess screen appears 3 Tap New The Address Book New screen appears 4 Tap Name The character input screen appears 5 Enter the destination name For details on how to input characters see How to input characters p 8 Note The maximum number of characters you can enter in the Name box is 24 Using email ...

Page 78: ...ess For details on how to input characters see How to input characters p 8 When addressing email including to other AOL members the recipients entire email address must be entered into the To field e g johndoe aol com 9 Tap Enter The Address Book New screen appears again 10 Tap Return The Address screen appears again Using email ...

Page 79: ...ress book To edit the address see Editing or deleting the address book below Editing or deleting the address book You can edit or delete the names or email addresses in the address book 1 Follow steps 1 and 2 in Registering destination addresses in the address book p 76 The Address screen appears 2 Display the address you want to edit or delete by tapping or 3 Tap Edit to select the address The Ad...

Page 80: ...lete an address tap Delete When verification appears tap OK When you stop deleting tap Cancel 5 Edit the name or address For details on how to input characters see How to input characters p 8 6 Tap Enter The Address Book Edit screen appears again 7 Tap Return The Address screen appears again 8 Check the name or address 9 Tap Exit The Network menu appears again Using email ...

Page 81: ...ow steps 1 and 2 in Registering destination addresses in the address book p 76 The Address screen appears 2 Select the address you want to send email by tapping or 3 Tap tTo The Send screen appears The selected address is set as the destination address 4 Carry out the procedures described in 2 Entering the subject of a message p 68 Using email ...

Page 82: ... leave a copy of your in coming messages on the mail server even if you download the message using your camcorder For details see Setting other preferences p 49 1 Open the Network Menu For details on how to open the Network Menu refer to Accessing the network in the operating instructions supplied with your camcorder 2 Tap Mail If the Receive screen is not displayed select the Receive from the Sen...

Page 83: ...xample in a hotel check the item Prefix No and enter the prefix number 6 Tap Connect Your camcorder starts dialing the selected telephone number When an email message has been sent to you your camcorder downloads it and the message Receiving Mail Complete appears Tap OK The phone line is automatically disconnected after email is received 7 When an email message has been received tap the area where...

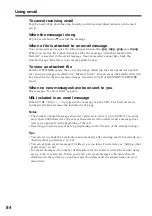
Page 84: ...ew messages have been sent to you The message No New Mail appears URL included in an email message When a URL http is typed in the message tap the URL The browser starts automatically and accesses the indicated web page Notes The number of email message characters allowed to enter is up to 4 000 If you enter more than 4 000 characters the excess characters will be deleted and a message that tells ...

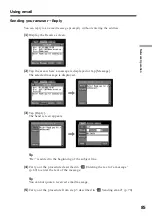
Page 85: ...splayed or tap Message The selected message is displayed 3 Tap Reply The Send screen appears Tip Re is added to the beginning of the subject line 4 Carry out the procedure described in 3 Entering the text of a message p 69 to enter the text of the message Tip You cannot quote a received email message 5 Carry out the procedure from step 3 described in 4 Sending email p 70 Using email ...

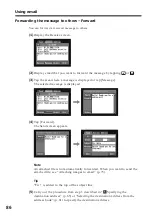
Page 86: ...e selected message is displayed 4 Tap Forward The Send screen appears Note An attached file is not automatically forwarded When you want to send the attached file see Attaching images to email p 73 Tip Fw is added to the top of the subject line 5 Carry out the procedure from step 3 described in 1 Specifying the destination address p 65 or Selecting the destination address from the address book p 8...

Page 87: ...receive and store up to 50 email messages in a Memory Stick The 51st email message may not be received and an error message appears Before operation Release the lock of the Memory Stick Insert the Memory Stick that the email message you want to delete is stored in into your camcorder 1 Open the Network Menu For details on how to open the Network Menu refer to Accessing the network in the operating...

Page 88: ...e the message by tapping or The selected message is displayed 4 Tap Delete The message Delete This Mail used for verification appears 5 Tap OK The selected email message is deleted To cancel deleting email Tap Cancel in step 5 Using email ...

Page 89: ...page and then access the Internet Be careful to enter the address correctly Tip on URL A web site has a unique address on the Internet The address is called a URL This URL is required to access a web site 1 Open the Network Menu For details on how to open the Network Menu refer to Accessing the network in the operating instructions supplied with your camcorder 2 Tap Browser The following screen ap...

Page 90: ...e access point When dialing other telephone numbers Tap TEL No The registered telephone number list appears Tap the desired telephone number to select it To connect to an outside line for example in a hotel check the item Prefix No and enter the prefix number 8 Tap Connect Your camcorder starts dialing the selected telephone number After the connection is completed the web page selected in step 4 ...

Page 91: ... the previous page in your step Next Page Go to the next page in your step Refresh Refresh the current page Use this button when images or characters on the web page are not displayed properly Stop Stop loading the current page Zoom Change the page size Help Display the introduction of each button Bookmark Bookmark the current page Bookmarks are stored in the camcorder Bookmarking is convenient to...

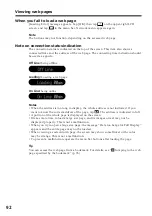
Page 92: ... display the whole address is not indicated If you want to know the correct address of the page tap The address is indicated in full A portion of the whole page is displayed on the screen It takes more time to load a large size page and its images or text may not be displayed properly This is not a malfunction When you try to open a large size page the message Data too Large for Full Display appea...

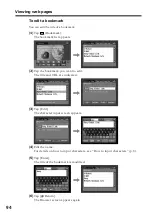
Page 93: ...r is not displayed tap menu on the upper right LCD screen The menu bar appears 3 Tap Bookmark The bookmark list appears 4 Tap Add The bookmark is added and the display returns to the web page Notes The phone line may not be disconnected automatically If this happen disconnect the phone line manually p 102 You cannot bookmark a web page that the URL is more than 256 characters Viewing web pages ...

Page 94: ...the bookmark you want to edit The title and URL are indicated 3 Tap Edit The character input screen appears 4 Edit the name For details on how to input characters see How to input characters p 8 5 Tap Enter The title of the bookmark is modified 6 Tap Return The Browser screen appears again Viewing web pages ...
Page 95: ...rks since you can only store up to 30 bookmarks 1 Tap Bookmark The bookmark list appears 2 Tap the bookmark you want to delete 3 Tap Delete The message Delete This Bookmark used for verification appears 4 Tap OK The selected bookmark is deleted To cancel deleting the bookmark Tap Cancel in step 4 Viewing web pages ...

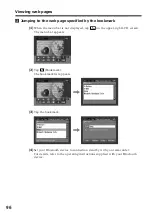
Page 96: ... tap menu on the upper right LCD screen The menu bar appears 2 Tap Bookmark The bookmark list appears 3 Tap the bookmark 4 Set your Bluetooth device to connection standby with your camcorder For details refer to the operating instructions supplied with your Bluetooth device Viewing web pages ...

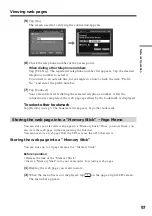
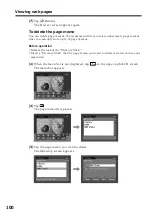
Page 97: ... is displayed To select other bookmark Tap Return in step 5 The bookmark list appears Tap other bookmark Storing the web page into a Memory Stick Page Memo You can store your favorite web pages in a Memory Stick Once you store them you can view the web page without accessing the Internet You cannot store a web page that the URL is more than 256 characters Storing the web page into a Memory Stick Y...

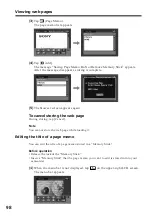
Page 98: ...e During storing tap Cancel Note You cannot store the web page while loading it Editing the title of a page memo You can edit the title of a page memo stored in a Memory Stick Before operation Release the lock of the Memory Stick Insert a Memory Stick that the page memo you want to edit is stored in into your camcorder 1 When the menu bar is not displayed tap menu on the upper right LCD screen The...

Page 99: ... memo you want to edit The title and URL of the selected page memo are indicated 4 Tap Edit The character input screen appears 5 Edit the name For details on how to input characters see How to input characters p 8 6 Tap Enter The title of the page memo is edited Viewing web pages ...

Page 100: ... to 30 page memos Before operation Release the lock of the Memory Stick Insert a Memory Stick that the page memo you want to delete is stored in into your camcorder 1 When the menu bar is not displayed tap menu on the upper right LCD screen The menu bar appears 2 Tap The page memo list appears 3 Tap the page memo you want to delete The following screen appears Viewing web pages ...

Page 101: ...ears again To cancel deleting the page memo Tap Cancel in step 5 Displaying a web page stored in page memo You can display a page memo stored in a Memory Stick Before operation Insert the Memory Stick that the page memo you want to display is stored in into your camcorder 1 When the menu bar is not displayed tap menu on the upper right LCD screen The menu bar appears 2 Tap The page memo list appea...

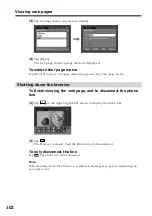
Page 102: ...utting down the browser To finish viewing the web page and to disconnect the phone line 1 Tap menu on the upper right LCD screen to display the menu bar 2 Tap END The browser is closed then the phone line is disconnected To only disconnect the line Tap The phone line is disconnected Note When shutting down the browser a verification message may appear depending on your camcorder Viewing web pages ...

Page 103: ...the network CAMNET01 RCV MBX Incoming email list IMAGEMEM CNF Page memo management file MEMOssss MEMOssss HTM Page memo HTML file IMGssss JPG Page memo still image file IMGssss GIF Page memo image file IMGssss PNG Page memo image file IMGssss XBM Page memo image file Do not delete these files These are required files even though they cannot be verified using a computer Additional Information File ...

Page 104: ...g type setup of the Modem Adaptor with Bluetooth function may be wrong Check the setup The message Bluetooth Connection Error is indicated and your camcorder cannot access the Internet c Check that the Bluetooth device is turned on c Install the Bluetooth device nearer to your camcorder The message Phone Line Disconnected is indicated when making an entry in the online registration procedure c Dat...

Page 105: ...n this and other AOL specific attributes go to keyword Handycam on your computer c When setting network preferences using the custom setup Check your setup according to the procedure described in Setting your provider preferences for other providers p 43 c All of your downloaded email messages are stored in the Memory Stick Insert a new Memory Stick that has sufficient memory and download your ema...

Page 106: ...ayed c When the page has been made using the software such as Macromedia Flash the page does not correspond to the browser of your camcorder c The web page may also be using JavaScript and Java Applets that cannot be executed with incompatible commands It takes some time to load the web page c When the web page is busy try to connect through other providers or other access points or connect during...

Page 107: ... use the Album on the Web You cannot view or edit your album send an invitation card or upload images An error code is indicated c See Album error codes p 113 It takes some time to load the album c When the web site is busy try to connect through other providers or access points or connect during off peak times The image cannot be deleted c There may be no images Tap The image cannot be downloaded...

Page 108: ...UCH PANEL then keep pressing DISPLAY TOUCH PANEL for about five seconds 5 Follow the procedure below with your finger or the supplied stylus 1 Touch at the upper left corner 2 Touch at the lower right corner 3 Touch in the middle of the LCD screen If you do not press the right spot always returns to the position at the upper left corner Note You can only carry out this operation with the LCD scree...

Page 109: ...es attached to email 99 The maximum file size of images attached to email 3 MB Signature The number of characters 256 Address book The registrable number of destination addresses 50 The maximum number of characters of a name 24 The maximum number of characters of an email address 64 Receiving Compatible attachment file standards Extension jpg mpg jpeg mpeg The maximum number of characters of an em...

Page 110: ...e pass key was wrong The pass key transmission failed The Bluetooth device was turned off The Bluetooth device is too far from your camcorder The Bluetooth device became impossible to connect No Bluetooth devices are registered Register the Bluetooth device p 19 Your ID or password entered on the PPP screen during manual setup may be wrong p 46 Check the connection status The telephone number ente...

Page 111: ... Password for DI Customer ID Enter PPP Password Enter AOL Password Saving the Profile Album on the Web Message Cause and or Corrective Actions Album Server Disconnected Upload Error Outgoing Mail Error Select Pictures Wrong File Unable to Save This File Check the File Type Memory Stick Directory Error No Picture Files When an 4 digit error code is indicated see Album error codes p 113 Messages For...

Page 112: ...fe tap OK You tried to open a page which is not SSL protected When you know that the page is safe tap OK The warrant of the page is no longer valid When you know that the page is safe tap OK The clock is not set up on your camcorder Set up the clock setting The certification of the page may be broken wrong or it may be of other pages When you know that the page is safe tap OK You cannot display th...

Page 113: ...stered There was an error in saving the file in the album The email address you are trying to send is invalid There is no message in the invitation There is an error with the image file in the album Login error Not logged into album The image is too large to upload Unable to read the image format Login error The server is unable to send now The authentication server is temporarily busy Unable to r...

Page 114: ...ial up connection Most Internet service providers charge for the time connected Cookie p 50 Used by the operator of an Internet site to identify the user This is frequently used in online shopping Dial up connection The dial up connection is used to access the Internet using a phone line DNS p 46 An abbreviation for Domain Name System This DNS is also referred to as a name server primary DNS serve...

Page 115: ...r in combination with a user ID POP3 p 47 An abbreviation for Post Office Protocol Version 3 This is a server used to receive email PPP p 46 An abbreviation for Point to Point Protocol Version 3 This is a protocol for accessing a provider using a dial up connection Proxy p 48 A server or program to make a computer located inside a firewall pass through the firewall Reply p 85 To reply to a previou...

Page 116: ...mail message Upload p 52 Load data such as still images and moving pictures from your camcorder to the server through the phone line URL p 89 An abbreviation for Uniform Resource Locator An address on the Internet By specifying this address you can access the web page Web page p 89 A web site that makes information available on the Internet When the page includes Web links you can specify other pa...

Page 117: ...Name Password TEL No 1 TEL No 2 TEL No 3 Custom PPP ID Password DNS1 DNS2 TEL No 1 TEL No 2 TEL No 3 Mail User ID Password Address POP Server SMTP Server Browser Proxy Port Setup memo Example XXXXXXX abc123 xxx so net com hcHZ7yd 192 168 0 1 192 168 0 2 XXXXXXX abc123 hcHZ7yd abc123 xxx so net com pop xxx so net com smtp xxx so net com proxy xxx so net com 8080 XXXXXXX ...

Page 118: ...y referring sites SEL may use several technologies to accomplish this Examples of such technologies are cookies and Web beacons When you visit SEL s Web sites or advertisements appearing thereon or use one or more of the SEL Web site services we may use an industry wide technology called cookies which stores certain information on your computer and which will allow us to customize your experience ...

Page 119: ...he requested information In addition with each communication you receive from SEL you will be given the opportunity to indicate if you do not wish to receive future communications from that company With your consent SEL may share your personal information with third parties outside of the Sony group of companies who may want to contact you about products services or other offerings that may be of ...

Page 120: ...ny of the child s personal information please note the following i The names addresses telephone numbers and email addresses of the operators collecting or maintaining personal information from children through this Web site are Sony Electronics Inc 1 Sony Drive Park Ridge New Jersey 07656 Telephone 201 930 4800 e mail address PIM am sony com Sony Electronics e Solutions Company LLC 155 Tice Boule...

Page 121: ...he Initial Notification to the parent guardian indicating among other things the information that the child is requested to provide the intended use s of the information and information on how the parent guardian can at their election delete the child s information from SEL s database or records Upon receipt of the Initial Notification a parent or guardian may respond back to SEL to grant his her ...

Page 122: ...or about this Privacy Statement please feel free to send us an email at PIM am sony com or write us at Sony Electronics Inc Personal Information Management Office 1 Sony Drive MD TA3 12 Park Ridge New Jersey 07656 Please check http www sel sony com SEL legal privacy html for latest information ...

Page 123: ...Site or broadcast messages through the Service to inform you of changes to this Membership Agreement the Service or other matters of importance Such posting or broadcast will constitute notice to you Any amendment to the Membership Agreement shall be effective immediately upon posting of the notice or broadcast of the message Your continued use of the Service after such notice or broadcast will re...

Page 124: ...the Site any Member Content that a Uses materials of others that are protected by copyright trademark or trade secrets patent or other intellectual property law without the express permission of the author or owner b Contains false or misleading statement of facts or description of the origin of the material or communications c Violates anyone s copyright moral rights author s rights trade secrets...

Page 125: ...t You agree that ImageStation may use the Member Content that you provide and make available on the Community Area by selecting such an option when uploading materials on the Site or at a later time at any time for any other purposes With respect to your Private Member Content such license includes without limitation granting ImageStation and its contractors the right to access display reproduce m...

Page 126: ...ther approvals b you have the right to use upload publish display the Member Content linked to your user ID c you have the right to grant the licenses granted herein and d the use by ImageStation of the rights that you grant ImageStation in this Membership Agreement will not violate the rights of any third parties including without limitation your employer and your clients 9 Code of Conduct ImageS...

Page 127: ...ile content or materials posted displayed or stored on or through the Site will not be altered deleted or damaged or will be available for access upload or download at all times or indefinitely f as to the result that may be obtained from the use of the Service g that the Site or the Service is free of viruses or other components that may infect harm or cause damage to computer equipment data soft...

Page 128: ...f despite the above limitations Sony and or ImageStation were found responsible to a Member for any reason whatsoever this liability will not exceed one hundred dollars 100 13 Privacy It is ImageStation s policy to respect the privacy of all of its customers For more information please see our full privacy policy 14 Site Content Domestic and foreign copyright trademark patents and other intellectu...

Page 129: ... the alleged infringement ImageStation will re post or unblock the material within 14 days after receiving the counter notification If you believe that your work has been copied in a way that constitutes copyright infringement and appears on the Site please provide ImageStation s copyright agent designated below the following information 1 an electronic or physical signature of the person authoriz...

Page 130: ...ion thereto or become dissatisfied with the Service the Site or any materials data text images video audio music sound or other Site Content or any transaction entered into through the Site or Service your only recourse is to immediately discontinue use of the Service and notice ImageStation of such termination The preceding sentence sets forth your sole and exclusive remedy regarding any objectio...

Page 131: ... and any ImageStation representatives with respect to the Service and your Member Content If a court of competent jurisdiction holds that any provision of this Membership Agreement is illegal unenforceable or contrary to law such provision shall be construed as nearly as possible to reflect the original intent of this Membership Agreement with the other provisions remaining in full force and effec...

Page 132: ...Printed in Japan Printed on 100 recycled paper using VOC Volatile Organic Compound free vegetable oil based ink ...

Reviews: