background image

GB

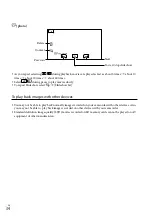
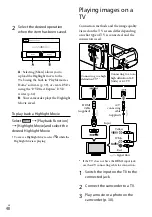
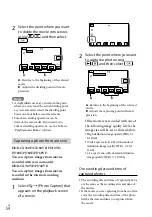
Select the desired operation 
when the item has been saved.

A

:

  Selecting [Share] allows you to 

upload the Highlight movie to the 
Web using the built-in “PlayMemories 
Home” software (p. 59), or create DVDs 
using the “DVDirect Express” DVD 
writer (p. 62)

B

:

  Your camcorder plays the Highlight 

Movie saved.

To play back a Highlight Movie

Select 


 [Playback Function] 

 [Highlight Movie] and select the 

desired Highlight Movie.

To erase a Highlight Movie, select   while the 

Highlight Movie is playing.

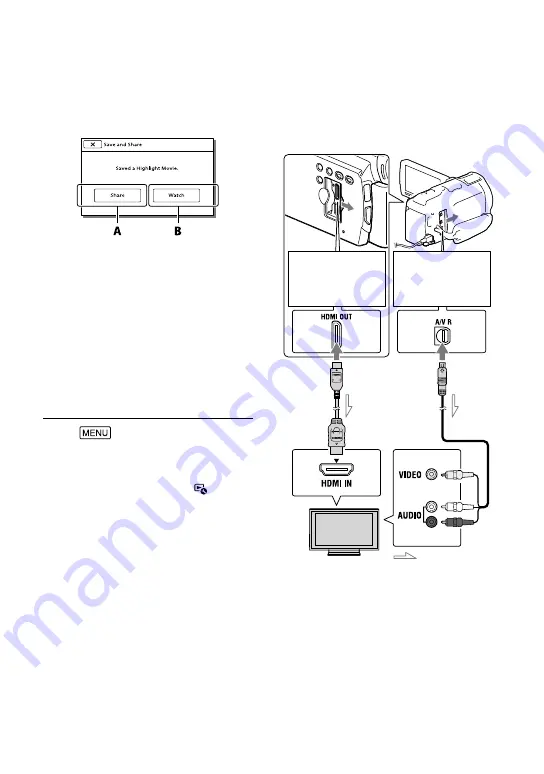
Playing images on a 

TV

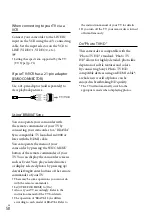
Connection methods and the image quality 

viewed on the TV screen differ depending 

on what type of TV is connected, and the 

connectors used.

*

  If the TV does not have the HDMI input jack, 

use the A/V connecting cable for connection.

Switch the input on the TV to the 
connected jack.

Connect the camcorder to a TV.

Play a movie or a photo on the 
camcorder (p. 30).

Connecting to a high 

definition TV

*

1

Connecting to a non-

high definition 16:9 

(wide) or 4:3 TV

Yellow

Red

White

HDMI 

Cable 

(supplied)

A/V 

connecting 

cable 

(supplied)

Input

Signal flow

Summary of Contents for Handycam HDR-CX730E

Page 1: ... Recorder Operating Guide 4 418 120 11 2 Please also refer to http www sony net SonyInfo Support Table of contents Getting started Recording Playback Advanced operations Editing Saving movies and photos with a computer Saving images with an external device Customizing your camcorder Others Index ...

Page 2: ...scribed in the instructions Replace the battery with the specified type only Otherwise fire or injury may result AC Adaptor Do not use the AC Adaptor placed in a narrow space such as between a wall and furniture Use the nearby wall outlet wall socket when using the AC Adaptor Disconnect the AC Adaptor from the wall outlet wall socket immediately if any malfunction occurs while using your camcorder...

Page 3: ...and other European countries with separate collection systems This symbol on the product or on its packaging indicates that this product shall not be treated as household waste Instead it shall be handed over to the applicable collection point for the recycling of electrical and electronic equipment By ensuring this product is disposed of correctly you will help prevent potential negative conseque...

Page 4: ...eries For more detailed information about recycling of this product or battery please contact your local Civic Office your household waste disposal service or the shop where you purchased the product For customers in the U S A If you have any questions about this product you may call Sony Customer Information Center 1 800 222 SONY 7669 The number below is for the FCC related matters only Regulator...

Page 5: ...mful interference to radio or television reception which can be determined by turning the equipment off and on the user is encouraged to try to correct the interference by one or more of the following measures Reorient or relocate the receiving antenna Increase the separation between the equipment and receiver Connect the equipment into an outlet on a circuit different from that to which the recei...

Page 6: ...nnected to other devices through a USB connection and the power of the camcorder is turned on do not close the LCD panel The image data that has been recorded may be lost Use the camcorder in accordance with local regulations LCD Panel viewfinder HDR CX730E CX740VE CX760E CX760VE PJ740VE PJ760E PJ760VE The LCD screen and viewfinder HDR CX730E CX740VE CX760E CX760VE PJ740VE PJ760E PJ760VE are manuf...

Page 7: ... card 32 GB Output only HDR PJ740VE 1 2 3 HDR PJ710VE 2 3 Input Output HDR PJ720E 3 64 GB HDR CX760E 1 CX760VE 1 2 96 GB HDR PJ760E 1 3 PJ760VE 1 2 3 The model with 1 is equipped with a viewfinder The model with 2 is equipped with a GPS function The model with 3 is equipped with a projector Learning more about the camcorder Handycam User Guide Handycam User Guide is an on line manual Refer to it f...

Page 8: ...rting a memory card 23 Recording Playback Recording 25 Recording movies 25 Shooting photos 25 Zooming 28 Playback 30 Playing movies and photos from a map HDR CX740VE CX760VE PJ710VE PJ740VE PJ760VE 31 Operating buttons while playing 33 Advanced operations Recording people clearly 35 Recording the selected subject clearly Face Priority 35 Recording voices clearly Closer Voice 35 Capturing smiles au...

Page 9: ...ayback in HD image quality Scenario Save 47 Converting the data format to STD image quality Highlight Movie 47 Playing images on a TV 48 Enjoying 5 1ch surround sound 49 Using the built in projector HDR PJ710VE PJ720E PJ740VE PJ760E PJ760VE 51 Editing Editing on your camcorder 53 Deleting movies and photos 53 Dividing a movie 53 Capturing a photo from a movie 54 Saving movies and photos with a com...

Page 10: ...ges on an external media device 65 Customizing your camcorder Using menus 67 Menu lists 69 Others Index Troubleshooting 73 Self diagnosis display Warning indicators 74 Recording time of movies number of recordable photos 76 Expected time of recording and playback with each battery pack 76 Expected recording time of movies 77 Expected number of recordable photos 78 About handling of your camcorder ...

Page 11: ...during recording The lamp flashes when the remaining recording media capacity or battery power is low MANUAL button 41 MANUAL dial 41 HDR CX730E CX740VE CX760E CX760VE HDR PJ710VE PJ720E PJ740VE PJ760E PJ760VE LCD screen Touch panel 20 22 If you rotate the LCD panel 180 degrees you can close the LCD panel with the LCD screen facing out This is convenient during playback operations Speakers Project...

Page 12: ...ton 38 NIGHTSHOT button 37 POWER button Memory card access lamp 23 While the lamp is lit or flashing the camcorder is reading or writing data Memory card slot 23 RESET button Press RESET using a pointed object Press RESET to initialize all the settings including the clock setting PROJECTOR button 51 HDR PJ710VE PJ720E PJ740VE PJ760E PJ760VE HDMI OUT jack 48 USB jack 62 65 Movie Photo lamp 25 MODE ...

Page 13: ...2 in To fasten the grip belt To attach the lens hood Align the lens hood with the camcorder properly then turn the securing ring of the lens hood in the direction of the arrow When attaching the lens hood align the opening section of the lens hood with the flash emitting section of the camcorder properly To remove the lens hood turn the securing ring of the lens hood in the opposite direction from...

Page 14: ...useful when you use the projector HDR PJ710VE PJ720E PJ740VE PJ760E PJ760VE DATA CODE button 71 Displays the date and time camera setting data or coordinates HDR CX740VE CX760VE PJ710VE PJ740VE PJ760VE of the recorded images when you press this button during playback PHOTO button 25 The on screen image when you press this button will be recorded as a still image SCAN SLOW buttons 33 Previous Next ...

Page 15: ...SB connection support cable is designed for use with this camcorder only Use this cable when the Built in USB Cable of the camcorder p 17 is too short for connection Lens hood 1 Step Down Ring 1 Wireless Remote Commander 1 Rechargeable battery pack NP FV50 1 Operating Guide This manual 1 Notes The PlayMemories Home Lite Version software and PlayMemories Home Help Guide are pre installed in this ca...

Page 16: ...camcorder and the wall outlet wall socket The CHG charge lamp turns on The CHG charge lamp turns off when the battery pack is fully charged Disconnect the AC Adaptor from the DC IN jack of your camcorder Notes You cannot attach any InfoLITHIUM battery pack other than the V series to your camcorder Battery pack CHG charge lamp Align the mark on the DC plug with that on the DC IN jack To the wall ou...

Page 17: ...table power supply device sold separately to charge the camcorder Charging time Approximate time min required when you fully charge a fully discharged battery pack Battery pack Charging time AC Adaptor Built in USB Cable when using your computer NP FV50 supplied 155 280 NP FV70 195 545 NP FV100 390 1 000 The charging times shown in the table above are measured when charging the camcorder at a temp...

Page 18: ...ttery pack from your camcorder and put it in a cool place When attaching a video light sold separately it is recommended that you use an NP FV70 or NP FV100 battery pack You cannot use the NP FV30 InfoLITHIUM battery pack with your camcorder In the default setting the power turns off automatically if you leave your camcorder without any operation for about 2 minutes to save battery power Eco Mode ...

Page 19: ...arging the battery pack abroad You can charge the battery pack in any countries regions using the AC Adaptor supplied with your camcorder within the AC 100 V 240 V 50 Hz 60 Hz range Do not use an electronic voltage transformer ...

Page 20: ... Next 4 Set Summer Time select the date format and the date and time If you set Summer Time to On the clock advances 1 hour When you select the date and time select one of the items and adjust the value with When you select the date and time setting operation is complete Changing the language setting You can change the on screen displays to show messages in a specified language Select Setup Genera...

Page 21: ...inder Status Power of the camcorder LCD screen Viewfinder Open Retracted On Pulled out On Closed Retracted Off Pulled out On Notes Even if the LCD screen is closed if the viewfinder is pulled out the camcorder is not turned off When you turn off the power of the camcorder make sure that the viewfinder is retracted to the original position When you make recording with the viewfinder only HDR CX730E...

Page 22: ...de during playback To display them select Setup Playback Settings Data Code Date Time Once the clock is set the clock time is automatically adjusted with Auto Clock ADJ and Auto Area ADJ set to On The clock may not be adjusted to the correct time automatically depending on the country region selected for your camcorder In this case set Auto Clock ADJ and Auto Area ADJ to Off HDR CX740VE CX760VE PJ...

Page 23: ... Notes You cannot select a different recording medium for movies and for photos Selecting a recording medium HDR CX740VE CX760E CX760VE PJ710VE PJ720E PJ740VE PJ760E PJ760VE Select Setup Media Settings Media Select the desired medium Inserting a memory card Open the cover and insert the memory card until it clicks The Preparing image database file Please wait screen appears if you insert a new mem...

Page 24: ...se with your camcorder SD Speed Class Capacity operation verified Described in this manual Memory Stick PRO Duo media Mark2 Up to 32 GB Memory Stick PRO Duo media Memory Stick PRO HG Duo media SD memory card Class 4 or faster Up to 64 GB SD card SDHC memory card SDXC memory card Operation with all memory cards is not assured Notes A MultiMediaCard cannot be used with this camcorder Movies recorded...

Page 25: ...mory card HDR CX740VE CX760E CX760VE PJ710VE PJ720E PJ740VE PJ760E PJ760VE Internal memory Recording movies 1 Open the LCD screen and press MODE to turn on the Movie lamp 2 Press START STOP to start recording To stop recording press START STOP again You can record photos during movie recording by pressing PHOTO Dual Capture Shooting photos 1 Open the LCD screen and press MODE to turn on the Photo ...

Page 26: ...to shooting modes Touch anywhere except the buttons on the LCD screen to display information on icons with functions convenient for recording Screen indicators during recording Described here are icons for both movie recording and photo recording modes Refer to the page in for details Zoom button W Wide T Telephoto START STOP button in movie recording mode PHOTO button in photo recording mode MENU...

Page 27: ...E PJ760VE To record in mirror mode Open the LCD panel 90 degrees to the camcorder then rotate it 180 degrees to the lens side A mirror image of the subject appears on the LCD screen but the image will be normal when recorded If white circular spots appear on photos This is caused by particles dust pollen etc floating close to the lens When they are accentuated by the camcorder s flash they appear ...

Page 28: ...de Frame p 70 as a guide Recording time recordable number of photos p 76 Media Select p 23 Flash p 70 To display items on the LCD screen all the time Display Setting p 70 To change the image size Image Size p 40 Recordable time remaining capacity Media Info p 71 Zooming Move the power zoom lever to magnify or reduce the size of the image W Wide angle Wider range of view T Telephoto Close view You ...

Page 29: ...GB Recording Playback You can magnify images up to 10 times using optical zooming in the following cases When SteadyShot is set to other than Active When the Photo is lit Further zooming Digital Zoom p 69 ...

Page 30: ...desired event to the center and then select it The camcorder displays recorded images as an event automatically based on the date and time 3 Select the image The camcorder plays from the selected image to the last image in the event Screen display on the Event View screen HDR CX740VE CX760VE PJ710VE PJ740VE PJ760VE To the MENU screen Event name To the previous event Change to the movie photo recor...

Page 31: ...PJ760VE Playing movies and photos from a map HDR CX740VE CX760VE PJ710VE PJ740VE PJ760VE 1 Switch to the Map View by touching Map View 2 Select the recording location Touch the direction on the map in which you want the map to be scrolled Keep touching that point to scroll the map continuously If you change the map scale using the power zoom lever the clusters of thumbnails will change as well To ...

Page 32: ...to the terms of the license agreement p 88 You cannot use the map data if you touch No However when you try to use the map data for the second time the same message will appear on the screen and you can use the map data by touching Yes Screen display on the Map View To the MENU screen To the movie recording display To the Event View screen To play back short movies p 46 To the Map View To the movi...

Page 33: ...ms again touch the LCD screen While playing a movie While viewing photos Operating buttons while viewing photos will be changed depends on the setting of Switch Image Type button p 31 Movie photo default setting Volume Delete Context Previous To fast reverse Next To fast forward To pause play To stop Delete Previous Next To play pause movies and photos in the order recorded ...

Page 34: ...show Set To play back images with other devices You may not be able to play back normally images recorded on your camcorder with other devices Also you may not be able to play back images recorded on other devices with your camcorder Standard definition image quality STD movies recorded on SD memory cards cannot be played on AV equipment of other manufacturers Next To start stop slide show Delete ...

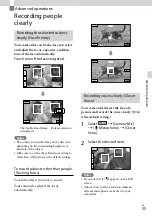
Page 35: ...e Face Detection setting to other than Off Auto is the default setting To record subjects other than people Tracking focus Touch the subject you want to record Your camcorder adjusts the focus automatically Recording voices clearly Closer Voice Your camcorder detects the face of a person and records the voice clearly On is the default setting 1 Select Camera Mic Microphone Closer Voice 2 Select th...

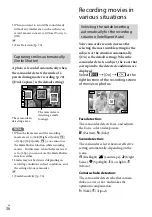
Page 36: ...Sensitivity p 70 Recording movies in various situations Selecting the suitable setting automatically for the recording situation Intelligent Auto Your camcorder records movies after selecting the most suitable setting for the subjects or the situation automatically On is the default setting When the camcorder detects a subject the icons that correspond to the detected conditions are displayed Sele...

Page 37: ... zooming as well as when shooting with a wide angle shot Active is the default setting 1 Select Camera Mic Camera Settings SteadyShot 2 Select the desired item Active In addition to the balanced SteadyShot function the camcorder compensates for camera shake in the vertical and horizontal directions Standard The camcorder reduces camera shake using the balanced SteadyShot function in wide angle sho...

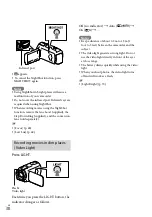
Page 38: ...parately Focus p 69 Low Lux p 69 Recording movies in dim places Video Light Press LIGHT Each time you press the LIGHT button the indicator changes as follows Off no indicator Auto On Notes Keep a distance of about 0 3 m to 1 5 m 1 foot to 5 feet between the camcorder and the subject The video light generates strong light Do not use the video light directly in front of the eyes at close range The b...

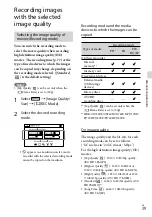
Page 39: ... on that medium Recording mode and the media devices to which the images can be copied Types of media Recording mode PS 1 FX FH HQ LP On this camcorder Internal memory 2 Memory card On external devices External media USB storage devices Blu ray discs AVCHD recording discs 1 50p Quality can be set only when the Frame Rate is set to 50p 2 HDR CX740VE CX760E CX760VE PJ710VE PJ720E PJ740VE PJ760E PJ76...

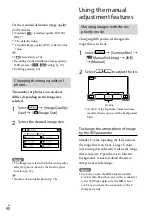
Page 40: ...tos p 78 Using the manual adjustment features Shooting images with the iris priority mode Changing IRIS parameter changes the range that is in focus 1 Select Camera Mic Manual Settings IRIS Manual 2 Select to adjust the iris As the F value aperture value becomes smaller the iris opens and the background blurs To change the atmosphere of image by the IRIS parameter Smaller F value opening the iris ...

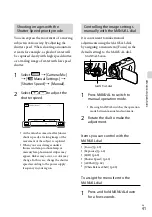
Page 41: ...lamp or mercury lamp horizontal stripes may appear flicker may occur or color may change In this case change the shutter speed according to the power supply frequency in your region Controlling the image settings manually with the MANUAL dial It is convenient to make manual adjustments using the MANUAL dial by assigning a menu item Focus in the default setting to the MANUAL dial 1 Press MANUAL to ...

Page 42: ...d even if you change the assigned item of the MANUAL dial However if you set Exposure after setting AE Shift manually Exposure will override AE Shift If you set either one of Exposure IRIS or Shutter Speed the settings of other 2 items are canceled Data Code p 71 Recording information on your location GPS HDR CX740VE CX760VE PJ710VE PJ740VE PJ760VE The following features are available if you use t...

Page 43: ...ormation can take priority Select Setup General Settings Your Location Notes If you select a certain point on the screen the map shows an area with that point at the center Select to move your current location back to the center again If the camcorder cannot acquire current location information the triangulating information screen appears p 44 If the location information that was previously acquir...

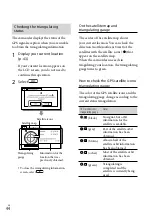
Page 44: ...lite map When the camcorder succeeds in triagulating your location the triangulating gauge turns to green How to check the GPS satellite icons triangulating gauge The color of the GPS satellite icons and the triangulating gauge change according to the current status triangulation GPS satellite icons triangulating gauge Status black No signal but orbit information for the satellite is available gra...

Page 45: ...order using the built in PlayMemories Home software the time it takes the camcorder to acquire your location information can be shortened Connect the camcorder to a computer that is connected to the Internet The GPS Assist Data will be updated automatically Notes In the following situations the current location of the camcorder shown on the map may be different from the actual location The margin ...

Page 46: ...ing on the screen after Highlight Playback has finished You can also change the setting by selecting Highlight Setting while the camcorder is playing highlight scenes Playback Range You can set the playback range starting and ending date of the Highlight Playback Theme You can select a theme for Highlight Playback Music You can select music Audio mix The original sound is played back with the musi...

Page 47: ...watch Highlight Playback or Highlight Scenario these images do not appear on the LCD screen of the camcorder Adding your desired music Music Transfer HDR CX760E CX760VE PJ710VE PJ720E PJ760E PJ760VE p 59 Saving Highlight Playback in HD image quality Scenario Save You can save your favorite Highlight Playback as a Scenario with high definition image quality HD Up to 8 scenarios can be saved and the...

Page 48: ...Highlight Movie select while the Highlight Movie is playing Playing images on a TV Connection methods and the image quality viewed on the TV screen differ depending on what type of TV is connected and the connectors used If the TV does not have the HDMI input jack use the A V connecting cable for connection 1 Switch the input on the TV to the connected jack 2 Connect the camcorder to a TV 3 Play a...

Page 49: ...s recorded with high definition image quality HD in 5 1ch sound you need a device compatible with 5 1ch surround When you connect your camcorder with the supplied HDMI cable the sound of high definition image quality HD movies recorded in 5 1ch sound is automatically output in 5 1ch sound The sound of standard definition image quality STD movies is converted to 2ch Audio Mode p 70 On an HDMI cable...

Page 50: ...ch as Event View play selected movies or display selected photos by pressing up down left right enter buttons of the remote commander of your TV There may be some operations you cannot do with the remote commander Set CTRL FOR HDMI to On Also set your TV accordingly Refer to the instruction manual of the TV for details The operation of BRAVIA Sync differs according to each model of BRAVIA Refer to...

Page 51: ... projected image using the PROJECTOR FOCUS lever The projected image is larger when the distance between your camcorder and the reflecting surface increase It is recommended that you place the camcorder about 0 5 m 1 6 feet or further away from the surface that the images are to be projected onto 4 Move the power zoom lever to select the image you want to play then press PHOTO to begin playback Us...

Page 52: ... projector lens The LCD screen and the projector lens become hot while in use Using the projector shortens battery life The following operations are unavailable while you are using the projector Map operation HDR PJ710VE PJ740VE PJ760VE Output of Highlight Playback to a device such as a TV Operation of the camcorder with the LCD screen closed Several other functions ...

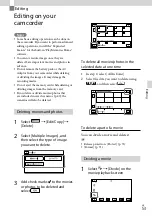
Page 53: ...card while deleting or dividing images from the memory card If you delete or divide movies photos that are included in saved scenarios p 47 the scenarios will also be deleted Deleting movies and photos 1 Select Edit Copy Delete 2 Select Multiple Images and then select the type of image you want to delete 3 Add check marks to the movies or photos to be deleted and select To delete all movies photos...

Page 54: ...layback screen of a movie 2 Select the point where you want to capture a photo using and then select If the movie was recorded with one of the following image quality levels the image size will be set as shown below High definition image quality HD 2 1 M 16 9 Wide aspect ratio 16 9 with standard definition image quality STD 0 2 M 16 9 4 3 aspect ratio with standard definition image quality STD 0 3...

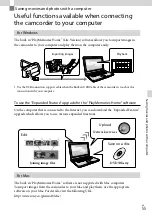
Page 55: ...o short for connection with your computer To use the Expanded Feature upgrade for the PlayMemories Home software On the computer that is connected to the Internet you can download the Expanded Feature upgrade which allows you to use various expanded functions For Mac The built in PlayMemories Home software is not supported with Mac computers To import images from the camcorder to your Mac and play...

Page 56: ... be necessary when creating AVCHD recording discs 50 GB maximum may be necessary when creating Blu ray discs Display Minimum 1 024 768 dots Others USB port this must be provided as standard Hi Speed USB USB 2 0 compatible Blu ray disc DVD burner Either NTFS or exFAT file system is recommended as the hard disk file system 1 Standard installation is required Operation is not assured if the OS has be...

Page 57: ...as been installed For details on PlayMemories Home select PlayMemories Home Help Guide on the software or visit the PlayMemories Home support page http www sony co jp pmh se Notes Make sure to set USB LUN Setting to Multi when you install the PlayMemories Home software If the Device Stage does not start up when you are using Windows 7 click Start then double click the camera icon for this camcorde...

Page 58: ...e files on a computer however the files will be handled properly by the import function and the playback function of the camcorder or the PlayMemories Home software Use the built in PlayMemories Home software when you import long movies or edited images from the camcorder to a computer If you use other software the images may not be imported correctly When you delete image files follow the steps o...

Page 59: ...plied with your camcorder to suit your tastes or to delete or add music files Furthermore this software can restore the music files that were supplied with your camcorder To use this software you must download it from the following URL and install it on your computer For Windows http www sony co jp imsoft Win For Mac http www sony co jp imsoft Mac For details refer to the Music Transfer help Insta...

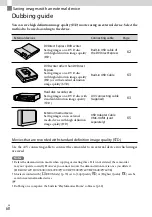
Page 60: ...ion image quality STD A V connecting cable supplied 63 External media device Saving images on an external media device with high definition image quality HD USB Adapter Cable VMC UAM1 sold separately 65 Movies that are recorded with standard definition image quality STD Use the A V connecting cable to connect the camcorder to an external device in which images are saved Notes Delete the demonstrat...

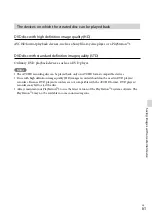
Page 61: ... devices such as a DVD player Notes The AVCHD recording disc can be played back only on AVCHD format compatible devices Discs with high definition image quality HD images recorded should not be used in DVD players recorders Because DVD players recorders are not compatible with the AVCHD format DVD players recorders may fail to eject the disc Always maintain your PlayStation 3 to use the latest ver...

Page 62: ...een saved on any disc can be saved on the disc at this time After the operation is completed select To perform DISC BURN OPTION You can also create a standard definition image quality STD disc 1 Select DISC BURN OPTION in step 3 above 2 Select the recording medium containing the movie s you want to save HDR CX740VE CX760E CX760VE PJ710VE PJ720E PJ740VE PJ760E PJ760VE 3 Select the image quality of ...

Page 63: ...HD disc with a DVD writer Use the built in USB cable to connect your camcorder to a Sony DVD writer other than DVDirect Express sold separately etc which is compatible with high definition image quality HD movies 1 Connect a DVD writer to your camcorder with the Built in USB Cable 2 Select USB Connect on the camcorder screen If the USB Select screen does not appear select Setup Connection USB Conn...

Page 64: ...ia analog data transfer the image quality may deteriorate High definition image quality HD movies will be copied with standard definition image quality STD When you connect a monaural device connect the yellow plug of the A V connecting cable to the video input jack and the white left channel or the red right channel plug to the audio input jack on the device Copying date and time information Data...

Page 65: ...image database file Please wait is displayed on the LCD screen If Repair Img DB F is displayed on the camcorder screen select 2 Select Copy on the camcorder screen HDR CX730E Movies and photos that are stored in the memory card inserted in the camcorder and that have not yet been saved on to external media device can be saved on the connected media device at this time HDR CX740VE CX760E CX760VE PJ...

Page 66: ...e for your camcorder If the storage medium of the external device was formatted for the NTFS file system etc format the external media device using the camcorder before use The format screen appears when an external media device is connected to your camcorder Make sure that important data has not previously been saved on the external media device before you format it using the camcorder Operation ...

Page 67: ...ems for customized shooting p 69 Image Quality Size Items for setting up image quality or size p 70 Playback Function Items for playback p 70 Edit Copy Items for editing images such as copy or protect p 71 Setup Other setup items p 71 1 Select 2 Select a category 3 Select your desired menu item Notes Select to finish setting the menu or to return to the previous menu screen Scrolls the menu items ...

Page 68: ...splays the list of menus in the sub category selected When you cannot select a menu item Grayed out menu items or settings are not available When you select the grayed out menu item your camcorder displays the reason why you cannot select the menu item or the instruction of under which condition you can set the menu item Sub category icons ...

Page 69: ...d it appears as if frozen on the image At a lower shutter speed the subject appears as if it is flowing AGC Limit Sets the maximum level of AGC Auto Gain Control AE Shift Adjusts the exposure Touch if the subject is white or the backlight is bright or touch if the subject is black or the light is dim White Balance Shift Adjusts the white balance Low Lux Records bright color images in the dim Camer...

Page 70: ...etting Sets the duration that icons or indicators are displayed on the LCD screen Zebra Displays a zebra pattern as a guide for adjusting brightness Peaking Displays an image on the screen with its outlines enhanced Light Bright Adjusts the brightness of the video light Audio Level Display Displays the audio level meter on the LCD screen while recording Image Quality Size REC Mode Sets the mode to...

Page 71: ...al depending on the TV connected p 48 HDMI Resolution Selects the output image resolution when connecting your camcorder to a TV with an HDMI cable CTRL FOR HDMI Sets whether or not the TV s Remote Commander is to be used when the camcorder is connected to a BRAVIA Sync compatible TV with the HDMI cable USB Connect Select this item when no instructions appear on the LCD screen when you connect you...

Page 72: ... Sets the date and time Area Setting Adjusts for a time difference without stopping the clock p 20 Auto Clock ADJ 2 Adjusts the clock automatically by acquiring the time from the GPS system Auto Area ADJ 2 Corrects time differences automatically by acquiring the current location information from the GPS system 1 HDR CX730E CX740VE CX760E CX760VE PJ740VE PJ760E PJ760VE 2 HDR CX740VE CX760VE PJ710VE...

Page 73: ...n Attach a charged battery pack to the camcorder p 16 The plug of the AC Adaptor has been disconnected from the wall outlet wall socket Connect it to the wall outlet wall socket p 18 The camcorder does not operate even when the power is set to on It takes a few seconds for your camcorder to be ready to shoot after the power is turned on This is not a malfunction Disconnect the AC Adaptor from the ...

Page 74: ...he Built in USB Cable from the computer and your camcorder and restart the computer then connect the computer and your camcorder again in the correct order When both the Built in USB Cable and the USB jack of the camcorder are connected to the external devices at the same time disconnect one that is not connected to a computer Self diagnosis display Warning indicators If indicators appear on the L...

Page 75: ...card with your camcorder p 71 Incompatible memory card is inserted p 24 The memory card is write protected Access to the memory card was restricted on another device There is something wrong with the flash The amount of lights is not sufficient so camera shake easily occurs Use the flash The camcorder is unsteady so camera shake easily occurs Hold the camcorder steady with both hands and record th...

Page 76: ...thout opening the LCD screen Each recording time is measured when the camcorder is recording high definition image quality HD movies with REC Mode set to Standard Typical recording time shows the time when you repeat recording start stop switching the MODE lamp and zooming Times measured when using the camcorder at 25 C 77 F 10 C to 30 C 50 F to 86 F is recommended The recording and playback time ...

Page 77: ... and min minute Recording mode Recording time HDR CX760E PJ760E HDR CX760VE PJ760VE 50p Quality 7 h 55 min 7 h 55 min 7 h 40 min 7 h 40 min Highest Quality 9 h 20 min 9 h 20 min 9 h 9 h High Quality 12 h 40 min 12 h 40 min 12 h 15 min 12 h 15 min Standard 22 h 20 min 16 h 55 min 21 h 35 min 16 h 25 min Long Time 5 1ch 38 h 35 min 31 h 40 min 37 h 20 min 30 h 40 min Long Time 2ch 39 h 55 min 32 h 3...

Page 78: ...h 25 25 55 50 110 100 225 210 460 420 You can change the recording sound format with Audio Mode p 70 When using a Sony memory card Notes The recordable time may vary depending on the recording and subject conditions and REC Mode and Frame Rate p 70 The number in is the minimum recordable time Expected number of recordable photos Internal memory HDR CX740VE CX760E CX760VE PJ710VE PJ720E PJ740VE PJ7...

Page 79: ... 1 944 dots 4 3 1 920 1 080 dots 16 9 640 480 dots 4 3 Capturing a photo from a movie 1 920 1 080 dots 16 9 640 360 dots 16 9 640 480 dots 4 3 About handling of your camcorder On use and care The camcorder is not dustproofed dripproofed or waterproofed Do not hold the camcorder by the following parts and also do not hold the camcorder by the jack covers Shoe cover Lens hood LCD Screen Battery pack...

Page 80: ...finder HDR CX730E CX740VE CX760E CX760VE PJ740VE PJ760E PJ760VE closed when you are not using your camcorder Do not wrap your camcorder with a towel for example and operate it Doing so might cause heat to build up inside When disconnecting the power cord mains lead pull it by the plug and not the cord Do not damage the power cord mains lead such as by placing anything heavy on it Do not use a defo...

Page 81: ...erate correctly When connecting the camcorder to another device with communication cables be sure to insert the connector plug in the correct way Pushing the plug forcibly into the terminal will damage the terminal and may result in a malfunction of the camcorder When the camcorder is connected to other devices through a USB connection and the power of the camcorder is turned on do not close the L...

Page 82: ...ander may not function properly In this case replace the battery with a Sony CR2025 lithium battery Use of another battery may present a risk of fire or explosion LCD screen Do not apply excessive pressure on the LCD screen as it may cause uneven color and other damage If your camcorder is used in a cold place a residual image may appear on the LCD screen This is not a malfunction While using your...

Page 83: ...asurement system for video cameras and offers a quality typical of a Carl Zeiss lens Also the lens for your camcorder is T coated to suppress unwanted reflections and faithfully reproduce colors MTF Modulation Transfer Function The number value indicates the amount of light from a subject coming into the lens About care and storage of the lens Wipe the surface of the lens clean with a soft cloth i...

Page 84: ...rmat PAL color CCIR standards HDTV 1080 50i 1080 50p specification Movie recording format HD MPEG 4 AVC H 264 AVCHD format Ver 2 0 compatible STD MPEG2 PS Audio recording system Dolby Digital 2ch 5 1ch Dolby Digital 5 1 Creator Photo file format DCF Ver 2 0 Compatible Exif Ver 2 3 Compatible MPF Baseline Compatible Recording media Movie Photo Internal memory HDR CX740VE PJ710VE PJ740VE 32 GB HDR P...

Page 85: ...ow Distance 0 5 m 1 6 feet or over Contrast ratio 1500 1 Resolution output nHD 640 360 Continuous projection time when using the supplied battery pack Approx 1 h 40 min General Power requirements DC 6 8 V 7 2 V battery pack DC 8 4 V AC Adaptor USB Charging DC 5 V 500 mA 1 5 A Average power consumption HDR PJ710VE PJ720E HD 3 4 W STD 3 1 W HDR CX730E CX740VE CX760E CX760VE PJ740VE PJ760E PJ760VE Du...

Page 86: ... g 1 lb 4 oz main unit only 675 g 1 lb 7 oz including the supplied rechargeable battery pack and the lens hood AC Adaptor AC L200C AC L200D Power requirements AC 100 V 240 V 50 Hz 60 Hz Current consumption 0 35 A 0 18 A Power consumption 18 W Output voltage DC 8 4 V Operating temperature 0 C to 40 C 32 F to 104 F Storage temperature 20 C to 60 C 4 F to 140 F Dimensions approx 48 mm 29 mm 81 mm 1 1...

Page 87: ...either registered trademarks or trademarks of Microsoft Corporation in the United States and or other countries Mac and Mac OS are registered trademarks of Apple Inc in the U S and other countries Intel Intel Core and Pentium are trademarks or registered trademarks of Intel Corporation or its subsidiaries in the United States and other countries and PlayStation are registered trademarks of Sony Co...

Page 88: ...trictions of such rights in such case the above restrictions may not apply to you Limitation on Reverse Engineering Decompilation and Disassembly You may not i extract the SOFTWARE from the PRODUCT ii reproduce copy modify port translate or create derivative works of the SOFTWARE in whole or in part or iii reverse engineer decompile disassemble the SOFTWARE by any means whatsoever in whole or in p...

Page 89: ...OF IMPLIED WARRANTIES IN SUCH CASE THE ABOVE EXCLUSIONS MAY NOT APPLY TO YOU You expressly understand that the data in the SOFTWARE may contain inaccurate or incomplete information due to the passage of time changing circumstances sources used and the nature of collecting comprehensive geographic data any of which may lead to incorrect results LIMITATION OF LIABILITY IN THIS SECTION SONY ITS AFFIL...

Page 90: ...ignated by SONY and or its affiliates and shall be treated in accordance with such notice Copyright and trademark information 1993 2011 NAVTEQ 2012 ZENRIN CO LTD Australia Hema Maps Pty Ltd 2010 Copyright Based on data provided under license from PSMA Australia Limited www psma com au Product incorporates data which is 2010 Telstra Corporation Limited GM Holden Limited Intelematics Australia Pty L...

Page 91: ...rks and registrations are owned by the USPS United States Postal Service USPS and ZIP 4 Screen indicators The following indicators appear when you change the settings See page 26 and 33 also for the indicators that appear during recording or playing Left Indicator Meaning MENU button 67 Self timer recording 69 GPS triangulating status 43 Video light Wide Mode 70 Fader 69 Face Detection set to Off ...

Page 92: ... Approximate number of recordable photos and photo size Playback folder 100 112 Current playing movie or photo Number of total recorded movies or photos Connection to the external media device 65 Bottom Indicator Meaning Micref Level low 70 Auto Wind NR set to Off 70 Closer Voice set to Off 35 Blt in Zoom Mic 70 Audio Mode 70 Low Lux 69 Spot Meter Fcs 69 Spot Meter 69 Exposure 69 EV AE Shift 69 Sh...

Page 93: ...er of recordable photos 78 O Operating buttons 33 P Photo Capture 54 Photos 25 Playback 30 Playing discs 61 Playing scenarios 47 PlayMemories Home 15 55 56 PlayMemories Home Help Guide 15 59 Power on 20 Projector 51 PS 39 R REC Mode 39 Recording 25 Recording and playback time 76 Recording media 23 Recording time of movies 76 77 Repair 73 RESET 12 Symbols 5 1ch surround sound 49 A Active Interface ...

Page 94: ... Starting PlayMemories Home 59 Summer Time 20 Supplied Items 15 T Thumbnails 31 Touch panel 26 Tracking focus 35 Triangulating 43 Triangulating priority mode 43 Tripod 13 Troubleshooting 73 TV 48 U USB 17 56 USB Adaptor Cable 65 USB Connect 63 USB connection support cable 15 V VBR 78 Video Light 38 W Wall outlet wall socket 18 Warning indicators 74 White Balance Shift 69 Wind noise 70 Windows 56 W...

Page 95: ...95 GB Others Index ...
Page 96: ...dditional information on this product and answers to frequently asked questions can be found at our Customer Support Website http www sony net Printed on 70 or more recycled paper using VOC Volatile Organic Compound free vegetable oil based ink ...

Reviews: