HBD-E2100/E3100/E3200/E4100/E6100
21
SECTION 3
TEST MODE
COLD RESET
The cold reset clears certain data in this system without initialize
Personal Information and some BD operation data. Execute this
mode when returning the unit to the customers.
Procedure:
1. Press the [
?/1
] button to turn the power on.
2. Press the [
x
] and [VOL –] buttons simultaneously and hold
down (around 5 seconds).
3. The message “WAIT” appears then “RESET” appears on
fl
uo-
rescent indicator tube, then becomes standby states.
DEMO MODE
This mode let you lock the disc tray. When this mode is activated,
the disc will not eject when the [
Z
] button is pressed. The message
“D. LOCK” will be displayed on the fluorescent indicator tube.
Procedure:
1. Press the [
?/1
] button to turn the power on.
2. Press the [FUNCTION] button to select the “BD/DVD”.
3. Insert a disc.
4. During stop condition, press the [
x
] and [
Z
] buttons
simultaneously and hold down (around 5 seconds) until
“D. LOCK” displayed on the fluorescent indicator tube.
Releasing method:
Press the [
x
] and [
Z
] buttons simultaneously and hold down
(around 5 seconds) until “D. OFF” displayed on the
fl
uorescent
indicator tube.
PANEL TEST
Procedure:
1. Press the [
?/1
] button to turn the power on.
2. Press button in order of the [DISPLAY]
[0]
[0]
[1]
[SUBTITLE] on the remote commander (Make the interval
when each button is pressed within two seconds).
3. All segments in
fl
uorescent indicator tube are lighted up. And
half segments in
fl
uorescent indicator tube are lighted up, oth-
ers half segments in
fl
uorescent indicator tube are lighted up,
then all segments in
fl
uorescent indicator tube are lighted up.
This operation is repeated.
4. In the state of step 3, press the [VOL +] button on the remote
commander and model information is displayed on the
fl
uores-
cent indicator tube.
Each time the [VOL +] button on the remote commander is
pressed, the display changes from destination information,
STR version, special mode in this order, and returns to the
model information display.
5. In the state of step 3, press the [FUNCTION] button on the
remote commander and “K 0” is displayed on the fluorescent
indicator tube.
“K 0” value increases whenever a button or sensor on the unit
is pressed. However, once a button or sensor has been pressed,
it is no longed taken into account.
All button and sensors on the unit are pressed, “OK” and “K 9”
are alternately displayed on the fluorescent indicator tube.
Releasing method:
To release from this mode, press the [
?/1
] button.
FACTORY INITIALIZE
Return all of the unit setting to their factory defaults.
Note 1:
Disconnect the following connections when you use this mode.
USB
LAN
Note 2:
The operation in this mode must use a remote commander and TV
monitor.
Procedure:
1. Press the [
?/1
] button to turn the power on.
2. Press the [HOME] button on the remote commander, and the
home menu is displayed.
3. Select
“Setup”
“Resetting”, and press the [ ] button on the
remote commander.
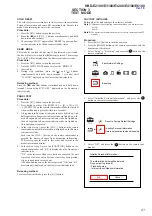
4. Select “Initialize Personal Information”, and press the [ ]
button on the remote commander.
5. Select “OK”, and press the [ ] button on the remote com-
mander.
Resetting
Easy Network Settings
Initialize Personal Information
OK
Cancel
The information below will be deleted.
Do you want to proceed?
- Playback history
- Internet video utilization information
Initialize Personal Information
Delete personal data when disposing
Reset to Factory Default Settings

