HBD-TZ210/TZ230/TZ510/TZ630/TZ710
6
SECTION 1
SERVICING NOTES
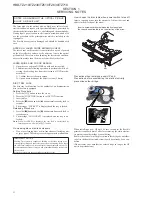
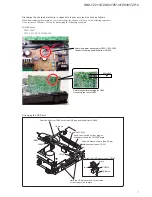
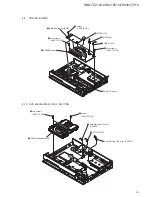
tray
Insert a screwdriver from between the front panel and
the chassis and slide the rod in the direction of the arrow.
NOTES ON HANDLING THE OPTICAL PICK-UP
BLOCK OR BASE UNIT
The laser diode in the optical pick-up block may suffer electro-
static break-down because of the potential difference generated by
the charged electrostatic load, etc. on clothing and the human body.
During repair, pay attention to electrostatic break-down and also
use the procedure in the printed matter which is included in the
repair parts.
The fl exible board is easily damaged and should be handled with
care.
How to open the disc table when power switch turns off
Insert a tapering driver into the aperture of the unit bottom, and
slide it in the direction of the arrow.
Precaution when installing a new OP unit/
Precaution before unsoldering the static electricity
prevention solder bridge
When installing a new OP unit, be sure to connect the fl exible
printed circuit board fi rst of all before removing the static electric-
ity prevention solder bridge by unsoldering.
Remove the static electricity prevention solder bridge by unsolder-
ing after the fl exible printed circuit board has already been con-
nected.
(Do not remove nor unsolder the solder bridge as long as the OP
unit is kept standalone.)
NOTES ON LASER DIODE EMISSION CHECK
The laser beam on this model is concentrated so as to be focused
on the disc refl ective surface by the objective lens in the optical
pickup block. Therefore, when checking the laser diode emission,
observe from more than 30 cm away from the objective lens.
On cleaning discs, disc/lens cleaners
• Do not use cleaning discs or disc/lens cleaners (including wet
or spray types). These may cause the apparatus to malfunction.
IMPORTANT NOTICE
Caution: This system is capable of holding a still video image or on-
screen display image on your television screen indefi nitely. If you leave
the still video image or on-screen display image displayed on your TV
for an extended period of time you risk permanent damage to your tele-
vision screen.
Projection televisions are especially susceptible to this.
DISC TRAY LOCK
The disc tray lock function for the antitheft of an demonstration
disc in the store is equipped.
Setting Procedure :
1. Press the [
?/1
] button to turn the set on.
2. Press the [FUNCTION] button to set DVD/CD function.
3. Insert a disc.
4. Press the [
x
] button and the [
Z
] button simultaneously for fi ve
seconds.
5. The message “LOCKED” is displayed and the tray is locked.
Releasing Procedure :
1. Press the [
x
] button and the [
Z
] button simultaneously for fi ve
seconds again.
2. The message “UNLOCKED” is displayed and the tray is un-
locked.
Note:
When “LOCKED” is displayed, the tray lock is not released by
turning power on/off with the [
?/1
] button.
LASER DIODE AND FOCUS SEARCH
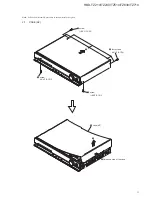
1. Open the case and turn POWER on with no disc inserted.
2. Confi rm that the following operation is performed while ob-
serving the objecting lens from the clearance of DVD mecha-
nism deck.
1) Confi rm that laser beam is spread.
2) Up and down motion of the objective lens. (2 times)


