.
IM/HDCU1000 Series
1-27 (E)
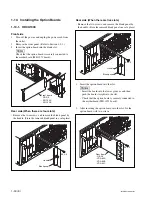
1-9-1. HDCU1000/1080
m
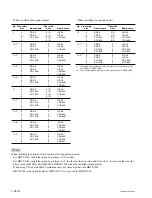
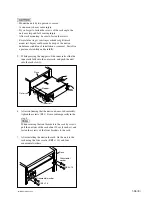
When installing the option board, keep the following points in mind:
.
For HDCU1000, install the option board from slot 3 in order.
For HDCU1080, install the option board from slot 3 in order for the front side, and from slot 2 in order for the rear side.
.
Three rear boards VDA-64A/64B/64C of HKCU1003 cannot be installed simultaneously.
When using VDA-64A/64B/64C simultaneously, use them together with HKCU1001.
.
HKCU1003 is the option board for HDCU1000. It is not used for HDCU1080.
.
When installing one option board
No Front side
Rear side
slot
Board name
slot
*
*
*
*
*
1
Board name
1
3
DRX-5
3 (2)
HIF-26
4
4 (3)
5
5 (4)
6
6 (5)
2
3
EN-159A
3 (2)
VDA-64A
4
4 (3)
5
5 (4)
6
6 (5)
3-1
*
2
3
EN-159B
3
VDA-64A
4
4
5
5
6
6
3-2
*
2
3
EN-159B
3
VDA-64B
4
4
5
5
6
6
3-3
*
2
3
EN-159B
3
VDA-64A
4
4
VDA-64C
5
5
6
6
3-4
*
2
3
EN-159B
3
VDA-64B
4
4
VDA-64C
5
5
6
6
*
1 : The number in parentheses in the rear side slot column indicates the
slot number for HDCU1080.
*
2 : This is the installation procedure of the option board for HDCU1000.
.
When installing two option boards
No Front side
Rear side
slot
Board name
slot
*
*
*
*
*
1
Board name
4
3
DRX-5
3 (2)
HIF-26
4
DRX-5
4 (3)
HIF-26
5
5 (4)
6
6 (5)
5
3
DRX-5
3 (2)
HIF-26
4
EN-159A
4 (3)
VDA-64A
5
5 (4)
6
6 (5)
6-1
*
2
3
DRX-5
3
HIF-26
4
EN-159B
4
VDA-64A
5
5
6
6
6-2
*
2
3
DRX-5
3
HIF-26
4
EN-159B
4
VDA-64B
5
5
6
6
6-3
*
2
3
DRX-5
3
HIF-26
4
EN-159B
4
VDA-64A
5
5
VDA-64C
6
6
6-4
*
2
3
DRX-5
3
HIF-26
4
EN-159B
4
VDA-64B
5
5
VDA-64C
6
6
7
3
EN-159A
3 (2)
VDA-64A
4
EN-159A
4 (3)
VDA-64A
5
5 (4)
6
6 (5)
8-1
*
2
3
EN-159A
3
VDA-64A
4
EN-159B
4
VDA-64A
5
5
6
6
8-2
*
2
3
EN-159A
3
VDA-64A
4
EN-159B
4
VDA-64B
5
5
6
6
8-3
*
2
3
EN-159A
3
VDA-64A
4
EN-159B
4
VDA-64A
5
5
VDA-64C
6
6
8-4
*
2
3
EN-159A
3
VDA-64A
4
EN-159B
4
VDA-64B
5
5
VDA-64C
6
6


