49
Configuring Camera Operations
C
h
ap
te
r 4
A
pplic
at
io
n
S
e
tti
n
gs
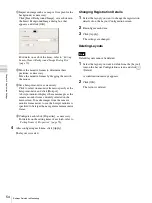
• Recording time may be limited depending on the camera
specifications.
• If the recording time available on the camera is
exceeded, recording will stop before you click [Stop].
• The shadow tour appears with a name (S-1to S-4) in the
[Tour] list on the [Camera Control] pane of the Main
screen.
Configuring Masks
Configure masks when you want to hide specific areas
within images monitored by the camera. The mask
function works in conjunction with the camera’s pan, tilt,
and zoom movements to constantly hide the specified
areas.
The mask function works in conjunction with pan, tilt, and
zoom movements only on Sony network cameras.
Even if you change the masks for the camera that is
recording, the settings will not be reflected in the current
recording file. If you want to change the masks, make the
changes before you start recording.
• A mask area configured for a camera with pan and tilt
functions may shift when the camera is panned, tilted, or
zoomed. When configuring the mask area, allow for
approximately 10% (of the full image size) of additional
space around the object you wish to mask. In addition, be
sure to position the object you wish to mask in the center
of the monitoring screen before configuring a mask area
for a camera with pan and tilt functions.
• When configuring the mask settings from a client, be
sure to preview the settings before configuring them.
1
Click [Device] at the top of the Configuration window.
The Device Configuration screen appears.
2
Select the camera for which you want to configure the
mask, and click the [Masking] tab.
Images from the camera are displayed in the preview
area.
3
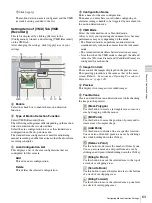
Configure each item.
You can configure up to 10 masks.
For details on each of the items, refer to
.
1
If necessary, select [Freeze image during PTZ
movement] to stop mask rendering during pan, tilt,
and zoom movement.
2
Enter the mask name.
3
Select how the mask will be displayed.
Masks can be filled with a single color or a pattern.
4
Use these buttons to create and edit the mask while
checking the image in the preview area.
5
For a camera equipped with pan, tilt, and zoom
functions, use these buttons to control the pan, tilt,
and zoom of the camera, and to confirm whether the
camera moves properly so as to hide the area you
set.
You can also select a preset, and move the camera
to the preset position.
6
Click [Apply].
The mask you created is added to the list.
When creating multiple masks, repeat Steps
2
to
6
.
Notes
Caution
Notes
1
6
5
4
3
2
Summary of Contents for Ipela NSR-1050H
Page 138: ......


