Quick Start Guide
©2004 by Sony Corporation
Ecological Paper - Totally Chlorine Free
4-101-936-11 (1)
Printed in Spain
Thank you for purchasing this Sony
product.
After following this step by step guide
you will be able to:
Insert Batteries into the Remote
Control.
Connect the Display Unit to the
Media Receiver Unit.
Connect the AC Cable, Aerial and
VCR to your TV.
Select the language of the menu
screens.
Select the country in which you wish
to operate the set.
Set the current time.
Tune your TV.
Change the broadcast channels into
a different order.
View TV Programmes.
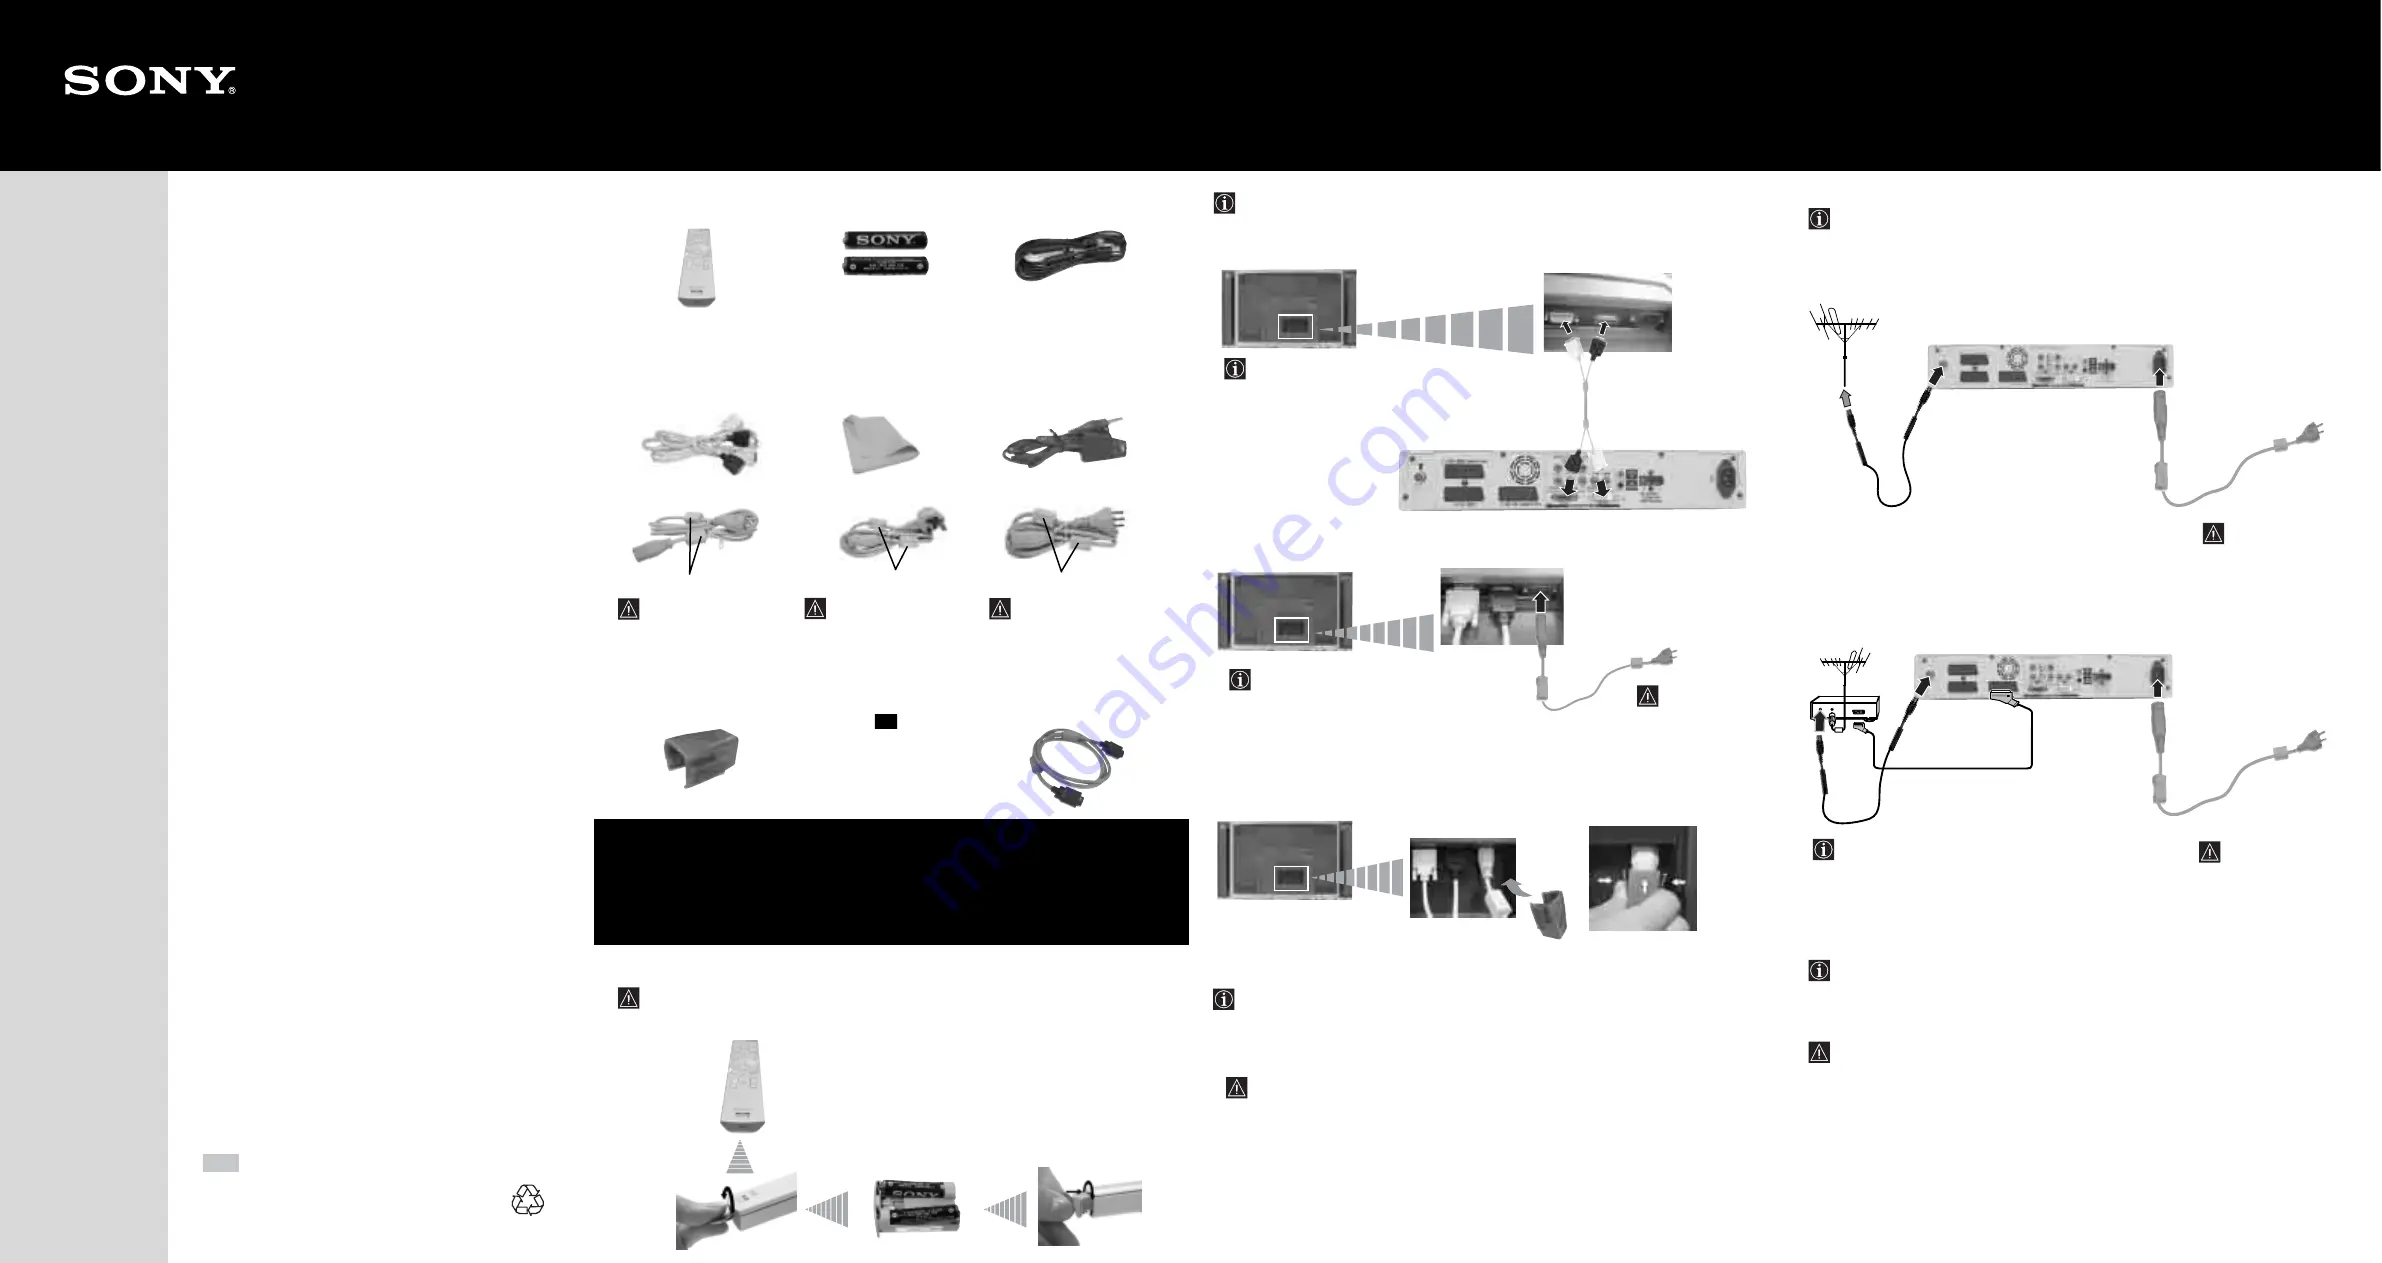
Make sure you insert the supplied batteries using the correct polarities.
Always remember to dispose of used batteries in an environmentally friendly way.
• Use the supplied display interface cable.
• Use the supplied mains lead for the display unit (Type C-4, Type BF or Type C-5, see step 1).
1
Connect the supplied interface cable to the display unit and to the media receiver unit.
2
Connect the supplied mains lead to the display unit.
3
Only for KE-P42MRX1, KE-P50MRX1 and KE-P61MRX1:
To unplug the mains lead pull down the mains plug holder by pushing in both sides of the holder,
then pull out the plug.
4
Install the display unit using the specified wall-mount bracket or stand.
Before installing the display unit, check the installation instructions of your wall-mount bracket
or stand.
1 Remote control (RM-Y1012):
1 “Notes on Plasma” book.
2 Batteries (AA size):
Only for KE-P61MRX1:
(supplied with the display unit:
PDM-6110)
• 2 Frame Bars
• 4 Screws
1 Coaxial Cable:
Only for KLV-L42MRX1:
(supplied with the display unit:
LDM:4210)
• 2 Speaker jack covers
1 Display Interface Cable:
One Cleaning Cloth:
One AV Mouse:
2 Mains Leads (Type C-4):
Use these mains leads
(with safety earth) if
you use the set
outside the United
Kingdom and Ireland.
1 Mains Plug holder:
2 Mains Leads (Type BF):
• Use these mains leads
(with safety earth) if you
use the set in the United
Kingdom.
• See “NOTICE FOR
CUSTOMERS IN THE
UNITED KINGDOM
and IRELAND” on
page 2
of the
instruction manual when
using these mains leads.
•
These mains leads may not
be supplied depending on
the country.
2 Mains Leads (Type C-5):
• Use these mains leads (with
safety earth) if you use the
set in the Swiss
Confederation.
• These mains leads may not
be supplied depending on
the country.
1 PC Input Cable
Do not remove ferrite cores.
Do not remove ferrite cores.
GB
Do not remove ferrite cores.
Location of the interface
connections may differ
depending on the model.
Location of the mains lead
connection may be separated from
the interface connections
depending on the model.
Do not connect to
the mains before
all connections
are completed.
Clip on the
AC IN jack
until you
hear
clicking.
Attach the mains plug holder
(supplied) to the mains lead.
• Use the supplied mains lead for the media receiver unit (Type C-4, Type
BF or Type C-5, see step 1).
• Use the supplied coaxial cable for aerial connection.
• The Scart lead is optional, however if you use a Scart lead to connect your VCR it can
improve picture and sound quality when using it.
• For more details of VCR connection, please refer to the section “Connecting Optional
Equipment” on page 50 of the instruction manual.
If you do not have a Scart lead, after automatically tuning the TV, tune in the VCR test signal
to the TV programme number “0” by using the “Manual Programme Preset” option. (for
details of how to manually programme these presets, see page 35, step A of the instruction
manual).
Refer to your VCR instruction manual to find out how to find the output channel of your
VCR.
For more details regarding VCR connection, refer to
“Connecting Optional Equipment to the TV” on page 50
of the instruction manual.
Connecting an aerial
Connecting a VCR with an aerial
3/
OUT
IN
Do not connect
to the mains
before all
connections
are complete.
Do not connect
to the mains
before all
connections
are complete.
Connecting the
Display Unit to the
Media Receiver Unit
Checking the
Accessories Supplied
KE-P42MRX1,
KE-P50MRX1,
KE-P61MRX1,
KLV-L32MRX1,
KLV-L42MRX1
4
Connecting the AC
Cable, Aerial and VCR
1
GB
Inserting Batteries into
the Remote Control
2
3


