background image

11

 GB

KLV-20S400A

3-876-379-

13

(1)

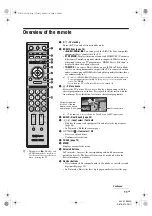
Overview of the remote

1

"/1

 – TV standby

Turns the TV on and off from standby mode.

2

BRAVIA Sync (page 18)

m

/

N

/

X

/

M

/

x

:

 You can operate the BRAVIA Sync-compatible 

equipment that is connected to the TV.

SYNC MENU

:

 Displays the menu of connected HDMI CEC (Consumer 

Electronics Control) equipment which is supported. While viewing 
other input screens or TV programmes, “HDMI Device Selection” is 
displayed when the button is pressed.

THEATRE

:

 You can set Theatre Mode on or off. When Theatre Mode 

is set to on, the optimum audio output (if the TV is connected with an 
audio system using an HDMI cable) and picture quality for film videos 
are automatically set.

~

• Control for HDMI (BRAVIA Sync) is only available with the connected 

Sony equipment that has the BRAVIA Sync logo or is compatible with 
control for HDMI.

• If you turn the TV off, Theatre Mode is also turned off.

3

 – Picture freeze

Freezes the TV picture. Press once to display a frozen image with the 
current programme in a window. Press again to fill the screen with the 
frozen image. Press third time to return to the current programme.

~

• This function is not available for Twin Picture and PC input source.

4

AUDIO – Dual Sound (page 25)

5

/

 – Input select / Text hold

• Displays the connected equipment list and selects the input source 

(page 16).

• In Text mode: Holds the current page.

6

F

/

f

/

G

/

g

/

 – Item select / OK

• Selects or adjusts items.
• Confirms selected items.

7

TOOLS (page 13)

8

MENU

Displays or cancels the menu.

9

Coloured buttons

In Text mode: Accesses the corresponding coloured Fastext menu 
quickly and easily. The Fastext feature can be used only when the 
Fastext broadcast is available.

0

Number buttons

• Selects channels. For channel numbers 10 and above, enter the second 

digit quickly (page 30).

• In Text mode: Enters the three digit page number to select the page.

TOOLS

AUDIO

THEATRE

SYNC MENU

BRAVIA Sync

RETURN

z

• The number 5, 

N

,


PROG + and 

AUDIO buttons have tactile dots. 
Use the tactile dots as references 
when operating the TV.

Freeze

Current programme 
(Location of the sub 
window can be moved 
by pressing 

F

/

f

/

G

/

g

.)

Frozen picture

Continued

010COV.book  Page 11  Friday, October 10, 2008  2:50 PM

Summary of Contents for KLV-20S400A/B

Page 1: ... 2008 Sony Corporation 3 876 379 13 1 KLV 20S400A 3 876 379 13 1 Operating Instructions KLV 20S400A LCD Colour TV 3 876 379 13 1 010COV book Page 1 Friday October 10 2008 2 50 PM ...

Page 2: ... Zealand model Your Bravia TV is ENERGY STAR qualified in the home mode When the TV is initially set up it is designed to meet ENERGY STAR requirements Changes to certain features settings and functionalities of this TV i e TV Guide Picture Sound Light Sensor Power Savings can slightly change the power consumption Depending upon such changed settings the power consumption may increase which possib...

Page 3: ...Tools menu 13 Overview of the TV buttons and indicators 14 15 Using Optional Equipment Connecting optional equipment 15 Viewing pictures from the connected equipment 16 Viewing Twin Picture 17 Viewing PIP Picture in Picture 17 Using BRAVIA Sync Control for HDMI 18 To connect the equipment that is compatible with control for HDMI 18 To make the control for HDMI settings 18 Control for HDMI 18 19 Us...

Page 4: ...the carrying handle Attach the carrying handle supplied for transportation onto the TV Prepare a screwdriver suitable for the screws supplied before attaching the carrying handle 1 Place the TV on a level surface such as the floor with the display panel facing down 2 Place the carrying handle on the rear of the TV Fit the protrusion on the rear of the carrying handle into the guidance holes on the...

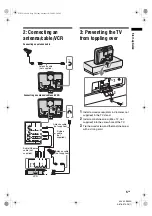
Page 5: ...plied in the TV stand 2 Install a machine screw M6 12 not supplied into the screw hole of the TV 3 Tie the wood screw and the machine screw with a strong cord 8 8 8 8 Connecting an antenna cable and VCR Antenna cable not supplied S video cable not supplied Antenna cable not supplied Antenna cable not supplied Audio Video cable not supplied VCR 010COV book Page 5 Friday October 10 2008 2 50 PM ...

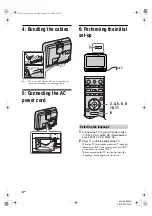
Page 6: ...let 110 240 V AC 50 60 Hz New Zealand only 220 240 V AC 50 60 Hz 2 Press 1 on the top edge of the TV When the TV is in standby mode the 1 standby indicator on the TV front panel is red press 1 on the remote to turn on the TV When you turn on the TV for the first time the Language menu appears on the screen Selecting the language 1 BRAVIA Sync AUDIO THEATRE SYNC MENU TOOLS RETURN 3 4 5 6 9 10 11 8 ...

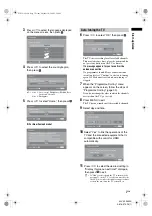
Page 7: ...s are found auto tuning is stopped 7 When the Programme Sorting menu appears on the screen follow the steps of Programme Sorting page 30 If you do not change the order in which the channels are stored on the TV go to step 8 8 Press MENU to exit The TV has now tuned in all the available channels 9 Select day and time 10 Select Yes to link the operations of the TV and the connected equipment that is...

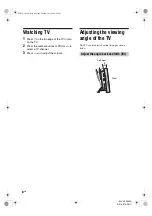
Page 8: ... the TV 2 Press the number buttons or PROG to select a TV channel 3 Press 2 to adjust the volume Adjusting the viewing angle of the TV This TV can be adjusted within the angles shown below Adjust the angle back and forth tilt Front Left view 010COV book Page 8 Friday October 10 2008 2 50 PM ...

Page 9: ...AC When wiring cables be sure to unplug the AC power cord for your safety and take care not to catch your feet on the cables Disconnect the AC power cord from the AC power outlet before working on or moving the TV set Keep the AC power cord away from heat sources Unplug the AC power plug and clean it regularly If the plug is covered with dust and it picks up moisture its insulation may deteriorate...

Page 10: ...n and is not a malfunction Do not push or scratch the front filter or place objects on top of this TV set The image may be uneven or the LCD screen may be damaged If this TV set is used in a cold place a smear may occur in the picture or the picture may become dark This does not indicate a failure These phenomena disappear as the temperature rises Ghosting may occur when still pictures are display...

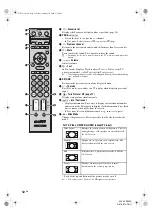
Page 11: ...rent programme in a window Press again to fill the screen with the frozen image Press third time to return to the current programme This function is not available for Twin Picture and PC input source 4 AUDIO Dual Sound page 25 5 Input select Text hold Displays the connected equipment list and selects the input source page 16 In Text mode Holds the current page 6 F f G g Item select OK Selects or a...

Page 12: ... 17 Displays two pictures simultaneously w Info Text reveal Displays information Press once to display current channel number and screen mode Press again to display clock information Press third time to remove the display from the screen In Text mode Reveals hidden information e g answers to a quiz wa Wide Mode Changes the picture size Press repeatedly to select the desired wide mode For TV Video ...

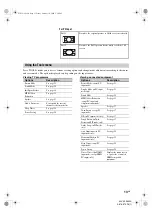
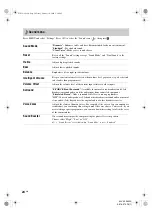
Page 13: ...to the favourite list Sleep Timer See page 28 Power Saving See page 28 Options Description Picture Mode except PC input mode See page 23 Display Mode in PC input mode only See page 23 Sound Mode See page 24 MPEG Noise Reduction except PC input and component input mode See page 23 Speaker See page 27 Twin Picture except PC input mode See page 17 PIP in PC input mode only See page 17 Single Picture ...

Page 14: ...p or down 5 1 Power Turns the TV on or off To disconnect the TV from the AC power completely pull the plug from the AC power outlet 6 Picture Off Timer indicator Lights up in green when the picture is turned off page 28 Lights up in amber when the timer is set page 28 7 1 Standby indicator Lights up in red when the TV is in standby mode 8 Power indicator Lights up in green when the TV is turned on...

Page 15: ...onal Equipment 8 S VHS Hi8 DVC camcorder Headphones Digital video camera DVD player Audio system Blu ray disc player DVD player without component video output VCR DVD player with component video output Hi Fi audio equipment DVD recorder PC VCR For service use only PC HDMI output Video game equipment Continued 010COV book Page 15 Friday October 10 2008 2 50 PM ...

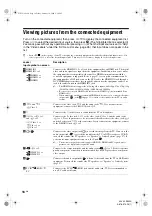
Page 16: ...at bears the HDMI logo recommended Sony HDMI cable When connecting an audio system with HDMI jack be sure to also connect to the audio output jacks refer G in page 15 to listen to the sound from the TV on audio system B 2 and 2 Video 2 Connect to the video jack 2 and the audio jacks 2 If you connect mono equipment connect to the L MONO jack 2 C i Connect to the i jack to listen to sound from the T...

Page 17: ...Picture You can view two pictures PC input and TV programme on the screen simultaneously Connect a PC page 15 and make sure that images from a PC appear on the screen page 16 1 Press Two pictures are displayed simultaneously 2 Press number buttons or PROG to select the TV channel To return to single picture mode Press RETURN You cannot display resolutions higher than WXGA 1360 768 pixels Power Man...

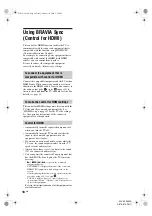
Page 18: ...onnected equipment for setting details Automatically turns the connected equipment off when you turn the TV off Automatically turns the TV on and switches the input to the connected equipment when the equipment starts to play If you turn on a connected audio system while the TV is on the sound output switches from the TV speaker to the audio system Adjusts the volume 2 and mutes the sound of a con...

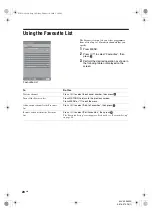
Page 19: ... your list and try again page 20 2 Programme List Displays available TV channels To watch the desired channel select the channel then press To assign a label to a channel select Edit Programme Labels then see page 30 3 External Inputs Selects equipment connected to your TV To watch the desired external input select the input source then press To assign a label to an external input select Edit Vide...

Page 20: ...een Favourite List To Do this Watch a channel Press F f to select the channel number then press Turn off the Favourite list Press RETURN to return to the previous screen Press MENU or to exit the menu Add a current channel to the Favourite list Press F f to select Add to Favourites then press Remove a channel from the Favourite list Press F f to select Edit Favourites then press The Favourite Set ...

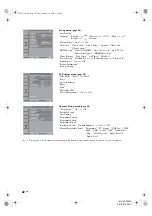
Page 21: ...nd Mode Dynamic t Standard t Clear Voice Reset Treble Bass Balance Intelligent Volume On t Off Volume Offset Surround S FORCE Front Surround t Simulated Stereo t Off Voice Zoom Sound Booster High t Low t Off Dual Sound Screen menu page 25 Wide Mode Wide Zoom t Normal t Full t Zoom Auto Wide On t Off 4 3 Default Wide Zoom t Normal t Off Horizontal Shift Vertical Shift Vertical Size Picture TV MENU ...

Page 22: ...On t Off Channel Set up menu page 30 1 Digit Direct On t Off Favourite Set up Auto Tuning Programme Sorting Programme Labels Programme Block Intelligent Picture On with Indicator t On t Off Manual Programme Preset Programme TV System VHF Low VHF High UHF Label AFT Audio Filter Skip Colour System Signal Booster Signal Level Select Set Exit MENU TV Set up Off Off English Standard Power Auto Start up...

Page 23: ...of the picture Cool Gives the white colours a blue tint Neutral Gives the white colours a neutral tint Warm 1 Warm 2 Gives the white colours a red tint Warm 2 gives a redder tint than Warm 1 Warm 1 and Warm 2 are not available when Picture Mode is set to Vivid Sharpness Sharpens or softens the picture Noise Reduction Reduces the picture noise snowy picture in a weak broadcast signal High Medium Lo...

Page 24: ...r inputs Surround S FORCE Front Surround Available for normal stereo broadcast and 5 1ch broadcast surround audio and the audio input from connected equipment Simulated Stereo Adds a surround like effect to mono programmes Off Converts and reproduces 5 1ch and other broadcast surround audio as normal stereo audio 2ch Reproduces the original audio of other broadcasts as it is Voice Zoom Adjusts the...

Page 25: ...ternal equipment connected to the HDMI jack is selected this is fixed to Stereo except HDMI IN 3 with DVI analogue sound input Broadcasting Selection NICAM stereo Stereo stereo sound Mono regular sound NICAM bilingual Main main sound Sub sub sound Mono regular sound NICAM monaural Main main sound Mono regular sound A2 German stereo Stereo stereo sound Mono regular sound A2 German bilingual Main ma...

Page 26: ... for standard use Off Turns off the Cinema Drive feature If the image contains irregular signals or too much noise Cinema Drive will be automatically turned off even if Auto is selected Cinema Drive is not available for a PC input source AV Set up Video Labels Assigns a name to any equipment connected to the side and rear jacks The name will be displayed briefly on the screen when the equipment is...

Page 27: ... made on the connected equipment Control for HDMI Sets whether or not to link the operations of the TV and the connected equipment that is compatible with control for HDMI When set to On the following menu items can be performed If the specific Sony equipment that is compatible with control for HDMI is connected this setting is applied to the connected equipment automatically when the Control for ...

Page 28: ...ses the picture settings according to the ambient light in the room Off Turns off the Light Sensor feature Be sure not to put anything over the sensor as its function may be affected Product Information Displays your TV s product information Factory Settings Resets all settings to factory settings other than Programme Block Favourites settings and the programme preset data After completing this pr...

Page 29: ...bove chart with a 60 Hz vertical frequency from a personal computer In plug and play signals with a 60 Hz vertical frequency will be selected automatically Phase Adjusts the phase when the screen flickers Pitch Adjusts the pitch when the picture has unwanted vertical stripes Horizontal Shift Adjusts the horizontal position of the picture Power Management Switches the TV to standby mode if no signa...

Page 30: ... move to a new position then press 2 Press F f to select the new position for your channel then press Programme Labels Assigns a channel name of your choice up to five letters or numbers The name will be displayed briefly on the screen when the channel is selected 1 Press F f to select the channel you want to name then press 2 Press F f to select the desired letter or number _ for a blank space th...

Page 31: ...F f to select the correct character 2 Repeat the procedure in step 1 until the name is completed then press AFT Allows you to fine tune the selected programme number manually if you feel that a slight tuning adjustment will improve the picture quality You can adjust the fine tuning over a range of 15 to 15 When On is selected the fine tuning is performed automatically Audio Filter Improves the sou...

Page 32: ... kilohms 1 2 Supported formats 1080p 50 60 Hz 1080i 50 60 Hz 720p 50 60 Hz 576p 576i 480p 480i Y 1 Vp p 75 ohms 0 3V sync negative PB CB 0 7 Vp p 75 ohms PR CR 0 7 Vp p 75 ohms 1 2 Audio input phono jacks 500 mVrms Impedance 47 kilohms Video output phono jack Audio output phono jacks HDMI IN 1 2 3 Video 1080 24p 1080p 50 60 Hz 1080i 50 60 Hz 720p 50 60 Hz 576p 576i 480p 480i Audio Two channel line...

Page 33: ...tandby indicator lights up in red press 1 No picture or no menu information from equipment connected to the video input jack Press to display the connected equipment list then select the desired input Check the connection between the optional equipment and the TV Poor Picture Only snow and noise appear on the screen Check if the antenna is broken or bent Check if the antenna has reached the end of...

Page 34: ...reo broadcast sound switches on and off or is distorted the sound switches between stereo and monaural frequently The antenna connection is loose or the antenna cable is damaged Check the cable and connection on the TV VCR and on the wall page 5 Adjust the antenna direction for the minimum interference Contact a Sony dealer for advice Signal transmission is low Try using a booster Otherwise use th...

Page 35: ...instruction manual supplied with the video game software The TV cabinet creaks Changes in room temperature sometimes make the TV cabinet expand or contract causing a noise This does not indicate a malfunction Static discharge is felt when touching the TV cabinet This is the same static discharge that is felt when touching metal door handles or car doors especially when the air is dry for example i...

Page 36: ... 1 Printed in Malaysia Customer support KLV 20S400A 3 876 379 13 1 010COV book Page 36 Friday October 10 2008 2 50 PM ...

Reviews: