background image

24

Adjusting the Convergence
Automatically (FLASH FOCUS)

The projection tube image appears on the
screen in three layers (red, green and blue). If
they do not converge, the color is poor and
the picture blurs.

Before you use your projection TV, be sure to
adjust the convergence.

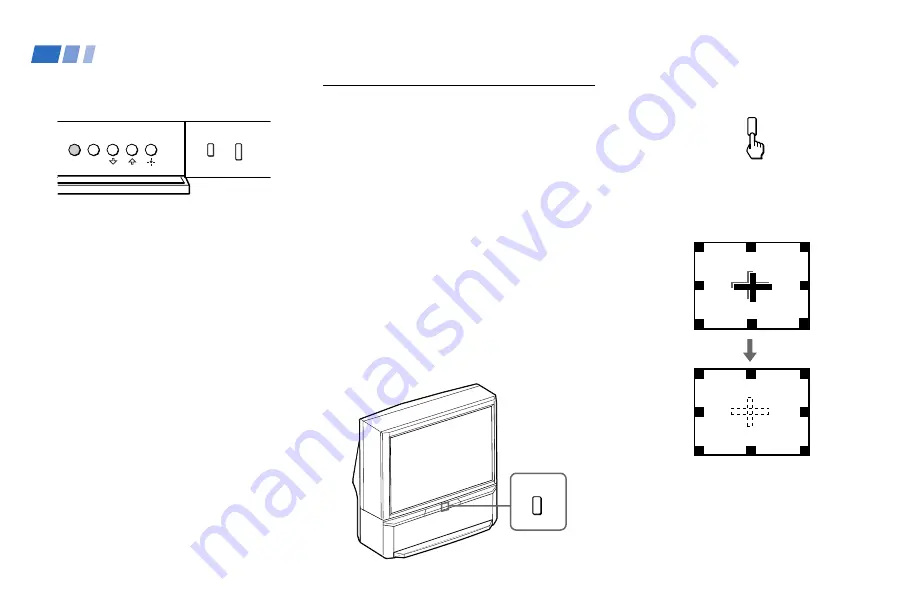
The FLASH FOCUS feature allows you to
adjust the convergence automatically.

Tips


 z

• It is recommended to perform FLASH FOCUS about

30 minutes after the projection TV is first turned on.

• You can also perform FLASH FOCUS using the Set

Up menu on page 43.

Press FLASH FOCUS.

The cross pattern appears and FLASH
FOCUS begins to work. The adjustment is
completed when the cross pattern becomes
white.

Note:

• FLASH FOCUS is canceled if you

perform any other function while FLASH
FOCUS is working.

To perform AUTO SET UP again

Press SET UP inside the drop-down panel on
the projection TV and perform steps 2-4 on
page 23.

Press SET UP again to exit.

FLASH FOCUS

FLASH FOCUS

Basic Set Up (continued)

TV/VIDEO

FLASH FOCUS

MENU

SET UP

Summary of Contents for KP 48V85

Page 1: ... 2000 Sony Corporation Color Rear Video Projector 4 077 172 11 1 Operating Instructions KP 48V85 KP 53V85 KP 61V85 ...

Page 2: ...blic may require authorization from the broadcaster cable company and or program owner NOTIFICATION This equipment has been tested and found to comply with the limits for a Class B digital device pursuant to Part 15 of the FCC Rules These limits are designed to provide reasonable protection against harmful interference in a residential installation This equipment generates uses and can radiate rad...

Page 3: ...st buttons see Watching the TV on page 25 Remote Control Joystick page 22 POWER pages 25 56 57 FUNCTION pages 25 55 57 TV VIDEO page 26 ANT page 27 0 9 buttons page 25 ENTER page 25 CHANNEL INDEX PIP P P ACTIVE pages 28 32 FREEZE pages 26 29 31 32 GUIDE page 57 MENU page 33 CH page 25 VTR 1 2 3 DVD MDP pages 43 55 56 MUTING page 25 PICTURE MODE pages 25 34 pages 27 35 DISPLAY page 26 JUMP page 26 ...

Page 4: ...ng CHANNEL INDEX 32 Adjusting Your SET UP menus 33 Learning Menu Selection 33 Using the Video Menu 34 Using the Audio Menu 35 Using the Timer Menu 37 ch Using the Channel Set Up Menu 38 Setting and Selecting Favorite Channel 40 Using the Set Up Menu 42 Using the Parental Control Feature 44 Activating the Parental Control Feature 44 Selecting a Custom Rating in U S A 46 Selecting a Custom Rating in...

Page 5: ...allowing you to view and choose from eight of your favorite channels S LinkTM allowing you to control some operations of your projection TV by other Sony components Welcome Two Y PB PR inputs for DVD Player and DTV receiver connections Three AUDIO VIDEO S VIDEO inputs 1 Owner s Record The model and serial numbers are located at the rear of the projection TV below the Sony logo on the sticker and a...

Page 6: ...tion TV is transported directly from a cold to a warm location or if the room temperature changes suddenly the picture may be blurred or show poor color In this case please wait a few hours to let the moisture evaporate before turning on the projection TV To obtain the best picture do not expose the screen to direct illumination or direct sunlight It is recommended to use spot lighting directed do...

Page 7: ... only one way This is a safety feature If you are unable to insert the plug fully into the outlet try reversing the plug If the plug should still fail to fit contact your electrician to have a suitable outlet installed Do not defeat the safety purpose of the polarized plug by forcing it in Alternate Warning For the set with a three wire grounding type AC plug This plug will only fit into a groundi...

Page 8: ...not place the set on an unstable cart stand table or shelf The set may fall causing serious injury to a child or an adult and serious damage to the set Use only a cart or stand recommended by the manufacturer for the specific model of projection TV An appliance and cart combination should be moved with care Quick stops excessive force and uneven surfaces may cause the appliance and cart combinatio...

Page 9: ...ng to qualified service personnel under the following conditions When the power cord or plug is damaged or frayed If liquid has been spilled into the set Power service grounding electrode system NEC Art 250 Part H Power Cord Protection Do not allow anything to rest on or roll over the power cord and do not place the set where the power cord is subject to wear or abuse Antennas Outdoor Antenna Grou...

Page 10: ...ce opening the cabinet may expose you to dangerous voltage or other hazards Refer all servicing to qualified service personnel Replacement Parts When replacement parts are required be sure the service technician certifies in writing that he has used replacement parts specified by the manufacturer that have the same characteristics as the original parts Unauthorized substitutions may result in fire...

Page 11: ...eople The projection TV has been equipped with casters for easy movement on a hard surface Please move your projection TV using the casters 60 60 60 min 1 8m approx 6 ft 48 min 2 1m approx 7 ft 53 min 2 4m approx 8 ft 61 20 min 2 1m approx 7ft 53 min 2 4m approx 8ft 61 min 1 8m approx 6ft 48 20 Installing the Projection TV Recommended viewing area Horizontal ...

Page 12: ...eparate S Link CONTROL S cable RK G69HG About the CONTROL S OUT jack To control other Sony equipment with the projection TV s remote control connect the CONTROL S IN jack of the equipment to the CONTROL S OUT jack on the projection TV with the CONTROL S cable Making Connections Connecting directly to a cable or an antenna The connection you choose will depend on the cable found in your home Newer ...

Page 13: ...gnals requiring a cable box only for certain channels e g HBO SHOWTIME etc For this set up you can switch between scrambled channels through your cable box and normal CATV channels by pressing ANT on your remote control Notes You may be able to program your Sony remote control to operate your cable box see Operating a Cable Box or Satellite Receiver SAT on page 57 During PIP P P CHANNEL INDEX or F...

Page 14: ...he incoming cable connection and connect the other two output jacks using the coaxial cable to IN on the cable box and VHF UHF on the projection TV 2 Using a coaxial cable connect OUT on the cable box to VHF UHF IN on the VCR 3 Using AUDIO and S VIDEO cables connect AUDIO and S VIDEO OUT on the VCR to AUDIO and S VIDEO IN on the projection TV White AUDIO Left Red AUDIO Right Disconnect all power s...

Page 15: ... satellite antenna to the satellite receiver 2 Attach the coaxial cable from the incoming cable connection or antenna to VHF UHF on the projection TV 3 Using AUDIO and S VIDEO cables connect AUDIO and S VIDEO OUT on the satellite receiver to AUDIO and S VIDEO IN on the projection TV White AUDIO Left Red AUDIO Right Note To view input from the satellite receiver select the video input which the sat...

Page 16: ...EO use a VIDEO cable yellow instead of the S VIDEO cable Note To view input from the satellite receiver or VCR select the video input which your satellite receiver or VCR is connected to by pressing TV VIDEO on the remote control Disconnect all power sources before making any connections VMC 810S 820S not supplied 4 VCR YC 15V 30V not supplied 5 1 S VIDEO 2 AUDIO L Coaxial cable Rear of projection...

Page 17: ...ecting be sure to read the Operating Instructions of the DTV receiver 1 Attach the coaxial cable from the roof antenna to VHF UHF IN DTV on the DTV receiver 2 Using AUDIO and S VIDEO cables connect AUDIO and S VIDEO OUT on the DTV receiver to AUDIO and S VIDEO IN on the projection TV White AUDIO Left Red AUDIO Right Note If your DTV receiver supports 480i signal from YPBPR you can connect Y PB and...

Page 18: ... Right 2 Press VIDEO 2 to select the video inputs from a camcorder If your camcorder is not equipped with S VIDEO use a VIDEO cable yellow instead of the S VIDEO cable If you are connecting a monaural camcorder connect only the single audio output to the left MONO input on the projection TV Disconnect all power sources before making any connections Front of projection TV Camcorder Audio video outp...

Page 19: ...e editing through MONITOR OUT When connecting a single VCR to the projection TV if VCR LINE OUT is connected to VIDEO IN on the projection TV do not connect MONITOR OUT on the projection TV to the VCR LINE INPUT see right Doing so will cause program interference and other viewing problems VIDEO AUDIO L AUDIO R Rear of projection TV VCR for recording 1 2 VMC 810S 820S not supplied VCR for playback ...

Page 20: ...abeled differently If so connect as follows Connect Y green to Y Connect PB blue to CB Cb or B Y Connect PR red to CR Cr or R Y AUDIO L DVD YC 15V 30V not supplied Rear of projection TV Audio S video outputs AUDIO R S VIDEO RK 74A not supplied VMC 10HG not supplied RK 74A not supplied AUDIO R AUDIO L DVD Rear of projection TV Connect the DVD Player directly to the projection TV Connecting the DVD ...

Page 21: ...connect an AV receiver 1 2 Perform as described in Connecting a cable TV system antenna to a VCR on page 10 3 Using a VIDEO cable connect VIDEO 1 IN on the projection TV to MONITOR OUT on the AV receiver 4 Using an AUDIO VIDEO cable connect TV OUT on the projection TV to VIDEO 2 IN on the AV receiver 5 Using an AUDIO VIDEO cable connect the video equipment to the AV receiver AUDIO R AUDIO VIDEO 1 ...

Page 22: ...o Logic surround system and super woofer mode with the remote control see Speaker and SAVA SP Control on page 36 Disconnect all power sources before making any connections Rear of projection TV RK 74A not supplied Line inputs AUDIO L white Stereo amplifier AUDIO R red Rear of projection TV AUDIO L white AUDIO R red Audio cord supplied with the speakers CONTROL S IN RK G34 etc not supplied 1 IN L 1...

Page 23: ...OUT on the projection TV 2 Using the CONTROL S cable connect CONTROL S IN on the speaker to CONTROL S OUT on the projection TV Connecting an amplifier that supports Dolby Pro Logic decoder If you use an amplifier with a Dolby Pro Logic decoder instead of the projection TV s audio system you can still use the projection TV s speaker as center speaker 1 Using the speaker cords supplied with the ampl...

Page 24: ...ojection TV Ensure that both ends are seated firmly and that the projection TV s S LINK jack is in the same row as the AUDIO VIDEO cable extending from the Sony VCR DVD Refer also to the Operating Instructions supplied with the VCR satellite receiver DVD player LD player and other Sony video equipment for details Rear of projection TV AUDIO R AUDIO L VIDEO Audio video S LINK cable Sony DVD RK G34 ...

Page 25: ... S Link function Disconnect all power sources before making any connections Refer also to the Operating Instructions supplied with the VCR satellite receiver DVD player LD player and other Sony video equipment for details Rear of projection TV Audio video S Link cable not supplied TV OUT Audio video outputs VCR 1 Audio video outputs RK G34 etc not supplied TV IN S LINK video audio inputs VIDEO 1 I...

Page 26: ...ing the remote control joystick The supplied remote control has a joystick which moves the on screen selector in four directions In most cases moving the joystick up down left or right will cause the selector to move in the selected direction In some cases the selector may move in four directions according to the function Pressing down on the center of the joystick will activate the selected item ...

Page 27: ... Press POWER to turn on the projection TV Press SET UP inside the drop down panel on the projection TV and the AUTO SET UP screen appears 2 Press CHANNEL to select English CHANNEL to select Español or VOLUME to select Français The screen will change to reflect your choice 3 Press VOLUME to continue 4 Press CHANNEL to preset channels automatically Auto Program appears and the projection TV starts s...

Page 28: ...CUS about 30 minutes after the projection TV is first turned on You can also perform FLASH FOCUS using the Set Up menu on page 43 Press FLASH FOCUS The cross pattern appears and FLASH FOCUS begins to work The adjustment is completed when the cross pattern becomes white Note FLASH FOCUS is canceled if you perform any other function while FLASH FOCUS is working To perform AUTO SET UP again Press SET...

Page 29: ...TE CONTROL ON THE INSIDE FRONT COVER OF THIS MANUAL AS YOU REVIEW THIS CHART Watching the TV Many TV features can be accessed directly through the remote control The following chart will explain the function of some buttons found on your remote control Using the White Labeled Buttons for Projection TV Operations and ENTER continued 0 9 PICTURE MODE Press PICTURE MODE repeatedly to directly choose ...

Page 30: ...rmation that appears on the TV s screen Press to freeze the desired picture The frozen picture is displayed on the left of the screen while viewing the normal picture of the current channel on the right Press again to display the normal picture Press to display the channel number current time channel caption if set and MTS mode if SAP is selected The SAP indication disappears and the other indicat...

Page 31: ...nt the projection TV to remain on before shutting off automatically Cancel by pressing until Sleep Off appears Press to change between the VHF UHF input and the AUX input for detailed connection information see Cable and antenna or Cable box and cable on page 9 Press to scroll through the Multi channel TV Sound MTS options Stereo SAP and Mono see MTS SAP on page 35 Press to select an audio option ...

Page 32: ...repeatedly to scroll through the available video inputs for the picture on which the symbol b or B is displayed see TV VIDEO on page 26 The Picture in Picture PIP feature allows you to view two channels simultaneously one in the full size main picture and one in a smaller window picture You can move the window picture to any location on the screen Free Layout Picture in Picture It will dim in abou...

Page 33: ...cture Press to freeze the desired scene in the main picture The frozen picture is displayed in the window picture while viewing the normal picture in the main picture The window picture size is automatically changed to 1 4 if it was 1 9 or 1 16 Press again to resume normal PIP viewing Press to switch the audio and video of the main picture and the window picture Each time you press SWAP the pictur...

Page 34: ... the TV on page 25 Speed Surf 1 Press and hold CH or to change the channel number rapidly 2 Release to display the desired channel Press to change between the VHF UHF input and the AUX input for the picture on which the symbol b or B is displayed The Picture and Picture P P feature allows you to view two channels simultaneously both in a reduced size screen The main picture will appear on the righ...

Page 35: ...EW THIS CHART under the cover Press to alternate sound between the right and left pictures The symbol will appear for a few seconds to indicate which picture s sound is being received This is useful when you need to copy down information that appears on the TV s screen Press to freeze both the right and left pictures Press again to resume P P viewing Press to switch the audio and video of the righ...

Page 36: ... Notes The projection TV will continually update each of the surrounding pictures while the CHANNEL INDEX screen is displayed Sound will only be heard from the center picture If one of the pictures received through CHANNEL INDEX is snowy the entire screen may become unstable In this case erase the snowy channel see Channel Skip Add on page 39 If you leave the CHANNEL INDEX screen displayed for abo...

Page 37: ... the MENU and buttons inside the front drop down panel of the projection TV for the menu selection Pop up menu Adjusting menu MENU MENU Adjusting Your SET UP menus V i d e o M o d e V i v i d P i c t u r e A d j u s t m e n t T r i n i t o n e H i g h N o i s e R e d u c t i o n O f f Move Select Exit MENU ch S e t U p L a n g u a g e V i d e o L a b e l P a r e n t a l C o n t r o l C a p t i o n...

Page 38: ... Adjust slider right up to brighten the picture left down to darken it Color Adjust slider right up to increase color intensity left down to decrease it Hue Adjust slider right up to increase the green tones left down to increase the red tones Sharpness Adjust slider right up to sharpen the picture left down to soften it High Select to give the white colors a blueish tint Medium Select to give the...

Page 39: ...S SAP options as follows Stereo n SAP n Mono On Sound output coming from TV speakers have the volume level equalized for all channel audio inputs when broadcasts have different sound transmission levels Off Sound output coming from the TV speakers varies according to the received channel Effect can only be set when Speaker is set to On or Off Trusurround Produces a virtual surround effect for Dolb...

Page 40: ...ojection TV as center speaker when you connect an amplifier with a Dolby Pro Logic decoder see Connecting an amplifier that supports Dolby Pro Logic decoder on page 19 Audio Out can only be set when Speaker is set to Off Fixed Sound output is held at a fixed level through the audio system Use the AV receiver s remote control to adjust the volume Variable Sound output varies according to the TV set...

Page 41: ...displayed and press 3 Move the joystick up or down until the current minute 00 59 is displayed and press The clock has now started Press MENU to exit 1 Move the joystick up or down until the desired day or range of days Every Sun Sat Every Mon Fri Sunday Monday Saturday Every Sunday Every Saturday is displayed and press 2 Move the joystick up or down until the time hours and minutes that you want ...

Page 42: ...w the channel that is selected with the Channel Caption menu in the sub screen 2 Press 3 Move the joystick up or down to display the first letter or number of the caption and press to select it Repeat until up to five digits are selected 4 Press To erase a caption press RESET The Favorite Channel feature enables easy access to the eight channels that you preset or the last channel that you were wa...

Page 43: ...Move the joystick up or down to select Skip and press The selected channel will be erased If you want to re enter the skipped channel follow the steps above and select Add Select Yes to signal the projection TV to automatically program all receivable channels When all the receivable channels are stored the lowest numbered channel is displayed Select No to cancel Auto Program Select On if your proj...

Page 44: ...ching Your Favorite Channel options can be set automatically or manually The factory setting for Favorite Channel is Auto When Favorite Channel is set to Auto the last eight channels selected with the 0 9 buttons will be set as Favorite Channel options If you want to input your own selections as Favorite Channel settings set to Manual Setting Favorite Channel manually 1 Select Favorite Channel fro...

Page 45: ...o select a new channel Press MENU when you are done Note The Favorite Channel feature is not available for the picture input from AUX Using Favorite Channel You can use the Favorite Channel feature to directly select the channel you want to watch 1 Press once The favorite channel menu and a window picture will be superimposed over the current channel The window picture displays the channel selecte...

Page 46: ...een Notes Poor reception of TV programs can cause errors in Caption Vision and XDS Captions may appear with a white box or other errors instead of the intended text XDS Caption Vision and the status display cannot be used at the same time Select from available languages English Español or Français to display all menus in your language of choice Using the Set Up Menu For detailed information on usi...

Page 47: ...witch on the remote control e g you connect your VCR to the VIDEO 3 IN jacks and set the VTR1 2 3 DVD MDP switch to VTR 3 With the Direct Play window open 1 Move the joystick up or down to select the input to which your video equipment is connected and press 2 Move the joystick up or down to select the position of the VTR 1 2 3 DVD MDP switch and press Select Yes and press to start Flash Focus adj...

Page 48: ...ony s predetermined ratings are also available See pages 51 to 54 for a description of the ratings The Parental Control feature of the TV functions by receiving the rating signal from your local broadcasting station or cable service provider Activating the Parental Control Feature First set a password then select your desired rating from Sony s predetermined ratings S e t U p L a n g u a g e V i d...

Page 49: ...r down to select Off and press 5 Press MENU to exit the menu P a r e n t a l C o n t r o l C o u n t r y U S A P a r e n t a l L o c k R a t i n g C h i l d C h a n g e P a s s w o r d Move Select Exit MENU O n P a r e n t a l C o n t r o l Move A g e s u p t o 6 Select Exit MENU On C o u n t r y U S A P a r e n t a l L o c k R a t i n g C h a n g e P a s s w o r d C h i l d Y o u t h Y o u n g A ...

Page 50: ...appear The indicator is displayed To view the program follow the steps below 1 Press ENTER to display the Password screen 2 Enter your password using the 0 9 buttons Parental Control will be canceled Parental Lock set to Off until you turn your projection TV off S e t U p L a n g u a g e V i d e o L a b e l P a r e n t a l C o n t r o l C a p t i o n V i s i o n C C 1 D i r e c t P l a y F l a s h...

Page 51: ...left or right to select the extender to be viewed and press 9 Move the joystick up or down to select and press appears beside the selected extender indicating that the programs that match the extender can be viewed If you select is displayed to show that the programs that match the extender will be blocked again T V R a t i n g Move S e l e c t r a t i n g Select Exit MENU TV Y TV Y7 TV G TV PG TV...

Page 52: ...Press MENU to exit the menu To block TV programs and or movies for which a rating signal is not given NR and N A For a description of the NR and N A ratings see page 52 1 Perform steps 1 4 of Selecting a Custom Rating in U S A on page 46 2 Move the joystick up or down to select Unrated and press C u s t o m R a t i n g Move S e l e c t c a t e g o r y Select Exit MENU T V R a t i n g M o v i e R a...

Page 53: ...select Custom and press continued Select View All TV Movie Both C u s t o m R a t i n g Move B l o c k a l l u n r a t e d p r o g r a m m i n g Select Exit MENU T V R a t i n g M o v i e R a t i n g U n r a t e d V i e w A l l T V M o v i e B o t h V i e w A l l T V M o v i e B o t h S e t U p L a n g u a g e V i d e o L a b e l P a r e n t a l C o n t r o l C a p t i o n V i s i o n C C 1 D i r ...

Page 54: ...e 0 9 buttons The Parental Control menu appears 3 Move the joystick up or down to select Change Password and press E n g l i s h R a t i n g Move S e l e c t r a t i n g Select Exit MENU C G C8 PG 14 18 _ _ _ _ _ _ F r e n c h R a t i n g Move S e l e c t r a t i n g Select Exit MENU G 8 ans 13 ans 16 ans 18 ans _ _ _ _ _ U S A R a t i n g Move S e l e c t r a t i n g Select Exit MENU TV Y TV Y7 T...

Page 55: ... Y7 TV G TV PG and TV NR Young Adult Suitable for children aged 13 and older Viewable U S movie ratings G PG PG 13 NR and N A Viewable U S TV ratings TV Y TV Y7 TV G TV PG TV 14 and TV NR continued If you have forgotten your password In step 2 of Changing the Password on page 50 enter the master password 4357 corresponding to HELP on a phone number pad You can then store a new password Notes If yo...

Page 56: ...t Rated This is a film that a producer has not rated intending to have his film widely released N A Not Applicable This is a film that a producer considers outside the scope of the MPAA ratings Note NR and N A ratings are shown together as Unrated in the menu U S TV ratings U S TV ratings are for TV programs rated according to the U S Television Parental Guidelines TV Y All Children This program i...

Page 57: ...ders are defined as follows D sexually suggestive Dialog Programs containing suggestive dialog or sexual innuendo FV Fantasy Violence Programs containing cartoon violence occurring in TV Y7 programs only L coarse Language Programs containing coarse language S Sexual situations Programs containing sexual content V Violence Programs containing violence There may be some profanity violence or brief n...

Page 58: ...xempt programming includes news sports documentaries and other information programming talk shows music videos and variety programming Note The E Exempt rating is not shown in the menu Canadian French Language ratings The Canadian French Language Ratings are for TV programs in French broadcast in Canada G General Programming intended for audience of all ages Contains no violence or the violence it...

Page 59: ...37 Dimensia 304 Emerson 319 320 316 317 318 341 Fisher 330 335 Funai 338 General Electric 329 304 309 Go Video 340 339 322 Goldstar 332 Hitachi 306 304 305 338 Instant Replay 309 308 JC Penney 309 305 304 330 314 336 337 JVC 314 336 337 Kenwood 314 336 332 337 LXI Sears 332 305 330 335 338 Magnavox 308 309 310 Marantz 314 336 337 Marta 332 Memorex 309 335 Minolta 305 304 Mitsubishi MGA 323 324 325...

Page 60: ...D VTR POWER Green Button Press the 0 9 buttons Press CH Press while pressing REC upper Press Press p Press Press 0 Press P Press again to resume normal playback Press or 0 during playback Release to resume normal playback Press TV VTR Press DVD VTR POWER Green Button Press Press p Press P Press again to resume normal playback Operating a DVD Player using the remote control To turn On Off To play T...

Page 61: ...ntering them one by one until you come to the correct code for your equipment If you enter a new code number the code number you previously entered at that setting is erased In some rare cases you may not be able to operate your equipment with the supplied remote control In this case use the equipment s own remote control unit Whenever you remove the batteries to replace them for example if too mu...

Page 62: ...atteries Press TV FUNCTION when operating your projection TV Make sure the projection TV s power cord is connected securely to the wall outlet Locate the projection TV at least 3 4 feet away from fluorescent lights Check the S Link connection see Using the S Link Function on page 20 Check the polarity of the batteries Adjust Picture in the Video menu see Picture Adjustment on page 34 Adjust Bright...

Page 63: ...nnels that are not presently in TV s memory see Auto Program on page 39 Use a highly directional outdoor antenna or a cable when the problem is caused by reflections from nearby mountains or tall buildings If the item you want to choose appears in gray you cannot select it Press the projection TV s power button off and on again Make sure Cable is On in the Channel Set Up menu see Cable on page 39 ...

Page 64: ...PR 0 7 Vp p 75 ohms AUDIO phono jacks 500 mVrms 100 modulation Impedance 47 kilohms TV OUT MONITOR OUT VIDEO phono jack 1 Vp p 75 ohms unbalanced sync negative AUDIO phono jacks 500 mVrms 100 modulation Impedance 470 ohms AUDIO VAR FIX OUT phono jacks 500 mVrms 100 modulation Impedance 470 ohms S LINK minijacks CONTROL S OUT minijack Speaker Tweeter 66 mm 2 5 8 2 Woofer 160 mm 6 3 8 2 Speaker outp...

Page 65: ...35 Channel Set Up 38 Set Up 42 Timer 37 CHANNEL INDEX 32 Channel Set Up menu operations ch 38 39 Channel Skip Add 39 Coaxial cable 8 9 Color 34 Connecting Projection TV to amplifier that supports Dolby Pro Logic decoder 19 antenna 8 audio system 18 AV receiver 17 cable 8 cable box 9 cable box and VCR 10 camcorder 14 DTV receiver 13 DVD Player 16 satellite receiver SAT 11 satellite receiver SAT and...

Page 66: ...IP 28 POSITION 28 SWAP 29 31 TV VIDEO 28 30 R Remote control 22 Graphic Illustration inside cover RESET button 28 34 35 Surround 35 SWAP button 29 31 T U Timer menu operations 37 Treble 35 Trinitone 34 Troubleshooting 58 59 TV FUNCTION button 25 TV POWER button 25 TV rating 47 TV VIDEO button 26 TV VTR button 27 Index continued Printed in U S A If after reading this instruction manual you have add...

Reviews: