background image

13

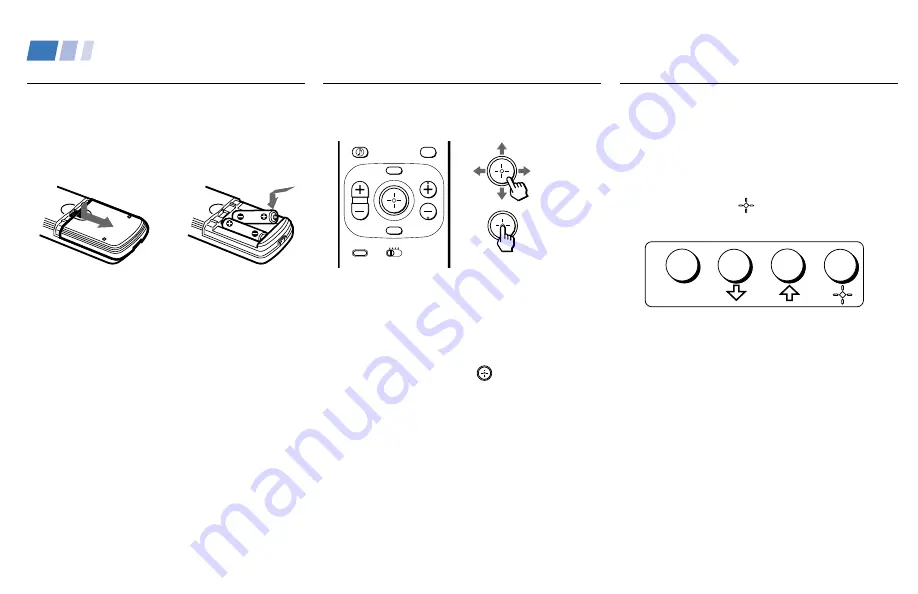
Inserting Batteries

Insert two size AA (R6) batteries (supplied) by
matching the + and – on the batteries to the
diagram inside the battery compartment.

Notes

• Remove the batteries to avoid damage

from possible battery leakage whenever
you anticipate that the remote control will
not be used for an extended period.

• Handle the remote control with care. Avoid

dropping it, getting it wet, or placing it in
direct sunlight, near a heater, or where the
humidity is high.

• Your remote control can be programmed to

operate most video equipment, (see page 34).

Using the Remote Control
Move & Select Buttons

The supplied remote control has a joystick
which allows for movement of the on-screen
cursor. Pressing up, down, left, or right on the
joystick will cause the cursor to move in the
corresponding direction. Pressing down on
the center of the joystick (


) will select the

item.

Front Panel Menu Control

The front panel menu controls allow access to
the on-screen menus without the use of a
remote control. Pressing the MENU button
will bring up the on-screen menus. The arrow
buttons, (

V

,

v

) move the on-screen cursor in

the menus and the (

) button selects the

menu item.

Select

 Basic Set Up

Move

MENU

MENU

GUIDE

VOL

TV/SAT

RESET

CH

VTR 1 2 3 DVD/MDP

CODE SET

RM -Y170

Summary of Contents for KV-32XBR250 - 32" Fd Trinitron Wega Xbr

Page 1: ...3 866 853 22 1 KV 32XBR250 KV 36XBR250 1999 by Sony Corporation 1999 by Sony Corpor Operating Instructions ...

Page 2: ...he TV Automatically 14 Watching the TV 15 Using Picture in Picture PIP 17 Using the Wireless Headphones Setting Up the Headphones 18 Using the Headphones 18 Listening to Sound from a Main PIP Picture 19 Coverage Area for the Infrared Rays 19 Using Your Menus Learning Menu Selection 20 Quick Start to the Menus 21 Using the VIDEO Menu 22 Using the AUDIO Menu 23 Using the TIMER Menu 24 Using the SET ...

Page 3: ...System off operation button Pink DVD Player operation buttons For a detailed explanation of most buttons see Watching the TV on page 15 All references to buttons on the remote control will be highlighted with bold text Remote Control MUTING page 15 POWER page 15 FUNCTION page 15 ENTER 0 9 Buttons GUIDE VTR1 2 3 DVD MDP pages 32 33 Joystick page 13 CH MENU RESET VOL TV SAT JUMP page 15 DISPLAY page...

Page 4: ...g the appliance CAUTION TO PREVENT ELECTRIC SHOCK MATCH WIDE BLADE OR PLUG TO WIDE SLOT FULLY INSERT RISK OF ELECTRIC SHOCK DO NOT OPEN CAUTION When using TV games computers and similar products with your TV keep the brightness and contrast functions at low settings If a fixed non moving pattern is left on the screen for long periods of time at a high brightness or contrast setting the image can b...

Page 5: ... used When the set is left unattended and unused for long periods of time unplug it from the wall outlet as a precaution against the possibility of an internal malfunction that could create a fire hazard Object and Liquid Entry Never push objects of any kind into the set through the cabinet slots as they may touch dangerous voltage points or short out parts that could result in a fire or electric ...

Page 6: ... have the same characteristics as the original parts Unauthorized substitutions may result in fire electric shock or other hazards Safety Check Upon completion of any service or repairs to the set ask the service technician to perform routine safety checks as specified by the manufacturer to determine that the set is in safe operating condition and to so certify When the set reaches the end of its...

Page 7: ...y accessories 2 Basic Set Up This section teaches you the basic skills needed to operate your new TV 3 Using your New TV This section shows the initial setup screen and how to use your remote control 4 Using your Menus This section teaches you how to access on screen menus and adjust your TV s settings 5 Troubleshooting This section helps you to correct problems you may encounter with your TV Safe...

Page 8: ...Satellite receiver 7 DVD player 8 DVD player with component video output connectors 8 Audio system 9 Audio Video receiver 9 Camcorder to view tapes 10 CONTROL S 11 VCR using S Link 12 Satellite receiver using S Link 12 Connecting and Installing the TV Refer to the table below it will direct you to the diagram suitable to the equipment you will be connecting If you will be connecting See page Makin...

Page 9: ... twin lead cable see B still other homes may contain both see C Antenna connector Rear of TV VHF UHF 300 ohm twin lead cable Rear of TV VHF UHF 75 ohm coaxial cable 75 ohm coaxial cable 300 ohm twin lead cable Rear of TV VHF UHF U V mixer not supplied Cable and antenna If your cable provider does not feature local channels you may find this set up convenient Select CABLE or antenna ANT mode by pre...

Page 10: ...control Notes Your Sony remote control can be programmed to operate your cable box see page 34 When using PIP you cannot view the AUX input in the window picture Tip z Pressing ANT switches between these inputs TO CONVERTER Cable box VHF UHF Rear of TV AUX 75 ohm coaxial cable not supplied CATV cable unscrambled channels signal If you are connecting a cable box through the AUX input and would like...

Page 11: ...e white audio output to the left input on your TV Connecting a VCR and TV with a cable box 1 Connect the coaxial cable from the wall to IN on your cable box 2 Using a coaxial connector connect OUT on your cable box to IN on your VCR 3 Connect a coaxial cable not supplied from the OUT jack on your VCR to VHF UHF on your TV 4 Using A V connectors connect AUDIO and VIDEO OUT on your VCR to AUDIO and ...

Page 12: ...rding to MONITOR AUDIO and VIDEO OUT on your TV Note You cannot record signals from equipment connected to the Y PB PR input Connecting and Installing the TV continued OUT MONITOR AUDIO VAR FIX TV VIDEO IN 1 3 4 IN L R MONO VIDEO VIDEO S VIDEO OUT AUDIO L R MONO AUDIO L R Y PB PR AUDIO S LINK CONTROL S LINE OUT OUT IN LINE IN OUT IN AUDIO R AUDIO L VIDEO AUDIO R AUDIO L VIDEO VCR for playback VCR ...

Page 13: ... VIDEO OUT on your VCR to AUDIO and VIDEO IN on your TV VIDEO IN 1 3 4 L R MONO VIDEO S VIDEO OUT AUDIO L R Y PB PR AUDIO S LINK CONTROL S AUX TO CONVERTER VHF UHF AUDIO R AUDIO L VIDEO AUDIO R AUDIO L VIDEO SATELLITE IN VHF UHF S VIDEO OUT IN LINE OUT LINE IN VHF UHF OUT IN LINE OUT S VIDEO 1 2 3 4 5 Rear of TV Satellite receiver VCR AUDIO R red AUDIO L white VIDEO yellow VIDEO IN 1 3 4 L R MONO ...

Page 14: ...t Y PB and PR on the COMPONENT VIDEO OUT on your DVD player to Y PB and PR on the VIDEO IN 4 panel at the rear of your TV Note Some DVD player terminals may be labeled Y CB and CR or Y B Y and R Y If so connect them by matching the colors Connecting and Installing the TV continued 1 3 4 L R MONO VIDEO S VIDEO OUT AUDIO L R Y PB PR AUDIO S LINK CONTROL S LINE OUT S VIDEO OUT S LINK DIGITAL OUT R AU...

Page 15: ...f you will be connecting your A V receiver to external speakers you do not need to connect AUDIO OUT on your A V receiver to AUDIO IN on your TV Tip z You may want to use CHANNEL FIX to fix your TV s input to the A V receiver VIDEO 1 see CHANNEL SET UP on page 26 VIDEO IN 1 3 4 OUT MONITOR AUDIO VAR FIX IN TV L R MONO VIDEO VIDEO S VIDEO OUT AUDIO L R MONO AUDIO L R Y PB PR AUDIO S LINK CONTROL S ...

Page 16: ...icture quality Connecting a camcorder This connection is convenient for viewing a picture directly from your camcorder Using A V connectors connect AUDIO and VIDEO OUT on your camcorder to AUDIO and VIDEO IN on your TV Tip z If you are connecting a monaural camcorder connect only the single white audio output to the left input on your TV Connecting and Installing the TV continued ...

Page 17: ...mpression feature These models use a feature called vertical compression to achieve maximum picture quality on widescreen sources including selected DVDs This feature compresses the height of each line for a higher resolution of the picture To enjoy this feature set your Sony DVD player to 16 9 mode The widescreen source will be automatically detected and displayed with maximum picture quality Rea...

Page 18: ...ly powers on the TV and switches to the correct video input 1 Using A V connectors connect AUDIO and VIDEO OUT on your satellite receiver to AUDIO and VIDEO IN on your TV 2 Using an S Link connector mono mini plug connect S LINK on your satellite receiver to S LINK CONTROL S OUT in the same VIDEO IN column on your TV Note The S Link feature will override the SKIP VIDEO LABEL input see page 25 2 1 ...

Page 19: ...deo equipment see page 34 Using the Remote Control Move Select Buttons The supplied remote control has a joystick which allows for movement of the on screen cursor Pressing up down left or right on the joystick will cause the cursor to move in the corresponding direction Pressing down on the center of the joystick will select the item Front Panel Menu Control The front panel menu controls allow ac...

Page 20: ... Using Your New TV Using the buttons on the top of the TV 1 Press POWER to turn on the TV The initial setup screen appears First please connect cable antenna EXIT AUTO PROGRAM CH CH 2 Press CH to run AUTO PROGRAM or press CH to exit AUTO PROGRAMMING Tip z To reset your TV to factory settings turn the TV on Then while pressing the RESET button on your remote control press the POWER button on your T...

Page 21: ...orth between the last two channels selected with the 0 9 keys Instantly turns off the sound Press again or press VOL to restore sound Turns the TV off in approximately 30 60 or 90 minutes Cancel by pressing until SLEEP OFF appears Press to return to factory settings while in an on screen menu Watching the TV The following chart explains more advanced buttons on your remote control Using the White ...

Page 22: ...to the AUX input Press when you are finished using a VCR and you want to switch to the TV input Your VCR power will remain on Cycles through the Multi channel TV Sound MTS options STEREO SAP Second Audio Program MONO see page 23 Powers off all Sony equipment at once This feature may not work with older Sony equipment Cycles through the AUTO VOLUME settings Using the White Labeled Buttons for TV Op...

Page 23: ...ttonsforPIPOperations Using Picture in Picture PIP Picture in Picture PIP allows you to watch two channels simultaneously one in the large main window and another in a small window picture Notes You must press TV FUNCTION before you can control PIP with the yellow labeled buttons The AUX input cannot be viewed in the window picture REFER TO THE ILLUSTRATION OF THE REMOTE CONTROL ON THE INSIDE FRON...

Page 24: ...hones securely on your head If you only want to listen to the sound from the cordless headphones turn down the TV speaker volume or press MUTING 3 To turn off the headphones remove them from your head and press Tip z For optimal sound reception do not cover the infrared transmitter on the TV or the infrared sensors on the headphones Notes To help prevent possible hearing damage due to sudden or pr...

Page 25: ...e audio to the headphones will be automatically turned off when the TV is powered off Coverage Area of the Infrared Rays This diagram illustrates the approximate area covered by the infrared rays emitted from the transmitter Notes If you use the headphones too far from the TV you may hear a hissing noise If something is between the headphones and the TV the sound may be interrupted These problems ...

Page 26: ... CAPTION VISION CC1 PARENTAL CONTROL VIDEO LABEL TILT CORRECTION 0 MENU LANGUAGE ENGLISH DEMO B Move Exit MENU Select 4 Press V or v to move to the desired feature and press CHANNEL SET UP CABLE OFF CHANNEL FIX OFF AUTO PROGRAM CHANNEL SKIP ADD CHANNEL CAPTION MENU FAVORITE CHANNEL Move Exit MENU Select Options for your selection will be highlighted 5 Press V or v to make your selection and press ...

Page 27: ...sic Menu provides quick access to frequently used settings Quick Start to the Menus The following is a guide to your menus To select a menu CHANNEL SET UP CABLE ON CHANNEL FIX OFF AUTO PROGRAM CHANNEL SKIP ADD CHANNEL CAPTION MENU FAVORITE CHANNEL Move Exit MENU Select Display Highlight Select MENU VIDEO MODE VIVID PICTURE BRIGHTNESS COLOR HUE SHARPNESS TRINITONE HIGH COLOR CORRECT OFF MENU B Move...

Page 28: ...st and create more vivid color Adjust left to darken the picture Adjust right to brighten the picture Adjust left to decrease color intensity or saturation Adjust right to increase color intensity or saturation Adjust left to increase the red tones Adjust right to decrease the red tones Adjust left to soften the picture detail Adjust right to sharpen the picture detail HIGH Gives the white colors ...

Page 29: ...se lower pitched sounds Adjust left or right to emphasize left and right speaker balance ON Select to stabilize the volume OFF Select to turn AUTO VOLUME off SIMULATED Adds a surround like effect to mono programs SRS Produces a dynamic three dimensional sound for stereo signals OFF Normal stereo or mono reception MONO Select to reduce noise in areas with poor reception SAP Select to listen to bili...

Page 30: ...ntil the current minute is displayed and press Any loss of power will cause these settings to be cleared CURRENT TIME SET must be programmed before you can use the ON OFF TIMER With the ON OFF TIMER menu open 1 Choose the ON OFF TIMER you would like to set and press 2 Press V or v until the desired day or range of days is displayed Press to select 3 Indicate the time that you want the TV to turn o...

Page 31: ...press VIDEO LABEL Options VIDEO 1 2 3 VHS 8mm BETA LD GAME SAT DVD WEB RECEIVER DTV SKIP VIDEO 4 DVD DTV SKIP If you select SKIP your TV will skip this connection when you press the TV VIDEO button CC1 2 3 or 4 Displays a printed version of the dialog or sound effects of a program the mode should be set to CC1 for most programs TEXT1 2 3 or 4 Displays network station information presented using ei...

Page 32: ...REVIEW is set to ON a window picture displays your favorite channels as you cycle through the options ON Select if you are receiving cable channels with a CATV cable OFF Select if you are using an antenna You will need to run AUTO PROGRAM after changing your CABLE settings CHANNEL FIX options 2 6 Select when you want to control all channel selection through a cable box Select the appropriate chann...

Page 33: ...vailable With the CHANNEL CAPTION menu open 1 Press and then V or v to access the desired channel and press again 2 Press V or v to display a letter or number of the caption and press to select it 3 Press to activate To erase a caption press RESET CHANNEL SKIP ADD MENU SKIP ADD 33 Use 0 9 or CH to select the channel Move Exit MENU Select CHANNEL CAPTION MENU CHANNEL CAPTION 33 Move Exit MENU Selec...

Page 34: ...ngs The Parental Guideline Rating System This table provides a brief overview of the rating systems available for the PARENTAL CONTROL feature For detailed information on how to change your TV rating see pages 30 31 Notes The content ratings will increase depending on the level of the age based rating For example a program with a TV PG V Violence rating may contain moderate violence while a TV 14 ...

Page 35: ...r 18 Adult programming Canadian models only G General programming 8 ans Not recommended for young children 13 ans Not recommended for ages under 13 16 ans Not recommended for ages under 16 18 ans Programming restricted to adults Canadian models only Please see TV RATINGS on page 28 for information on U S A RATINGS Overview of the Ratings ENGLISH RATINGS G MENU C8 C 18 14 PG Select rating _ _ _ _ _...

Page 36: ...L menu 3 Press and use the 0 9 buttons to enter your 4 digit password 1 2 3 4 5 6 7 8 0 9 PARENTAL CONTROL PASSWORD _ _ _ _ Use the 0 9 buttons to enter new four digit password MENU Move Exit MENU Select 4 Confirm your password by entering it again 1 2 3 4 5 6 7 8 0 9 PARENTAL CONTROL PASSWORD X X X _ Confirm password MENU Move Exit MENU Select Once your password is set correctly you will be taken...

Page 37: ...ADULT TV 14 PG 13 U S models only TV 14 14 13 ans Canadian models only CUSTOM If you prefer to set more restrictive ratings highlight CUSTOM and press See pages 28 29 for an overview of the rating systems available In the CUSTOM RATINGS menu 1 Select the desired rating category and press 2 Press V or v to select the maximum rating or content and press 3 Press V or v to block or unblock the rating ...

Page 38: ...5 Minolta 305 304 Mitsubishi MGA 323 324 325 326 Multitech 325 338 321 NEC 314 336 337 Olympic 309 308 Optimus 327 Panasonic 308 309 306 307 Pentax 305 304 Philco 308 309 Philips 308 309 310 Pioneer 308 Quasar 308 309 306 RCA PROSCAN 304 305 308 309 311 312 313 310 329 Realistic 309 330 328 335 324 338 Sansui 314 Samsung 322 313 321 Sanyo 330 335 Scott 312 313 321 335 323 324 325 326 Sharp 327 328...

Page 39: ... menu Buttons on the remote control Press VTR DVD POWER Press Press p Press P To resume normal playback press again or press Press or 0 during playback To resume normal playback press Press CH 0 9 ENTER Press to display DVD menu Use your arrow buttons V v B b Buttons on the remote control Press VTR DVD POWER Press Press p Press P To resume normal playback press again or press Press or 0 during pla...

Page 40: ...z If more than one code number is listed try entering them one by one until you come to the correct code for your equipment If you enter a new code number the code number you previously entered at that setting is erased In some rare cases you may not be able to operate your equipment with the supplied remote control In this case use the equipment s supplied remote control Whenever you remove the b...

Page 41: ...set correctly in the CHANNEL SET UP menu Antenna cable connections may not be correct TV may be set to AUX mode First turn the TV on Then while pressing the RESET button on the remote control press the POWER button on the TV The TV will turn itself off and then back on When the TV turns on again all settings will be reset and the initial setup screen will appear Call your local Sony service center...

Page 42: ...ease call our Direct Response Center at 1 800 222 SONY 7669 U S residents only or 416 499 SONY 7669 Canadian residents only Ensure that CABLE is set to OFF in the CHANNEL SET UP menu page 26 Use AUTO PROGRAM to add receivable channels that are not presently in TV memory page 26 Ensure that CABLE is set to OFF in the CHANNEL SET UP menu page 26 Use AUTO PROGRAM to add receivable channels that are n...

Page 43: ...Sound Inc KV 32XBR250 120 V 60 Hz 3 2 4 1 1 1 3 1 1 15W 2 200 W 2 W 882 687 592 mm 34 3 4 27 1 16 23 1 4 in 79 kg 175 lbs Design and specifications are subject to change without notice Notes 1 1 Vp p 75 ohms unbalanced sync negative 2 Y 1 Vp p 75 ohms unbalanced sync negative C 0 286 Vp p Burst signal 75 ohms 3 500 mVrms Impedance 47 kilohms 4 More than 408 mVrms at the maximum volume setting vari...

Page 44: ... 23 AUDIO menu operations AUDIO OUT 23 BALANCE 23 BASS 23 EFFECT 23 MTS 23 SPEAKER 23 TREBLE 23 AUDIO OUT FIXED 23 VARIABLE 23 AUTO PROGRAM 26 AUTO VOLUME CONTROL 23 AUX Hookup 3 4 A V receiver 9 B BALANCE 23 BASIC menu operations B 21 BASS 23 Battery installation 13 18 BRIGHTNESS 22 C CABLE 26 Cable box 4 operation 34 CAPTION VISION closed caption 25 CH 17 F FAVORITE CHANNEL 26 FAVORITE CHANNEL w...

Page 45: ... 17 PICTURE MODE button 15 PIP connections 17 PIP operations AUDIO 17 CH 17 FREEZE 17 PIP 17 POSITION 17 SWAP 17 TV VIDEO 17 Programming the remote 32 34 R RATINGS ENGLISH 29 FRENCH 29 MOVIE 28 TV 28 U S A 29 UNRATED 28 Remote control 13 15 FUNCTION buttons 15 Illustration inside front cover T U TILT CORRECTION 25 TIMER menu operations CURRENT TIME SET 24 DAYLIGHT SAVING 24 ON OFF TIMER 24 TREBLE ...

Page 46: ...Printed in U S A ...

Reviews: