6
L
R
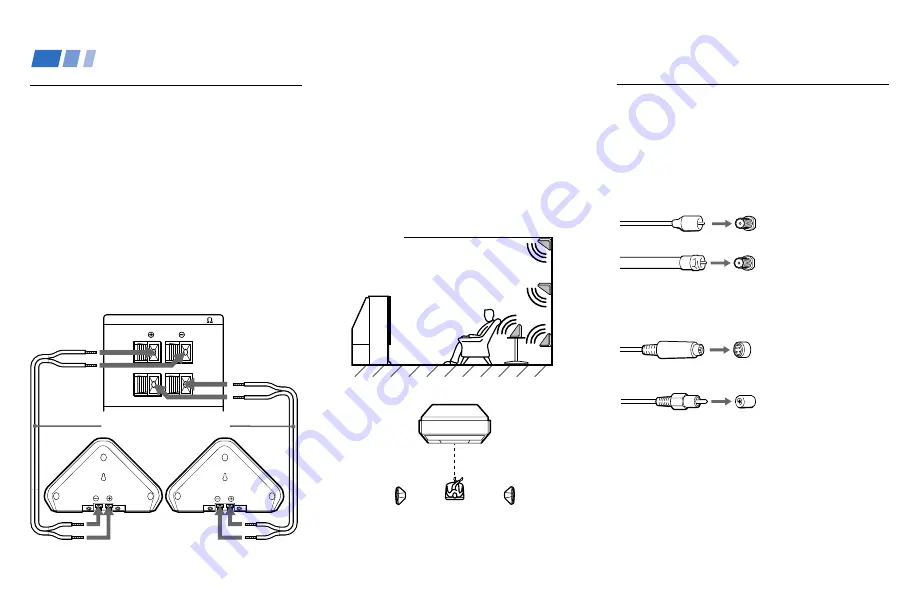
REAR SPEAKER OUT(MIN 16 )
Mounting the Supplied Rear
Speakers
For enhanced surround effect, connect the
supplied rear speakers to your projection TV.
Connecting the rear speakers
Using the supplied speaker cords, connect
REAR SPEAKER OUT L on your projection
TV to the speaker terminal on one rear
speaker, and connect REAR SPEAKER OUT
R to the terminal on the other one.
Note:
• Match the colors of the speaker cords and
the terminals. If the colors are reversed,
sound will be distorted.
(Rear of projection TV)
Speaker cord (supplied)
Speaker (supplied)
Speaker (supplied)
(Rear of projection TV)
Projection TV
Rear speaker
Left rear
speaker
Right rear
speaker
Installation
For optimum surround effect, mount the rear
speakers in the following places (as shown in
the illustration):
• on a wall, a little higher or lower than the
listener’s ears.
• on a table, a little lower than the listener’s
ears.
• at the corner where the wall and ceiling
meet.
Installing and Connecting the Projection TV (continued)
Connector Types
You may find it necessary to use some of the
following connector types during set up.
Coaxial cable
Standard TV cable and antenna cable
S Video cable
High quality video cable for enhanced
picture quality
Audio/Video cable
Video - Yellow
Audio (Left) - White
Audio (Right) - Red
Some DVD Players are equipped with the
following three video connectors.
Y - Green
P
B
(C
B
, C
b
or B–Y) - Blue
P
R
(C
R
, C
r
or R–Y) - Red
Plug Type
Screw-on Type
Screw into connection.
Push into connection.
Align guides and
push into connection.
Push into connection.


