19
R
L
AUDIO OUT
VAR
FIX
L
R
S VIDEO
VIDEO
VIDEO OUT
3
Y
P
B
P
R
R
G
B
HD
VD
AUDIO OUT
L
(MONO)
1
2
4
1
2
DOLBY DIGITAL
OUTPUT
(OPTICAL)
R
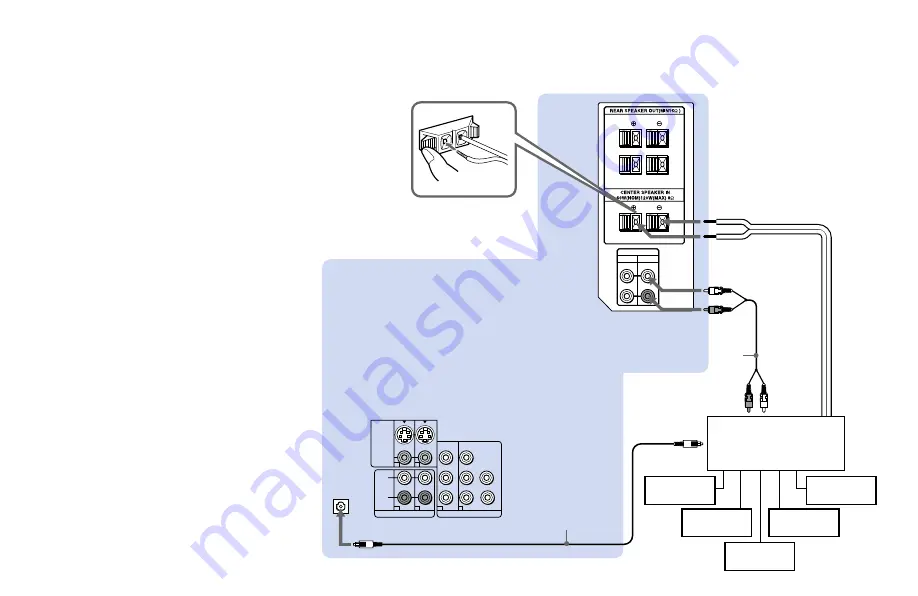
Connecting an amplifier that
supports Dolby Pro Logic/Dolby
Digital decoder
If you use an amplifier with a Dolby Pro
Logic/Dolby Digital decoder instead of the
projection TV’s audio system, you can still
use the projection TV’s center speaker.
1
Using the speaker cords (supplied with
the amplifier), connect the speaker
terminals on the amplifier to CENTER
SPEAKER IN +/– on the TV’s upper
panel.
2
Using an AUDIO cable, connect AUDIO
(FIX) OUT on the TV’s upper panel to one
of the unused Line inputs (e.g. Tape-2,
AUX1, etc.) on the amplifier (White-
AUDIO Left, red-AUDIO Right).
3
If the amplifier is equipped with a digital
audio input, connect DOLBY DIGITAL
OUTPUT (OPTICAL) on the TV’s lower
panel to the digital audio input on the
amplifier using the optical digital cable.
4
Set the amplifier to the chosen Line input
and use the AUDIO menu to set
“SPEAKER” to “CENTER IN” on the
projection TV. (see “SPEAKER” on page
49)
Note:
• The Dolby Pro Logic/Dolby Digital
decoder’s digital audio input jacks are
sometimes labeled AC-3 or DCN.
Disconnect all power sources before making any connections.
(Rear of projection TV)
AUDIO (FIX) OUT-R
RK-74A (not supplied)
AUDIO (FIX) OUT-L
Rear
speaker (L)
Front
speaker (L)
Front
speaker (R)
Rear
speaker (R)
CENTER IN
’
CENTER IN
‘
1
2
Line input
Amplifier with Dolby
Pro Logic/Dolby Digital
decoder
Optical digital cable
Woofer
Digital
audio input
4
3


