background image

Using the Menu

15


Using the Menu

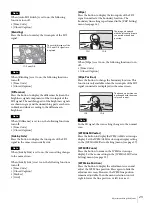
The unit is equipped with an on-screen menu for 
making various adjustments and settings such as picture 
control, input setting, set setting change, etc.

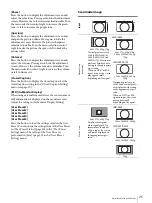
The current settings are displayed in place of the 




marks on the illustrations of the menu screen.

1

Press the MENU button.

The menu appears.
The menu presently selected is shown in yellow.

2

Turn the menu selection control to select a menu, 
then press the menu selection control.

The menu icon presently selected is shown in 
yellow and setting items are displayed.

3

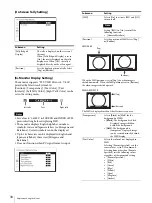
Select an item.

Turn the menu selection control to select the item, 
then press the menu selection control.
The item to be changed is displayed in yellow. 
If the menu consists of multiple pages, turn the 
menu selection control to go to the desired menu 
page.

4

Make the setting or adjustment on an item.

When changing the adjustment level:

To increase the number, turn the menu selection 
control right.
To decrease the number, turn the menu selection 
control left.
Press the menu selection control to confirm the 
number, then restore the original screen.

When changing the setting:

Turn the menu selection control to change the 
setting, then press the menu selection control to 
confirm the setting.

When returning the adjustment or setting to the 
previous value:

Press the BACK button before pressing the menu 
selection control.

Notes

An item displayed in black cannot be accessed. 
You can access the item if it is displayed in white.

If the [Key Inhibit] has been turned [On], all 
items are displayed in black. To change any of the 
items, turn the [Key Inhibit] to [Off] first.

If the [Password Lock] has been turned [On], the 
setting values of the color temperature for [User1] 
and the User Preset for [User Preset1] cannot be 
changed. To change the values, enter the 
password.

For details on the key inhibit and password lock 
functions, see “[Security] menu” (page 32).

To return the display to the previous screen

Press the BACK button.

To clear the menu

Press the MENU button.
The menu disappears automatically if a button is not 
pressed for one minute.

About the memory of the settings

The settings are automatically stored in the monitor 
memory.

BACK button

Summary of Contents for LMD-A170

Page 1: ... Professional Video Monitor Operating Instructions Before operating the unit please read this manual thoroughly and retain it for future reference LMD A240 LMD A220 LMD A170 2013 Sony Corporation Software Version 1 1 ...

Page 2: ...liquid has been spilled or objects have fallen into the apparatus the apparatus has been exposed to rain or moisture does not operate normally or has been dropped WARNING To reduce the risk of fire or electric shock do not expose this apparatus to rain or moisture To avoid electrical shock do not open the cabinet Refer servicing to qualified personnel only THIS APPARATUS MUST BE EARTHED WARNING Wh...

Page 3: ...hock refer servicing to qualified service personnel WARNING THIS WARNING IS APPLICABLE FOR OTHER COUNTRIES 1 Use the approved Power Cord 3 core mains lead Appliance Connector Plug with earthing contacts that conforms to the safety regulations of each country if applicable 2 Use the Power Cord 3 core mains lead Appliance Connector Plug conforming to the proper ratings Voltage Ampere If you have que...

Page 4: ...als will help to conserve natural resources For more detailed information about recycling of this product please contact your local civic office your household waste disposal service provider or the store where you made the purchase You may contact our company s toll free number in India for assistance This product complies with the India E waste Rule 2011 The E waste Rules 2011 is an Indian direc...

Page 5: ... 11 Removing the Monitor Stand Pre Attached 13 Attaching the handle LMD A220 A170 only 13 Connecting the AC Power Cord 14 Initial settings 14 Using the Menu 15 Protection of the Setting Values 16 Protecting the setting values using Key Inhibit 16 Protecting the setting values using Password Lock 16 Adjustment Using the Menus 16 Items 16 Adjusting and Changing the Settings 17 Status menu 17 Color T...

Page 6: ...use the screen to lose uniformity If the unit is used in a cold place horizontal lines or a residual image may appear on the screen This is not a malfunction When the monitor becomes warm the screen returns to normal The screen and the cabinet become warm during operation This is not a malfunction On Burn in For LCD panel permanent burn in may occur if still images are displayed in the same positi...

Page 7: ...alcohol benzene thinner acidic or alkaline detergent detergent with abrasives or chemical wipe as these may damage the screen Use a blower to remove dust from the screen surface On Dew Condensation If the unit is suddenly taken from a cold to a warm location or if ambient temperature suddenly rises moisture may form on the outer surface of the unit and or inside of the unit This is known as conden...

Page 8: ... is as follows F1 button Brightness F2 button Contrast F3 button Chroma F4 button Scan F5 button Marker F6 button Volume F7 button WFM ALM Vector You can assign various functions in Function Button Setting page 22 of the User Configuration menu The Function Button Setting menu can also be displayed by pressing and holding the function button Press the button Brightness Contrast Chroma Volume WFM L...

Page 9: ...when using the unit with DC input check that the DC voltage range is appropriate If an error display appears when using the unit with AC input or with DC input within the appropriate DC voltage range refer to a Sony qualified service personnel Error display Symptom Flashes red There is an abnormality with the panel power or sensor The error also displays if the DC input voltage goes outside the ac...

Page 10: ...gnal is input 6 Available only when 2K signal is input 7 Available only when the resolution of the input signal is 1920 1080 or 2048 1080 Item Input signal Composite SDI HDMI HDMI DVI Color B W SD HD Dual Link 3G SD HD PC Color Temp Color Space Gamma Aperture V Sharpness ACC Shift H Shift V SDI RGB Range 1 1 DVI RGB Range 2 NTSC Setup Marker Time Code Focus Assist WFM ALM Vector 3 3 3 3 3 Closed C...

Page 11: ...ion menu Note Output is only activated when the power is on HDMI IN connector Input connector for HDMI 1 signals HDMI High Definition Multimedia Interface is an interface that supports both video and audio on a single digital connection allowing you to enjoy high quality digital picture and sound The HDMI specification supports HDCP High bandwidth Digital Content Protection a copy protection techn...

Page 12: ... to use the Remote Control Connect the function you want to use with a Remote Control to the Ground Pin 5 HDMI cable holder Secures the HDMI cable Ø7 mm or less Rotate to unlock the HDMI cable holder first then remove it DC input connector Plug the DC power supply to this connector to provide power to the monitor It runs on DC 12 V to 17 V CAUTION Be sure to connect to a power supply of the specif...

Page 13: ...tached To install the monitor on a rack remove the bottom stand as follows 1 Put the monitor on a soft cloth with the surface of the monitor downward 2 Remove the two screws 3 Remove the stand Attaching the handle LMD A220 A170 only The handle supplied can be attached to the rear panel using the four screws supplied ...

Page 14: ...time after purchasing it select the language you wish to use You can select the language from among English French German Spanish Italian Japanese Simplified Chinese For details on operating the unit see Using the Menu page 15 When the language has been selected the following items are set The setting of the color temperature and NTSC setup can be changed For details refer to the following pages C...

Page 15: ...lection control left Press the menu selection control to confirm the number then restore the original screen When changing the setting Turn the menu selection control to change the setting then press the menu selection control to confirm the setting When returning the adjustment or setting to the previous value Press the BACK button before pressing the menu selection control Notes An item displaye...

Page 16: ... color temperature values for User1 using Adjust Gain Bias or Copy From When you change the User Preset values for User Preset1 using Save For details see Password Lock page 32 Adjustment Using the Menus Items The screen menu of this monitor consists of the following items Status the items indicate the current settings Displays the unit setting status etc For details on the displayed items see Sta...

Page 17: ...t Audio Setting SDI Audio Setting Analog Audio Output Closed Caption Setting Closed Caption Type 708 608 Intensity On Screen Tally Setting Tally Bckgnd Display Position In Monitor Display Setting IMD Position Transparency Text Color Text Intensity Left Tally Color Right Tally Color Remote Parallel Remote Serial Remote Security Key Inhibit Password Lock Adjusting and Changing the Settings Status me...

Page 18: ...put Phase V sharpness NTSC setup ACC Shift H Shift V Page 4 Model name Serial No Software version FPGA1 version FPGA2 version Operation Time Color Temp Color Space Gamma menu This menu is used for adjusting the color temperature color space and gamma You need to use the measurement instrument to adjust the white balance Recommended Konica Minolta Color Analyzer CA 210 CA 310 Submenu Setting Color ...

Page 19: ...en turned On the User1 value is protected by a password To change the values enter the password Color Space Selects the color space from among ITU 709 EBU SMPTE C Native Native sets the color space to the original color reproduction of the panel Gamma Select the appropriate gamma mode from 2 2 or 2 4 Submenu Setting Volume Adjusts the volume Aperture Sharpens the picture outline The higher the set...

Page 20: ...tting except for the following Color temperature for User1 Color temperature for User2 User Preset for User Preset1 User Preset for User Preset2 User Preset for User Preset3 User Preset for User Preset4 User Preset for User Preset5 Password setting Network setting Language setting User Reset Returns to the factory default setting except for the following Color temperature for User1 Color temperatu...

Page 21: ...ll 0 black level to 1023 white level DVI RGB Range Sets the black level and white level for the RGB format of DVI input Limited 16 black level to 235 white level Full 0 black level to 255 white level Anamorphic Set to confirm the content using the anamorphic lens Depending on the magnification of the lens or the aspect ratio of the imager you can select from the following Off 2 0X_4 3 2 0X_16 9 2 ...

Page 22: ...d Set the camera focus in Focus Assist Setting see page 27 Focus Gain Press the button to display the adjustment screen and adjust the level of edge sharpening Press again to hide the adjustment screen However the level of edge sharpening remains adjustable Turn the menu selection control right to increase the edge sharpening or left to decrease it Chroma Up Press the button to display the chroma ...

Page 23: ...dary location The boundary line setting is performed in the P P Setting menu see page 26 Note When Wipe is set to on the following functions turn off Time Code Closed Caption Wipe Position Press the button to change the boundary location This function is only available when the two inputs of the SDI signal connected are displayed in the same screen Note In the 2K signal the scan setting changes to...

Page 24: ... selection control Flip H Flip V Flip H V Press the button to display the reversed image Flip H Flip V and Flip H V can be assigned to each function button Note When the reverse function is enabled the following functions turn off Wipe Side by Side Blending Difference Auto SDI Switch WFM ALM Vector Closed Caption Time Code Anamorphic Brightness Press the button to display the adjustment screen and...

Page 25: ...n is displayed on the monitor screen Adjust the setting in In Monitor Display Setting User Preset1 User Preset2 User Preset3 User Preset4 User Preset5 Press the button to load the settings saved in the User Preset You can check the setting status of the User Preset in User Preset Status page 20 in the User Preset Setting menu The saving of the User Preset is performed in Save page 20 in the User P...

Page 26: ... Window Displays the grid except for the center part of the screen Grid Pitch Sets the grid pitch to be displayed 60dots Sets the grid line interval to 60 dots 120dots Sets the grid line interval to 120 dots Submenu Setting Time Code Selects On to display the time code and Off not to display Format Sets the time code format VITC To display the time code in VITC format LTC To display the time code ...

Page 27: ... the display of the camera metadata Select On to display the camera metadata and Off to not display Metadata1 to Metadata12 Assigns the camera metadata to be displayed on the screen You can assign from the following Iris F Number Iris T Number Focus Position Focus Ring Position Macro Setting Lens Zoom 35mm Lens Zoom focal Zoom Ring Position Optical Extender Mag Lens Attribute Neutral Density Filte...

Page 28: ...orm percentage and audio level units values do not appear on the display When WFM is selected Waveform Audio level Channel number Position Sets the position of the WFM ALM vectorscope display You can select from among Top Left Top Right Bottom Left Bottom Right Transparency Selects Black or Half transparent for the background of the WFM ALM vectorscope display Black The background is black Display...

Page 29: ...peakers headphone jack and AUDIO OUT connector Embedded Outputs an audio signal embedded in SDI or HDMI signal Analog Outputs an audio signal that comes from the AUDIO IN connector Submenu Setting Submenu Setting Closed Caption Select On to display closed caption and Off not to display Type Sets the closed caption display type Auto1 Select this to display automatically 608 VBI 3 when SD SDI signal...

Page 30: ...the video signal Position Sets the display position of tally Select Top or Bottom Left tally Text Right tally Submenu Setting IMD Selects On to activate IMD and Off to turn it off Note Setting IMD to On turns off the following function Camera Metadata Position Sets the position of IMD Select Top or Bottom When the IMD position is set to Top the video image is shifted downward When the IMD position...

Page 31: ... same color as set in TSL command Selecting from other than Remote Specified sets the following colors regardless of the command setting Remote Specified White Red Green Blue Yellow Cyan Magenta Amber Submenu Setting Submenu Setting Parallel Remote Selects the PARALLEL REMOTE connector pins for which you want to change the function You can assign various functions to pins 1 to 4 and pins 6 to 8 Th...

Page 32: ...gateway On or Off Address Sets the default gateway Cancel Selects to cancel the setting Confirm Selects to save the setting Controller Sets the address of the remote controller IP Address Sets the IP address Subnet Mask Sets the subnet mask 255 255 255 000 Default Gateway Sets the default gateway On or Off Address Sets the default gateway Cancel Selects to cancel the setting Confirm Selects to sav...

Page 33: ... turn off In this case refer to Sony qualified service personnel Specifications Picture performance Panel a Si TFT Active Matrix LCD Picture size diagonal LMD A240 611 3 mm 24 1 8 inches LMD A220 546 1 mm 21 1 2 inches LMD A170 419 6 mm 16 5 8 inches Effective picture size H V LMD A240 518 4 324 0 mm 20 1 2 12 7 8 inches LMD A220 476 1 267 8 mm 18 3 4 10 5 8 inches LMD A170 365 8 205 7 mm 14 1 2 8...

Page 34: ... C to 35 C 32 F to 95 F Recommended temperature 20 C to 30 C 68 F to 86 F Humidity 30 to 85 no condensation Pressure 700 hPa to 1060 hPa Storage and transport conditions Temperature 20 C to 60 C 4 F to 140 F Humidity 0 to 90 Pressure 700 hPa to 1060 hPa Accessories supplied AC power cord 1 AC plug holder 1 Handle 1 LMD A220 A170 only Fixing screws for the handle 4 LMD A220 A170 only Before Using T...

Page 35: ...e displayed picture may be hidden depending on the input signal System Com posite SD HD Dual Link 3G HDMI 575 50i PAL 480 60i NTSC 1 576 50p 480 60p 1 640 480 60p 1 1080 24PsF 1 3 3 1080 25PsF 2 3 3 1080 30PsF 1 2 3 3 1080 24p 1 3 3 1080 25p 3 3 1080 30p 1 3 3 1080 50i 3 3 1080 60i 1 3 3 1080 50p 4 4 1080 60p 1 4 4 720 24p 1 720 25p 720 30p 1 720 50p 3 720 60p 1 3 2048 24PsF 1 3 3 2048 25PsF 2 3 3...

Page 36: ...Dimensions 36 Dimensions LMD A240 Front Rear Side Unit mm inches Mass Approx 7 6 kg 16 lb 12 oz LMD A220 Front 4 M4 hole 5 M4 hole ...

Page 37: ...Dimensions 37 Rear Side Unit mm inches Mass Approx 5 4 kg 11 lb 14 oz LMD A170 Front Rear Side Unit mm inches Mass Approx 4 9 kg 10 lb 13 oz 4 M4 hole 5 M4 hole 4 M4 hole 5 M4 hole ...

Page 38: ...Dimensions 38 LMD A240 A220 A170 Unit mm inches Length of M4 screws side rear Monitor cabinet Attached object M4 screw 7 9 32 to 10 13 32 Torque 1 2 0 1 N m ...

Page 39: ...Sony Corporation ...

Reviews: