background image

5

EN

Getting Started

Getting Started

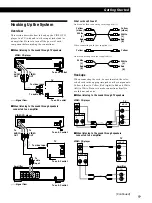
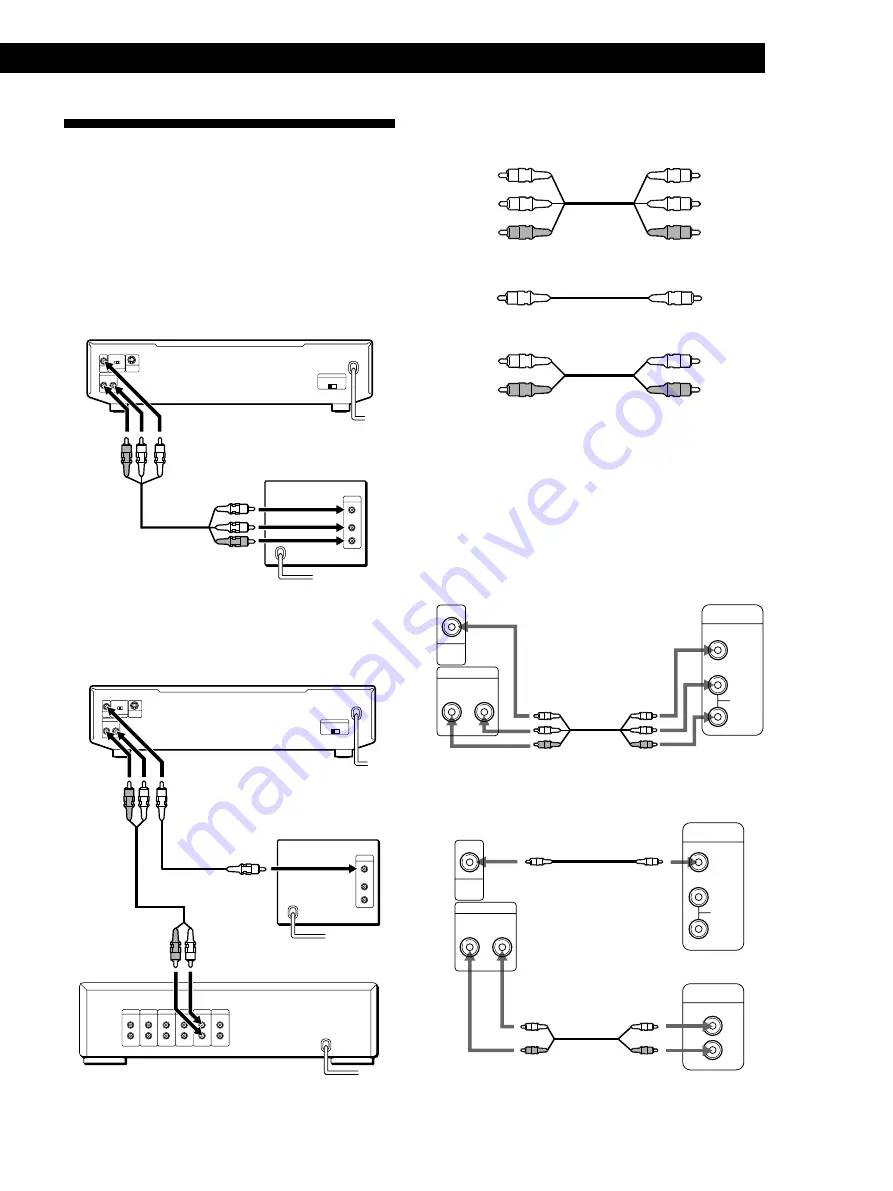
What cords will I need?

Audio and video connecting cord (supplied) (1)

Video connecting cord (not supplied) (1)

Audio connecting cord (not supplied) (1)

Hookups

When connecting the cord, be sure to match the color-
coded cord to the appropriate jacks on the components:
Yellow (video) to Yellow, Red (right) to Red and White
(left) to White. Be sure to make connections firmly to
avoid hum and noise.

p

When listening to the sound through TV speakers

L

R

VIDEO

AUDIO

INPUT

R

L

AUDIO OUT

VIDEO

OUT

ç

p

When listening to the sound through speakers
connected to an amplifier

L

R

VIDEO

AUDIO

INPUT

CD

L

R

ç

ç

R

L

AUDIO OUT

VIDEO

OUT

Hooking Up the System

Overview

This section describes how to hook up the VIDEO CD
player to a TV (with audio/video input jacks) and/or
an amplifier. Be sure to turn off the power of each
component before making the connections.

p

When listening to the sound through TV speakers

ç

ç

: Signal flow

p

When listening to the sound through speakers
connected to an amplifier

ç

ç

ç

: Signal flow

VIDEO CD player

TV

(Continued)

VIDEO CD player

Yellow

Yellow

White

(L)

Red

(R)

Yellow
(video)

White

(L)

Red

(R)

Red

(R)

White

(L)

Yellow
(video)

White
(L)
Red
(R)

Amplifier

To
VIDEO
OUT

To an AC outlet

To video input

To an AC outlet

To an AC outlet

Amplifier

VIDEO CD player

TV

To
audio
input

To
AUDIO
OUT

TV

To an AC outlet

To
VIDEO
OUT

To video input

To audio input

To an AC outlet

To
AUDIO
OUT

TV

VIDEO CD player

Summary of Contents for MCE-F88K

Page 1: ... mechanical shock On operation If the player is brought directly from a cold to a warm location or is placed in a very damp room moisture may condense on the lenses inside the player Should this occur the player may not operate properly In this case remove the disc and leave the player turned on for about an hour until the moisture evaporates On adjusting volume Do not turn up the volume while lis...

Page 2: ... 16 Locating by Observing Several Scenes at One Time Digest Play 17 Playing CDs in Various Modes Playing Repeatedly 19 Playing in Random Order Shuffle Play 20 Creating Your Own Program Program Play 20 Enjoying Picture Effects 22 Enjoying Sound Effects 22 Switching the Sound 23 Controlling the TV with the Supplied Remote 23 Enjoying Karaoke with Non Karaoke Discs Playing Karaoke with Any Stereo Dis...

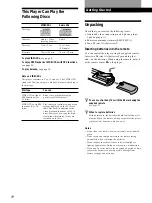
Page 3: ...n the disc Unpacking Check that you received the following items Audio and video connecting cord 3 phono plugs 3 phono plugs 1 Remote commander remote RMT F88V 1 Sony R6 size AA batteries 2 Inserting batteries into the remote You can control the player using the supplied remote Insert two R6 size AA batteries by matching the and on the batteries When using the remote point it at the remote sensor ...

Page 4: ...D L R ç ç R L AUDIO OUT VIDEO OUT Hooking Up the System Overview This section describes how to hook up the VIDEO CD player to a TV with audio video input jacks and or an amplifier Be sure to turn off the power of each component before making the connections pWhen listening to the sound through TV speakers ç ç Signal flow pWhen listening to the sound through speakers connected to an amplifier ç ç ç...

Page 5: ... the color system of your TV is PAL Set the COLOR SYSTEM switch to PAL Pictures will not be displayed if you set the switch to NTSC When you play a VIDEO CD recorded in the NTSC color system the picture will be stretched horizontally and will be displayed with the upper and lower parts of the screen masked in black If your TV automatically changes the color system according to the input signal Pic...

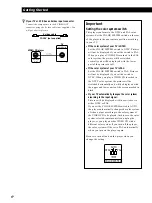
Page 6: ...hat the VOLTAGE SELECTOR on the rear panel of the player is set to the local power line voltage If not set the selector to the correct position using a screwdriver before connecting the AC power cord to a wall outlet 220 240V 110 120V VOLTAGE SELECTOR Connecting the AC power cord Connect the AC power cord to a wall outlet ...

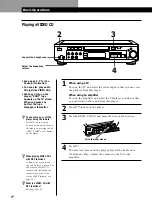
Page 7: ...this player 2 Press 1 u to turn on the player 3 Press OPEN CLOSE and place the disc on the disc tray With the label side up 4 Press The disc tray closes and the player plays all the tracks once Continuous Play Adjust the volume on the TV or the amplifier Adjust the headphone volume Connect the headphones z What is a VIDEO CD with PBC functions See page 25 or 29 z When playing VIDEO CDs with PBC fu...

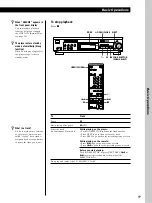
Page 8: ...E appears in the front panel display You can resume playback from the point you stopped the VIDEO CD Resume Play see page 14 z The player enters standby mode automatically Sleep function When 20 minutes elapse after the player stops it enters standby mode z What is a track A disc is divided into sections of a picture or a music piece called tracks Each track is assigned with a track number to loca...

Page 9: ...d plug the control plug into the MIC CONTROL jack Note that the CHOI MODOSHI function does not work when you plug a microphone with a control plug to this player MIC 1 and MIC 2 jacks MIC 1 and MIC 2 LEVEL controls Number buttons Microphone not supplied Karaoke microphone F VK98 F VK600 etc not supplied Control plug 2 Select the track you want to play On the player Turn JOG SELECTOR until the trac...

Page 10: ...ophones connected to the MIC 1 and MIC 2 jacks Note If you don t want any echo effect set the ECHO LEVEL control to MIN Adjusting the music level If you want to reduce the music level turn MUSIC LEVEL to MIN This has no effect on the settings of the MIC LEVEL 1 2 controls Note When playing a CD as a general CD turn the MUSIC LEVEL control to MAX Changing the key Key Control You can change the key ...

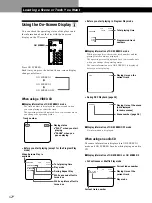
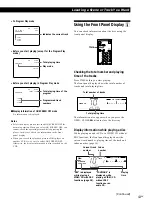
Page 11: ...de Current index number Playing time of the scene not displayed for some scenes Playing time on the current track Total playing time When Resume Play is available Play mode During Repeat Play While a picture effect is turned on Playing status PLAY when you start playing PAUSE when you pause playing Track number While a sound effect is turned on Before you start playing in Program Play mode VCD STO...

Page 12: ...tal playing time Total playing time of the program Programmed track numbers Total number of tracks Total playing time Index number Current track number PBC is displayed while playing a VIDEO CD with PBC functions page 25 CONTINUE is displayed while playing a VIDEO CD without PBC functions or an audio CD Playing time Continued In Program Play mode CD PLAY TR 3 IDX 1 0 55 PROGRAM 1 TR 1 2 TR 3 3 TR ...

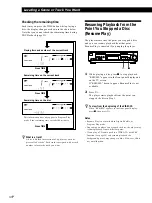
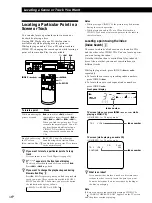
Page 13: ...resume playback from that point Resume Play is canceled if you unplug the player p L R STEREO PREV NEXT PICTURE SOUND EFFECT RETURN OPEN CLOSE KARAOKE PON ˆ PLAY MODE REPEAT KEY CONTROL STANDBY P p 0 JOG SELECTOR g PUSH SELECT n N 1 u PHONES LEVEL MIN MAX MIN MAX MIC 2 MIC 1 MIC CONTROL ECHO LEVEL MIN MAX MIC 1 LEVEL MIN MAX MIC 2 LEVEL MIN MAX MUSIC LEVEL 1 While playing a disc press p to stop pl...

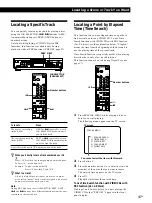
Page 14: ...into sections of a picture or a music piece called tracks Each track is assigned with a track number to locate the track you want Note During PBC Playback the JOG SELECTOR PREV NEXT and buttons have different functions from the ones explained in the table above Locating a Point by Elapsed Time Time Search This function lets you use elapsed time as a guide to find a certain point on a VIDEO CD To u...

Page 15: ...t panel display The disc has reached the end after you pressed Press 0 or to go back z If you want to change the playback speed during Slow motion Play Z Press SLOW repeatedly until you find the playback speed you want Three speeds are available SLOW 1 SLOW 2 and SLOW 3 Each time you press the button the indication changes as follows n SLOW 1 n SLOW 2 n SLOW 3 Notes While playing a VIDEO CD the pi...

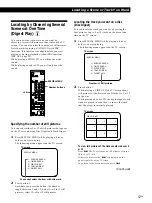
Page 16: ...n TV screen SPECIAL MENU 1 SCENE SEARCH 2 TIME SEARCH 3 DISC DIGEST 4 TRACK DIGEST 5 DIGEST 9m12 2 Press button 5 Each time you press the button the number toggles between 9 and 12 Select 9n12 for 9 still pictures select 12n9 for 12 still pictures You cannot select the item with this mark Locating the track you want on a disc Disc Digest You can locate the track you want by observing the first pic...

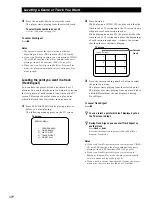
Page 17: ...4 TRACK DIGEST 5 DIGEST 9m12 2 Press button 4 While playing a VIDEO CD the player divides the track into 9 or 12 sections and the TV screen shows still pictures of each section in order While playing an audio CD the player divides the track into 9 or 12 sections and plays the beginnings of each section in sequence n shows the section that the player is currently playing TV screen TRACK 1 DIGEST 1 ...

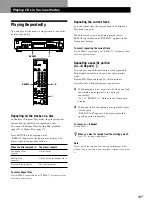
Page 18: ...age 8 All the tracks Shuffle Play page 20 All the tracks in random order Program Play page 20 The same program To cancel Repeat Play Press REPEAT repeatedly until REPEAT disappears from the front panel display Repeating the current track You can repeat only the current track in Continuous Play mode page 8 While the track you want is being played press REPEAT repeatedly until REPEAT1 appears in the...

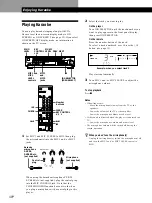
Page 19: ...playing in Continuous Play mode Press PLAY MODE repeatedly until SHUFFLE appears in the front panel display Shuffle Play starts from the current track Note If you play a VIDEO CD with PBC functions in Shuffle Play mode you cannot use the PBC functions SHUFFLE is lit Creating Your Own Program Program Play You can arrange the order of the tracks on the discs and create your own program The program c...

Page 20: ...layer pauses at the step in which a pause is programed until you press P or This might be useful when you record a program on both sides of a tape z You can check the contents of the program during programing on the TV screen If you press ON SCREEN to select ON SCREEN OFF display mode you won t see this information page 12 z The program remains even after the Program Play ends When you press you c...

Page 21: ...cture Theater Picture Press EFFECT PICTURE repeatedly until THEATER appears in the front panel display To cancel the picture effect Press EFFECT PICTURE repeatedly until ACTIVE or THEATER disappears from the front panel display Note The Active Picture and Theater Picture functions are not available while playing an audio CD Enjoying Sound Effects You can play a disc with one of two acoustic atmosp...

Page 22: ...ange as follows Press Indication You will hear Once MONO L The sound of the left channel Twice MONO R The sound of the right channel Three times STEREO The standard stereo sound When you select ON SCREEN OFF display mode check the indication on the front panel display This indication doesn t appear in the front panel display Controlling the TV with the Supplied Remote Z You can control Sony TVs wi...

Page 23: ...e singer s voice so that you can enjoy karaoke However this also reduces the stereo effect To cancel Karaoke Pon Press KARAOKE PON again K PON disappears from the front panel display z When you use Karaoke Pon Use stereo recorded discs Notes Karaoke Pon may not work well for the following cases Monaural recorded discs The accompaniment is also reduced Only a few instruments are playing in the ster...

Page 24: ...TOR On the remote Press the number button of the item you want When you want to select an item number over 10 press 10 first then the corresponding number buttons To enter 0 use button 10 0 Example To select item number 30 Press 10 first then 3 and 10 0 3 Follow the instructions on the menu screen for interactive operations When Do the following Selecting the item Turn JOG SELECTOR on the player t...

Page 25: ...ectly Using the Scene Numbers Scene Search Z On VIDEO CDs with PBC functions the menu screens moving pictures and still pictures are divided into scenes and each scene is assigned with a scene number You can check the current scene number by displaying it on the TV screen during playback see page 12 Be sure to memorize the scene number from which you want to start playing CLEAR SPECIAL MENU OPEN C...

Page 26: ...e The player automatically starts PBC Playback page 25 z You can check the scene number while playing a disc Press ON SCREEN repeatedly to select ON SCREEN 2 display mode see page 12 The scene numbers appear on the upper left side of the TV screen Notes Some discs don t allow you to start playing from a particular scene In this case when you do the task before you start playing the player starts p...

Page 27: ...d securely Make sure you operate the TV or the amplifier correctly Make sure you select the CD player position on the amplifier There s no picture Check that the player is connected securely Make sure you operate the TV correctly Make sure you set the COLOR SYSTEM switch correctly according to your TV The picture is distorted Clean the disc see page 28 The disc doesn t play There s no disc inside ...

Page 28: ...n hearing are compressed while the sounds we can hear aren t compressed VIDEO CDs can hold 6 times the audio information of conventional audio CDs There are 2 versions of VIDEO CDs Version 1 1 You can play only moving pictures and sounds Version 2 0 You can play high resolution still pictures and enjoy PBC functions This player conforms to both versions Specifications VIDEO CD player Laser Semicon...

Page 29: ...ay 20 Program changing 21 checking 21 R Remaining time 14 Remote control 4 Repeating 19 Reserving the next tracks 11 Resume Play 14 S Scene 26 Scene Seach 26 Searching See Locating Shuffle Play 20 Slow motion Play 16 Specifying number of still pictures 17 T Theater picture 22 Total playing time 13 Track Digest 18 Troubleshooting 28 U Unpacking 4 V W X Y Z VIDEO CDs 4 8 29 Names of controls Buttons...

Page 30: ...Additional Information 31EN ...

Page 31: ...Sony Corporation Printed in Malaysia ...

Reviews: