000
Chapter 2: Preparation: Connecting a Computer for Settings Configuration
23
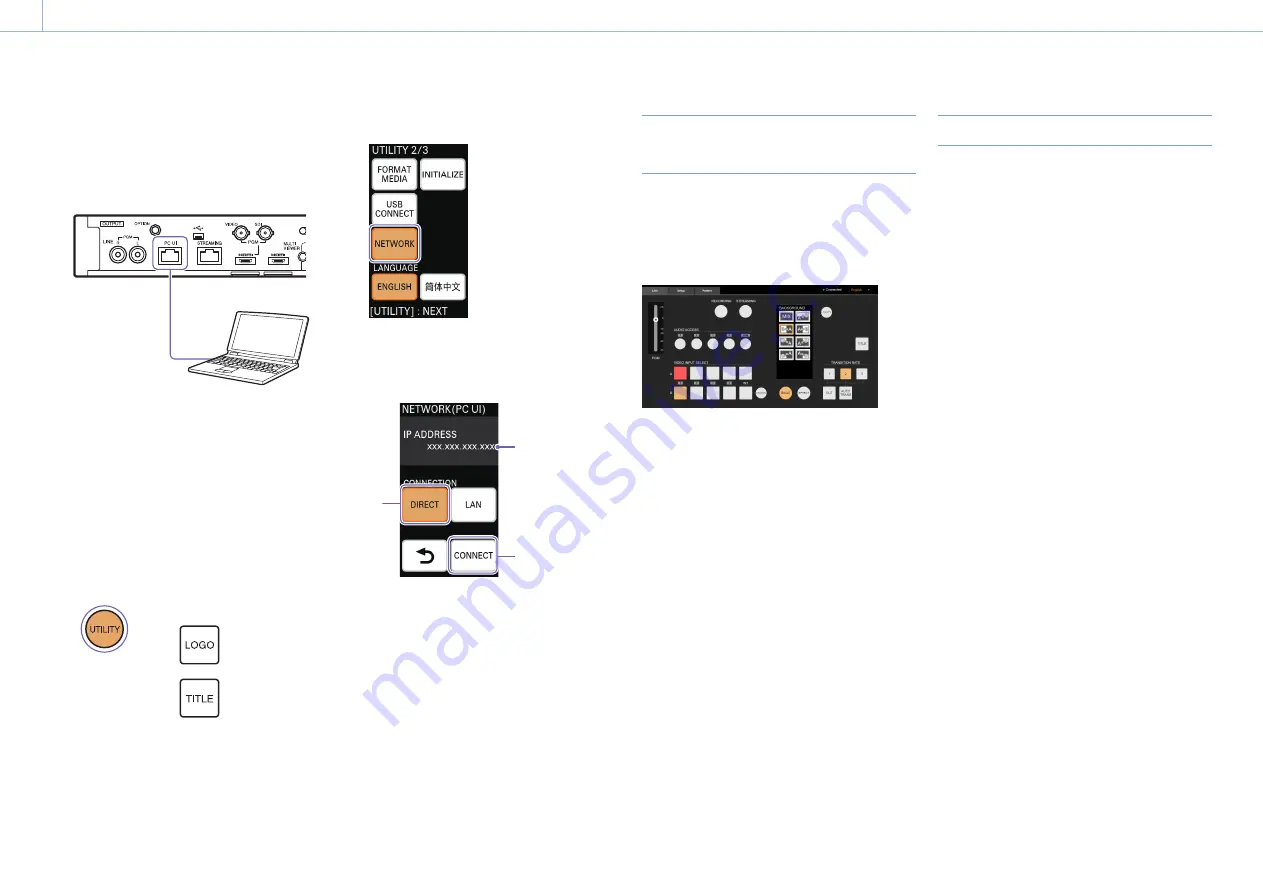
Connecting in direct mode
1
Use a LAN cable to connect to the computer via
the PC UI network connector on the rear of the
unit.
2
Change the IP address of the computer to
enable communication with the unit.
The unit's IP address is fixed at "192.168.0.1."
Specify an IP address that is identical to the
unit's up to "192.168.0" but is unique to
"192.168.0.1" (e.g., "192.168.0.10").
Set the subnet mask to "255.255.255.0."
3
Press UTILITY button on the control panel to
display the [UTILITY 2/3] menu.
4
Tap [NETWORK].
The [NETWORK (PC UI)] menu appears.
5
Tap [DIRECT] (
) to enable it, and tap
[CONNECT] (
).
IP address
The IP address display is updated.
Accessing the Unit from a Web
Browser
Enter "http://<IP address displayed in the
[NETWORK (PC UI)] menu>" in the address bar of
the web browser to access the unit.
When access is successful, the [Live] screen of the
PC UI appears.
[Notes]
Communications are not encrypted in HTTP connections,
lowering the security level. Be aware of the security risk when
using such connections.
Improving Security
Use HTTPS connections with encrypted
communications to improve security.
After accessing the unit, download the CA
certificate, and install it on your web browser.
1
Start your computer's web browser, and enter
"http://<IP address displayed in the [NETWORK
(PC UI)] menu>/RootCA.crt" in the address bar.
When connection is successful, the "CA
certificate for the switcher" appears.
2
Download the "CA certificate for the switcher"
to any location.
3
Install the "CA certificate for the switcher" on
the web browser.
Double-click the downloaded CA certificate
file, and follow the instructions on the screen
to install.
4
Access "https://<IP address of the unit>" from
the web browser.
When the PC UI appears, a warning about the
unsecured status of the connection appears.
To enable HTTPS connection without a
warning display, the name resolution must be
configured as follows between the unit’s IP
address and the CA certificate issue location.
5
Reference the CA certificate using the method
used by your web browser.
When using Google Chrome, perform the
following.
Click the lock icon on the left side of the
address bar, and click [Details] in the menu
that appears.
Click [View certificate].
The certificate viewer appears.
Reference the [Issued to] item.
Sony-MCX-500-<serial number>


