background image

10

GB

Before you start the hookup

Getting 
Started

This chapter provides information on 
the supplied accessories and hookups. 
Be sure to read this chapter thoroughly 
before you actually connect any 
equipment to the deck.

Before you start the 
hookup

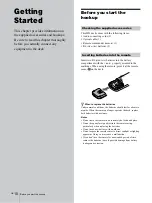
This MD deck comes with the following items:

Audio connecting cords (2)

Optical cable (1)

Remote commander (remote) (1)

R6 (size-AA) batteries (2)

Insert two R6 (size-AA) batteries into the battery 
compartment with the + and – properly oriented to the 
markings. When using the remote, point it at the remote 
sensor 

 on the deck.

z

When to replace the batteries

Under normal conditions, the batteries should last for about six 
months. When the remote no longer operates the deck, replace 
both batteries with new ones.

Notes

Do not leave the remote in an extremely hot or humid place.

Do not drop any foreign object into the remote casing, 
particularly when replacing the batteries.

Do not use a new battery with an old one.

Do not expose the remote sensor to direct sunlight or lighting 
apparatus. Doing so may cause a malfunction.

If you don’t use the remote for an extended period of time, 
remove the batteries to avoid possible damage from battery 
leakage and corrosion.

Checking the supplied accessories

Inserting batteries into the remote

Summary of Contents for MDS-JB940

Page 1: ...4 229 607 51 1 MiniDisc Deck Operating Instructions ____________________________________________ Mode d emploi _________________________________________________ GB FR 2000 Sony Corporation MDS JB940 ...

Page 2: ... more of the following measures Reorient or relocate the receiving antenna Increase the separation between the equipment and receiver Connect the equipment into an outlet on a circuit different from that to which the receiver is connected Consult the dealer or an experienced radio TV technician for help Owner s Record The model and serial numbers are located on the rear of the unit Record the seri...

Page 3: ...ng tracks in random order Shuffle Play 27 Creating your own program Program Play 27 Tips for recording from MDs to tape 29 Editing Recorded MDs Before you start editing 30 Erasing tracks ERASE 31 Dividing tracks DIVIDE 33 Combining tracks COMBINE 34 Moving tracks MOVE 34 Naming a track or MD NAME 35 Changing the recorded level after recording S F EDIT 37 Undoing the last edit UNDO 38 Other Functio...

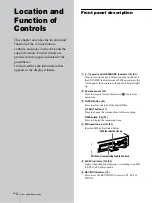
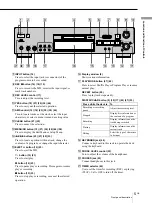
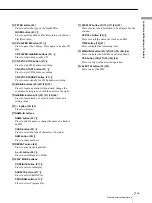
Page 4: ...icator turns off When you press the switch again the deck turns off and the indicator lights up B Remote sensor 10 Point the remote toward this sensor for remote operations C FILTER button 43 Press to select the type of the digital filter S F EDIT button 37 Press to change the recorded level after recording TIME button 18 21 Press to display the remaining time D MD insertion slot 14 23 Insert an M...

Page 5: ...ress to eject the MD H button 14 23 Press to start play X button 14 23 Press to pause play or recording Press again to resume play or recording x button 15 23 Press to stop play or recording or cancel the selected operation P Display window 8 Shows various information Q PLAY MODE button 27 42 Press to select Shuffle Play or Program Play or resume normal play REPEAT button 26 Press to play tracks r...

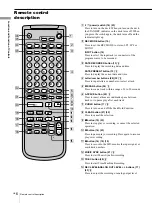
Page 6: ...hree second blank space between tracks or to pause play after each track G P HOLD button 17 Z Press to turn on and off the Peak Hold Function H CLEAR button 27 35 Press to cancel the selection I x button 15 23 Press to stop play or recording or cancel the selected operation J X button 14 23 Press to pause play or recording Press again to resume play or recording K z button 14 18 19 Press to record...

Page 7: ...ect a menu item and a setting value T H button 14 23 Press to start play U NAME IN buttons NAME button 35 Z Press to add the name or change the name of a track or an MD CHAR button 35 Z Press to select the type of characters to be input NUM button 35 Z Press to input numbers V REPEAT button 26 Press to play tracks repeatedly AyB button 26 Z Press to select Repeat A B Play W PLAY MODE buttons CONTI...

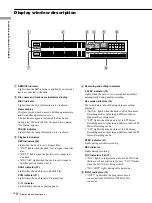
Page 8: ...Shuffle Play PGM indicator 27 Lights when the deck is set to Program Play HS indicator Lights during playing or playing pause D Recording and editing indicators L SYNC indicator 19 Lights when the deck is set to assign track numbers automatically during analog recording Rec mode indicators 16 These indicators turn off during stereo recording playback MONO lights when the deck is set to Monaural Re...

Page 9: ...all the displays will revert to their default i e the factory set display the next time you turn on the deck To change the display in stop mode Press DISPLAY CHAR or DISPLAY repeatedly to change the display Each press of the button changes the display as follows Total number of tracks total recorded time and disc name1 r The contents of a program only when PGM lights up r Level of the input signal...

Page 10: ...remote sensor on the deck z When to replace the batteries Under normal conditions the batteries should last for about six months When the remote no longer operates the deck replace both batteries with new ones Notes Do not leave the remote in an extremely hot or humid place Do not drop any foreign object into the remote casing particularly when replacing the batteries Do not use a new battery with...

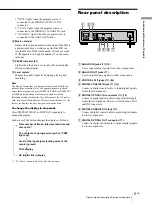
Page 11: ...ons Do not connect any AC power cord until all the connections are completed Be sure the connections are firm to prevent hum and noise A C B D CONTROL A1ΙΙ AC power cord 1 Digital equipment with a DIGITAL OUT connector only 2 Digital equipment with both DIGITAL IN and OUT connectors Amplifier etc CD player DBS tuner etc 1 Digital amplifier DAT deck MD deck etc 2 to a wall outlet Required cords Whi...

Page 12: ...ppears in the display Setting the clock Once you set the MD deck s internal clock the MD deck will automatically record the date and time of all recordings For USA and Canadian models date is displayed in the order of month day year and time on a 12 hour clock For European model date is displayed in the order of day month year and time on a 24 hour clock Note The display windows below are of USA a...

Page 13: ...amping of recordings Reset the time at least once a week Note If the AC power cord is disconnected for a long time the memorized clock settings will disappear and Initialize will flash in the display the next time you plug in and turn on the deck If this happens reset the clock You can then check the recorded date and time of a track 1 Press or number buttons to locate the track you want to check ...

Page 14: ...you want to record to a new MD or start recording from the end of the recorded portion skip this step and go to step 6 To record over from the beginning of an existing MD track Turn AMS or press repeatedly until the number of the track to be recorded over appears To record over from the middle of an MD track Turn AMS or press repeatedly until the number of the track to be recorded over appears the...

Page 15: ...sure of the recorded material To protect an MD recording slide the record protect tab in the direction of the arrow see illustration below to open the slot To enable re recording close the slot z You can play the tracks you have just recorded Press H immediately after stopping recording The deck starts to play from the first track of the material just recorded z You can play from the first track o...

Page 16: ...can record 2 times the normal recordable time and in LP4 Stereo mode you can record 4 times the normal recordable time In addition the recordable time for monaural recording is approximately double the stereo recording time Note MDs recorded in MD LP LP2 or LP4 Stereo mode cannot be played back on a deck that does not support MD LP mode In addition you cannot perform S F Edit for MDs recorded in M...

Page 17: ...source with the strongest output 3 Press DISPLAY CHAR or DISPLAY repeatedly until the level of the input signal appears 4 While monitoring the sound turn REC LEVEL or press REC LEVEL ANALOG OUT LEVEL repeatedly to raise the recording level to its highest level without turning on the two rightmost indicators on the peak level meters 5 Stop playing the program source 6 To start recording continue fr...

Page 18: ...ALOG OUT jacks and PHONES jack after D A conversion AD DA appears in the display during this time When INPUT is set to OPT1 OPT2 or COAX The digital signal input from the DIGITAL IN connector is output to the DIGITAL OUT connector after passing through the sampling rate converter and then to the ANALOG OUT jacks and PHONES jack after D A conversion DA appears in the display during this time Checki...

Page 19: ... AC power cord the deck will store the last setting S Space On or S Space Off and recall it the next time you turn on the deck If the deck continues recording pause for about 10 minutes after the Auto Cut activated recording stops automatically Marking track numbers while recording Track Marking You can mark track numbers either manually or automatically while recording By marking track numbers at...

Page 20: ...nected to the DIGITAL IN connector the entire material may be recorded as a single track When recording from a DAT deck or DBS tuner connected to the DIGITAL IN connector the deck will mark a track number whenever the sampling frequency of the input signal changes regardless of the track marking parameter setting T Mark Lsyn or T Mark Off z You can mark track numbers even after recording has finis...

Page 21: ...nected to a Sony CD player or Hi Fi component system you can easily copy the contents of CDs to the MD using the deck s remote Because the MD remote operates both the MD deck and the CD player or CD player section of the component system make sure to place the MD deck and the CD player as close together as possible 1 Turn on the amplifier and the CD player and select CD on the amplifier 2 Do steps...

Page 22: ... 1 on the MD deck s remote z During CD Synchro recording the deck copies CD text information CD text and disc memos as it is to the MD Disc Memo Copy Function The Disc Memo Copy Function operates when you make a CD Synchro recording from a Sony CD player connected with a control A1ΙΙ cable not supplied to the MD deck Notes When performing CD Synchro recording with a CD player with a mode selector ...

Page 23: ...D LP indicator lights up when you press H in step 5 above z To use headphones Connect them to the PHONES jack Turn PHONE LEVEL or press REC LEVEL ANALOG OUT LEVEL repeatedly to adjust the volume z You can adjust the analog signal level output to the ANALOG OUT jacks and the PHONES jack 1 While the deck is playing press DISPLAY CHAR or DISPLAY repeatedly until the line output adjustment display app...

Page 24: ...on again to pause scrolling and again to continue scrolling Playing a specific track While the deck is playing or stopped use the procedure below to quickly play any track 1 Automatic Music Sensor z You can locate the last track of the MD quickly While the deck is stopped turn AMS counterclockwise or press once z If you locate a track while the deck is stopped or paused The deck will still be stop...

Page 25: ...ill still be paused at the beginning of the track Locating a particular point in a track You can locate a particular point in a track during play or play pause During play press down m M until you reach the point you want You will hear intermittent playing as the disc goes forward or in reverse When you reach the point you want release the button Notes If the MD reaches the end while you re pressi...

Page 26: ...e portion that you specify must be within the boundaries of a single track 1 While the deck is playing press AyB at the starting point point A of the portion to be played repeatedly REP A lights up and B flashes in the display 2 Continue playing the track or press M to locate the ending point point B then press AyB REP A B lights up and Repeat A B Play starts To stop Repeat A B Play and resume nor...

Page 27: ... play the tracks that have already been played once Creating your own program Program Play You can pick out the tracks that you like and specify the playing order in a program containing up to 25 tracks 1 While the deck is stopped press MENU NO twice Setup Menu appears in the display 2 Turn AMS or press repeatedly until Program appears then press AMS or YES 3 Turn AMS or press repeatedly until the...

Page 28: ...isplay To see the rest of the program turn AMS or press repeatedly While the deck is stopped and PGM lights up do steps 1 and 2 of Programing the tracks on page 27 followed by one of the procedures below Checking the order of the program Changing the contents of the program To Do the following Erase a track Press m M repeatedly until the number of the unwanted track flashes then press CLEAR Erase ...

Page 29: ...you turn off the deck or disconnect the AC power cord the deck will store the last setting Auto Space or Auto Off and recall it the next time you turn on the deck You can set the MD deck so that it pauses after each track to give you time to locate the next track to be recorded 1 While the deck is stopped press MENU NO twice Setup Menu appears in the display 2 Turn AMS or press repeatedly until Au...

Page 30: ...You can also use the control to specify points in a track for erasure or track division YES button Press this button instead of the AMS control to enter a selection m M buttons Press to specify the unit minute second or frame by which the MD is advanced when the AMS control is turned You can also use these buttons to locate the end point of the portion to be erased For further details on the funct...

Page 31: ...previous track number 3 becomes track number 2 and the previous track number 4 becomes track number 3 and so on 1 While the deck is stopped playing or paused press MENU NO Edit Menu appears in the display 2 Turn AMS or press repeatedly until Tr Erase appears then press AMS or YES The deck starts to play the track indicated by the number in the display 3 Turn AMS or press repeatedly until the track...

Page 32: ...86 second The time indication minute second and frame of the current point is displayed and the deck plays several seconds of the track to that point repeatedly When recording in Stereo mode you can shift the starting point by 2 frame intervals in Monaural mode and LP2 Stereo mode or by 4 frame intervals in LP4 Stereo mode To find a point quickly Specify a unit minute second or frame by which the ...

Page 33: ...s in Monaural mode and LP2 Stereo mode or by 4 frame intervals in LP4 Stereo mode To find a point quickly Specify a unit minute second or frame by which the MD is advanced when you turn AMS or press repeatedly To do this press m M in step 4 repeatedly to select minutes second or frame The selected unit flashes in the display 5 Repeat step 4 until you have located the dividing point 6 Press AMS or ...

Page 34: ...g it repeatedly 4 Turn AMS or press repeatedly until the number of the second track of the two to be combined appears then press AMS or YES Complete appears for a few seconds and the tracks are combined The deck starts to play the combined track To cancel the operation Press MENU NO or x Notes Tracks recorded in different modes stereo MONO LP2 or LP4 cannot be combined If Impossible appears in the...

Page 35: ...number when naming a track or Disc when naming the MD flashes then press AMS or YES A flashing cursor appears The deck starts playing and you can name a track while monitoring the sound 5 Press DISPLAY CHAR repeatedly to select the character type To enter a space Press M while the cursor is flashing You cannot enter a space as the first character 6 Turn AMS to select the character The selected cha...

Page 36: ... naming a track or Disc when naming a disc flashes then press AMS or YES to enter the copied name Complete appears for a few seconds and the name is copied To cancel the operation Press MENU NO or x z When Overwrite appears in step 5 above The track or the disc selected in step 5 already has a name If you wish to replace the name press AMS or YES again while the indication appears in the display 1...

Page 37: ...acks using S F Scale Factor Edit The original track is recorded over at the new recording level When changing the recording level you can select Fade in Recording to gradually increase the signal level at the start of recording or Fade out Recording to gradually decrease the signal level at the end of recording 1 Press S F EDIT S F Edit appears in the display 2 Turn AMS or press repeatedly until T...

Page 38: ...damage the recording data preventing recording from being performed properly You cannot change the recorded level of a track recorded in LP2 or LP4 Stereo mode Do not use an MD that is damaged or dirty This may prevent recording data from being recorded properly Repeatedly changing the recording level results in poor sound quality The recording level will not return to the exact original level onc...

Page 39: ... or press repeatedly until the desired step value appears then press AMS or YES 4 Press MENU NO To recall the factory setting Press CLEAR while setting the value Notes When you change the step value the playing sound drops out momentarily The step value returns to 0 factory setting when you turn off the deck or eject the MD When a dot appears to the right of the step value in the pitch display thi...

Page 40: ...ks and the PHONES jack at the start of playing Fade out Play gradually decreases the signal level at the end of playing Fade in Recording gradually increases the signal level at the start of recording Fade out Recording gradually decreases the signal level at the end of recording Note The level of the signal output from the DIGITAL OUT connector does not change during Fade in Play nor Fade out Pla...

Page 41: ... appears in the display 2 Turn AMS or press repeatedly until Sleep Off appears in the display then press AMS or YES 3 Turn AMS or press repeatedly to select the setting then press AMS or YES 4 Turn AMS or press repeatedly until Sleep 60min appears in the display then press AMS or YES 5 Turn AMS or press repeatedly to select the time to be turned off 30min 60min factory setting 90min or 120min then...

Page 42: ...ng and turns off When you have set the time for both the start and end of recording the deck turns off When the starting time arrives the deck turns on and starts recording When the ending time arrives the deck stops recording and turns off 4 After you have finished using the timer set TIMER on the deck to OFF Then change the deck to standby mode by plugging the AC power cord of the deck into a wa...

Page 43: ...ent and the source being played Note that the digital filters are effective only on the analog signals output from the ANALOG OUT jacks and the PHONES jack 1 Press FILTER The currently selected filter appears in the display 2 Press FILTER repeatedly to select the filter you want The FILTER button lights green when a setting other than FILTER STD is selected in DF digital filter display z You can u...

Page 44: ...ble component is not supplied with a connecting cable use a commercially available monaural 2P mini plug cable less than 2 meters 6 6 feet long with no resistance such as the Sony RK G69HG Automatic function selection When you connect CONTROL A1ΙΙ compatible Sony components using CONTROL A1ΙΙ cables not supplied the function selector on the amplifier or receiver automatically switches to the corre...

Page 45: ...ight together 3 Set the deck to recording pause mode 4 Press X on the deck The source component is automatically released from pause mode and recording begins shortly thereafter When play ends from the source component recording stops z You can use a special synchronized recording This MD deck is equipped with a special synchronized recording function that uses the CONTROL A1ΙΙ Control System see ...

Page 46: ... mA or less Connect the keyboard connector to the KEYBOARD jack on the front panel of the deck You can connect or disconnect the keyboard at any time regardless of whether the deck is turned on or off The first time you connect a keyboard you need to select the keyboard type 1 While the deck is stopped press MENU NO twice Setup Menu appears in the display 2 Turn AMS or press repeatedly until Keybo...

Page 47: ...flashing cursor appears in the display and you can enter a name for the track being recorded In this case go to step 5 3 Press F10 F11 repeatedly until Nm In appears then press F12 4 Press F10 F11 repeatedly until the track number when naming a track or Disc when naming the MD flashes then press F12 A flashing cursor appears 5 Enter a name 6 Press F12 The whole name appears in the display Shortcut...

Page 48: ...t has not been assigned Default appears 5 Press F12 Set Key flashes in the display 6 Press the key to be assigned to on the keyboard Key Change appears and the selected character is assigned to the key If Same Key appears The same character is already assigned to the key If Remove old assign appears A different character is already assigned to the key Press F12 to clear the current assignment and ...

Page 49: ... press F12 Set Key flashes in the display 3 Press Delete Key Clear appears and the key assignment is cleared To clear all key assignments 1 Do steps 1 to 3 of Assigning a character on page 48 2 Press Ctrl Alt and Delete simultaneously All Reset appears in the display 3 Press F12 Complete appears and all assignments are cleared To cancel the operation Press Esc ...

Page 50: ...time be sure to disconnect the deck from the wall outlet To disconnect the AC power cord grasp the plug itself never pull the cord AC power cord must be changed only at the qualified service shop On condensation in the deck If the deck is brought directly from a cold to a warm location or is placed in a very damp room moisture may condense on the lenses inside the deck Should this occur the deck m...

Page 51: ...rous short tracks Tracks under 12 seconds in length are not counted and so erasing them may not lead to an increase in the recording time During stereo recording In MONO or LP2 mode about 24 seconds In LP4 mode about 48 seconds The total recorded time and the remaining recordable time on the MD may not total the maximum recording time Recording is done in minimum units of two seconds each no matte...

Page 52: ...ck does not play Moisture has formed inside the deck Take the MD out and leave the deck in a warm place for several hours until the moisture evaporates The deck is not on Press 1 to turn on the deck The deck may not be connected to the amplifier correctly Check the connection page 11 The MD is inserted in the wrong direction Slide the MD into the disc slot with the label side up and the arrow poin...

Page 53: ...y Replace the disc and repeat the recording procedure C13 Read Error The deck could not read the TOC on the MD properly Take out the MD and insert it again C14 Toc Error The deck could not read the TOC on the MD properly Insert another disc If possible erase all the tracks on the MD page 32 C41 Cannot Copy The sound source is a copy of commercially available music software or you tried to record a...

Page 54: ...moved while recording was in progress or the MD is damaged or dirty Initialize flashing The Setup Menu settings have been lost Or the contents recorded by the timer have disappeared over time and are not be available for saving to disc or Program Play could not be activated since the program has disappeared over time The message flashes for about four seconds when you turn on the deck by pressing ...

Page 55: ... to 20 000 Hz 0 3 dB Signal to noise ratio Over 100 dB during play Wow and flutter Below measurable limit ANALOG IN Jack type phono Impedance 47 kilohms Rated input 500 mVrms Minimum input 125 mVrms DIGITAL OPTICAL IN1 Connector type square optical Impedance 660 nm optical wave length DIGITAL OPTICAL IN2 Connector type square optical Impedance 660 nm optical wave length DIGITAL COAXIAL IN Jack typ...

Page 56: ...ks on an MD 32 Undo Undoes the last edit operation 38 S F Edit Tr Level Changes the overall recorded level after recording 37 Fade In Records over a track using Fade in Recording 38 Fade Out Records over a track using Fade out Recording 38 Setup Enters Setup Menu below directly Menu item Sub item Function Parameters Factory setting Reference page Program Creates a program 27 T Mark Turns Automatic...

Page 57: ... Selects the type of the keyboard connected to the deck US JP US 46 Assign Assigns a character to the keyboard connected to the deck 48 Clock Set Set the clock 12 LPstamp Sets whether to automatically add LP at the beginning of a track name during a long time recording On Off On 16 1 Adjustable in 2 dB steps Menu item Sub item Function Parameters Factory setting Reference page ...

Page 58: ...ntrol 39 H Headphones 23 Hooking up 11 I Input monitor 18 K Keyboard assigning characters 48 naming a track or MD 47 operating the deck 48 setting 46 L Level input signal 9 15 output signal 24 recording 17 Locating particular point 25 tracks 24 LP mode 16 M Manual track marking 19 MD MiniDisc ejecting 15 23 record protect tab 15 Menu edit 56 setup 56 Monitoring input signal See Input monitor Movin...

Page 59: ...SCMS See Serial Copy Management System Scrolling the name 24 Self diagnosis function 53 Serial Copy Management System 52 Shuffle play 27 Sleep timer 41 Smart space 19 Supplied accessories 10 System limitations 51 S F Edit 37 T Time machine recording 20 Timer falling asleep to music 41 playing 42 recording 42 TOC 16 31 Track marking 19 Troubleshooting 52 U Undoing 38 ...

Page 60: ...ions d ENERGY STAR en matière d économie d énergie Bienvenue Nous vous remercions d avoir porté votre choix sur cette platine MiniDisc Sony Veuillez lire attentivement ce mode d emploi avant l utilisation et rangez le dans un endroit sûr Notes sur le mode d emploi Conventions Les commandes indiquées dans les procédures sont celles du panneau avant de la platine Vous pouvez utiliser à leur place le...

Page 61: ...ation d un programme de lecture lecture programmée 28 Conseils pour l enregistrement d un MD sur une cassette 30 Montage de MD enregistrés Avant de commencer un montage 31 Effacement de plages ERASE 32 Division d une plage DIVIDE 34 Combinaison de plages COMBINE 35 Déplacement d une plage MOVE 35 Titrage d une plage ou d un MD NAME 36 Changement du niveau du son enregistré après l enregistrement S...

Page 62: ... pour commander la platine à distance C Touche FILTER 46 Appuyez sur cette touche pour sélectionner le type de filtre numérique Touche S F EDIT 39 Appuyez sur cette touche pour changer le niveau du son enregistré après l enregistrement Touche TIME 18 22 Appuyez sur cette touche pour afficher le temps restant D Fente d insertion du MD 14 24 Insérez le MD comme sur la figure ci dessous E Témoin MD L...

Page 63: ...ture ou l enregistrement Touche x 15 24 Appuyez sur cette touche pour arrêter la lecture ou l enregistrement ou pour abandonner l opération sélectionnée P Afficheur 8 Affiche diverses informations Q Touche PLAY MODE 28 44 Appuyez sur cette touche pour sélectionner la lecture aléatoire ou la lecture programmée ou pour reprendre la lecture normale Touche REPEAT 27 Appuyez sur cette touche pour écout...

Page 64: ...endre les 6 à 20 premières secondes de chaque plage F Touche A SPACE 30 Z Appuyez sur cette touche pour que la platine insère un espace de trois secondes entre les plages ou passe en pause de lecture après chaque plage G Touche P HOLD 17 Z Appuyez sur cette touche pour activer ou désactiver la fonction Peak Hold maintien du niveau de crête H Touche CLEAR 28 36 Appuyez sur cette touche pour abandon...

Page 65: ...caliser un passage d une plage changer le contenu d un programme de lecture ou déplacer le curseur vers la droite S Touches 14 24 32 41 48 Appuyez sur ces touches pour localiser les plages ou pour sélectionner une option d un menu et une valeur de réglage T Touche H 14 24 Appuyez sur cette touche pour commencer la lecture U Touches NAME IN Touche NAME 36 Z Appuyez sur cette touche pour ajouter le ...

Page 66: ...age Indicateur SHUF 28 S allume lorsque la platine est placée en mode de lecture aléatoire Indicateur PGM 28 S allume lorsque la platine est placée en mode de lecture programmée Indicateur HS S allume en mode de lecture ou de pause de lecture D Indicateurs d enregistrement et de montage Indicateur L SYNC 20 S allume lorsque la platine est réglée pour inscrire automatiquement les numéros de plage p...

Page 67: ...la platine Pour changer l affichage en mode d arrêt Appuyez plusieurs fois sur DISPLAY CHAR ou sur DISPLAY pour changer d affichage À chaque pression sur la touche l affichage change comme suit Nombre total de plages temps total enregistré et nom de disque1 r Contenu du programme de lecture seulement lorsque PGM est allumé r Niveau du signal d entrée valeur de réglage du niveau d enregistrement r ...

Page 68: ...placer les piles Lors d une utilisation normale les piles durent environ six mois Quand la platine ne répond plus à la télécommande remplacez les deux piles ensemble par des neuves Remarques Ne laissez pas la télécommande dans un endroit très chaud ou très humide Veillez à ce que rien ne pénètre dans le boîtier de la télécommande en particulier lorsque vous remplacez les piles N utilisez pas une p...

Page 69: ... ronflement ou des parasites assurez vous que les fiches sont bien enfoncées A C B D CONTROL A1ΙΙ Cordon d alimentation 1 Appareil numérique doté seulement d un connecteur DIGITAL OUT 2 Appareil numérique doté de connecteurs DIGITAL IN et OUT Amplificateur etc Lecteur CD tuner satellite DBS etc 1 amplificateur numérique platine DAT platine MD etc 2 vers une prise murale Cordons nécessaires Blanc L...

Page 70: ...uez à nouveau l opération ci dessus Demo On s affiche Réglage de l horloge Une fois que vous avez réglé l horloge interne de la platine MD celle ci enregistre automatiquement la date et l heure de tous les enregistrements que vous effectuez Pour les modèles américain et canadien la date est affichée dans l ordre du mois jour année et heure avec un cycle horaire de 12 heures Pour le modèle européen...

Page 71: ...écis des enregistrements Remettez l horloge à l heure au moins une fois par semaine Remarque Si le cordon d alimentation reste longtemps débranché les réglages de la date et de l heure sont effacés de la mémoire et Initialize clignote sur l afficheur lorsque vous rebranchez et rallumez la platine la fois suivante Réglez alors à nouveau l horloge Vous pouvez alors afficher la date et l heure de l e...

Page 72: ...istrement Si vous désirez enregistrer sur un MD neuf ou à la suite des enregistrements existants sautez cette opération et passez à l étape 6 Pour commencer à enregistrer depuis le début d une plage existante d un MD Tournez AMS ou appuyez plusieurs fois sur jusqu à ce que le numéro de la plage par dessus laquelle vous désirez enregistrer s affiche Pour commencer à enregistrer depuis le milieu d u...

Page 73: ...rement Pour empêcher un effacement accidentel d un enregistrement Pour empêcher l enregistrement sur un MD déplacez le taquet de protection contre l enregistrement dans le sens de la flèche voir l illustration ci dessous pour ouvrir le hublot Pour pouvoir enregistrer fermez le hublot z Pour écouter les plages que vous venez d enregistrer Appuyez sur H juste après avoir arrêté l enregistrement La l...

Page 74: ...al cette platine dispose de deux modes d enregistrement longue durée LP2 et LP4 En mode stéréo LP2 vous pouvez enregistrer deux fois plus longtemps qu en mode normal En mode stéréo LP4 vous pouvez enregistrer quatre fois plus longtemps De plus en mono vous pouvez enregistrer pendant une durée deux fois plus longue environ qu en stéréo Remarque Les MD enregistrés en mode MD LP stéréo LP2 ou LP4 ne ...

Page 75: ...nregistrement analogique et l enregistrement numérique 1 Effectuez les opérations 1 à 6 de Enregistrement sur un MD à la page 14 2 Lisez la partie de la source ayant le niveau de sortie le plus élevé 3 Appuyez plusieurs fois sur DISPLAY CHAR ou DISPLAY jusqu à ce que le niveau du signal d entrée s affiche 4 Tout en écoutant le son tournez REC LEVEL ou appuyez plusieurs fois sur REC LEVEL ANALOG OU...

Page 76: ...es prises connecteur d entrée auxquelles est raccordée la source 3 Appuyez sur REC z Quand INPUT est sur ANALOG Le signal analogique entrant par les prises ANALOG IN sort par le connecteur DIGITAL OUT après avoir subi une conversion analogique numérique puis par les prises ANALOG OUT et la prise PHONES après avoir subi une conversion numérique analogique AD DA s affiche alors Z Vérification du tem...

Page 77: ...he alors Pour activer ou désactiver les fonctions Smart Space et Auto Cut procédez comme suit 1 Quand la platine est arrêtée appuyez deux fois sur MENU NO Setup Menu s affiche 2 Tournez AMS ou appuyez plusieurs fois sur jusqu à ce que S Space On s affiche puis appuyez sur AMS ou YES 3 Tournez AMS ou appuyez plusieurs fois sur pour sélectionner une option puis appuyez sur AMS ou YES 4 Appuyez sur M...

Page 78: ...matique des plages Procédez comme suit pour changer le niveau de signal qui déclenche le marquage automatique des plages 1 Quand la platine est arrêtée appuyez deux fois sur MENU NO Setup Menu s affiche 2 Tournez AMS ou appuyez plusieurs fois sur jusqu à ce que LS T s affiche puis appuyez sur AMS ou YES 3 Tournez AMS ou appuyez plusieurs fois sur pour sélectionner le niveau puis appuyez sur AMS ou...

Page 79: ...is que la platine est en mode de pause d enregistrement elle mémorise continuellement les six dernières secondes de son de l émission que vous écoutez Quand vous appuyez sur AMS ou T REC pour commencer à enregistrer ces six secondes sont ajoutées au début de l enregistrement Ainsi vous ne risquez pas de manquer le début d une émission FM ou satellite que vous enregistrez en direct 1 Effectuez les ...

Page 80: ...un lecteur CD Sony ou une chaîne Hi Fi vous pourrez copier facilement des CD sur le MD au moyen de la télécommande de la platine Vous pouvez utiliser cette télécommande de la platine MD à la fois pour cette platine et le lecteur CD ou la section lecteur CD de la chaîne Placez donc la platine MD et le lecteur CD aussi près l un de l autre que possible 1 Allumez l amplificateur et le lecteur CD puis...

Page 81: ...latine MD enfoncée z Durant un enregistrement CD Synchro la platine copie les informations CD Text CD Text et Disc Memo telles quelles sur le MD fonction Disc Memo Copy La fonction Disc Memo Copy est activée lorsque vous effectuez un enregistrement CD Synchro depuis un lecteur CD Sony raccordé par un câble CONTROL A1ΙΙ non fourni à la platine MD Remarques Lorsque vous effectuez un enregistrement C...

Page 82: ...ns pouvant être effectuées pendant la lecture z Quand vous écoutez un MD enregistré en mode stéréo LP2 ou LP4 Le témoin MD LP s allume lorsque vous appuyez sur H à l étape 5 ci dessus z Pour utiliser un casque Raccordez le casque à la prise PHONES Tournez PHONE LEVEL ou appuyez plusieurs fois sur REC LEVEL ANALOG OUT LEVEL pour régler le volume Pour Faites ceci arrêter la lecture Appuyez sur x pas...

Page 83: ...pouvez vérifier le nom de plage pendant la lecture Z Appuyez sur SCROLL Le nom de plage s affiche et défile Vous pouvez arrêter momentanément le défilement en appuyant une seconde fois sur cette touche puis le reprendre en appuyant à nouveau sur la touche Lecture d une plage donnée Quand la platine est en mode de lecture ou d arrêt procédez comme suit pour lire rapidement une plage 1 Automatic Mus...

Page 84: ...t de la plage Localisation d un point donné d une plage Vous pouvez localiser un point donné d une plage pendant la lecture ou en pause de lecture Appuyez continuellement sur m M pendant la lecture jusqu à ce que vous atteigniez le point recherché Pendant cette recherche avant ou arrière vous entendez un son intermittent Lorsque vous atteignez le point recherché relâchez la touche Remarques Si vou...

Page 85: ...nné doit se trouver à l intérieur d une même plage 1 Avec la platine en mode de lecture appuyez sur AyB au point de départ point A du passage à répéter REPA s allume et B clignote sur l afficheur 2 Continuez à écouter la plage ou appuyez sur M pour localiser le point final du passage point B puis appuyez sur AyB REPA B s allume et la lecture Repeat A B commence Pour arrêter la lecture Repeat A B e...

Page 86: ...z sur Notez que vous ne pouvez pas localiser et écouter des plages qui ont déjà été lues une fois Création d un programme de lecture lecture programmée Vous pouvez créer un programme de lecture de 25 plages au maximum en sélectionnant celles ci dans l ordre dans lequel vous désirez les écouter 1 Quand la platine est arrêtée appuyez deux fois sur MENU NO Setup Menu s affiche 2 Tournez AMS ou appuye...

Page 87: ...es du programme s affichent Pour voir le reste du programme tournez AMS ou appuyez plusieurs fois sur Quand la platine est arrêtée et PGM allumé effectuez les opérations 1 et 2 de Programmation des plages à la page 28 puis l une des opérations ci dessous Vérification de l ordre du programme Changement du contenu du programme Pour Faites ceci effacer une plage Appuyez plusieurs fois sur m M jusqu à...

Page 88: ...teignez la platine ou débranchez le cordon d alimentation la platine mémorise le dernier état Auto Space ou Auto Off et le rappelle quand vous la rallumez la fois suivante Vous pouvez programmer la platine MD pour qu elle soit placée en pause après chaque plage afin de vous laisser le temps de localiser la plage à enregistrer ensuite 1 Quand la platine est arrêtée appuyez deux fois sur MENU NO Set...

Page 89: ...our valider votre choix Vous pouvez également utiliser la molette pour sélectionner des points d une plage afin d effacer un passage ou de diviser la plage Touche YES Appuyez sur cette touche au lieu de la molette AMS pour valider un choix Touches m M Appuyez sur ces touches pour spécifier l unité minute seconde ou trame de déplacement du MD lorsque vous tournez la molette AMS Vous pouvez égalemen...

Page 90: ...o de plage 2 l ancien numéro 3 devient le numéro 2 l ancien numéro 4 devient le numéro 3 et ainsi de suite 1 Quand la platine est en mode d arrêt de lecture ou de pause appuyez sur MENU NO Edit Menu s affiche 2 Tournez AMS ou appuyez plusieurs fois sur jusqu à ce que Tr Erase s affiche puis appuyez sur AMS ou YES La platine commence à lire la plage dont le numéro est indiqué sur l afficheur 3 Tour...

Page 91: ...alles de 1 trame 1 trame 1 86 seconde L indication de temps minute seconde et trame du point actuel s affiche et la platine lit quelques secondes de la plage jusqu à ce point en mode répétition Quand vous enregistrez en mode stéréo vous pouvez déplacer le point de départ par intervalles de 2 trames en mode mono ou stéréo LP2 ou de 4 trames en mode stéréo LP4 Pour localiser rapidement un point Spéc...

Page 92: ...en mode stéréo LP4 Pour localiser rapidement un point Spécifiez l unité minute seconde ou trame d avance du MD lorsque vous tournez AMS ou appuyez plusieurs fois sur Pour ceci appuyez plusieurs fois sur m M à l étape 4 pour sélectionner minute seconde ou trame L unité sélectionnée clignote sur l afficheur 5 Répétez l opération 4 jusqu à ce que le point de division ait été localisé 6 Appuyez sur AM...

Page 93: ...s sur jusqu à ce que le numéro de la seconde des deux plages à combiner s affiche puis appuyez sur AMS ou YES Complete s affiche pendant quelques secondes et les plages sont combinées La lecture de la plage combinée commence Pour abandonner l opération Appuyez sur MENU NO ou x Remarques Des plages enregistrées dans des modes stéréo MONO LP2 ou LP4 différents ne peuvent pas être combinées Si Imposs...

Page 94: ...ue le numéro de plage si vous titrez une plage ou Disc si vous titrez le MD clignote puis appuyez sur AMS ou YES Un curseur clignotant s affiche La platine commence la lecture et vous pouvez titrer une plage tout en contrôlant le son 5 Appuyez plusieurs fois sur DISPLAY CHAR pour sélectionner le type de caractères Pour saisir un espace Appuyez sur M alors que le curseur clignote Vous ne pouvez pas...

Page 95: ...U NO Edit Menu s affiche 2 Tournez AMS ou appuyez plusieurs fois sur jusqu à ce que Name s affiche puis appuyez sur AMS ou YES 3 Tournez AMS ou appuyez plusieurs fois sur jusqu à ce que Nm Copy s affiche puis appuyez sur AMS ou YES 4 Tournez AMS ou appuyez plusieurs fois sur jusqu à ce que le numéro de la plage lorsque vous copiez le nom d une plage ou Disc lorsque vous copiez le nom du disque cli...

Page 96: ...u Disc pour effacer le nom du disque clignote puis appuyez sur AMS ou YES Complete s affiche pendant quelques secondes et le nom est effacé Pour abandonner l opération Appuyez sur MENU NO ou x Vous pouvez effacer tous les noms de plage et le nom de disque du MD en une seule fois 1 Quand la platine est en mode d arrêt de lecture ou de pause appuyez sur MENU NO Edit Menu s affiche 2 Tournez AMS ou a...

Page 97: ...de la plage À la fin de l enregistrement Complete s affiche pendant quelques secondes 1 Appuyez sur S F EDIT S F Edit s affiche 2 Tournez AMS ou appuyez plusieurs fois sur jusqu à ce que Fade In ou Fade Out s affiche puis appuyez sur AMS ou YES 3 Tournez AMS ou appuyez plusieurs fois sur jusqu à ce que le numéro de la plage dont vous désirez changer le niveau d enregistrement s affiche puis appuye...

Page 98: ...uvez annuler le dernier montage effectué et remettre le contenu du MD comme il se trouvait avant l opération Notez toutefois que vous ne pouvez pas annuler une opération de montage si après le montage vous avez commencé l enregistrement appuyé sur z ou MUSIC SYNC de la télécommande changé le niveau du son enregistré après l enregistrement éteint la platine ou éjecté le MD débranché le cordon d ali...

Page 99: ... 3 Tournez AMS ou appuyez plusieurs fois sur jusqu à ce que la valeur désirée pour le pas de réglage s affiche puis appuyez sur AMS ou YES 4 Appuyez sur MENU NO Pour rappeler les réglages d usine Appuyez sur CLEAR pendant le réglage de la valeur Remarques Lorsque vous changez le pas de réglage de vitesse le son à la lecture est momentanément coupé Le pas de réglage de vitesse revient à 0 réglage d...

Page 100: ...aux prises ANALOG OUT et à la prise PHONES au début de la lecture La fonction de fermeture en fondu à la lecture diminue graduellement le niveau du signal à la fin de la lecture La fonction d ouverture en fondu à l enregistrement augmente graduellement le niveau du signal au début de l enregistrement La fonction de fermeture en fondu à l enregistrement diminue graduellement le niveau du signal à l...

Page 101: ...nné 1 Quand la platine est arrêtée appuyez deux fois sur MENU NO Setup Menu s affiche 2 Tournez AMS ou appuyez plusieurs fois sur jusqu à ce que Sleep Off s affiche puis appuyez sur AMS ou YES 3 Tournez AMS ou appuyez plusieurs fois sur pour sélectionner une option puis appuyez sur AMS ou YES 4 Tournez AMS ou appuyez plusieurs fois sur jusqu à ce que Sleep 60min s affiche puis appuyez sur AMS ou Y...

Page 102: ...t À l heure programmée la platine s allume et l enregistrement commence Si vous avez programmé l heure de fin d enregistrement l enregistrement continue À l heure programmée l enregistrement s arrête et la platine s éteint Si vous avez programmé l heure de début et l heure de fin d enregistrement la platine s éteint À l heure de début d enregistrement programmée la platine s allume et l enregistre...

Page 103: ... sortie du son en choisissant le nombre de bits pour qu il corresponde à celui de la platine MD de la platine DAT ou de l autre élément numérique raccordé au connecteur de sortie numérique 1 Quand la platine est arrêtée appuyez deux fois sur MENU NO Setup Menu s affiche 2 Tournez AMS ou appuyez plusieurs fois sur jusqu à ce que Dout s affiche puis appuyez sur AMS ou YES 3 Tournez AMS ou appuyez pl...

Page 104: ...t des chaînes composées d éléments séparés Sony Les liaisons CONTROL A1ΙΙ sont utilisées pour la transmission des signaux de commande Elles permettent d obtenir les mêmes caractéristiques d automatisation et de commande que sur les chaînes d un seul bloc Les liaisons CONTROL A1ΙΙ entre des éléments Sony platine MD lecteur CD amplificateur ampli tuner et platine cassette permettent actuellement la ...

Page 105: ...que vous écoutez un CD le sélecteur de fonction de l amplificateur passe de CD à MD Remarques Cette fonction ne peut être utilisée que si les éléments sont raccordés aux entrées de l amplificateur ou ampli tuner correspondant aux touches de fonction de même nom Certains ampli tuners vous permettent de changer les noms des touches de fonction Consultez dans ce cas leur mode d emploi Pendant un enre...

Page 106: ... est une marque déposée d International Business Machines Corporation 2 La consommation électrique ne doit pas dépasser 120 mA Raccordez le connecteur de clavier à la prise KEYBOARD à l avant de la platine Vous pouvez brancher et débrancher le clavier même lorsque la platine est allumée La première fois que vous raccordez un clavier vous devez sélectionner le type de clavier 1 Quand la platine est...

Page 107: ...fiche Opérations que vous pouvez effectuer lors du titrage d une plage ou d un MD Pour utiliser le clavier avec Sélectionnez la configuration de clavier anglaise US réglage d usine1 la configuration de clavier japonaise JP 1 Vous pouvez également rappeler le réglage d usine en appuyant sur CLEAR Raccourci de la procédure de titrage Pour titrer Appuyez sur cette touche quand la platine est une plag...

Page 108: ...ous pouvez commander la platine MD en utilisant les touches du clavier Ceci vous permet de monter des MD et de commander la platine sans utiliser les touches et commandes de la platine et de la télécommande Pour plus d informations sur chaque fonction voir Description du panneau avant à la page 4 ou Description de la télécommande à la page 6 Quand une plage est sélectionnée vous pouvez effectuer d...

Page 109: ...veau caractère Pour abandonner l opération appuyez sur Esc Remarques Vous ne pouvez affecter un caractère avec la touche Shift que pour les touches de symbole et numériques Vous ne pouvez pas affecter un caractère aux touches suivantes Esc F1 à F12 Back Space Tab Caps Lock Enter Shift Ctrl Alt Windows Espace Application Print Screen Scroll Lock Pause Insert Delete Home End Page Up Page Down Num Lo...

Page 110: ...mentation tenez le par la fiche ne tirez jamais directement sur le cordon lui même Si le cordon d alimentation a besoin d être changé ne confiez cette opération qu à un centre de réparation qualifié Condensation dans la platine Si la platine est déplacée directement d un endroit froid à un endroit chaud ou placée dans une pièce très humide de la condensation peut se former sur les lentilles à l in...

Page 111: ...ntérieur d une plage sont quelquefois interprétées par la platine comme des espaces interplages Ceci augmente le nombre de plages et Disc Full s affiche Le temps d enregistrement restant sur le disque n augmente pas après que vous avez effacé de nombreuses petites plages Les plages de moins de 12 secondes ne sont pas comptées Le temps d enregistrement restant n augmente donc pas lorsque vous les e...

Page 112: ...un lecteur CD raccordé au connecteur DIGITAL IN vous effectuez une copie de première génération Remarque Les restrictions du système SCMS ne s appliquent pas à un enregistrement effectué par une liaison analogique analogique Guide de dépannage Si vous rencontrez l un des problèmes suivants lors de l utilisation de la platine utilisez ce guide pour le résoudre Si vous n y parvenez pas consultez vot...

Page 113: ...e s est pas effectué correctement Placez la platine dans un endroit stable et recommencez l enregistrement Le MD dans la platine est sale taches traces de doigts etc rayé ou de mauvaise qualité Remplacez le disque et recommencez l enregistrement C13 Read Error La platine n a pas pu lire correctement le sommaire TOC du MD Retirez le MD puis réinsérez le C14 Toc Error La platine n a pas pu lire corr...

Page 114: ...message clignote pendant quatre secondes environ quand vous allumez la platine en appuyant sur 1 Name Full La capacité de titrage du MD a atteint sa limite 1 700 caractères environ No Change Alors que vous essayiez de changer le niveau du son enregistré après l enregistrement vous avez appuyé sur MENU NO sans réellement effectuer de changement Aucun changement n a donc été effectué No Disc Il n y ...

Page 115: ...réquence 5 à 20 000 Hz 0 3 dB Rapport signal bruit Supérieur à 100 dB pendant la lecture Pleurage et scintillement Non mesurable ANALOG IN Type de prise Cinch Impédance 47 kilohms Entrée nominale 500 mV rms Entrée minimale 125 mV rms DIGITAL OPTICAL IN1 Type de connecteur optique carré Impédance 660 nm longueur d onde optique DIGITAL OPTICAL IN2 Type de connecteur optique carré Impédance 660 nm lo...

Page 116: ...Divise une plage 34 A B Erase Efface un passage d une plage 33 All Erase Efface toutes les plages d un MD 33 Undo Annule la dernière opération de montage 40 S F Edit Tr Level Change le niveau global du son enregistré après l enregistrement 39 Fade In Enregistre par dessus une plage avec une ouverture en fondu à l enregistrement 39 Fade Out Enregistre par dessus une plage avec une fermeture en fond...

Page 117: ...bre de bits du signal de sortie numérique 24 16 bit 24 bit 45 Sleep Spécifie la durée de la minuterie d arrêt 30 60 90 120min 60min 43 Sleep Active ou désactive la minuterie d arrêt On Off Off 43 Keyboard Type Sélectionne le type de clavier raccordé à la platine US JP US 48 Assign Affecte un caractère à une touche du clavier raccordé à la platine 51 Clock Set Règle l heure 12 LPstamp Spécifie si L...

Page 118: ...r 14 mode enregistrer 16 niveau 17 par dessus les plages existantes 14 Espace silencieux insertion pendant la lecture Voir Auto Space suppression pendant l enregistrement Voir Smart Space et Auto Cut F Fermeture en fondu 42 Filtre numérique 46 Fonction d autodiagnostic 55 G Guide de dépannage 54 I Indicateurs de niveau de crête 17 L Lecture depuis la première plage 24 d une plage donnée Voir Local...

Page 119: ...ctuelle Voir Lecture Repeat 1 de toutes les plages Voir Lecture Repeat All d un passage d une plage Voir Lecture Repeat A B S SCMS Voir protection contre la copie abusive Smart Space 19 Système de commande CONTROL A1II 46 S F Edit 39 T Télécommande 6 Titrage comment titrer 36 copie 37 re titrage 38 utilisation du clavier 49 TOC 16 32 ...

Page 120: ...Sony Corporation Printed in Malaysia ...

Reviews: