background image

4

Precautions

•Choose the mounting location carefully, observing the following:
—Do not install the unit where;

•it will interfere with normal driving operations.
•it will injure driver or passengers.
•the ambient temperature exceeds 55 °C (131 F°).
•it will be exposed to direct sunlight or hot air from a heater.
•it will be exposed to rain, water, or high humidity.
•it will be exposed to a lot of dust.
•it will become magnetized.
•it will be subject to excessive vibration.
•there are wire harnesses or pipelines under the place.
•it will jam any working parts of the car.
•it will get the wires under a screw, or caught in moving parts.

•Use only the supplied mounting hardware for a safe and secure

installation.

•If the unit is installed at an angle, when inserting and removing the

“MG Memory stick,” take care not to drop it.

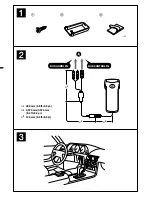
Installation  (

4

)

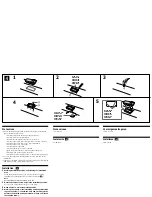
1

Deciding installation position, and cleaning the installation
area.

Clean the installation area of any dirt or oil before applying
installed tape on the holder 

2

 (see above illustration 

4

-4).

Note
Be sure nothing obstructs the handle, lever, etc.

2

Mark the position of screw holes in the installation position.

Use the screw hole of the holder 

2

 as a template.

3

Make a hole of 2 mm at the marked position.

4

Warm up the surface of the installation position and installed
tape on the holder 

2

 to between 20 ºC and 30 ºC. Adjust the

holder to the desired position, press down firmly, and install
the supplied screw 

1

.

After installing the screw, cover the protruding end of the screw
to avoid damage to cords. Gum tape may be used for this
purpose.

5

To install, align the 3 lockup holes on the bottom of the unit
with the 3 holder catches.

Secure the long cord with the supplied cord clamp 

3

 so that it

does not interfere with driving. Take extra care that the cord does
not become twisted around the gear lever as an accident may
occur.

Précautions

•##<FR-7>##

Installation (

4

)

##<FR-8>##

Precauciones

• ##<ES-7>##

Instalación (

4

)

##<ES-8>##

Vorsichtsmaßnahmen

•##<DE-7>##

Installation (

4

)

##<DE-8>##

Voorzorgsmaatregelen

•##<NL-7>##

Installeren (

4

)

##<NL-8>##

Precauzioni

•##<IT-7>##

Installazione (

4

)

##<IT-8>##

4

1

3

5

2

2

screw hole
##<FR-4>##
##<ES-4>##
##<DE-4>##
##<NL-4>##
##<IT-4>##

2

gum tape, etc.
##<FR-5>##
##<ES-5>##
##<DE-5>##
##<NL-5>##
##<IT-5>##

lockup holes
##<FR-6>##
##<ES-6>##
##<DE-6>##
##<NL-6>##
##<IT-6>##

1

Summary of Contents for MGS-X1 - Mg Memory Stick System-up Player

Page 1: ...ig Bitte nehmen Sie sich etwas Zeit um den Geräte Pass vollständig auszufüllen Dieser befindet sich auf der hinteren Umschlagseite dieser Bedienungsanleitung Owner s Record The model and serial numbers are located on the rear side of the unit Record the serial number in the space provided below Refer to these numbers whenever you call upon your Sony dealer regarding this product Model No MGS X1 Se...

Page 2: ...k or unplug the USB cable during reading or writing of data use the Memory Stick in a location subject to static electricity or electric noise On formatting the Memory Stick The Memory Stick is shipped with a FAT format as the standard format To format the Memory Stick please use devices conformable with the Memory Stick When formatting the Memory Stick do not use the format function on the Window...

Page 3: ... beyond this limitation requires permission of the copyright holders MagicGate Memory Stick Memory Stick are trademarks of Sony Corporation MagicGate and are trademarks of Sony Corporation US and foreign patents licensed from Dolby Laboratories All other trademarks and registered trademarks are trademarks or registered trademarks of their respective holders Caractéristiques FR 1 La musique enregis...

Page 4: ...erformed during playback A beep will be heard when pressing the REP or SHUFF buttons although no function occurs Even if the display button display mode changes is pressed song names are not displayed The disc name is displayed as MG MS Track names and disc names stored in MG Memory Stick are not displayed When connecting the RM X69RF to this unit quickly press and release M or m CUE REVIEW button...

Page 5: ...n only be used with the MG Memory Stick The MG Memory Stick has been formatted by a personal computer t After copying the necessary data to your personal computer etc retry formatting the MG Memory Stick with the MG Memory Stick exclusive device Error displays If there is a problem with the unit the MG Memory Stick or audio file various messages will be displayed Messages will vary depending on th...

Page 6: ...0 dB excluding 66 kbps Power consumption Less than 300 mA during playback Operating temperature 10 C to 55 C Dimensions Approx 48 1 30 5 113 5 mm w h d 1 15 16 1 1 4 4 1 2 in Mass Approx 210 g 7 4 oz Supplied accessories Parts for installation and connections 1 set Optional accessories Source selector XA C30 Bus Pin extension cord 2 m RC 87 Bus extention cord RC U305 0 5 m RCA pin cord RC 60 0 3 m...

Page 7: ... fo le R P A L fo P ap L p For the customers in the USA WARNING This equipment has been tested and found to comply with the limits for a Class B digital device pursuant to Part 15 of the FCC Rules These limits are designed to provide reasonable protection against harmful interference in a residential installation This equipment generates uses and can radiate radio frequency energy and if not insta...

Page 8: ...Memory Stick System up Player Installation Connections Installation Connexions Instalación Conexiones Installation Anschluß Montage Aansluitingen Installazione Collegamenti Sony Corporation 2001 Printed in Japan ...

Page 9: ...1 3 2 1 3 2 2 BUS AUDIO IN BUS CONTROL IN A 1 2 3 1 300 mm 9 8 ft 9 8 pi 2 2 570 mm 2 570 mm 8 4 ft 8 4 pi 3 130 mm 0 5 ft 0 5 pi ...

Page 10: ...ster unit or the source selector compatible with the Sony Bus Notes You can only connect one MGS X1 to the source selector optional Be sure to insert each connector securely as vibration through driving may cause a poor connection To connect this unit to the CD MD changer the source selector XA C30 optional is necessary Mounting example 3 Installing the unit in the centre console etc for easy oper...

Page 11: ... an angle when inserting and removing the MG Memory stick take care not to drop it Installation 4 1 Deciding installation position and cleaning the installation area Clean the installation area of any dirt or oil before applying installed tape on the holder 2 see above illustration 4 4 Note Be sure nothing obstructs the handle lever etc 2 Mark the position of screw holes in the installation positi...

Page 12: ...tion position and cleaning the installation area Clean the installation area of any dirt or oil before applying installed tape on the holder 2 see above illustration 4 4 Note Be sure nothing obstructs the handle lever etc 2 Mark the position of screw holes in the installation position Use the screw hole of the holder 2 as a template 3 Make a hole of 2 mm at the marked position 4 Warm up the surfac...

Page 13: ......

Page 14: ......

Reviews: