background image

Other Features

43

Timer-recording radio
programs

To timer-record, you must preset the radio station
(see “Step 4: Presetting radio stations” on page
10) and set the clock (see “Step 3: Setting the
time” on page 9) beforehand.

2 7

3,4,5

3,4,5

TIMER SELECT

1

Tune in a preset radio station (see
“Listening to the radio” on page 17).

2

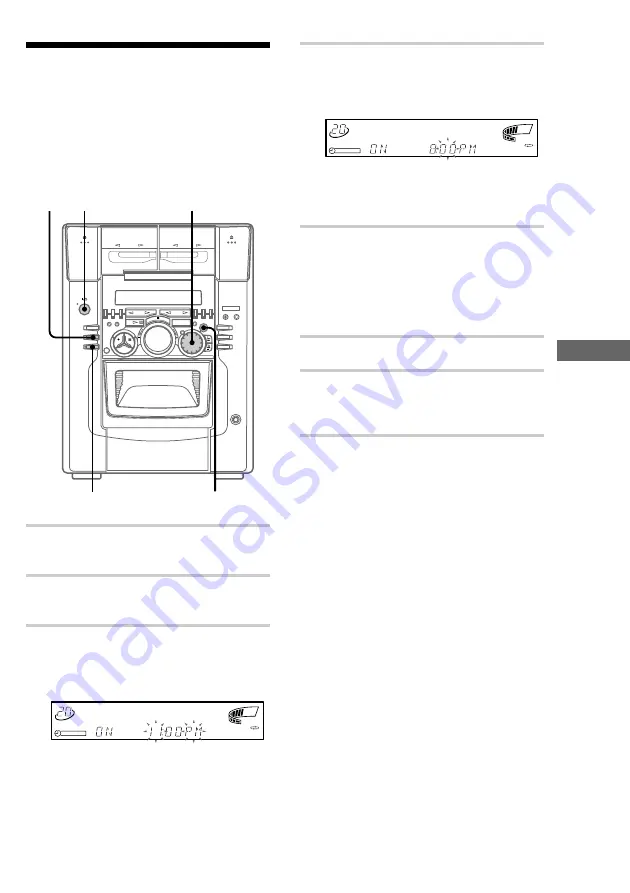
Press CLOCK TIMER SET.

“SET (DAILY 1)” appears.

3

Turn SELECTOR to select “REC,” then
press ENTER.

“ON” appears and the hour indication flashes
in the display.

ALL 

1

 DISC S

PROGRAM

SHUFFLE

REPEAT 1

TEXT

DELETE
FILE

DISC GROUP

SYNC

TRACK

ART

MONO

STEP

STEREO

GROUP
FILE

PLUS ONE

DOLBY NR RELAY

NEXT

 CD TEXT

HI-LIGHT

DBFB   

TUNED
MANUAL
AUTO
PRESET

SUR

1

kHz

MHz

1 2 

REC

 SLEEP

VOLUME

2

3

4

5

4

Set the time to start recording.

Turn SELECTOR to set the hour, then press
ENTER.

The minute indication starts flashing.

ALL 

1

 DISC S

PROGRAM

SHUFFLE

REPEAT 1

TEXT

DELETE
FILE

DISC GROUP

SYNC

TRACK

ART

MONO

STEP

STEREO

GROUP
FILE

PLUS ONE

DOLBY NR RELAY

NEXT

 CD TEXT

HI-LIGHT

DBFB   

TUNED
MANUAL
AUTO
PRESET

SUR

1

kHz

MHz

1 2 

REC

 SLEEP

VOLUME

2

3

4

5

Turn SELECTOR to set the minute, then
press ENTER.

The hour indication flashes again.

5

Set the time to stop recording following
the above procedure.

The starting time, the stopping time, and the
preset radio station to be recorded (e.g.,
“TUNER FM 5”) appear in succession, then
the original display appears.

6

Insert a recordable tape.

7

Press 

?

/

1

 to turn off the power.

When the recording starts, the volume level
is set to the minimum.

To check the setting

Press TIMER SELECT and turn SELECTOR to
select “REC,” then press ENTER.

To change the setting, start over from step 1.

To cancel the timer operation

Press TIMER SELECT and turn SELECTOR to
select “TIMER OFF,” then press ENTER.

Notes

• If the power is on at the preset time, the recording

will not be made.

• You cannot set the timer if the starting time and the

stopping time are the same.

• When you set the Sleep Timer, the Timer-recording

will not start until the Sleep Timer turns off the
system.

• You cannot activate the Daily Timer and Timer-

recording at the same time.

Summary of Contents for MHC-M100

Page 1: ...located on the rear of the unit Record the serial number in the space provided below Refer to them whenever you call upon your Sony dealer regarding this product Model No Serial No Compact Hi Fi Stereo System 4 227 898 13 1 2000 Sony Corporation MHC M500AV M300AV MHC M100 ...

Page 2: ...nce will not occur in a particular installation If this equipment does cause harmful interference to radio or television reception which can be determined by turning the equipment off and on the user is encouraged to try to correct the interference by one or more of the following measures Reorient or relocate the receiving antenna Increase the separation between the equipment and receiver Connect ...

Page 3: ...Index 55 Getting Started Step 1 Hooking up the system 4 Step 2 Setting up the speakers 7 Step 3 Setting the time 9 Step 4 Presetting radio stations 10 Saving the power in standby mode 12 Inserting CDs 13 Basic Operations Playing a CD Normal play 15 Recording a CD CD Synchro Recording 16 Listening to the radio Preset Tuning 17 Recording from the radio 19 Playing a tape 20 The CD Player Using the CD...

Page 4: ...ng up the system 3 2 1 6 5 4 4 2 2 Front speaker Left Rear surround speaker Right FM antenna Center surround speaker AM loop antenna Rear surround speaker Left Front speaker Right Super woofer MHC M500AV M300AV only MHC M500AV only ...

Page 5: ...ure to connect both left and right rear surround speakers Otherwise the sound will not be heard 3 MHC M500AV M300AV only Connect the center surround speaker Connect the speaker cords from the center surround speaker to the appropriate CENTER SPEAKER jacks as shown below Insert only the stripped portion Solid 3 Stripe continued Insert only the stripped portion 1 Connect the front speakers Connect t...

Page 6: ...utlet detach it from the plug for models equipped with an adapter only To deactivate the demonstration When you set the time see Step 3 Setting the time on page 9 the demonstration is deactivated To activate deactivate the demonstration again press DISPLAY while the system is off Tip MHC M300AV only You can reinforce the bass sound by connecting an optional super woofer to the super woofer connect...

Page 7: ... speakers at a suitable distance to the left and right of the television For MHC M500AV place the super woofer on either side of the television Place the center speaker on the top center of the TV set The placement of rear speakers greatly depends on the configuration of the room The rear speakers may be placed on both sides of the listening position A or behind the listening position B Front spea...

Page 8: ...E ON OFF on the remote The test tone is heard from the speakers in the following order Adjust the volume of the test tone Front left t Center t Front right R Rear T 3 From your listening position press CENTER LEVEL and REAR LEVEL on the remote to adjust the volume The volume levels from each speaker must become the same 4 Press T TONE ON OFF when you are done adjusting The test tone turns off Tip ...

Page 9: ...To enjoy high quality sound do not turn the super woofer volume too high The bass sound is enhanced in MOVIE mode rather than in MUSIC mode Therefore if you change the mode to MOVIE while listening to some sources that do not include the bass sound you may not be able to get the effect Step 3 Setting the time You must set the time before using the timer functions 1 2 4 3 5 1 Press CLOCK TIMER SET ...

Page 10: ...e following 1 While the power is off press DISPLAY repeatedly until the clock display appears 2 Do steps 1 through 5 above If you want to display the demo mode press DISPLAY when the power is off The above explanation shows you how to set the time while the power is off To change the time while the power is on do the following 1 Press CLOCK TIMER SET 2 Turn SELECTOR to select SET CLOCK 3 Press ENT...

Page 11: ...p 3 turn SELECTOR to select the preset number you want to change then overwrite the preset number to the desired station To erase a preset station 1 Keep pressing TUNER MEMORY until a preset number appears in the display ALL 1 DISC S PROGRAM SHUFFLE REPEAT1 TEXT DELETE FILE DISC GROUP SYNC TRACK ART MONO STEP STEREO GROUP FILE PLUS ONE DOLBY NR RELAY NEXT CD TEXT HI LIGHT DBFB TUNED MANUAL AUTO PR...

Page 12: ...ration t clock Power Saving Mode T The display disappears in the Power Saving Mode The system is turned on off by pressing 1 Tips 1 indicator and timer indicator when the timer is set light even in the Power Saving Mode The timer functions in the Power Saving Mode Note You cannot set the time in the Power Saving Mode To set the time cancel the Power Saving Mode To cancel the Power Saving Mode Pres...

Page 13: ...slot at the loading position 1 Press 1 to turn on the system 2 Press FUNCTION repeatedly until CD appears Disc number The disc number or Disc Memo see page 29 for details at the loading position appears in the display As you turn SELECTOR the disc number or Disc Memo changes If you have already inserted discs the disc number at the playing position appears When you turn SELECTOR the displayed disc...

Page 14: ...ng CDs on page 12 remove the discs Then close the front cover Notes Do not insert an empty 8 cm 3 inch CD adaptor It may damage the unit Do not attach anything such as seals or sleeves to CDs It may damage the unit or the disc If you drop a disc into the unit and the CD won t go into the slot correctly consult your nearest Sony dealer When transporting the unit remove all discs from the unit If yo...

Page 15: ... after pause Press CD H S X on the remote Select a CD Turn SELECTOR clockwise or press b on the remote or counterclockwise or press B on the remote and release it when you reach the desired CD Advance or return 10 CDs at a time Press V on the remote to move 10 CDs ahead or v to move 10 CDs back Select a track During play or pause press repeatedly to go forward or repeatedly to go back until you re...

Page 16: ...PEAT1 NEXT DELETE FILE DISC GROUP SYNC TRACK ART MONO STEP STEREO GROUP FILE PLUS ONE DOLBY NR RELAY NEXT CD TEXT HI LIGHT DBFB TUNED MANUAL AUTO PRESET SUR 1 kHz MHz 1 2 REC SLEEP VOLUME 2 3 4 5 To cancel the specified disc press CONTINUE repeatedly until NEXT disappears Tips Pressing CD H S when the power is off automatically turns the power on and starts CD playback if there is a CD in the slot...

Page 17: ...ights up 4 Press DIRECTION repeatedly to select g to record on one side Select j or RELAY to record on both sides 5 Press X PAUSE Recording starts To stop recording Press x Tips If you want to record from the reverse side press TAPE B h to light its indicator after pressing CD SYNCHRO When you record on both sides be sure to start from the front side If you start from the reverse side recording st...

Page 18: ...h from another source to the radio just by pressing TUNER BAND Automatic Source Selection When an FM program is noisy press STEREO MONO so that MONO appears in the display There will be no stereo effect but the reception will improve Press the button again to restore the stereo effect To improve broadcast reception reorient the supplied antennas Turn counter clockwise for lower preset numbers Turn...

Page 19: ...LIGHT DBFB TUNED MANUAL AUTO PRESET SUR 1 kHz MHz 1 2 REC SLEEP VOLUME 2 3 4 5 With the side you want to record facing forward 4 Press z REC Deck B stands by for recording 5 Press DIRECTION repeatedly to select g to record on one side Select j or RELAY to record on both sides 6 Press X PAUSE Recording starts To stop recording Press x Tips If you want to record from the reverse side press TAPE B h ...

Page 20: ... facing forward 2 Press DIRECTION repeatedly to select g to play one side Select j to play both sides To play both decks in succession select RELAY relay play 3 Press TAPE A or TAPE B h H Press TAPE A or TAPE B h H again to play the reverse side The tape starts playing For MHC M500AV M300AV You can also use TAPE A or TAPE B h H on the remote Press TAPE A or TAPE B h H again to play the reverse sid...

Page 21: ...o go to the beginning of the next track Press the opposite direction to go to the beginning of the current track The search direction and 1 the next track or 1 the current track appear in the display Example searching the next song TEXT DELETE FILE DISC GROUP SYNC TRACK ART MONO STEP GROUP FILE PLUS ONE DOLBY NR RELAY CD TEXT HI LIGHT TUNED MANUAL AUTO PRESET 1 kHz MHz 1 2 REC SLEEP 2 3 4 5 Note T...

Page 22: ...ble of Contents displays current disc number total number of tracks on the disc and total playing time of the disc 4 Depending on the disc some CD TEXT information may not appears The CD Player Using the CD display You can check the remaining time of the current track or that of the CD DISPLAY Press DISPLAY Each time you press the button the display changes as follows In stop mode In Program Play ...

Page 23: ...s in the display Repeat Play starts Do the following procedure to change the repeat mode To repeat Press All the tracks on the current CD CONTINUE repeatedly until 1 DISC appears in the display All the tracks on all CDs CONTINUE repeatedly until ALL DISCS appears in the display Only one track REPEAT repeatedly until REPEAT 1 appears in the display while playing the track you want to repeat To canc...

Page 24: ...the tracks play in random order To cancel Shuffle Play Press CONTINUE Tips You can start Shuffle Play by pressing SHUFFLE while playing To skip a track press You can specify another disc during 1 DISC Shuffle Play Turn SELECTOR to specify the next disc After all the tracks on the current disc are played in random order the next disc starts playing To skip to the next disc right away press ENTER wh...

Page 25: ... you select has Disc Memo it appears and then switches to the following display ALL 1 DISC S PROGRAM SHUFFLE REPEAT1 TEXT DELETE FILE DISC GROUP SYNC TRACK ART MONO STEP STEREO GROUP FILE PLUS ONE DOLBY NR RELAY NEXT CD TEXT HI LIGHT DBFB TUNED MANUAL AUTO PRESET SUR 1 kHz MHz 1 2 REC SLEEP VOLUME 2 3 4 5 Track number 5 Press ENTER to program the track The programmed track and corresponding step p...

Page 26: ...ESET SUR 1 kHz MHz 1 2 REC SLEEP VOLUME 2 3 4 5 Press CHECK until the track or disc you want appears then press CLEAR Tips When you press CD H S you can play the same program again When you press PROGRAM during Normal or Shuffle Play the program will be played after the current track If you replace discs the programmed disc and track numbers remain until you erase them So the system plays only the...

Page 27: ... the display changes to 51 and you can play the disc as the 51st disc Tips To play a disc already inserted into the PLUS ONE slot press CD PLUS ONE while the front cover is closed You can start Shuffle Play during Plus One Play by pressing SHUFFLE Notes Activating Plus One Play during Program Play automatically switches the system to Normal Play Plus One Play will be canceled if you turn SELECTOR ...

Page 28: ...UNED MANUAL AUTO PRESET SUR 1 kHz MHz 1 2 REC SLEEP VOLUME 2 3 4 5 Disc number 4 Press CLEAR to delete the track OFF appears next to the track number ALL 1 DISC S PROGRAM SHUFFLE REPEAT1 TEXT DELETE FILE DISC GROUP SYNC TRACK ART MONO STEP STEREO GROUP FILE PLUS ONE DOLBY NR RELAY NEXT CD TEXT HI LIGHT DBFB TUNED MANUAL AUTO PRESET SUR 1 kHz MHz 1 2 REC SLEEP VOLUME 2 3 4 5 If you want to restore ...

Page 29: ...T1 TEXT DELETE FILE DISC GROUP SYNC TRACK ART MONO STEP STEREO GROUP FILE PLUS ONE DOLBY NR RELAY NEXT CD TEXT HI LIGHT DBFB TUNED MANUAL AUTO PRESET SUR 1 kHz MHz 1 2 REC SLEEP VOLUME 2 3 4 5 6 Repeat steps 4 and 5 to input additional characters If you made a mistake Press or to move the cursor to the position you want to correct then turn SELECTOR to select the appropriate character or press DEL...

Page 30: ...hen you perform the following operation the program created for Program Play is also erased at the same time While holding down INPUT press ENTER ALL ERASE appears in the display and all Disc Memos and the program will be erased Tips When you replace a disc with a CD TEXT disc the Disc Memo of the CD TEXT disc is restored automatically The Disc Memo for the CD TEXT disc is no longer stored disappe...

Page 31: ...play 5 Press ENTER to select the disc In Program Play the disc will be added to the end of the program To locate a disc on the remote In step 4 press B or b on the remote until the Disc Memo you want appears Skip step 5 To cancel Memo Search Press SEARCH again Tip If there are no more Disc Memos starting with the character input in step 3 the system automatically changes to the next input characte...

Page 32: ...ecord e g CD appears 3 Press z REC Deck B stands by for recording The TAPE B H indicator for front side lights up 4 Press DIRECTION repeatedly to select g to record on one side Select j or RELAY to record on both sides 5 Press X PAUSE Recording starts 6 Start playing the source to be recorded To Press Stop recording x Pause recording X PAUSE Tip If you want to record from the reverse side press TA...

Page 33: ...e desired track number appears When the disc you select has Disc Memo it appears and then switches to the following display ALL 1 DISC S PROGRAM SHUFFLE REPEAT1 TEXT DELETE FILE DISC GROUP SYNC TRACK ART MONO STEP STEREO GROUP FILE PLUS ONE DOLBY NR RELAY NEXT CD TEXT HI LIGHT DBFB TUNED MANUAL AUTO PRESET SUR 1 kHz MHz 1 2 REC SLEEP VOLUME 2 3 4 5 Track number 6 Press ENTER to program the track T...

Page 34: ...h sides 10 Press X PAUSE Recording starts To stop recording Press x To check the program Press CHECK repeatedly After the last track END appears To clear a specific track or disc Press CHECK repeatedly to display the step you want to clear then press CLEAR To clear the entire program Press and hold CLEAR To cancel Program Play Press CONTINUE Recording a CD by specifying track order continued Tip I...

Page 35: ... play This lets you create original recordings For MHC M500AV M300AV LOOP For MHC M100 LOOP Press and hold LOOP on the remote during play at the point you want to start the Loop function and release it to resume Normal Play To adjust the loop length Press M or m while holding LOOP to select different loop lengths LOOP 1 20 ...

Page 36: ...emote during play at the point you want to start the Flash function and release it to resume Normal Play To adjust the flash length Press M or m while holding FLASH to select different flash lengths FLASH 1 20 To use LOOP and FLASH together Press and hold both LOOP and FLASH at the same time Note The loop and flash length cannot be adjusted together Adjust the loop and flash lengths independently ...

Page 37: ... If you have connected a super woofer please note that sound comes from the super woofer even when the headphones are connected Turn off the power of the super woofer when using headphones Sound Adjustment Adjusting the sound You can reinforce the bass create a more powerful sound and listen with headphones GROOVE DBFB PHONES jack To reinforce bass DBFB Press DBFB Every time you press the button t...

Page 38: ...y Press DISPLAY repeatedly to select one of the displays below PATTERN 1 ALL 1 DISC S PROGRAM SHUFFLE REPEAT1 TEXT DELETE FILE DISC GROUP SYNC TRACK ART MONO STEP STEREO GROUP FILE PLUS ONE DOLBY NR RELAY NEXT CD TEXT HI LIGHT DBFB TUNED MANUAL AUTO PRESET SUR 1 kHz MHz 1 2 REC SLEEP VOLUME 2 3 4 5 PATTERN 2 ALL 1 DISC S PROGRAM SHUFFLE REPEAT1 TEXT DELETE FILE DISC GROUP SYNC TRACK ART MONO STEP ...

Page 39: ...ics of a movie theater ENHANCED THEATER Reproduces the acoustics of a large movie theater DSP OFF Turns off the DSP mode The indicator on the front panel s DSP button lights up Note When you select other sound effects the surround effects will be canceled For MHC M100 SURR Press SURR to turn the surround effect on or off Every time you press the button the display changes as follows t SURROUND ON ...

Page 40: ...RO LOGIC or PRO LOGIC ON OFF on the remote while playing a program source The PRO LOGIC indicator lights up To cancel the Dolby Pro Logic Surround sound Press PRO LOGIC or PRO LOGIC ON OFF on the remote again to turn off the PRO LOGIC indicator Notes You can t use both Dolby Pro Logic Surround sound and the DSP surround effects at the same time When recording the sound be sure to turn off Dolby Pr...

Page 41: ... up to 100 minutes To check the remaining time Press SLEEP once To change the time to turn off Select the time you want by pressing SLEEP To cancel the timer operation Press SLEEP repeatedly until OFF appears Waking up to music Daily Timer You can wake up to music at a preset time every day Make sure you have set the clock see Step 3 Setting the time on page 9 3 9 4 5 6 7 4 5 6 8 TIMER SELECT 1 Pr...

Page 42: ...layback following the above procedure 7 Turn SELECTOR until the music source you want appears The indications change as follows t TUNER y CD PLAY T t TAPE PLAY T 8 Press ENTER The type of timer DAILY 1 or DAILY 2 the starting time stopping time and the music source appear in succession then the original display appears 9 Press 1 to turn off the power To check the setting Press TIMER SELECT and tur...

Page 43: ...LE PLUS ONE DOLBY NR RELAY NEXT CD TEXT HI LIGHT DBFB TUNED MANUAL AUTO PRESET SUR 1 kHz MHz 1 2 REC SLEEP VOLUME 2 3 4 5 Turn SELECTOR to set the minute then press ENTER The hour indication flashes again 5 Set the time to stop recording following the above procedure The starting time the stopping time and the preset radio station to be recorded e g TUNER FM 5 appear in succession then the origina...

Page 44: ...IGITAL IN jack of the MD deck Connecting an MD deck for analog recording Make sure to match the color of the plugs and the connectors To listen to the sound of the connected MD deck press FUNCTION repeatedly until MD appears To the audio output of the MD deck Note If you cannot select MD even when you have pressed FUNCTION press 1 while holding down FUNCTION when the power is turned off VIDEO will...

Page 45: ...headphones Connect headphones to the PHONES jack PHONES jack Connecting a DVD player MHC M500AV only Select one of the following two connections depending on the output your DVD player has To the front output of the DVD player To the rear output of the DVD player To the woofer output of the DVD player To the center output of the DVD player continued ...

Page 46: ...yer to the FRONT jacks of DVD INPUT with the audio connecting cable To listen to the sound of the connected DVD player press DVD 5 1CH so that its indicator goes off Notes Each time you press DVD 5 1CH the function changes as follows DVD 5 1CH y DVD 2 channel indicator on indicator off You cannot enjoy the 5 1 channel surround sound if you connect a DVD player which does not have the 5 1 channel a...

Page 47: ...dio output of the VCR Note If the sound is distorted when selecting VIDEO or you want to switch back to MD repeat the operation described above Connecting external antennas Connect the external antenna to improve the reception FM antenna Connect the optional FM external antenna You can also use the TV antenna instead FM75 AM 75 ohm coaxial cable not supplied AM antenna Connect a 6 to 15 meter 20 t...

Page 48: ...g Subject to direct sunlight On operation If the stereo system is brought directly from a cold to a warm location or is placed in a very damp room moisture may condense on the lens inside the CD player Should this occur the system will not operate properly Remove the CD and leave the system turned on for about an hour until the moisture evaporates When you move the unit take out any discs If you h...

Page 49: ...hours of use with a separately sold demagnetizing cassette For details refer to the instructions of the demagnetizing cassette Troubleshooting If you have any problem using this system use the following check list First check that the power cord is connected firmly and the speakers are connected correctly and firmly Should any problem persist consult your nearest Sony dealer General The display st...

Page 50: ...ularity still persists place the speakers farther away from the TV set Speakers Sound comes from one channel or the left and right volumes are unbalanced Check the speaker connection and speaker placement The sound comes from the center speaker only MHC M500AV M300AV only The source being played back is monaural Press PRO LOGIC to turn off the Dolby Pro Logic mode There is no sound from the center...

Page 51: ... capstans or pinch rollers are dirty Clean them see Cleaning the tape heads on page 49 Noise increases or the high frequencies are erased The record playback heads are magnetized Demagnetize them see Demagnetizing the tape heads on page 49 After pressing H h or A there is a mechanical noise EJECT appears in the display and the system enters standby mode automatically The tape was not inserted corr...

Page 52: ...M100 Continuous RMS power output 75 75 watts 6 ohms at 1 kHz 10 THD Total harmonic distortion less than 0 09 6 ohms at 1 kHz 40 watts Canadian model MHC M300AV Front Speaker Continuous RMS power output 60 60 watts 6 ohms at 1 kHz 10 THD Total harmonic distortion less than 0 09 6 ohms at 1 kHz 30 watts Center Speaker Continuous RMS power output 35 watts 6 ohms at 1 kHz 10 THD Rear Speaker Continuou...

Page 53: ...prox 215 110 151 mm Mass Approx 1 1 kg net per speaker continued CD player section System Compact disc and digital audio system Laser Semiconductor laser λ 780 nm Emission duration continuous Laser output Max 44 6 µW This output is the value measured at a distance of 200 mm from the objective lens surface on the Optical Pick up Block with 7 mm aperture Frequency response 2 Hz 20 kHz 0 5 dB Wavelen...

Page 54: ...d Approx 280 110 146 mm Mass Approx 1 3 kg net per speaker SS CT175 for MHC M300AV Speaker system 1 way 1 unit bass reflex type magnetically shielded Speaker units Full range 8 cm cone type Nominal impedance 6 ohms Dimensions w h d Approx 280 110 146 mm Mass Approx 1 3 kg net per speaker For customers in Canada MHC M300AV only Use only the supplied SS RS175 rear surround speaker for connection to ...

Page 55: ...18 21 P Q Playing a CD 15 tracks in random order Shuffle Play 24 tracks in the desired order Program Play 25 tracks repeatedly Repeat Play 23 Plus One Play 26 Power Saving Mode 11 Presetting radio stations 10 Preset tuning 17 Program Play 25 Protecting recordings 48 R Radio stations presetting 10 tuning in 17 Recording a CD 16 a radio program 19 timer recording 43 Repeat Play 23 Resetting the syst...

Page 56: ...Sony Corporation Printed in China ...

Reviews: