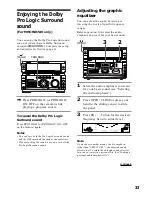
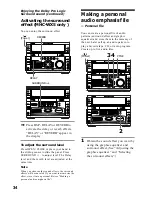
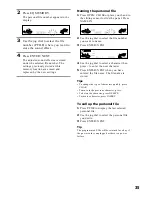
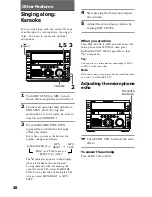
background image

47

1

2

3

4

5

6

7

8

9
0

!™

!∞

!•

RM-SR5 for MHC-WX5

1
2

SLEEP

3

DISC SKIP

4

CD 

(

5

TUNER BAND

6

DECK A 

(

7

DECK B 

(

8

MD 

·

/

/

π

9

P

0

p

=+

!™

0)

CLEAR

CHECK

!∞

LOOP

FLASH

FUNCTION

!•

FILE SELECT 

>

/

.

ON/OFF

VOL +/–

Summary of Contents for MHC-WX5

Page 1: ... 1999 by Sony Corporation Mini Hi Fi Component System Operating Instructions 3 867 706 11 1 MHC WX7AV MHC WX5 f ...

Page 2: ...g Corporation DOLBY the double D symbol a and PRO LOGIC are trademarks of the Dolby Laboratories Licensing Corporation The MHC WX7AV consist of the following components A V control amplifier STR WX7 CD player Stereo cassette deck HTC WX5 Speaker system Front speaker SS WX7 Center speaker SS CN50G Rear speaker SS SR50G The MHC WX5 consist of the following components A V control amplifier STR WX5 CD...

Page 3: ... order 23 Programming the CD tracks 24 Playing CDs without interruption 25 The Tape Deck Recording on a tape manually 26 Recording a CD by specifying track order 27 DJ Effects Looping part of a CD 29 Flashing part of a CD 29 Sound Adjustment Adjusting the sound 30 Selecting the audio emphasis 31 Selecting the surround effects 32 Enjoying the Dolby Pro Logic Surround sound 33 Making a personal audi...

Page 4: ...et up the stereo system vertically Be sure to place the A V control amplifier on top of the CD player stereo cassette deck 2 Connect the FM AM antennas Set up the AM loop antenna then connect it Extend the FM lead antenna horizontally 1 Connect the flat cord to the SYSTEM CONTROL connectors until it clicks To disconnect AM loop antenna FM antenna AM loop antenna 1 2 ...

Page 5: ...em replace both batteries with new ones Note If you do not use the remote for a long period of time remove the batteries to avoid possible damage from battery leakage When carrying this system Do the following to protect the CD mechanism 1 Press FUNCTION repeatedly until CD appears in the display 2 Hold down LOOP and press power so that LOCK appears in the display 3 Unplug the power cord ...

Page 6: ... supplied rear and center speakers enables you to fully enjoy Dolby Pro Logic Surround sound Dolby Pro Logic Surround is a decoding system standardized in TV programs and movies Dolby Pro Logic Surround improves sound image by using four separate channels These channels manipulate the sound to be heard and enhance the action as it happens on the screen Positioning the speakers Before you connect t...

Page 7: ...f supplied continued Left front speaker Insert only the stripped portion Insert only the stripped portion Black Red 2 Connect the rear speakers supplied for MHC WX7AV only Connect the speaker cords to the REAR SPEAKER jacks of the same color Keep the speaker cords away from the aerials to prevent noise The color of your speaker cords might be different See the speakers manual for details if suppli...

Page 8: ...supplied adapter from the plug except for Australia and Malaysia 6 Deactivate the demo mode by pressing DISPLAY DEMO when the system is turned off The demo mode is also deactivated when you set the time To activate the automatic sliding panel Press OPEN CLOSE to slide the panel Press OPEN SENSOR ON OFF button so that AUTO indicator lights up When you stand within 30 cm from the panel the panel sli...

Page 9: ... Rear 3 From your listening position press CENTER LEVEL and REAR LEVEL on the remote to adjust the volume The volume levels from each speaker must become the same 4 Press T TONE ON OFF when you are done adjusting The test tone is turned off Tips If you turn VOLUME or press VOLUME on the remote all the speaker volumes change If Test Tone turns off automatically press TEST TONE ON OFF to continue No...

Page 10: ...he demo mode press DISPLAY DEMO when the power is off Step 3 Setting the time ß RELAY DAILY 1 2 REC SLEEP DOLBY NR PROGRAM REPEAT1 SHUFFLE ALL DISCS 1 TUNED MONO STEREO SYNC STEP MHz kHz t VOLUME a SUR ß RELAY DAILY 1 2 REC SLEEP DAILY 1 2 REC SLEEP DOLBY NR DOLBY NR PROGRAM REPEAT1 SHUFFLE TUNED MONO STEREO SYNC STEP MHz kHz REC t VOLUME a DBFB SUR Note The previous explanation shows you how to s...

Page 11: ...n the jog dial to select the preset number you want 5 Press ENTER NEXT The station is stored 6 Repeat steps 1 to 5 to store other stations To tune in a station with a weak signal Press or repeatedly to tune in the station manually To change the preset number Start over from step 1 To change the AM tuning interval Except for the Middle Eastern model The AM tuning interval is factory preset to 9 kHz...

Page 12: ...he VCR Connecting optional AV components To enhance your system you can connect optional components Refer to the instructions of each component Connecting audio components Select one of the following two connections depending on the equipment to be connected and method of connecting Connecting an MD deck for digital recording You can record from CD into the MD deck digitally by connecting an optic...

Page 13: ...e to a gas pipe Connecting a video game player You can enjoy video games with audio emphasis by connecting a video game player To listen to and watch a video game press FUNCTION repeatedly until VIDEO 2 appears Press OPEN CLOSE or place your hand to the sliding sensor to slide the panel Connect a video game player as shown below To the audio video output of a video game player To the video input o...

Page 14: ... If you press P or CD on the remote play starts from the CD loaded on the tray whose button is lit green Playing time With the label side up When you play a CD single place it on the inner circle of the tray ß RELAY DAILY 1 2 REC SLEEP DAILY 1 2 REC SLEEP PROGRAM SHUFFLE S TUNED MONO STEREO SYNC STEP MHz kHz REC t VOLUME DOLBY NR ALL DISC 1 DBFB SUR 1 Track number Playing a CD Normal play You can ...

Page 15: ...e DISC SKIP EX CHANGE or D SKIP on the remote Play only the Press PLAY MODE CD you have repeatedly until 1 DISC selected appears Play all CDs Press PLAY MODE repeatedly until ALL DISCS appears Remove the CD Press OPEN CLOSE 6 Exchange other Press DISC SKIP CDs while EX CHANGE playing Adjust the Turn VOLUME or press volume VOLUME MHC WX7AV or VOL MHC WX5 on the remote Tips Pressing P when the power...

Page 16: ... ª so that ª for reverse side lights up When you record on both sides be sure to start from the front side If you start from the reverse side recording stops at the end of the reverse side When you want to reduce the hiss noise in low level high frequency signals press DOLBY NR so that DOLBY NR appears after pressing CD SYNCHRO Notes You cannot listen to other sources while recording Dolby NR and ...

Page 17: ...BY NR DOLBY NR PROGRAM REPEAT1 SHUFFLE ALL DISCS 1 TUNED MONO STEREO SYNC STEP MHz kHz REC t VOLUME SUR 1 Preset number Frequency To listen to non preset radio stations Use manual or automatic tuning For manual tuning press or repeatedly For automatic tuning press and hold or Tips Pressing TUNER BAND when the power is off automatically turns the power on and tunes to the last received station One ...

Page 18: ...equency signals press DOLBY NR so that DOLBY NR ON appears after pressing r REC If noise is heard while recording from the radio move the respective antenna to reduce the noise Note Dolby NR and DIRECTION MODE ß or RELAY is off when the mains AC power supply is switched off With the side you want to record facing forward Recording from the radio You can record the radio program on a tape by callin...

Page 19: ... DECK B MHC WX5 on the remote continued 1 Press and insert a recorded tape in deck A or B 2 Press DIRECTION MODE repeatedly to select A to play one side Select ß to play both sides To play both decks in succession select RELAY relay play 3 Press Press ª to play the reverse side The tape starts playing The deck stops automatically after repeating the sequence five times Relay play always follows th...

Page 20: ...en the mains AC power supply is switched off To Do this Stop play Press π or p on the remote Pause Deck B only Press P PAUSE Press again to resume play Fast forward Press while playing the front side or 0 while playing the reverse side Rewind Press 0 while playing the front side or while playing the reverse side Remove the cassette Press Adjust the volume Turn VOLUME or press VOLUME MHC WX7AV or V...

Page 21: ...tops at the end of the reverse side If you set DIRECTION MODE to ß when the tapes you use have different lengths the tape in each deck reverses independently If you select RELAY the tapes in both decks reverse together You don t have to set DOLBY NR since the tape in deck B is automatically recorded in the same state as the tape in deck A Note Dolby NR and DIRECTION MODE ß is off when the mains AC...

Page 22: ...ppears in the display Repeat Play starts Do the following procedure to change the repeat mode To cancel Repeat Play Press REPEAT so that REPEAT or REPEAT 1 disappears from the display Press DISPLAY DEMO during playback Each time you press the button during normal playback the display changes as follows To check the total playing time and the number of tracks on a CD Press DISPLAY DEMO in the stop ...

Page 23: ... repeatedly to select SHUFFLE To skip a track turn the jog dial clockwise or press on the remote 1 Press FUNCTION repeatedly until CD appears in the display then place a CD 2 Press PLAY MODE repeatedly until 1 DISC SHUFFLE or ALL DISCS SHUFFLE appears in the display ALL DISCS shuffles all the CDs in the player 1 DISC shuffles the CD whose DISC indicator is green 3 Press P J appears and then all th...

Page 24: ...VOLUME 1 SUR The last programmed track Total playing time CHECK CLEAR 4 4 0 P P p p ª ª VOLUME DECK A 9 You can make a program of up to 32 tracks from all the CDs in the order you want them to be played 3 7 2 4 5 CD 1 1 Press FUNCTION repeatedly until CD appears in the display then place a CD 2 Press PLAY MODE repeatedly until PROGRAM appears in the display 3 Press one of the DISC 1 3 buttons to s...

Page 25: ...tire p once in stop mode or program twice while playing Tips The program you made remains in the CD player even after it has been played back Press P to play the same program again If appears instead of the total playing time during programming this means you have programmed a track number which exceeds 20 the total playing time has exceeded 100 minutes Playing CDs without interruption Non Stop Pl...

Page 26: ...ng rec pause mode after pressing r REC in step 3 and before pressing P PAUSE in step 5 Note Dolby NR and DIRECTION MODE ß or RELAY is off when the mains AC power supply is switched off The Tape Deck You can record from CD tape or radio as you like For example you can record just the songs you want or record from the middle of the tape The recording level is adjusted automatically 1 Insert a blank ...

Page 27: ...acks from the same disc Recording a CD by specifying track order Program Edit You can record tracks from all the CDs in the order you want When programming make sure the playing times for each side do not exceed the length of one side of the tape 8 CHECK 4 0 P P p p ª ª 5 6 4 10 11 1 12 2 3 1 CD Total playing time including selected track Disc number ß RELAY DAILY 1 2 REC SLEEP DAILY 1 2 REC SLEEP...

Page 28: ...ess P on the remote to insert a pause at the end of side A P appears in the display and the total playing time resets to 0 00 in the display 9 Repeat steps 5 and 6 for tracks from the same disc or steps 4 to 6 for tracks from another disc to program the remaining tracks to be recorded on side B 10 Press CD SYNCHRO Deck B stands by for recording and the CD player stands by for playback for front si...

Page 29: ...ou create original recordings Press and hold FLASH or FLASH on the remote during playback at the point you want to start the Flash function and release to resume normal play To adjust the flash length Turn the jog dial while holding FLASH or press FILE SELECT while holding FLASH on the remote MHC WX5 to select different flash lengths FLASH 1 20 To use LOOP and FLASH together Press and hold both LO...

Page 30: ...ets DBFB to DBFB LOW and flattens the equalizer curve Press DBFB to adjust DBFB level Adjust the equalization to obtain the effect you desire To listen through the headphones Connect the headphones to PHONES jack No sound will come from the speakers You can reinforce the bass create a more powerful sound and listen with headphones To reinforce bass DBFB 1 Press DBFB Every time you press the button...

Page 31: ...t you desire The preset name appears in the display 3 Press ENTER NEXT You don t need to press ENTER NEXT when you use the remote To cancel the effect Press EFFECT ON OFF repeatedly so that EFFECT OFF appears in the display CD EFFECT ON OFF 1 3 2 Effect ACTION ROMANCE SF DRAMA SPORTS ROCK POP JAZZ DANCE SOUL SHOOTING RACING RPG BATTLE ADVENTURE DISCO CLUB LIVE HOUSE CHURCH CONCERT HALL P FILE 1 5 ...

Page 32: ... to the sliding sensor to slide the panel Press SURROUND to adjust the surround level Notes The level of the SURROUND ON effect cannot be changed When you choose other sound effects the surround effects will be canceled If you want to memorize the effect store it into the personal file see Making a personal audio emphasis file Selecting the surround effects For MHC WX7AV only The DSP Digital Signa...

Page 33: ...equalizer You can adjust the sound by raising or lowering the levels of specific frequency ranges Before operation first select the audio emphasis you want for your basic sound 1 Select the audio emphasis you want for your basic sound see Selecting the audio emphasis 2 Press OPEN CLOSE or place your hand to the sliding sensor to slide the panel 3 Press EQ button for the desired frequency band to a...

Page 34: ...ctivating the surround effect MHC WX5 only You can enjoy the surround effect Press DSP DELAYor REVERB to activate the delay or reverb effects DELAY or REVERB appear in the display To adjust the surround level Press OPEN CLOSE or place your hand to the sliding sensor to slide the panel Press SURROUND to adjust level The Delay level and the reverb level are adjusted at the same time Note When you ch...

Page 35: ... entered the file name The file name is stored Tips To change the type of characters quickly press CHAR To move to the previous character press To delete the character press DELETE To insert a character press INSERT To call up the personal file 1 Press P FILE to display the last selected personal file 2 Use the jog dial to select the personal file you desire 3 Press ENTER NEXT Tip The programmed P...

Page 36: ...y stereo CD tape or audio input by turning down the singer s voice You need to connect an optional microphone 1 Turn MIC LEVEL to MIN to turn down the microphone control level 2 Connect an optional microphone to MIX MIC 1 and 2 If only one microphone is to be used be sure to insert it into MIX MIC 1 3 Press KARAOKE PON MPX repeatedly to obtain the karaoke effect you desire Every time you press the...

Page 37: ...Press SLEEP on the remote Every time you press the button the minute display the turn off time changes as follows AUTO n 90min n 80min n 70min n n 10min n OFF n AUTO When you choose AUTO The power turns off when the current CD or tape finishes playback for up to 100 minutes To check the remaining time Press SLEEP on the remote once To change the time to turn off Select the time you want by pressin...

Page 38: ...he jog dial to select TIMER OFF then press ENTER NEXT Tip The power turns on 15 seconds before the preset time TUNER CD PLAY TAPE PLAY N N N N ß DOLBY NR PROGRAM REPEAT1 SHUFFLE ALL DISCS 1 TUNED MONO STEREO SYNC STEP MHz kHz REC SUR VOLUME 1 REC SLEEP DAILY 2 1 t You can wake up to music at a preset time every day Make sure you have set the clock see Step 3 Setting the time 3 9 2 4 5 6 7 8 CD TIM...

Page 39: ... setting start over from step 1 To cancel the timer operation Press TIMER SELECT and turn the jog dial to select TIMER OFF then press ENTER NEXT Note If the power is on at the preset time the recording will not be made ß DOLBY NR DOLBY NR PROGRAM REPEAT1 SHUFFLE ALL DISCS 1 TUNED MONO STEREO SYNC STEP MHz kHz REC SUR VOLUME 1 SLEEP DAILY 2 1 REC t To timer record you must preset the radio station ...

Page 40: ...ereo system Do not place the unit in an inclined position Do not place the unit in locations where it is Extremely hot or cold Dusty or dirty Very humid Vibrating Subject to direct sunlight On operation If the stereo system is brought directly from a cold to a warm location or is placed in a very damp room moisture may condense on the lens inside the CD player Should this occur the system will not...

Page 41: ...ker cord into the SPEAKER jack Inserting the vinyl portion of the speaker cord will obstruct the speaker connections Before placing a cassette in the tape deck Take up any slack in the tape Otherwise the tape may get entangled in the parts of the tape deck and become damaged When using a tape longer than 90 minutes The tape is very elastic Do not change the tape operations such as play stop and fa...

Page 42: ... irregularity still persists place the speaker farther away from TV set Speakers Sound comes from one channel or unbalanced left and right volume Check the speaker connection and speaker placement The sound comes from the center speaker only MHC WX7AV only The source being played back is monaural Press PROLOGIC and turn off the Pro Logic mode There is no sound from the center speaker MHC WX7AV onl...

Page 43: ...is a decrease in sound level The heads are dirty Clean them see Cleaning the tape heads on page 41 The record playback heads are magnetized Demagnetize them see Demagnetizing the tape heads on page 41 The tape does not erase completely The record playback heads are magnetized Demagnetize them see Demagnetizing the tape heads on page 41 There is excessive wow or flutter or the sound drops out The c...

Page 44: ...impedance of 6 to 16 ohms CENTER SPEAKER MHC WX7AV accepts impedance of 8 to 16 ohms REAR SPEAKER MHC WX7AV accepts impedance of 8 to 16 ohms MHC WX5 accepts impedance of 16 ohms SUPER WOOFER Voltage 1 V impedance 1 kilohm Video section Inputs AV INPUT VIDEO phono jack 1 Vp p 75 ohms Outputs MONITOR OUT phono jack 1 Vp p 75 ohms CD player section System Compact disc and digital audio system Laser ...

Page 45: ...er Rear speaker SS SR50G for MHC WX7AV Speaker system Full range bass reflex type magnetically shielded Speaker units Full range 8 cm dia cone type Nominal impedance 16 ohms Dimensions w h d Approx 215 x 100 x 210 mm Mass Approx 1 kg net per speaker Center speaker SS CN50G for MHC WX7AV Speaker system Full range bass reflex type magnetically sheilded Speaker units Full range 8 cm dia cone type x 2...

Page 46: ... p ª ª 1 2 3 4 5 6 7 8 9 0 ª º RM SR77 for MHC WX7AV 1 POWER 2 FUNCTION 3 SLEEP 4 CD 5 TUNER BAND 6 DECK A 9 7 DECK B 9 8 9 0 0 MD P p D SKIP CHECK CLEAR p P LOOP FLASH PRO LOGIC ON OFF ª T TONE ON OFF º DSP CENTER LEVEL REAR LEVEL VOLUME ...

Page 47: ...47 1 2 3 4 5 6 7 8 9 0 ª º RM SR5 for MHC WX5 1 2 SLEEP 3 DISC SKIP 4 CD 5 TUNER BAND 6 DECK A 7 DECK B 8 MD π 9 P 0 p 0 CLEAR CHECK LOOP FLASH FUNCTION FILE SELECT ª ON OFF º VOL ...

Page 48: ...ng the system 43 S Saving recordings 40 Selecting the audio emphasis 31 Setting the time 10 Shuffle Play 23 Sleep Timer 37 Sound adjustment 30 Speakers 6 12 T U V Timer falling asleep to music 37 timer recording 39 waking up to music 38 Troubleshooting 41 Tuner 11 16 45 Tuning interval 11 45 W X Y Z Wake up timer 38 A Adjusting the audio emphasis 31 the sound 30 the volume 9 15 20 Antennas 4 13 Au...

Reviews: