USO
RESTRITO
Cross-Point Settings (Xpt Assign Menu)
583
Knob
Parameter
Adjustment
Setting values
1
Source No Source signal
selection
1 to 326 (MVS-
8000X)
1 to 152 (MVS-
7000X)
2
Num
Number of
source signals to
be selected
Ch
a
p
te
r 19
Co
n
tr
o
l P
a
n
e
l S
e
tu
p
(P
a
n
e
l)
In the <Xpt Shift Mode> group of the Panel >Xpt Assign
>Main, V/K Pair Assign menu or Panel >Xpt Assign
>Table Button Assign menu, select one of the following
for each cross-point table.
Hold:
Acts as a shift button, and the shifted version of the
cross-point buttons is enabled while the button is held
down.
Lock:
Acts as a shift button, and pressing the button
toggles between the shifted version and the unshifted
version.
Off:
Acts as a cross-point button, in a 16-button system as
button number 16, in a 24-button system as button
number 24, and in a 32-button system as button
number 32.
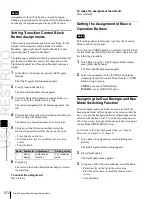
Setting the action of the [SHIFT] button in
the cross-point control block
In the <Display Shift Mode> group of the Panel >Xpt
Assign >Main, V/K Pair Assign menu or Panel >Xpt
Assign >Table Button Assign menu, select either of the
following.
Shift All Bus:
When this is On, it functions as a shift
button for all buses.
Key5-8 Select:
This functions as a shift button dedicated
to the key 1 and key 2 rows. When On, keys 5 to 8 are
selected, and when Off, keys 1 to 4 are selected.
Notes
•
It is not possible to make this setting separately for each
of the M/E and PGM/PST banks.
•
“Shift All Bus” is only valid when the cross-point button
shift operation
(see previous item)
is set to “Lock” or
“Off.”
•
If both “Shift All Bus” and “Key5-8 Select” are off, the
[SHIFT] button functions as a shift button for the source
name display. It is not possible to set both “Shift All
Bus” and “Key5-8 Select” to On.
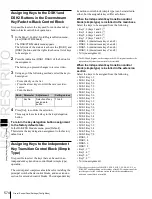
Setting the source signal name
1
In the Panel >Xpt Assign menu or Panel >Xpt Assign
>Table Button Assign menu, press [Src Name/LCD
Color].
The Src Name/LCD Color menu appears.
2
Turn the knob to select the signal to be set.
3
Press [Source Name].
A keyboard window appears.
4
Enter any name of not more than 16 characters, then
press [Enter].
Sequential names for multiple signals
When you specify a number at the end of a signal name, all
of the signals in the range selected by knobs 1 and 2 are
automatically assigned names ending with sequential
numbers.
Example:
To assign sequential names to source signal 2 through
source signal 4
1.
In step
2
above, set knob 1 to “2,” and set knob 2 to
“3.”
2.
Set the name of source signal 2 to “CAM2.”
The name “CAM3” is assigned automatically to
source signal 3, and the name “CAM4” is assigned
automatically to source signal 4.
Setting the source name display color
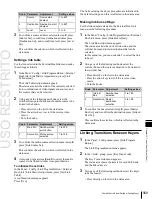
1
In the Panel >Xpt Assign >Table Button Assign >Src
Name/LCD Color menu, turn the knobs to select the
setting target.
Knob
Parameter
Adjustment
Setting values
1
Source No Source signal
selection
1 to 326 (MVS-
8000X)
1 to 152 (MVS-
7000X)
2
Num
Number of
source signals to
be selected
2
In the <LCD Color> group, select the color (Orange/
Green/Yellow).
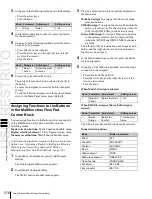
Copying Cross-Point Assign Tables
The contents of a cross-point assign table can be copied to
another cross-point assign table, and vice versa.
Notes
The contents of a sub table cannot be copied to the main
table.
1
In the Panel >Xpt Assign menu, press [Table Copy].
The Table Copy menu appears.
The status area shows a list of copy sources and a list
of copy destinations.
2
Using any of the following methods, select the number
of the table to use as the copy source and the number
of the table you want to be the copy destination.
Summary of Contents for MVS-8000X SystemMVS-7000X System
Page 358: ...USO RESTRITO 358 Wipe Pattern List Appendix Volume 1 Enhanced Wipes Rotary Wipes ...
Page 360: ...USO RESTRITO Random Diamond DustWipes 360 1 w pe PaternLO ...
Page 362: ...USO RESTRITO 362 DME Wipe Pattern List Appendix Volume 1 Door 2D trans 3D trans ...
Page 364: ...USO RESTRITO 364 DME Wipe Pattern List Appendix Volume 1 Page turn Page roll ...
Page 377: ...USO RESTRITO Menu Tree 377 Appendix Volume 1 AUX Menu AUX button CCR Menu CCR button ...
Page 379: ...USO RESTRITO Menu Tree 379 Appendix Volume 1 DME Menu DME button ...
Page 381: ...USO RESTRITO Menu Tree 381 Appendix Volume 1 Macro Menu MCRO button ...
Page 382: ...USO RESTRITO 382 Menu Tree Appendix Volume 1 Key Frame Menu KEY FRAME button ...
Page 383: ...USO RESTRITO Menu Tree 383 Appendix Volume 1 Effect Menu EFF button ...
Page 384: ...USO RESTRITO 384 Menu Tree Appendix Volume 1 Snapshot Menu SNAPSHOT button ...
Page 385: ...USO RESTRITO Menu Tree 385 Appendix Volume 1 Shotbox Menu SHOTBOX button ...
Page 386: ...USO RESTRITO 386 Menu Tree Appendix Volume 1 File Menu FILE button ...
Page 391: ...USO RESTRITO Menu Tree 391 Appendix Volume 1 ENG SETUP button to previous pages ...
Page 413: ...USO RESTRITO MVS 8000X System MVS 7000X System SY 4 470 637 01 1 Sony Corporation 2013 ...
Page 706: ...USO RESTRITO MVS 8000X System MVS 7000X System SY 4 470 637 01 1 Sony Corporation 2013 ...

