USO
RESTRITO
418
Control of P-Bus Devices
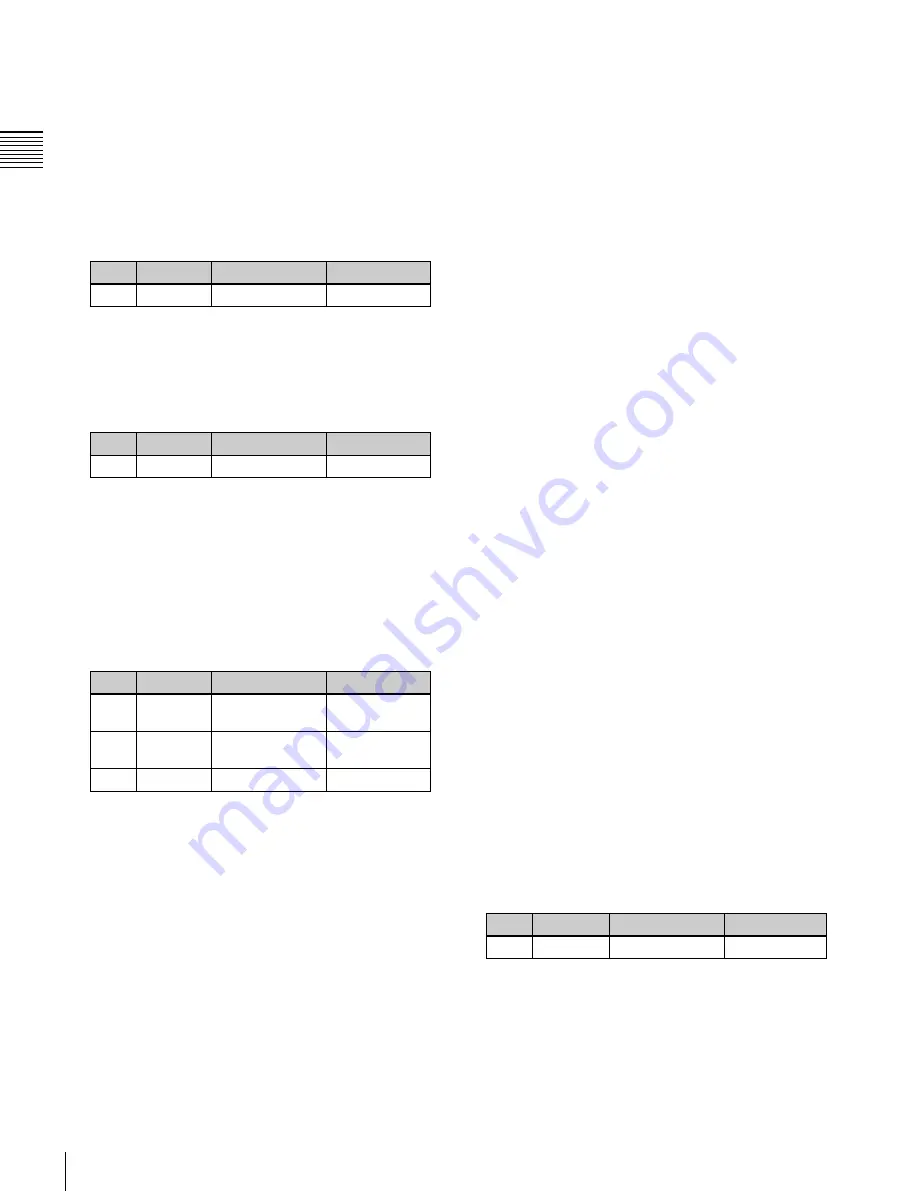
Knob
Parameter
Adjustment
Setting values
1
ID
Device number
0 to 23
Knob
Parameter
Adjustment
Setting values
2
Action No
Action
1 to 4
a)
Knob
Parameter
Adjustment
Setting values
3
Store No
Register number
for Store
1 to 250
3
Recall No
Register number
for Recall
1 to 250
3
Trigger No Trigger number
0 to 15
settings in this list will be saved as keyframe point
data. The right list is for selecting the action.
2
Select the P-Bus device for which you want to set an
action, by using any of the following methods to
specify the device ID.
•
Press directly on the list on the left of the status area.
•
Press the arrow keys to scroll the reverse video
Ch
a
p
te
r 12
E
x
te
rn
a
l De
v
ic
e
s
cursor.
•
Turn the knob.
3
Using either of the following methods, select the
action.
•
Press directly on the list on the right of the status
area.
•
Turn the knob.
a) 1: Off (no specification)
2: Store
3: Recall
4: Trigger
4
If in step
3
you selected 2 (Store), 3 (Recall), or 4
(Trigger), turn knob 3 to select the register number or
trigger number.
The indication for knob 3 changes to reflect the
selection of Store, Recall, or Trigger.
The setting is reflected in the list on the right of the
status area.
5
Press [Set].
For the device selected in the list on the left of the
status area, this sets the action specified in step
4
.
Repeat steps
2
to
5
as required for other devices.
Testing an action command
To produce a test output of the action command, press
[Test Fire].
The action command is output from the 9-pin serial port of
the DCU according to the setting in the list on the left of
the status area.
Clearing an action setting
To clear the setting for separate devices
1
In the list on the left of the status area, select the device
for which you want to clear the action setting.
2
In the list on the right, select “Off.”
3
Press [Set].
To clear the action settings for all devices in a
single operation
Press [All Off].
Setting the action for a rewind operation
On the P-Bus timeline, when the [REWIND] button in the
keyframe control block is pressed the action set for the first
keyframe is not executed; when the [RUN] button is
pressed, then the first keyframe action is executed.
To execute an action when the [REWIND] button is
pressed, it is necessary to set this action (Rewind Action).
To carry out this setting, in the Device >P-Bus Timeline
menu, press [Rewind Action] to recall the Rewind Action
menu. In this setting screen, use the same setting method
as in the screen for setting an action on the P-Bus timeline.
Alternatively, you can select the reverse arrangement,
whereby when the [REWIND] button is pressed, this
executes the action set for the first keyframe, and when the
[RUN] button is pressed the first keyframe action is not
executed. In this case, the Rewind Action setting is still
valid.
For details, see “Setting the First Keyframe When a
Rewind is Executed” (page 603).
Carrying out a Direct Store
You can carry out a Learn with the register number
specified for the device selected in the menu.
1
Using any of the following methods, select the device.
•
Press directly on the list on the left of the status area.
•
Press the arrow keys to scroll the reverse video
cursor.
•
Turn the knob.
Knob
Parameter
Setting
Setting values
1
ID
Device ID
0 to 23
2
In the Device >P-Bus Timeline menu, press [Direct
Store].
The numeric keypad window appears.
Summary of Contents for MVS-8000X SystemMVS-7000X System
Page 358: ...USO RESTRITO 358 Wipe Pattern List Appendix Volume 1 Enhanced Wipes Rotary Wipes ...
Page 360: ...USO RESTRITO Random Diamond DustWipes 360 1 w pe PaternLO ...
Page 362: ...USO RESTRITO 362 DME Wipe Pattern List Appendix Volume 1 Door 2D trans 3D trans ...
Page 364: ...USO RESTRITO 364 DME Wipe Pattern List Appendix Volume 1 Page turn Page roll ...
Page 377: ...USO RESTRITO Menu Tree 377 Appendix Volume 1 AUX Menu AUX button CCR Menu CCR button ...
Page 379: ...USO RESTRITO Menu Tree 379 Appendix Volume 1 DME Menu DME button ...
Page 381: ...USO RESTRITO Menu Tree 381 Appendix Volume 1 Macro Menu MCRO button ...
Page 382: ...USO RESTRITO 382 Menu Tree Appendix Volume 1 Key Frame Menu KEY FRAME button ...
Page 383: ...USO RESTRITO Menu Tree 383 Appendix Volume 1 Effect Menu EFF button ...
Page 384: ...USO RESTRITO 384 Menu Tree Appendix Volume 1 Snapshot Menu SNAPSHOT button ...
Page 385: ...USO RESTRITO Menu Tree 385 Appendix Volume 1 Shotbox Menu SHOTBOX button ...
Page 386: ...USO RESTRITO 386 Menu Tree Appendix Volume 1 File Menu FILE button ...
Page 391: ...USO RESTRITO Menu Tree 391 Appendix Volume 1 ENG SETUP button to previous pages ...
Page 413: ...USO RESTRITO MVS 8000X System MVS 7000X System SY 4 470 637 01 1 Sony Corporation 2013 ...
Page 706: ...USO RESTRITO MVS 8000X System MVS 7000X System SY 4 470 637 01 1 Sony Corporation 2013 ...


