USO
RESTRITO
Control of VTRs, Extended VTRs, and Disk Recorders
427
Ch
a
p
te
r 12
E
x
te
rn
a
l De
v
ic
e
s
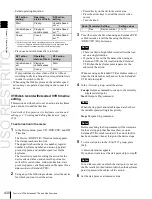
VTR/disk recorder automatically in the same way as when
automatically executing a keyframe effect.
1
In the numeric keypad control block, press the [EFF]
2
Press the [SET STOP TC] button, and enter “200”
from the numeric keypad control block. This
automatically sets DUR.
button, turning it on.
The [RCALL] button in the numeric keypad control
block lights.
START
TC STOP
TC (DUR
00:00:00:00
00:00:02:00
0:02:00)
2
With the region selection buttons in the numeric
keypad control block, select the region.
You can select more than one button.
3
Press the [SET DUR] button, and enter “–100” from
the numeric keypad control block.
START TC remains the same, and STOP TC
changes.
a)
3
Enter the number of the register to be recalled with the
numeric keypad buttons.
4
Press the [REWIND] button in the keyframe control
block.
START TC
STOP TC
(DUR
Example 2
00:00:00:00
00:00:01:00
0:01:00)
The VTR/Extended VTR/disk recorder automatically
advances to the timecode value set as the start point.
While the VTR/Extended VTR/disk recorder is
1
Press the [SET DUR] button, and enter “200” from the
numeric keypad control block.
operating, the [ALL STOP] button in the device
control block flashes amber, and when the start point
is reached lights green.
START
TC STOP
TC (DUR
--:--:--:--
--:--:--:--
0:02:00)
If the operating VTR/Extended VTR/disk recorder is
selected as the reference region in the device control
block, the [CUE] button also flashes and lights in the
same way as the [ALL STOP] button. Also, when the
start point is reached, the [STOP] button lights amber.
2
Press the [SET STOP TC] button, and enter
“01000000” from the numeric keypad control block.
This automatically sets START TC.
5
Press the [RUN] button in the keyframe control block.
START
TC
STOP TC
(DUR
00:59:58:00
01:00:00:00
0:02:00)
The VTR/Extended VTR/disk recorder is now
controlled according to the keyframe data.
Setting the start point and stop point with
the [SET XX] buttons
When you enter a timecode and make a setting with the
3
Press the [SET STOP TC] button, and without entering
anything from the numeric keypad control block, press
[ENTER].
The STOP TC display, and the START TC display
automatically calculated in step
2
disappear, and the
setting of the DUR does not change.
[SET START TC], [SET STOP TC], or [SET DUR] button
in the device control block (search dial), the timecode
display changes as follows. With these buttons you can set
the start point and stop point timecodes, and the duration
START
TC STOP
TC (DUR
--:--:--:--
--:--:--:--
0:02:00)
(the duration is not displayed). When two of these values
are set, the remaining one is automatically determined.
Example 1
1
Press the [SET START TC] button, and enter
“00000000” from the numeric keypad control block.
a)
If after pressing the [SET XX] button you press the [+ / –] button in
the numeric keypad control block, you can enter offsets from the
existing setting values. Each time you press this button, the sign of
the offset cycles through the settings “ ”(absolute value)
t
“+”
t
“
–
”…, and the sign appears in the numeric keypad control block
display. If there is no existing setting value, then it is only possible to
enter an absolute value, and not an offset value.
Setting the start point, stop point, and
START TC
STOP TC
(DUR (not
displayed)
00:00:00:00
--:--:--:--
)
start delay time in a menu
In the Device menu, you can set the start point, stop point,
and start delay time.
1
In the Device menu, press VF3 ‘DDR/VTR’ and HF1
‘Cueup & Play.’
Summary of Contents for MVS-8000X SystemMVS-7000X System
Page 358: ...USO RESTRITO 358 Wipe Pattern List Appendix Volume 1 Enhanced Wipes Rotary Wipes ...
Page 360: ...USO RESTRITO Random Diamond DustWipes 360 1 w pe PaternLO ...
Page 362: ...USO RESTRITO 362 DME Wipe Pattern List Appendix Volume 1 Door 2D trans 3D trans ...
Page 364: ...USO RESTRITO 364 DME Wipe Pattern List Appendix Volume 1 Page turn Page roll ...
Page 377: ...USO RESTRITO Menu Tree 377 Appendix Volume 1 AUX Menu AUX button CCR Menu CCR button ...
Page 379: ...USO RESTRITO Menu Tree 379 Appendix Volume 1 DME Menu DME button ...
Page 381: ...USO RESTRITO Menu Tree 381 Appendix Volume 1 Macro Menu MCRO button ...
Page 382: ...USO RESTRITO 382 Menu Tree Appendix Volume 1 Key Frame Menu KEY FRAME button ...
Page 383: ...USO RESTRITO Menu Tree 383 Appendix Volume 1 Effect Menu EFF button ...
Page 384: ...USO RESTRITO 384 Menu Tree Appendix Volume 1 Snapshot Menu SNAPSHOT button ...
Page 385: ...USO RESTRITO Menu Tree 385 Appendix Volume 1 Shotbox Menu SHOTBOX button ...
Page 386: ...USO RESTRITO 386 Menu Tree Appendix Volume 1 File Menu FILE button ...
Page 391: ...USO RESTRITO Menu Tree 391 Appendix Volume 1 ENG SETUP button to previous pages ...
Page 413: ...USO RESTRITO MVS 8000X System MVS 7000X System SY 4 470 637 01 1 Sony Corporation 2013 ...
Page 706: ...USO RESTRITO MVS 8000X System MVS 7000X System SY 4 470 637 01 1 Sony Corporation 2013 ...


