USO
RESTRITO
Operation Settings (Operation Menu)
605
Ch
a
p
te
r 19
Co
n
tr
o
l P
a
n
e
l S
e
tu
p
(P
a
n
e
l)
[CUT] buttons in the transition control block,
press [Auto Trans/Cut Swap], turning it on.
Transition preview operation mode:
For the
operation mode of the [TRANS PVW] button,
select [Lock] or [Hold] in the <Trans Pvw> group.
The setting as to whether to use the “One-time
mode” in which the transition preview terminates
when the transition completes, or to use button
control, is made on the switcher side
•
Hold:
Acts as a utility button while held down,
changing the assignment of the cross-point
button rows.
•
Lock:
For the key rows, each time the button is
pressed the cross-point button assignment
toggles between the utility assignment and the
normal assignment. The background A and B
rows are fixedly assigned to the A and B rows,
even if the [UTIL] button is pressed.
[KEY] button operation mode for key source bus
operations:
When the key source bus is selected
with the delegation buttons in the auxiliary bus
control block, specify the [KEY] button operation
mode in the <Key Source Bus Select Mode>
group, as follows.
•
Key:
If you select this, the [KEY] button is
always lit, and this mode allows only key signals
to be selected with the cross-point buttons.
•
Video & Key:
The [KEY] button is enabled,
and either video or key signals can be selected.
CCP-6000/8000-specific button settings:
Press
[CCP-6000/8000 Button], and skip to step
3
. This
setting is enabled when the CCP-6224/6324 is
used.
3
If required, make the following settings.
Operation mode during a fade-to-black:
To set the
operation mode if the [FTB] button is pressed once
more during a fade-to-black, select either of the
following in the <FTB> group.
•
Continue:
Continue the fade-to-black.
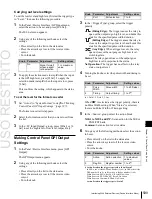
Setting the Operation Mode of the
[ALL] Button in the Transition
Control Block
Specify the next transition selected by pressing the [ALL]
button in the transition control block.
Notes
If everything here is set to Off, then pressing the [ALL]
button does not change the specification of the next
transition.
1
In the Panel >Operation >Custom Button menu, press
[Next Trans All].
The Next Trans All menu appears.
2
Press the button for the next transition you want to
select with the [ALL] button, turning it On.
•
Cancel:
Cancel the fade-to-black, and return to
the state before executing the fade-to-black.
Operation mode of the [XPT HOLD] buttons in the
key rows:
Set the operation mode of the [XPT
HOLD] buttons in the key rows in the <Key Bus
Xpt Hold> group, as follows.
•
Normal:
The <Xpt Hold Mode> in the Switcher
>Key/Wipe/FM/CCR menu is enabled.
•
Protect:
In this mode, pressing a panel button
cannot change the cross-point settings.
Notes
The button On/Off state is preserved in each of the
“Normal” and “Protect” modes. For example, if
the [XPT HOLD] buttons are “On” in the Normal
mode, and you switch to Protect mode, then if the
[XPT HOLD] buttons were “Off” in this mode the
previous time, the [XPT HOLD] buttons go off,
and if they were “On” they light.
[UTIL] button operation mode:
To set the operation
mode of the [UTIL] button in the cross-point
control block, press either of the following in the
<Util Button> group.
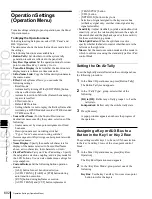
Setting Trackball, Joystick, Search
Dial, and Double-Click Sensitivity
You can set the operational sensitivity for trackball,
joystick and the buttons which recall the relevant menus
when pressed twice, and the relation between the rotation
angle of the search dial with the playback speed.
1
In the Panel >Operation menu, press the [Sensitivity].
The Sensitivity menu appears.
The status area shows a list of the items with their
settings.
2
Make the following settings as required.
Trackball and Z-ring sensitivity in normal mode:
In the <Trackball Normal Mode> group, select
[
1], [
2], or [
4].
Trackball and Z-ring sensitivity in fine mode:
In the
<Trackball Fine Mode> group, select [
1
/
2
], [
1
/
4
],
or [
1
/
8
].
Joystick sensitivity in normal mode:
In the <Joystick
Normal Mode> group, select [
1], [
2], or
[
4].
Summary of Contents for MVS-8000X SystemMVS-7000X System
Page 358: ...USO RESTRITO 358 Wipe Pattern List Appendix Volume 1 Enhanced Wipes Rotary Wipes ...
Page 360: ...USO RESTRITO Random Diamond DustWipes 360 1 w pe PaternLO ...
Page 362: ...USO RESTRITO 362 DME Wipe Pattern List Appendix Volume 1 Door 2D trans 3D trans ...
Page 364: ...USO RESTRITO 364 DME Wipe Pattern List Appendix Volume 1 Page turn Page roll ...
Page 377: ...USO RESTRITO Menu Tree 377 Appendix Volume 1 AUX Menu AUX button CCR Menu CCR button ...
Page 379: ...USO RESTRITO Menu Tree 379 Appendix Volume 1 DME Menu DME button ...
Page 381: ...USO RESTRITO Menu Tree 381 Appendix Volume 1 Macro Menu MCRO button ...
Page 382: ...USO RESTRITO 382 Menu Tree Appendix Volume 1 Key Frame Menu KEY FRAME button ...
Page 383: ...USO RESTRITO Menu Tree 383 Appendix Volume 1 Effect Menu EFF button ...
Page 384: ...USO RESTRITO 384 Menu Tree Appendix Volume 1 Snapshot Menu SNAPSHOT button ...
Page 385: ...USO RESTRITO Menu Tree 385 Appendix Volume 1 Shotbox Menu SHOTBOX button ...
Page 386: ...USO RESTRITO 386 Menu Tree Appendix Volume 1 File Menu FILE button ...
Page 391: ...USO RESTRITO Menu Tree 391 Appendix Volume 1 ENG SETUP button to previous pages ...
Page 413: ...USO RESTRITO MVS 8000X System MVS 7000X System SY 4 470 637 01 1 Sony Corporation 2013 ...
Page 706: ...USO RESTRITO MVS 8000X System MVS 7000X System SY 4 470 637 01 1 Sony Corporation 2013 ...


