background image

10

-GB

Recording an MD right away!

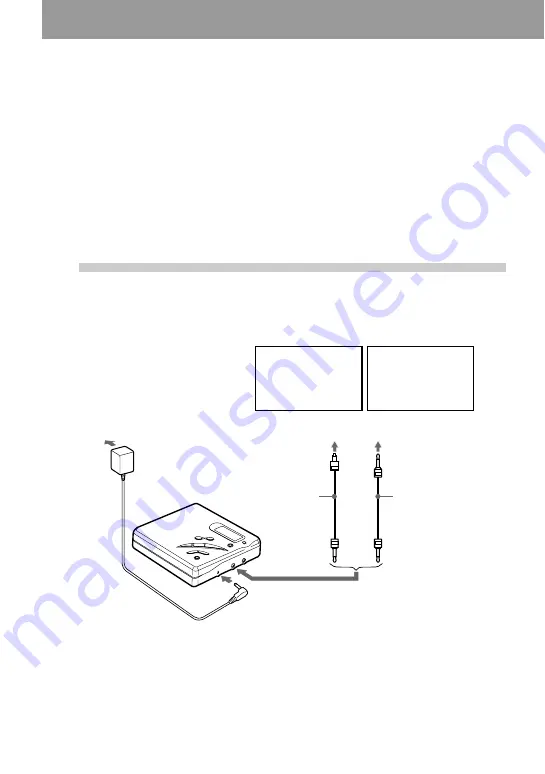
Connect to a digital source using an optical cable (supplied with the 
European, Chinese and Argentine models only) to make digital 
recordings. Digital recording is possible even from digital equipment 
with different sampling rates, such as a DAT deck or a BS tuner, using 
the built-in sampling rate converter. To record from an analog source, 
see “Recording with analog input (line cable required)” (page 16). T
record from an MD, see “Note on digital recording” (page 31).

1

Make connections. 

(Insert the cables 

firmly and completely into the appropriate jacks.)

to a wall 
outlet

AC power adaptor

1)

to LINE IN (OPTICAL)

to DC IN 3V

CD player, MD 
player, digital 
amplifier, etc.

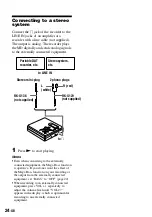
Portable CD 
player, etc.

Optical mini-plug

to DIGITAL OUT (OPTICAL)

1)

Supplied with the European, Chinese and Argentine models only.

2)

Supplied with the European and Argentine models only.

3)

Supplied with the Chinese model only.

Optical cable

3)

Optical plug

Optical cable

2)

Summary of Contents for MZ-R500

Page 1: ...3 223 746 13 1 Portable MiniDisc Recorder Operating Instructions 2000 Sony Corporation MZ R500 R500PC R500DPC ...

Page 2: ...rence to radio communications However there is no guarantee that interference will not occur in a particular installation If this equipment does cause harmful interference to radio or television reception which can be determined by turning the equipment off and on the user is encouraged to try to correct the interference by one or more of the following measures Reorient or relocate the receiving a...

Page 3: ...ther outlet unless the blades can be fully inserted to prevent blade exposure The CE mark on the unit is valid only for products marketed in the European Union Certain countries may regulate disposal of battery used to power this product Please consult with your local authority WALKMAN and are trademarks of Sony Corporation GB ...

Page 4: ...tart stop recording in sync with the source player Synchro recording 17 Recording without overwriting existing material 18 Adjusting the recording level manually Manual recording 19 Checking the remaining time or the recording position 20 Various ways of playback 21 Playing tracks repeatedly 21 Emphasizing bass DIGITAL MEGA BASS 22 Protecting your hearing AVLS 22 Checking the remaining time or the...

Page 5: ... track 25 To erase the whole disc 25 Adding a track mark 26 Erasing a track mark 26 Moving recorded tracks 27 Labeling recordings 28 Additional information 30 Precautions 30 Troubleshooting 32 System limitations 34 Messages 35 Specifications 37 What is an MD 38 ...

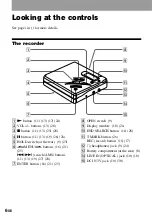
Page 6: ...8 E HOLD switch at the rear 9 23 F MENU buttons 16 21 25 search AMS buttons 11 13 19 27 28 G ENTER button 16 21 25 H OPEN switch 9 I Display window 18 21 J END SEARCH button 11 28 K T MARK button 26 REC record button 11 17 L i headphones jack 9 24 M Battery compartment at the rear 8 N LINE IN OPTICAL jack 10 16 O DC IN 3V jack 10 30 A C B E D F G I J K H O N M L ...

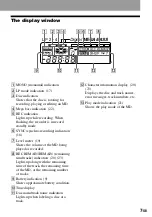
Page 7: ... MD being played or recorded H REC REMAIN REMAIN remaining time tracks indication 20 23 Lights up along with the remaining time of the track the remaining time of the MD or the remaining number of tracks I Battery indication 9 Shows approximate battery condition J Time display K Disc name track name indication Lights up when labeling a disc or a track L Character information display 20 23 Displays...

Page 8: ... models only Battery life1 Unit Approx hours JEITA2 1 The battery life may be shorter due to operating conditions the temperature of the location and varieties of batteries 2 Measured value by the standard of JEITA Japan Electronics and Information Technology Industries Association LR6 SG alkaline dry battery3 3 When using a Sony LR6 SG STAMINA alkaline dry battery produced in Japan Normal LP2 LP4...

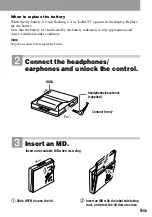
Page 9: ...cation is only approximate and varies with the recorder condition Note Stop the recorder before replacing battery 2 Connect the headphones earphones and unlock the control 3 Insert an MD 1 Slide OPEN to open the lid 2 Insert an MD with the label side facing front and press the lid down to close To i Connect firmly HOLD headphones earphones supplied Insert an recordable MD when recording ...

Page 10: ... Recording with analog input line cable required page 16 To record from an MD see Note on digital recording page 31 1 Make connections Insert the cables firmly and completely into the appropriate jacks to a wall outlet AC power adaptor1 to LINE IN OPTICAL to DC IN 3V CD player MD player digital amplifier etc Portable CD player etc Optical mini plug to DIGITAL OUT OPTICAL 1 Supplied with the Europe...

Page 11: ... open until Edit disappears in the display REC x N To Press Record from the end of the previous recording1 END SEARCH and press N while pressing REC Record partway through the previous recording1 N or to find the start point of recording and press x to stop Then press N while pressing REC Pause X2 Press X again to resume recording Remove the MD x and open the lid 3 The lid does not open while Edit...

Page 12: ...n optical type output When recording from a portable CD player set the CD player to pause and then do the recording procedure on the recorder Note the following when recording from a portable CD player Some portable CD players may not be capable of digital out unless powered by the AC power Connect the AC power adaptor to the portable CD player and use it on AC power as the power source Disable an...

Page 13: ... 5 minutes when using the supplied AC power adaptor or the optional AC E30HG when an AC power adaptor is not supplied VOL x N To Press Find the beginning of the current track once Find the beginning of the next track once Pause X Press X again to resume play Go backwards while playing1 1 To go backward or forward quickly without listening press X and keep pressing or keep pressing Go forward while...

Page 14: ...ides a higher level of shock protection during playback than the traditional one If the play does not start Make sure the recorder is not locked page 23 z Playback will switch automatically between stereo and monaural according to the sound source Note Sound may skip if the recorder receives stronger continuous shock than expected a dirty or scratched MiniDisc is played ...

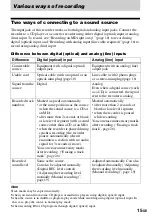
Page 15: ...able cord Optical cable with an optical or an optical mini plug page 10 Line cable with 2 phono plugs or a stereo mini plug page 16 Signal from the source Digital Analog Even when a digital source such as a CD is connected the signal sent to the recorder is analog Recorded track numbers Marked copied automatically at the same positions as the source when the sound source is a CD or an MD after mor...

Page 16: ...e recording while pausing recording thus the track will be counted as a new track Recording for long times Select each recording mode according to the recording time that you want Stereo recording is possible at 2 times LP2 or 4 times LP4 the normal recording time MDs recorded in monaural LP2 or LP4 mode can be played back only on MD players or recorders with monaural LP2 or LP4 playback mode 1 Pr...

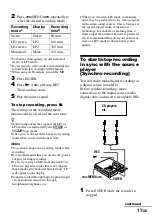
Page 17: ... etc When you record in LP4 mode momentary noise may be produced on very rare occasions with certain sound sources This is because of the special digital audio compression technology that enables a recording time 4 times longer than normal If noise is produced it is recommended that you record in normal stereo or LP2 mode to obtain better sound quality To start stop recording in sync with the sour...

Page 18: ...ng Recording may not be done properly Even when there is no recorded sound on the sound source there may be cases when recording does not pause automatically during synchro recording due to the noise level emitted from the sound source If a silent portion is encountered for 2 seconds or more during synchro recording a new track mark is automatically added at the point where the silent portion ends...

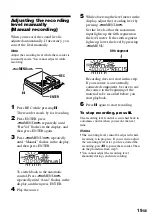
Page 19: ...eter in the display adjust the recording level by pressing MENU Set the level so that the maximum input lights up the fifth segment on the level meter If the sixth segment lights up lower the level by pressing MENU Recording does not start in this step If your source is an externally connected component be sure to cue the source to the beginning of the material to be recorded before you start play...

Page 20: ... changes as follows LapTim elapsed time r RecRem remaining time for recording 1 r AllRem remaining time after the current location 2 1 REC REMAIN start flashing in the display when the remaining time for recording become 3 minutes or less 2 Appears only when the recorder is stopped 3 Press ENTER The display changes as follows z If you want to check the playing position or track name while playing ...

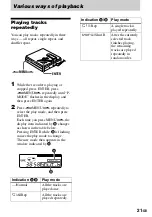
Page 21: ... then press ENTER Each time you press MENU the display item indicated by B changes as shown in the table below Pressing ENTER while B is flashing causes the play mode to change The new mode then appears in the window indicated by A Indication A B Play mode Normal All the tracks are played once AllRep All the tracks are played repeatedly MENU ENTER A B 1 Rep A single track is played repeatedly Shuf...

Page 22: ...olume The Mega Bass function does not affects the sound being recorded Protecting your hearing AVLS The AVLS Automatic Volume Limiter System function keeps down the maximum volume to protect your ears 1 Press ENTER press MENU repeatedly until AVLS flashes in the display and then press ENTER again 2 Press MENU repeatedly until ON flashes in the display and then press ENTER When you try to turn the ...

Page 23: ... r AllRem remaining time after current location 3 Press ENTER The display changes as follows z If you want to check the remaining time or the recording position while recording or in stop mode see page 20 Locking the controls HOLD To prevent the buttons from being accidentally operated when you carry the recorder use this function 1 Slide HOLD in the direction of the To unlock the controls Slide H...

Page 24: ...ted equipment the Mega Bass function is operative If you do not want the effect of the Mega Bass function on your recording or the output from the externally connected equipment set BASS to OFF page 22 When recording to an externally connected equipment press VOL repeatedly to adjust the volume level until VOL 27 appears in the display which is optimum for recording to an externally connected equi...

Page 25: ... EDIT flashes in the display and then press ENTER again and Name flash in the display and the recorder plays the selected track repeatedly 2 Press MENU repeatedly until and Erase flash in the display and then press ENTER Erase and ENTER appear alternately in the display To cancel erasing press x 3 Press ENTER The track is erased and the next track starts to play All the tracks after the one erased...

Page 26: ...u want to mark MK ON appears in the display and a track mark is added The track number will increase by one To add track marks while recording Press T MARK at the point you want to add a track mark Note You cannot add track marks during synchro recording Erasing a track mark When you record with analog line input unnecessary track marks may be recorded where recording level is low You can erase a ...

Page 27: ...d through a digital connection and a track recorded through an analog connection If you try to erase such a track mark SORRY appears in the display Moving recorded tracks You can change the order of the recorded tracks Example Move track C from the third to the second track 1 While playing the track you want to move press ENTER press MENU repeatedly until EDIT flashes in the display and then press...

Page 28: ... flash in the display 2 Press ENTER The disc is ready to be labeled 3 Press MENU repeatedly to select a letter and press ENTER The selected letter stops flashing and the cursor moves to the next input position 4 Repeat step 3 and enter all characters of the label name To cancel labeling press x 5 Press ENTER for 2 seconds or more The track or disc is labeled MENU VOL X x ENTER END SEARCH Press To ...

Page 29: ...ed 3 Follow steps 3 to 5 of Labeling a disc during stop To cancel labeling press x Notes When the recording is stopped while labeling a track or a disc during recording or when the recording moves on to the next track while labeling a track the input at that point is entered automatically LP has automatically been added at the beginning of track names for tracks recorded in LP2 or LP4 Relabeling r...

Page 30: ...t can also be potentially dangerous to play your recorder at high volume while walking especially at pedestrian crossings You should exercise extreme caution or discontinue use in potentially hazardous situations Preventing hearing damage Avoid using headphones earphones at high volume Hearing experts advise against continuous loud and extended play If you experience a ringing in your ears reduce ...

Page 31: ... edited To record again slide the tab back so the tab is visible Note on digital recording This recorder uses the Serial Copy Management System which allows only first generation digital copies to be made from premastered software You can only make copies from a home recorded MD by using the analog connections If you have any questions or problems concerning your recorder please consult your neare...

Page 32: ...while the disc indication was rotating quickly Wait until the indication rotates slowly When recording digitally from a portable CD player you did not use AC power or did not disable the anti skip function such as ESP page 12 The analog recording was made using a connecting cord with an attenuator Use a connecting cord without an attenuator page 16 While operating the recorder received a mechanica...

Page 33: ... beginning of the disc and restart playing after checking the track number in the display Playback sound skips The recorder is placed where it receives continuous vibration Put the recorder on a stable place A very short track may cause sound to skip Sound has a lot of static Strong magnetism from a television or such device is interfering with operation Move the recorder away from the source of s...

Page 34: ...e or monaural mode or 48 seconds long recorded in LP4 mode cannot be erased You cannot combine tracks recorded in different recording modes e g a track recorded in stereo and a track recorded in monaural nor can you combine a track recorded with digital connection and a track recorded with analog connection Tracks of under 12 seconds 24 seconds or 48 seconds in length are not counted and so erasin...

Page 35: ...end position from the memory to the disk Wait until this process is completed Do not expose the player to physical shock nor disrupt power supply BUSY You tried to operate the recorder while it was accessing the recorded data Wait until the message goes out in rare cases it may take 2 3 minutes FULL You tried to enter more than 200 letters to label a single track or disc You tried to enter a total...

Page 36: ...playback Insert a recordable MD SAVED You tried to record or edit on a MD with the tab in the record protect position Slide the tab back page 31 SORRY You tried to erase the track mark at the beginning of the first track You tried to erase a track mark to combine tracks the recorder cannot combine a track recorded in stereo and in mono for example You tried to press X or T MARK during synchro reco...

Page 37: ...quirements Sony AC power adaptor connected at the DC IN 3V jack supplied with the European Chinese and Argentine models only 120 V AC 60 Hz U S A Canadian and Taiwan model 230 V AC 50 60 Hz Europe continental model 240 V AC 50 Hz Australian model 220 V AC 50 Hz Chinese model 230 240 V AC 50 Hz U K and Hong Kong model 220 V AC 50 Hz Argentina model 110 220 V AC 60 Hz Korean model 100 240 V AC 50 60...

Page 38: ...yed like regular CDs A laser beam focuses on the pits in the surface of the MD and reflects the information back to the lens in the recorder The recorder then decodes the signals and plays them back as music Recordable MDs Recordable MDs which use magneto optical MO technology can be recorded again and again The laser inside the recorder applies heat to the MD demagnetizing the magnetic layer of t...

Page 39: ...ny music track Premastered MDs are recorded with location addresses corresponding to each music selection Recordable MDs are manufactured with a User TOC Area to contain the order of the music The TOC Table of Contents system is similar to the directory management system of floppy disks In other words starting and ending addresses for all music tracks recorded on the disc are stored in this area T...

Page 40: ...Sony Corporation Printed in Japan Sony Corporation Printed in Malaysia This warranty is valid only in the United States ...

Reviews: