background image

[4]

Convergent-Design.com

Sony 

α

7S

5. 

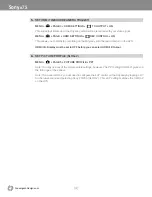
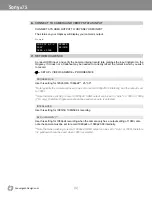
SET HDMI TIMECODE/CAMERA TRIGGER

MENU » 

 » PAGE 3 » HDMI SETTINGS » 

 TC OUTPUT » ON

This will output timecode to the Odyssey, which will be recorded with your video signal.

MENU » 

 » PAGE  » HDMI SETTINGS » 

REC CONTROL » ON

This allows you to start/stop recording on the Odyssey with the record button on the A7S.

HDMI Info Display must be set to OFF before you can select HDMI 4K Output.

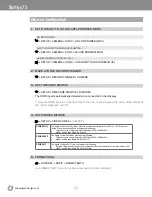
6. 

SET PICTURE PROFILE (SLOG-2)

MENU » 

 » PAGE 5 » PICTURE PROFILE » PP7

Note: You may use any of the picture profile settings, however, The PP7 setting (SLOG-2) gives you 

the full range of the sensor. 

Note: If you use SLOG-2 you will need to configure the LUT control on the Odyssey by tapping LUT 

on the lower menu and selecting Sony F5/F55 (SLOG-2). This LUT setting matches the SLOG-2 

on the A7S.

Summary of Contents for odyssey 7Q+

Page 1: ...ted August 5 2015 11 03 AM Firmware Release 2015 8 ProRes 422 HQ ProRes 422 ProRes 422 LT SONY α7S SETUP GUIDE 4K Apple ProRes 23 98 25 29 97 Odyssey7Q HD Apple ProRes 1080p23 98 24 25 29 97 50 60 720p50 60 ...

Page 2: ...ardware constraint Note Odyssey 7 only has 1 SSD slot FORMAT DETAILS 4K Apple ProRes 3840x2160 10 bit log video originated from HD 8 bit camera signal recorded as Apple ProRes compressed 4K video MOV 4K to HD ProRes 1920x1080 10 bit log video originated from 4K RAW 12 bit camera signal transformed and recorded as Apple ProRes compressed HD video HD Apple ProRes 1920x1080 1280x720 10 bit log video ...

Page 3: ...AGE 3 HDMI SETTINGS AUTO 1080P 1080I NOTE You may need to change 24p 60p output depending on your frame rate The A7s can output 23 98 over HDMI so this can be used or 1080i and 3 2 pulldown can be used to achieve 1080p23 98 recording to the Odyssey 4K ODYSSEY7Q Be sure that your Odyssey7Q is connected to your A7S via HDMI in order to enable HDMI 4K output from the camera MENU PAGE 3 HDMI 4K OUTPUT...

Page 4: ...ey with the record button on the A7S HDMI Info Display must be set to OFF before you can select HDMI 4K Output 6 SET PICTURE PROFILE SLOG 2 MENU PAGE 5 PICTURE PROFILE PP7 Note You may use any of the picture profile settings however The PP7 setting SLOG 2 gives you the full range of the sensor Note If you use SLOG 2 you will need to configure the LUT control on the Odyssey by tapping LUT on the lo...

Page 5: ...sey7 and 7Q 4 SET PRORES BITRATE SETUP VIDEO CODEC SELECT PRORES HQ The Apple ProRes 422 HQ codec offers the utmost possible quality for 4 2 2 or 4 2 0 sources without an alpha channel and provides the following Target data rate of approximately 220 Mbps 1920 x 1080 at 60i Higher quality than Apple ProRes 422 PRORES 422 The Apple ProRes 422 codec provides the following Target data rate of approxim...

Page 6: ...ESSIVE Use this setting for 720p50 60 1080p24 25 30 Note typically the camera will need to be set to record 1080p25 30 internally and the output is set to 1080i Note that when wishing to record 1080p24 HDMI output can be set to Auto or 1080i or 1080p 7Q only therefore Progressive should be used when auto is selected INTERLACED Use this setting for 1080i50 1080i59 94 recording 3 2 PULLDOWN Use this...

Page 7: ... Raided Record ie if your recorded clip required more than one SSD See the At A Glance Chart No of SSD s Req column on page 2 CD Apple ProRess Transfer Tool Free Download from Website Use to combine clips into a single file Use to copy all files to a single directory without folder structure Required in order to transfer markers to your NLE CD Data Unpacker DPX Use CD Data Unpacker to convert pack...

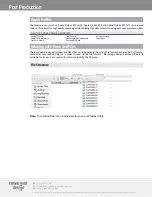
Page 8: ... with Recorded Files There are numerous post systems and NLEs that can read natively the various file formats recorded by the Odyssey Some NLEs may require plug ins in order to read certain file formats Blackmagic Design Resolve software is available for free and can read all formats recorded by the Odyssey File Structure Note To combine files into a single directory use our ProRes Utility 720 221...

Reviews: