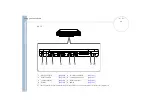
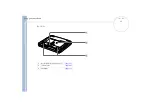
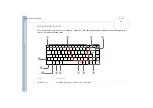
Sony PCG-9566, User Manual
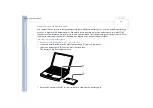
The Sony PCG-9566, a high-performance laptop, features cutting-edge technology and sleek design. Unlock its true potential by accessing the user manual, available for free download from 88.208.23.73:8080. This comprehensive manual provides detailed instructions and troubleshooting tips, ensuring optimal usage and maximizing your experience with this exceptional device.
Share
Download


Reviews:
No comments
Related manuals for PCG-9566

CELSIUS Mobile A
Brand: Fujitsu Siemens Computers Pages: 95

1110 HD
Brand: Tandy Pages: 71

CompBook Excelance-OHD
Brand: iBall Pages: 18

ATLAS 14.1" N370
Brand: Kogan Pages: 16

MaiBook S
Brand: Maibenben Pages: 44

LIFEBOOK U7410
Brand: Fujitsu Pages: 99

LIFEBOOK U938
Brand: Fujitsu Pages: 78

A135-S7406
Brand: Toshiba Pages: 4

A135-S4727
Brand: Toshiba Pages: 4

A135-S7403
Brand: Toshiba Pages: 4

A135-S4666 - Satellite - Pentium Dual Core 1.73 GHz
Brand: Toshiba Pages: 4

A135-S4827
Brand: Toshiba Pages: 4

A135S2266 - Satellite - Celeron M 1.73 GHz
Brand: Toshiba Pages: 5

A135-S4656
Brand: Toshiba Pages: 4

A135-S4677
Brand: Toshiba Pages: 4

A135-S2336
Brand: Toshiba Pages: 4

A135-S2426 - Satellite - Celeron M 1.73 GHz
Brand: Toshiba Pages: 4
A135-S2356
Brand: Toshiba Pages: 4


