background image

Using the System and Application Recovery CDs

%'

Using the Application Recovery CD(s)

The Application Recovery CD(s) allows you to reinstall individual 
applications and device drivers if they are corrupted or accidentally 
erased. Reinstalling an individual device driver or software title may 
correct a problem you are experiencing with your computer, and you may 
not need to recover the entire contents of your hard drive. If you do need 
to reinstall all the software titles that shipped with your computer, use the 
System Recovery CD(s). See “Using the System Recovery CD(s)” on 
page 77. 

You can also use the Application Recovery CD to install Windows NT® 
Workstation 4.0 drivers on your computer. 

To use the Application Recovery CD(s)

1

Turn on your computer. If your computer is already on, close all 
applications.

2

When the Windows desktop appears, insert the Sony Application 
Recovery CD in the DVD-ROM drive. The Application Recovery 
utility loads automatically.

3

When the Application Recovery menu appears, select the icon for the 
application you want to restore and then follow the on-screen 
instructions to complete the recovery process.

You must be in Windows to run the Application Recovery CD. The application will not run from 

DOS. If you have any questions on using the Application Recovery CD, contact Sony Customer 

Support.

Your system may include one or two Application Recovery CDs. If you have two Application 

Recovery CDs, insert the first CD to run the Application Recovery program. You may be 

prompted to insert the second CD, depending on the application you wish to restore.

Summary of Contents for PCG-F580

Page 1: ...VAIO Notebook User Guide PCG F540 PCG F540K PCG F560 PCG F560K PCG F570 PCG F580 PCG F580K PCG F590 PCG F590K ...

Page 2: ...e an additional charge Subscriptions to online service providers may require a fee and credit card information Financial services may require prior arrangements with participating financial institutions As an ENERGY STAR Partner Sony Corporation has determined that this product meets the ENERGY STAR guidelines for energy efficiency The International ENERGY STAR Office Equipment Program is an inter...

Page 3: ...enir tout risque d incendie ou d électrocution garder cet appareil à l abri de la pluie et de l humidité Pour prévenir tout risque d électrocution ne pas ouvrir le châssis de cet appareil et ne confier son entretien qu à une personne qualifiée Ne jamais effectuer l installation de fil modem ou téléphone durant un orage électrique Ne jamais effectuer l installation d une prise téléphonique dans un ...

Page 4: ...correct the interference by one or more of the following measures Reorient or relocate the receiving antenna Increase the separation between the equipment and the receiver Connect the equipment into an outlet on a circuit different from that to which the receiver is connected Consult the dealer or an experienced radio TV technician for help Pour changer la pile de rechange veuillez contacter votre...

Page 5: ...nce of service may be required But if advance notice is not practical the telephone company will notify the customer as soon as possible Also you will be advised of your right to file a complaint with the FCC if you believe it is necessary The telephone company may make changes in its facilities equipment operations or procedures that could affect the operations of the equipment If this happens th...

Page 6: ... areas the disposal of lithium ion batteries in household or business trash may be prohibited Do not handle damaged or leaking lithium ion batteries Ne pas manipuler les batteries au lithium ion qui fuient ou sont endommagées Danger of explosion if battery is incorrectly replaced Replace only with the same or equivalent type recommended by the manufacturer Discard used batteries according to the m...

Page 7: ...ity or electrician as appropriate NOTICE The Ringer Equivalence Number REN assigned to each terminal device provides an indication of the maximum number of terminals allowed to be connected to a telephone interface The termination on an interface may consist of any combination of devices subject only to the requirement that the sum of the Ringer Equivalence Numbers of all the devices does not exce...

Page 8: ...ments lui même il doit avoir recours à un service d inspection des installations électriques ou à un électricien selon le cas AVIS L indice d équivalence de la sonnerie IES assigné à chaque dispositif terminal indique le nombre maximal de terminaux qui peuvent être raccordés à une interface La terminaison d une interface téléphonique peut consister en une combination de quelques dispositifs à la s...

Page 9: ...tors 8 Front 8 Left 9 Right 10 Back 10 Bottom 11 Connecting a Power Source 12 Using the AC Adapter 12 Notes on the AC Adapter 12 Starting Your Computer 18 Shutting Down Your Computer 19 Using the Keyboard 21 Combinations and Functions with the Windows Key 23 Indicators 24 Using the Touchpad 27 Using the Floppy Disk Drive 28 Using the DVD ROM Drive 31 Using the CD RW drive PCG F570 only 34 ...

Page 10: ...eral Devices 51 Connecting a Phone Line 52 Connecting the Port Replicator 53 Using Ethernet to Connect to a Network 57 Setting Up Your Ethernet Connection 57 Connecting a Printer 58 Connecting an External Display 59 Connecting an External Mouse or Keyboard 62 Connecting External Speakers 64 Connecting an External Microphone 65 Connecting a Digital Video Camera Recorder 66 Connecting a Universal Se...

Page 11: ...NE Adding Memory 81 Specifications 85 Index 89 ...

Page 12: ...NEE ...

Page 13: ...oftware Multimedia features Enjoy the stereo speakers or use a headphone not supplied to listen to audio and video CDs Microsoft Windows operating system Your system includes Microsoft Windows 98 Second Edition or Microsoft Windows 2000 Professional Communications Access popular online services send e mail browse the Internet and use fax features Digital Versatile Disc DVD This new optical storage...

Page 14: ... on how to get the most from your computer find help and solve common problems It also includes product specifications The V AIO Consumer Information Guide contains ergonomic considerations and your computer s limited warranty statement The Microsoft Windows 98 Second Edition Getting Started manual or Microsoft Windows 2000 Professional Getting Started manual explains how to use the basic features...

Page 15: ...Unpacking Your Notebook Software CDs Microsoft Word 2000 Other Setting up your VAIO Notebook poster Packet containing special product offers ...

Page 16: ... ...

Page 17: ...r as a portable device in a variety of environments Whenever possible you should attempt to apply the following ergonomic considerations to both stationary and portable environments Position of your computer Place the computer directly in front of you as you work Keep your forearms horizontal with your wrists in a neutral comfortable position while using the keyboard touchpad Computer positioned d...

Page 18: ...ion where windows and lights do not create glare and reflection on the display Use indirect lighting to avoid bright spots on the display You can also purchase accessories for your display that help reduce glare Proper lighting adds to your comfort and work effectiveness Placement of an external display When using an external display set the display at a comfortable viewing distance Make sure the ...

Page 19: ...radio signals and may cause interference to radio or TV reception Should this occur relocate the computer a suitable distance away from the set Use only specified peripheral equipment and interface cables otherwise problems may result Do not use cut or damaged connection cables Your computer will not work with party lines cannot be connected to a coin operated telephone and may not work with multi...

Page 20: ...r computer and then unplug it You may want to have the computer checked by qualified personnel before operating it any further Do not drop the computer or place heavy objects on top of the computer Locating Controls and Connectors Front LCD Liquid Crystal Display screen page 25 Battery 1 and 2 indicators pages 14 24 Speakers pages 25 64 Hard disk drive indicator page 24 Keyboard page 21 Num Lock i...

Page 21: ...Controls and Connectors Left i LINK S400 connector page 66 Microphone connector pages 60 65 Infrared port page 42 PC card slots page 37 Video out Battery bay page 13 Headphone connector pages 60 64 1 5 2 6 3 7 4 ...

Page 22: ...e 31 Certain specifically configured systems may come with a CD RW drive instead of a DVD drive Power button Multipurpose drive bay pages 28 46 49 Modem jack page 52 Monitor connector page 59 Mouse Keyboard connector page 62 USB connectors page 68 Serial connector DC In connector page 12 Printer connector page 58 1 3 2 4 cover 1 5 2 6 3 7 4 ...

Page 23: ...s a ventilation slot located between the USB connector and the DC In connector Do not cover the ventilation slot when your computer is on Port replicator connector cover pages 54 56 Tilt stands Multipurpose drive bay RELEASE lever pages 48 50 1 3 2 ...

Page 24: ... other power consuming equipment such as a copy machine or shredder You can purchase a power strip with a surge protector This device prevents damage to your computer caused by sudden power surges such as those that may occur during an electrical storm Do not place heavy objects on the power cord To disconnect the cord pull it out by the plug Never pull the cord itself Unplug your computer from th...

Page 25: ...s not fully charged at the time of purchase Follow the steps below to insert and charge the battery pack To insert the battery pack 1 Open the cover of the battery bay 2 Insert the battery pack into the battery bay on the left side of the computer 3 Close the cover of the battery bay until it clicks When attaching your computer to the port replicator do not attempt to insert or remove the battery ...

Page 26: ...ery Information in the online manual Customizing Your V AIO Notebook for information on checking the battery life There are two battery indicator lights on the computer Battery Indicator Meaning 1 Indicates the status of the battery pack in the battery bay on the left side of the computer 2 Indicates the status of the battery pack in the multipurpose drive bay on the right side of the computer Bat...

Page 27: ...ould either attach the AC adapter to recharge the battery or shut down your computer and insert a fully charged battery You can extend battery life by changing the power management modes in the PowerPanel utility See Using Power Saving Modes on page 44 The battery pack supplied with your computer is a lithium ion battery and can be recharged at any time Charging a partially discharged battery does...

Page 28: ...attery pack heats up This is normal and is not cause for concern Keep the battery pack away from all sources of heat Keep the battery pack dry Do not open or try to disassemble the battery pack Do not expose the battery pack to any mechanical shock If you are not using the computer for an extended period of time remove the battery pack from the computer to prevent damage to the battery If after fu...

Page 29: ...Connecting a Power Source If you have not used the battery pack for a considerable amount of time recharge the battery ...

Page 30: ... indicator light turns on 3 If necessary adjust the brightness controls for the LCD display To decrease the brightness press Fn F5 and then the down or left arrow key To increase the brightness press Fn F5 and then the up or right arrow key If you hold the power button in the On position for more than four seconds the computer turns off LCD lock lever Power button Power button Power indicator ...

Page 31: ...r a window Do not scratch the LCD or exert pressure on it This could cause malfunction To avoid potential loss of data follow these steps to shut down your computer Respond to any prompts warning you to save documents If you are unable to shut down your computer using the steps described above press the Ctrl Alt Delete keys at the same time to restart the computer If you are unable to restart the ...

Page 32: ...rature the screen returns to normal The screen becomes warm during operation This is normal and does not indicate a malfunction The LCD is manufactured using high precision technology You may however see tiny black points and or bright points red blue or green that continuously appear on the LCD This is a normal result of the manufacturing process and does not indicate a malfunction ...

Page 33: ...the screen Correction keys The Insert Back Space and Delete keys enable you to make corrections in your documents Function keys The twelve function keys along the top of the keyboard are used to perform designated tasks For example in many applications F1 is the Help key The task associated with each function key may vary from one application to the next Escape key The Esc Escape key is used to ca...

Page 34: ...s on a typewriter it is used to produce capital letters or special symbols such as and Windows key The key with the Windows logo displays the Windows Start menu it is the equivalent of clicking the Start button on the taskbar See Combinations and Functions with the Windows Key on page 23 Fn key The Fn key is used in combination with other keys to issue commands See Combinations and Functions with ...

Page 35: ...hen Files or Folders from the Start menu Ctrl F Displays the Windows Find Computer window where you can locate other computers This is the equivalent of selecting Find and then Computer from the Start menu M Minimizes all displayed windows Shift M Returns all minimized windows to their previous size R Displays the Run window This is the equivalent of selecting Run from the Start menu Fn Insert Dis...

Page 36: ...computer Hard disk Lights when data is being read from or written to the hard drive Do not enter System Suspend mode or turn off the computer when this indicator light is on Light On Off Num Lock The number keys in the numeric keypad are active The alphanumeric character keys in the keypad area are active Caps Lock The letters appear in uppercase as you type The Shift key lowers the case of typed ...

Page 37: ...olume To increase volume press Fn F4 then or To decrease volume press Fn F4 then or Fn F5 Brightness control Adjusts the brightness of the LCD To increase light intensity press Fn F5 and then or To decrease light intensity press Fn F5 and then or Fn F6 Contrast control Adjust the screen contrast PCG F420 only Fn F7 Switch to the external monitor LCD Toggles through the LCD external display connect...

Page 38: ...ystem power is turned off To return the system to its original state use the power button to turn on power Fn D Video standby Turns off the LCD to save power To turn the LCD back on press any key Windows 98 only Fn S System Idle Puts the system into System Idle mode a power management state To return the system to the active state press any key Some functions are not available until Windows launch...

Page 39: ...enu of context sensitive choices Drag Slide one finger while pressing the left button Scroll Move your finger along the right edge of the touchpad to scroll vertically Move your finger along the bottom to scroll horizontally The scroll function is available only with applications that support a touchpad scroll feature See Mouse Help for information on touchpad features such as clicking both button...

Page 40: ...side facing up 2 Gently push the diskette into the drive until it clicks into place To remove a diskette When you finish using the diskette wait until the LED indicator light turns off and then press the Eject button to remove the diskette Do not press the Eject button when the LED indicator is turned on Otherwise data may be lost Floppy disk drive Diskette Eject button LED indicator ...

Page 41: ...dialog box select the appropriate option and then click Stop 4 Confirm the device and click OK 5 A message appears informing you that the device can now be safely removed from the system Slide the RELEASE lever on the bottom of the computer in the direction of the arrow and then unplug the floppy disk drive from the computer To reinsert the floppy disk drive 1 Turn off the computer 2 If another de...

Page 42: ...Guide 3 Insert the floppy disk drive into the multipurpose drive bay with the VAIO label facing up Continue pushing the drive into the bay until the RELEASE lever locks into place Multipurpose drive bay Floppy disk drive ...

Page 43: ...with the label side facing up For DVD ROMs which can be played on both sides the side of the disc facing up is the side that plays Push the disc onto the hub until the disc clicks into place When the computer is in System Suspend or System Hibernation mode you cannot insert a disc See Controlling Power Management in the online manual Customizing Your VAIO Notebook for more information on System Su...

Page 44: ...online manual Customizing Your VAIO Notebook for more information about System Suspend and System Hibernation modes If the disc does not come out when you press the Eject button turn off the computer and insert a thin pointed object into the manual eject hole The DVD player automatically adjusts the screen properties when you play a DVD movie Depending on the display setup properties you have sele...

Page 45: ...IO Notebook On Handling CD and DVD media Do not touch the surface of the disc Do not drop or bend the disc On Cleaning CD and DVD media Fingerprints and dust on the surface of a disc may cause read errors Proper care of the disc is essential to maintain its reliability Do not use solvents such as benzine thinner commercially available cleaners or anti static spray as they may cause damage to the d...

Page 46: ...otebook computer s performance PCGA CDRWX1W Drive Specifications Compatible discs CD RW CD R CD ROM CD ROM XA Photo CD multi session CD DA music CD Video CD CD Extra CD CD TEXT Electronic Book Disc diameter 12 cm 4 3 4 in 8 cm 3 in reading only Drive performance Data transfer rate Max 20X speed reading CD ROM CD R 14X speed reading CD RW 4X speed writing 1X speed 150 KB s Access time Average 1 3 s...

Page 47: ...ss follow the instructions included with your software For more information consult the online manuals for these applications PCGA CDRWX1W Drive Specifications Drive performance Storage temperature 4 F to 140 F 20 C to 60 C temperature gradient less than 18 F 10 C hour Storage humidity 10 to 90 not condensed provided that humidity is less than 20 at 140 F 60 C hygrometer reading of less than 95 F ...

Page 48: ...tebook does not support 1x writing speed If you use CD RW or CD R writing software other than DirectCD use PowerPanel to select the DVD Profile Memory resident disk utilities may cause unstable operation or data loss Deactivate these utilities before writing data to a disc Exit anti virus software before writing data to a disc When using Easy CD Creator Standard be sure to close and exit all other...

Page 49: ...patible with Card Bus Some PC cards may require that you disable idle devices when using the PC card You can use Sony Notebook Setup to disable devices See Displaying the Sony Notebook Setup Screen in the online manual Customizing Your VAIO Notebook for details Be sure to use the most recent software driver provided by the PC card manufacturer If an mark appears on the Device Manager tab in the Sy...

Page 50: ...rd into the slot as this may damage the connector pins If you have difficulty inserting a card check that you are inserting the card with the correct orientation See the manual that came with your PC card for more information on use For some PC cards if you alternate between normal power operation and the System Suspend or System Hibernation power management modes while the card is inserted you ma...

Page 51: ... Hardware dialog box select the appropriate option and then click Stop 4 Confirm the device and click OK 5 A message appears informing you that the device can now be safely removed from the system 6 Press the PC card RELEASE button to remove the PC card Cleaning Your Notebook Make sure to disconnect the power cord before cleaning the computer Avoid rubbing the LCD screen as this can damage the scr...

Page 52: ...eys PPK at the top of you keyboard are shortcut buttons that can be programmed to carry out a variety of computer operations automatically If you wish you can use the VAIO Action Setup software to change the Programmable Power Keys preset functions See the online manual Customizing Your V AIO Notebook for details Internal Timer The VAIO Action Setup software allows you to set your computer s inter...

Page 53: ...bles compatible with your VAIO notebook include cables with the following part numbers VMC IL4415 a 1 5 meter cable with a 4 pin connector at each end VMC IL4615 a 1 5 meter cable with a 4 pin connector at one end and a 6 pin connector at the other and VMC IL4408A a 0 8 meter cable with a 4 pin connector at each end You can purchase these cables through VAIO Direct http www sonydirect com notebook...

Page 54: ...ocated on the left side You can use this port to communicate with other infrared equipped devices with compatible protocols such as a digital still camera or other computers To use infrared communication with another computer Align the infrared ports on the two computers so that they are in a direct line ...

Page 55: ... disable infrared communication Do not use the icon in the taskbar Check the Status tag of the Infrared Monitor in the Windows Control Panel to determine if the infrared device is detected If the two devices are too far apart or too close together data transfer may be interrupted or there may be noise in the transmission Do not cover the infrared ports with your hand or any other object Avoid dire...

Page 56: ...e power management setting you select Normal Mode This is the normal state of your computer when it is in use The green power indicator light is on in this mode To save power you can turn off a specific device such as the LCD or the hard disk System Idle Mode This mode is convenient if you do not need to use your computer for a brief period The hard disk and video display enter a low power state a...

Page 57: ...tion mode Press Fn F12 The Save to Disk Manager screen appears and then the computer enters System Hibernation mode You can also use the PowerPanel utility to enter System Hibernation mode To return to normal mode Turn on the computer by pressing the power button The computer returns to its previous state Time to return to normal mode System Idle requires less time than System Suspend and System S...

Page 58: ...ging by observing the battery indicator lights To insert a second battery pack 1 If another device is in the multipurpose drive bay remove the device 2 Insert the battery pack into the multipurpose drive bay If the battery is being used the battery 2 indicator light turns on 3 Attach the weight saver to the computer to stabilize the battery pack There is a RELEASE lever on the bottom of the weight...

Page 59: ...he battery indicator flashes while the battery is charging See also To charge the battery pack on page 14 for more information To determine the amount of time the battery lasts see Displaying Battery Information in the online manual Customizing Your VAIO Notebook Second battery pack not supplied Battery indicators Battery pack supplied ...

Page 60: ...ving is on right click the battery icon on the task tray and click the Switch discharge battery option 1 There is a Release lever on the bottom of the weight saver To remove the battery pack slide this lever in the direction of arrow 1 then slide the RELEASE lever on the bottom of the computer in the direction of arrow 2 2 Remove the weight saver and then pull out the battery pack 3 Reinsert the w...

Page 61: ...her device is in the multipurpose drive bay remove the device See or To remove the second battery pack on page 48 2 Fold out the hinged arm of the weight saver and then push on the hinged arm to lock it into place Slide the weight saver in the direction of the arrow until it clicks 3 Manually lock the weight saver s Release lever Weight saver supplied ...

Page 62: ...emove the weight saver slide this lever in the direction of arrow 1 then slide the Release lever on the bottom of the computer in the direction of arrow 2 2 After removing the weight saver pull out the weight saver s hinged arm and fold it into the weight saver Arrow 1 Weight saver Release lever Arrow 2 Release lever ...

Page 63: ...ouse or keyboard page 62 External speakers page 64 External microphone page 65 Digital video camera recorder page 66 Universal Serial Bus USB device page 68 Before you connect peripherals turn off the computer and all peripherals You do not need to turn off your computer to connect USB devices Connect the power cord only after connecting all cables Turn on the computer only after turning on all pe...

Page 64: ...r Support you must connect to a phone line You must register your computer to receive the extended warranty Your computer does not work with party lines cannot be connected to a coin operated telephone and may not work with multiple phone lines or a private branch exchange PBX Some of these connections may result in excess electrical current and could cause a malfunction in the internal modem If y...

Page 65: ... USB page 68 Monitor page 59 Printer page 58 Serial DC In page 12 Mouse Keyboard page 62 The port replicator can be powered only with an AC power adapter Do not remove the AC adapter from the port replicator or the AC outlet while using the port replicator this may cause data damage or hardware malfunctions When you attach your computer to the port replicator for the first time the installation of...

Page 66: ...connect all peripherals 2 On the bottom of the computer slide the port replicator connector cover open 3 Attach the bottom of the computer to the port replicator connector until it clicks When attaching your computer to the port replicator do not attempt to insert or remove the battery pack Lifting and turning the computer with an attached port replicator could cause a temporary loss of power Port...

Page 67: ...or on the port replicator Plug the power cord into the AC adapter and an AC outlet The power indicator light turns green 5 Turn on the computer Use the AC adapter that comes with your computer or the optional Sony PCGA ACX1 adapter AC adapter Power cord Port replicator connector Power Release lever ...

Page 68: ...ort replicator to disengage the computer from the port replicator 3 Lift the computer away from the port replicator 4 Close the port replicator connector cover on the bottom of your computer It is extremely important to close the port replicator connector cover after removing your computer from the port replicator If the cover is left open dirt may get inside and damage the computer Lever ...

Page 69: ...add a client adapter protocol or service 3 Click File and Print Sharing to enable these functions 4 Select a Primary Network Logon 5 Click the Identification tab to set the computer name workgroup and computer description 6 Click the Access Control tab to set the share level or user level access control Windows 2000 models To connect to the network 1 Right click My Network Places and select Proper...

Page 70: ...n the computer See the manual that came with your printer for more information on installation and use If your printer stops functioning after resuming from a power saving mode see I cannot print on page 75 Before using the printer you may need to change the Printer setting in the Sony Notebook Setup software See Displaying the Sony Notebook Setup Screen in the online manual Customizing Your VAIO ...

Page 71: ...age 60 To connect a computer display Use the symbol on the back of the computer to locate the Monitor connector Plug the display cable not supplied into this connector on the back of the computer If necessary plug one end of the display power cord into the display and the other end into an AC outlet See the manual that came with your computer display for more information on installation and use Co...

Page 72: ...ctor Plug the speaker cable into this connector 3 Use the symbol to locate the Microphone connector Plug the microphone cable into this connector To connect a projector You can use a projector such as the Sony LCD Projector as an external display See the manual that came with your multimedia computer display for more information on installation and use See the manual that came with your projector ...

Page 73: ...nitor or both devices Use the Fn F7 keys to select a display See also Selecting the Display Mode in the online manual Customizing Your V AIO Notebook for more information To Press Result Switch to an external display Fn F7 Toggles between the LCD the external display connected to the Monitor connector or both the LCD and external display Only LCD LCD and external display Only external display ...

Page 74: ...oard Plug the keyboard cable or mouse cable into the appropriate connector with the mark facing up To connect both a PS 2 mouse and keyboard at the same time use an optional PS 2 division connector You can also use one or both of the USB ports to connect a mouse and keyboard at the same time Mouse Keyboard USB PS 2 ...

Page 75: ...ur mouse or keyboard for more information on installation and use Before you connect or disconnect the mouse or keyboard turn off the computer Do not connect or disconnect the PS 2 device keyboard or mouse when the computer is on It may cause malfunction A Sony USB mouse PCGA UMS1 not supplied is a USB device You must connect it to the USB connector ...

Page 76: ...tor Plug the speaker cable into this connector Make sure your speakers are designed for computer use Turn down the volume of the speakers before you turn them on Do not place diskettes on the speakers the speakers magnetic field may damage the data on the diskettes See the manual that came with your speakers for more information on installation and use Speakers Speaker cable supplied with speakers...

Page 77: ... external microphone Use the to locate the Microphone connector Plug the microphone cable into this connector Make sure your microphone is designed for computer use The microphone should be compliant with the plug in power microphone See the manual that came with your microphone for more information on installation and use Microphone to Microphone optional ...

Page 78: ...e not supplied into the i LINK connector on the left side of the computer and the other end into the DV In Out connector on the digital video camera recorder The Sony digital video camera recorder is pictured you may need to connect your camera differently On Sony digital video cameras connectors labeled DV In Out or i LINK are i LINK compatible Digital video camera recorder i LINK cable to i LINK...

Page 79: ...meras The i LINK connector on the computer does not supply power to external devices If the external device requires power from the i LINK connector you cannot use the device with the computer The computer supports transfer rates up to 400 Mbps however the actual transfer rate is the lowest transfer rate of the external device The i LINK features available may vary depending on the software applic...

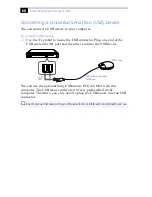
Page 80: ...e USB cable into this port and the other end into the USB device You can use the optional Sony USB mouse PCGA UMS1 with this computer The USB mouse software driver is preinstalled in the computer Therefore you only need to plug the USB mouse into the USB connector See the manual that came with your USB device for more information on installation and use to USB device USB USB connecting cable optio...

Page 81: ...ged the computer into a power strip or UPS make sure the power strip or UPS is turned on and working If you are using an external display check that it is plugged into a power source and turned on Check that the brightness and contrast controls are adjusted correctly See the manual that came with your display for details Moisture condensation may have occurred Do not use the computer for at least ...

Page 82: ... appears 4 Press the arrow keys to select the Exit menu 5 Press the arrow keys to select Get Default Values and then press the Enter key The message Load default configuration now appears 6 Check that Yes is selected then press the Enter key 7 Press the arrow keys to select Exit Save Changes and then press the Enter key The message Save configuration changes and exit now appears 8 Check that Yes i...

Page 83: ... CD ROM stop the DVD ROM CD ROM and restart the computer by pressing Ctrl Alt Delete My software program locks up or crashes Contact the software publisher or designated provider for technical support See either the printed or the online version of Read Me First for a complete list of phone numbers My DVD ROM drive tray does not open Make sure the computer is turned on Press the Eject button on th...

Page 84: ... to read the disc If necessary reboot the computer remove the disc and then check that it is not dirty or damaged When I click an application icon a message appears such as You must insert the application CD into your CD ROM drive and the software does not start Some titles require specific files that are located on the application s CD ROM Insert the disc and try starting the program again Make s...

Page 85: ...or Sony Customer Support My modem connection is slow Your notebook comes with a 56K V 90 compatible modem Many factors influence modem connection speed including telephone line noise or compatibility with telephone equipment such as fax machines or other modems If you think your modem is not connecting properly to other PC based modems fax machines or your Internet Service Provider check the follo...

Page 86: ...multiple i LINK devices the combination of the connected devices may cause unstable operation In this case turn off the power to all connected devices and disconnect unused devices Check the connection then turn on the power again My touchpad interprets a single tap as a double click Click the Mouse icon in the Control Panel and then change the button assignments in the Mouse Properties dialog box...

Page 87: ...ange it to ECP See Displaying the Sony Notebook Setup Screen in the online manual Customizing Your V AIO Notebook for details on using Sony Notebook Setup Your connected printer may not function after the computer resumes from a power saving mode When this occurs follow the procedures below to reset the printer connection 1 Right click the My Computer icon on the desktop and then select Properties...

Page 88: ...ls for preinstalled software are located on your hard disk drive as online help files You can access the online help files from the Help menu in the specific application A printed manual is available for some applications 5 Sony PC Support Provides instant access to information on commonly encountered problems Enter a description of your problem and the Knowledge Database searches for the correspo...

Page 89: ...came with your computer without formatting the hard disk Word 2000 must be restored from the enclosed CD ROM Full Restore with Format formats the hard disk drive and then restores all the original software If your hard drive is partitioned into C and D drives the computer offers you the option to reformat the drive into a single partition Word 2000 must be restored from the enclosed CD ROM Operati...

Page 90: ...elect Get Default Values and then press the Enter key The message Load default configuration now appears 5 Check that Yes is selected then press the Enter key 6 Press the arrow keys to select Exit Save Changes and then press the Enter key The message Save configuration changes and exit now appears 7 Check that Yes is selected then press the Enter key The computer restarts from the Recovery CD Cert...

Page 91: ... To use the Application Recovery CD s 1 Turn on your computer If your computer is already on close all applications 2 When the Windows desktop appears insert the Sony Application Recovery CD in the DVD ROM drive The Application Recovery utility loads automatically 3 When the Application Recovery menu appears select the icon for the application you want to restore and then follow the on screen inst...

Page 92: ... ...

Page 93: ...lead contacts The procedures described below assume familiarity with the general terminology associated with personal computers and with the safety practices and regulatory compliance required for using and modifying electronic equipment Disconnect the system from its power source and from any telecommunications links networks or modems before you open the system or follow any of the procedures de...

Page 94: ... memory module package until you are ready to install the module The package protects the module from ESD Use the special bag for preventing ESD or use aluminum foil when you store the memory module PCG F540 PCG F540K PCG F560 PCG F560K PCG F570 Typical expansion memory configuration PCG F580 PCG F580K PCG F590 PCG F590K Typical expansion memory configuration To remove a memory module 1 Shut down ...

Page 95: ... 6 Tighten the screw on the bottom of the computer To install a memory module 1 Follow steps 1 to 4 of To remove a memory module 2 Remove the memory module from its packaging Your computer comes with a memory module installed in the memory slot To upgrade your memory you will need to remove this module from the slot before installing your upgrade memory screw 1 Pull the tabs in the direction of th...

Page 96: ...er 2 Click the Start button point to VAIO and click Sony Notebook Setup The Sony Notebook Setup screen appears 3 Click the About This Computer tab to view the amount of system memory If the additional memory is not shown repeat steps 1 4 in To install a memory module 1 Slide the memory module into the slot 2 Press the module into place until it clicks ...

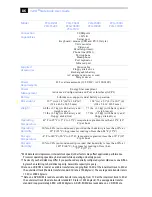
Page 97: ...with 3 MB Video RAM 6MB video supports 3D graphics Sound Capabilities 16 bit CD quality stereo sound Diskette Drive Removable 3 5 1 44 MB DVD ROM Drive Reads CD data from 10 3X to 24X variable transfer rate Reads DVD data from 1 7X to 8X variable transfer rate Laser Diode Properties CD ROM Wavelength 795nm laser output 16 5uW CD RW Wavelength 780nm laser output 0 112mW DVD ROM Wavelength 780 nm an...

Page 98: ...e RJ 11 Microphone Headphone Port replicator Infrared port Supplied Accessories Video cable Floppy disk drive Rechargeable battery AC adapter and power cord Weight saver Power Requirements 49 5 watts maximum 19 5V DC AC 120 240V Power Management Energy Star compliant Advanced Configuration and Power Interface ACPI Battery Lithium ion supports dual battery operation Dimensions 12 7 w x 1 8 h x 10 4...

Page 99: ...d at thickest point The thinnest height for PCG F540 PCG F540K PCG F560 PCG F560K PCG F570 is 1 4 35 8 mm The thinnest height for PCG F580 PCG F580K PCG F590 PCG F590K is 1 5 38 5 mm If a region code warning appears when you are using the DVD player it could be that the DVD ROM you are trying to play is incompatible with the DVD ROM drive in your VAIO notebook Region code indicators such as a 1 or...

Page 100: ... ...

Page 101: ...removing 16 46 48 brightness adjusting 18 25 built in speakers 8 See also speakers 25 buttons Eject 31 32 left 8 right 8 Start Windows 98 19 C cables phone 8 power cord 12 cameras digital video recorder 66 canceling commands 21 Caps Lock 8 indicator light 24 CD ROM DVD ROM discs ejecting 32 inserting 31 troubleshooting 71 CD ROMs cleaning 33 handling 33 charge status indicator light 14 charging ba...

Page 102: ...ys 22 customer assistance support options 76 D DC In 12 53 digital still camera 42 digital video camera 66 disconnecting port replicator 56 diskettes ejecting 28 handling 29 inserting into drive 28 troubleshooting 72 display options 61 See also monitor selecting 61 disposal of lithium ion battery vi drives floppy disk 8 installing additional hard disk 37 DV devices troubleshooting 74 DV In Out 66 ...

Page 103: ...cation devices 42 other computers 42 infrared port 42 infrared transmission active distance 43 troubleshooting 43 input devices v Insert key 22 inserting battery pack 13 CD ROM DVD ROM discs 31 diskettes into drive 28 installation 6 installing hard drives 37 hardware 51 memory module 83 peripherals 51 interference iv internal speakers See speakers K keyboard 22 53 connector 8 10 L LCD 8 lock lever...

Page 104: ... drive tray 31 operator keys 22 output devices v adding 58 P party phone lines 52 PBX 52 PC card inserting 37 release button 37 removing 39 slot protector 38 slots 37 troubleshooting 75 phone cable 8 connecting line 52 jack 52 laws governing v port replicator connecting 53 54 disconnecting 56 lever 56 network 53 power 24 cord 12 indicator light 8 switch 18 power saving modes 44 System Hibernation ...

Page 105: ...button 19 starting computer 18 startup problems 19 switching display 25 monitor 25 System Hibernation mode 26 45 System Idle mode 26 44 System Recovery CD 77 System Suspend mode 25 45 T technical support support options 76 touchpad 8 27 74 troubleshooting 69 startup 19 69 turning on computer 18 TV interference iv U unpacking the computer 2 USB connecting 68 connector 10 53 68 mouse 68 V ventilatio...

Page 106: ... ...

Reviews: