S
o
ft
wa
re
Guide
Using Click To DVD*
66
❑
Select the left clip of the pair to be combined, and then click
Combine selected clip with next clip
task
.
Alternatively, click the
Combine
button between the clips to be combined.
The combined clips become an individual chapter on the DVD.
❑
To rearrange the order that clips appear in on the DVD:
❑
Select the clips to be moved, and then click where you want the clips to appear.
Alternatively, drag the clips to be moved to the position where you want the clips to appear.
❑
To delete clips from your DVD project:
❑
Select the clip to be deleted, and then click the
Send this clip to the Recycle Bin
task.
Alternatively, drag the clip to be deleted to the Recycle Bin.
❑
To restore a clip, click the
Recover clips from Recycle Bin
task, and then select the clip to be restored
to the clip tray in the dialog box that appears.
Previewing videos
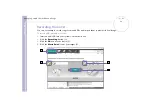
You can play back a clip by using the
Clip Playback Control
buttons. The video clip that is currently being
played appears in the monitor.
To play all clips in order, click
Play All
.
✍
You can also play only selected clips by selecting them before clicking
Play All
.
Although a black screen appears between successive clips when multiple clips are played, this black screen is not included when you write the clips
to DVD.
Importing still images
When creating a photo album or slide show DVD, you can import pictures from your computer's hard disk
drive or from an external device, such as a digital still camera or a Memory Stick™. You can import pictures
saved in Bitmap, JPEG, or TIFF format.

