Connecting an i.LINK digital video recorder
You can connect an i.LINK digital video (DV) recorder when the computer is on or off. Connecting the DV recorder when the
computer is in a power saving mode (Standby or Hibernate) may cause the computer to malfunction.
Before you connect an i.LINK digital video recorder
Do not connect more than one digital video camera recorder at a time. The preinstalled programs on your computer
will not recognize multiple cameras.
Do not connect an external device that requires power from the i.LINK port. The i.LINK port does not supply power
to the external device.
The i.LINK port supports transfer rates of up to 400 Mbps; however, the actual transfer rate is the lowest transfer
rate of the external device.
The i.LINK features available may vary depending on the programs you use. See the help guide that accompanied
your program for more information.
To connect an i.LINK digital video recorder
1.
Turn on the digital video (DV) device and the computer.
2.
Plug the i.LINK
®
cable into the i.LINK port on the DV device.
3.
Plug the other end of the i.LINK cable into the i.LINK port on your computer. The
Found New Hardware
window
appears on the lower right corner of your screen.
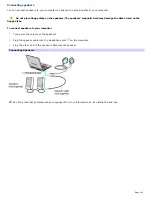
Connecting an i.LINK Digital Video Cam era Recorder
See the guide that accompanied your digital video camera recorder for more information on its installation and use.
Page 109
Summary of Contents for PCG-K14 - VAIO - Pentium 4 2.8 GHz
Page 44: ...Page 44 ...
Page 49: ...4 Lift the disc from the drive 5 Push the drive tray gently to close it Page 49 ...
Page 52: ...Page 52 ...
Page 64: ...Printer Connections Printing With Your Computer Page 64 ...
Page 84: ...Floppy Disk and PC Card Connections Using a Floppy Disk Drive Using PC Cards Page 84 ...
Page 96: ...Mice and Keyboards Using the Keyboard Connecting External Mice and Keyboards Page 96 ...
Page 99: ...equivalent of clicking the right mouse button Page 99 ...


