background image

VAIO® Computer Quick Start

58

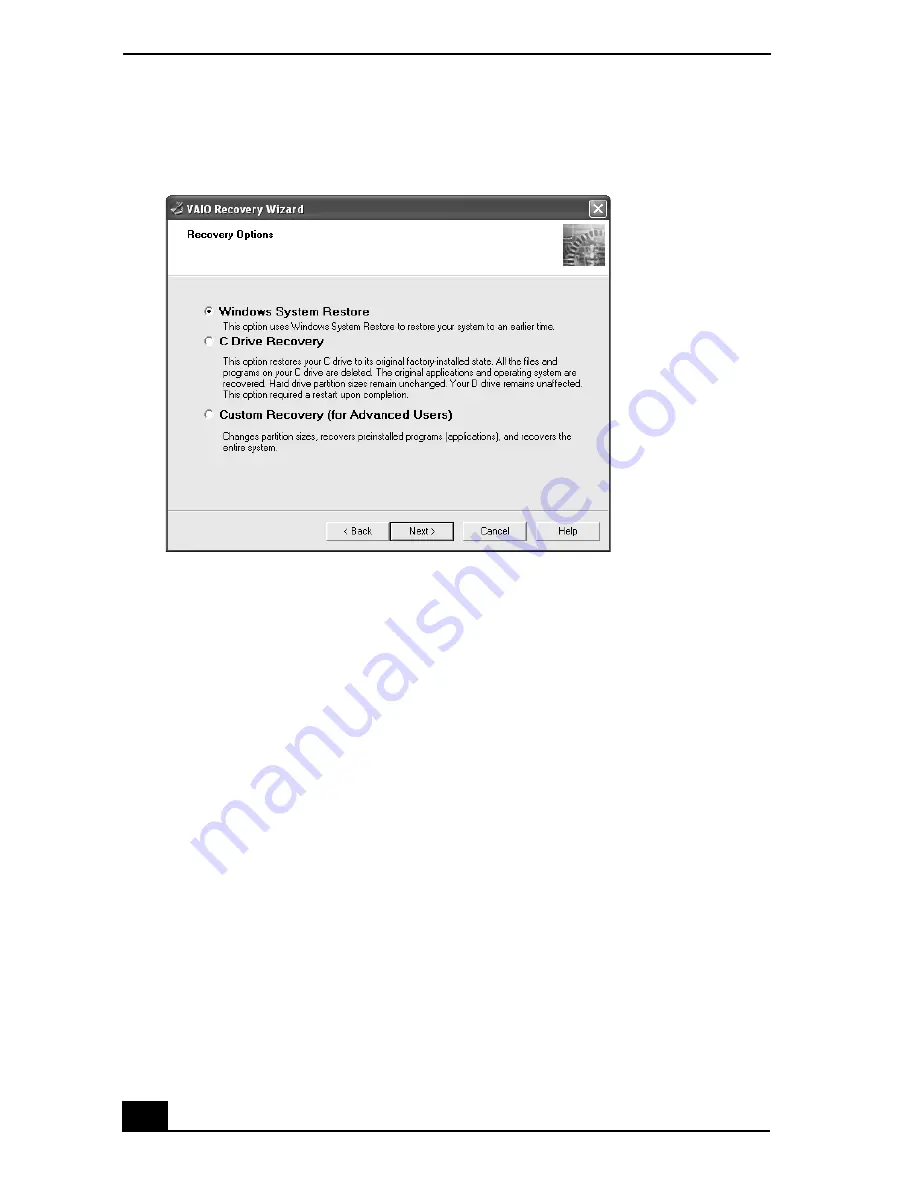
To recover drive C

1

Start the VAIO Recovery Wizard, and click 

Next

.

2

Select 

Proceed with System Recovery

, and click 

Next

If using the Recovery Media Kit, skip this step.

3

Select 

C Drive Recovery

, and click 

Next

.

VAIO Recovery Wizard — Selecting Windows System Restore

Summary of Contents for PCG-V505BC

Page 1: ...VAIO Computer Quick Start PCG V505B Series ...

Page 2: ......

Page 3: ...g On Your Computer 26 Using the Touch Pad 29 Registering Your Computer 31 Locating Your VAIO Computer User Guide 32 Setting Up A Dial Up Connection 34 Turning Off Your Computer 36 Expanding Your Computing Power 39 Upgrading Memory 40 Locating Preinstalled Programs 40 VAIO Recovery Options 41 About Recovery Options 42 About the Recovery Media Kit 44 ...

Page 4: ... for Your Computer 57 Storing Your Computer 58 Using Cables and Connections 58 Cleaning Your Computer 59 Handling the LCD Screen 59 Troubleshooting 61 Troubleshooting Your Computer Windows XP 62 Troubleshooting Your Computer Windows 2000 67 Support Options 71 Index 73 ...

Page 5: ...oftware owned by Sony and licensed by third parties Use of such software is subject to the terms and conditions of license agreements enclosed with this product Some of the software may not be transported or used outside the United States Software specifications are subject to change without notice and may not necessarily be identical to current retail versions Updates and additions to software ma...

Page 6: ...NK PC peripherals to your system such as a CD RW or hard disk drive confirm their operating system compatibility and required operating conditions All other trademarks are trademarks of their respective owners End User Product Activation Requirements Certain software product s included with this computer may include features such as copy protection and content management technology Use of the soft...

Page 7: ...die ou d électrocution garder cet appareil à l abri de la pluie et de l humidité Pour prévenir tout risque d électrocution ne pas ouvrir le châssis de cet appareil et ne confier son entretien qu à une personne qualifiée Ne jamais effectuer l installation de fil modem ou téléphone durant un orage électrique Ne jamais effectuer l installation d une prise téléphonique dans un endroit mouillé à moins ...

Page 8: ...quency energy and if not installed and used in accordance with the instructions may cause harmful interference to radio communications However there is no guarantee that interference Pour changer la pile de rechange veuillez contacter votre centre de service Sony le plus près Avertissement L utilisation d instruments optiques avec ce produit augmente les risques pour les yeux Puisque le faisceau l...

Page 9: ...to determine the number of devices which may be connected to the telephone line Excessive RENs on the telephone line may result in the devices not ringing in response to an incoming call In most but not all areas the sum of the RENs should not exceed five 5 0 To be certain of the number of devices that may be connected to the line as determined by the total RENs contact the telephone company to de...

Page 10: ...ify this transmitter device Any unauthorized change made to this device could void your authority to operate this device IC RSS 210 Canada FOR MODELS WITH WIRELESS LAN Operation is subject to the following two conditions 1 this device may not cause interference and 2 this device must accept any interference including interference that may cause undesired operation of the device To prevent radio in...

Page 11: ...In order to program this information into your facsimile machine see your fax software documentation Telephone Consumer Guidelines Canada Please refer to your telephone directory under Privacy Issues and or Terms of Service For more detailed information please contact CRTC Terrasses de la Chaudière Tour centrale 1 promenade du Portage 5 étage Hull PQ K1A 0N2 This Class B digital apparatus complies...

Page 12: ...only with the same or equivalent type recommended by the manufacturer Discard used batteries according to the manufacturer s instructions The battery pack used in this device may present a fire or chemical burn hazard if mistreated Do not disassemble heat above 140 F 60 C or incinerate Dispose of used battery promptly Keep away from children Ne pas utiliser des batteries au lithium ionisé qui sont...

Page 13: ...only to the requirement that the sum of the Ringer Equivalence Numbers of all the devices does not exceed five AVIS DE L INDUSTRIE CANADA REMARQUE Cet équipement est conforme aux Spécifications Techniques des Équipements Terminaux d Industrie Canada en vigueur Le Nombre Équivalent de Sonneries REN de cet équipement terminal est 0 2 Le REN attribué à chaque équipement terminal indique le nombre max...

Page 14: ...VAIO Computer Quick Start 14 ...

Page 15: ...purchase of the Sony VAIO computer Sony has combined leading edge technology in audio video computing and communications to provide state of the art personal computing Unpacking Your Computer Applying Ergonomics Locating Controls and Ports ...

Page 16: ...omputer for immediate use VAIO Computer Specifications Windows XP An on screen file that details the hardware specifications and lists the installed programs on your computer See Locating Your VAIO Computer User Guide on page 32 for more information VAIO Computer Specifications Windows 2000 A printed sheet that details your computer s hardware specifications Microsoft Windows guide Explains how to...

Page 17: ...npacking Your Computer 17 Recovery CDs are not included with your computer Instead a hard disk drive recovery program is built into your computer For more information see VAIO Recovery Options on page 41 ...

Page 18: ...your feet are flat on the floor A footrest may make you more comfortable Sit in a relaxed upright posture and avoid slouching forward or leaning far backward Viewing angle of the computer s display Tilt the display to find the best viewing angle Also try adjusting the brightness setting of the display Following these suggestions can reduce eye strain and muscle fatigue Lighting Choose a location w...

Page 19: ...ttery indicator 3 Keyboard 11 Hard disk drive indicator 4 Touch pad 12 Wireless LAN indicator 5 Left and right buttons 13 Num lock indicator 6 Memory Stick media indicator 14 Caps lock indicator 7 Power switch 15 Scroll lock indicator 8 Wireless LAN switch Wireless LAN capabilities are available on selected models only 4 ...

Page 20: ...omputer Quick Start 20 Back 1 Battery port Left 1 DC IN port 6 i LINK IEEE 1394 S400 port 2 Air vent 7 Microphone jack 3 Monitor VGA port 8 Headphone jack 4 PC Card eject button 9 PC Card slot 5 USB 2 0 port ...

Page 21: ...TX cables to the Network Ethernet port Do not connect any other type of network cable or any telephone line to this port Connecting cables other than those listed above may result in an electric current overload and could cause a malfunction excessive heat or fire in the port To connect the unit to a network refer to your on screen VAIO Computer User Guide or contact your network administrator See...

Page 22: ...VAIO Computer Quick Start 22 Removing the Protective Tabs Gently pull the protective tabs away from the computer to find the Ethernet port and modem jack Protective tab ...

Page 23: ...Locating Controls and Ports 23 Bottom 1 Port replicator connector 4 Reset button 2 Battery UNLOCK LOCK latch 5 Air vent 3 Battery RELEASE latch ...

Page 24: ...VAIO Computer Quick Start 24 ...

Page 25: ... support options You ll also learn how to locate your on screen VAIO Computer User Guide which contains step by step instructions for operating your computer Turning On Your Computer Using the Touch Pad Registering Your Computer Locating Your VAIO Computer User Guide Setting Up A Dial Up Connection Turning Off Your Computer ...

Page 26: ... Powering Your Computer in your on screen VAIO Computer User Guide for more information about using batteries See also Locating Your VAIO Computer User Guide on page 32 To charge the battery 1 Switch the UNLOCK LOCK latch on the bottom of the computer to the UNLOCK position 2 Align the grooves on the battery with the tabs on the back of the computer and slide the battery toward the computer until ...

Page 27: ... See To connect the AC adapter Once you connect the AC adapter to the computer the battery begins to charge whether the computer is on or off The battery indicator shows the battery status The indicator blinks as the battery charges See Powering Your Computer in your on screen VAIO Computer User Guide for more information Inserting the Battery Battery Grooves ...

Page 28: ...apter and an AC outlet To open and turn on the computer 1 Slide the release latch to the right and lift the cover while holding the bottom of the computer firmly Connecting the AC Adapter to the Computer Use only the supplied AC adapter with your computer Opening the Computer DC IN port AC adapter supplied Power cord supplied Release latch ...

Page 29: ...then press the Up Arrow key or Right Arrow key To decrease brightness press the Fn F5 keys and then press the Down Arrow key or Left Arrow key Using the Touch Pad The computer contains a pointing device called a touch pad You can point to select drag and scroll objects on the screen using the built in touch pad Turning on the Computer If you hold the power switch to the right the computer turns of...

Page 30: ...ing one finger while pressing the left button Equivalent to using the mouse to drag an item Moving your finger along the right edge of the touch pad Equivalent to scrolling vertically The scroll function is available only with programs that support a touch pad scroll feature Moving your finger along the bottom to scroll horizontally Equivalent to scrolling horizontally The scroll function is avail...

Page 31: ...tension Protect your investment See the Warranty Card for more details Product Information Notification By giving Sony your contact information you will enable Sony to reach you regarding performance updates and upgrades You are prompted to register your computer the first time you turn on the unit Follow the on screen instructions to complete the registration process If you are not able to regist...

Page 32: ...indows XP 1 Click Start on the Windows taskbar and then click Help and Support The Help and Support Center window appears displaying information about your VAIO computer and Microsoft Windows operating system Batteries PC Cards and Floppy Disks Internet and Networking Optical Drives CDs and DVDs Port Replicators if applicable Printing Audio Video Features Preinstalled Programs Mice and Keyboards M...

Page 33: ...ter To open the user guide Windows 2000 Click Start on the Windows taskbar point to VAIO Help Center and click VAIO User Guide The VAIO User Guide appears VAIO User Guide Windows XP 1 User guide table of contents List of computer help topics 2 Link to Electronic Flyer List of updates and supplemental information 3 Link to VAIO Computer Specifications List of specifications and programs ...

Page 34: ...up a dial up connection Windows XP 1 Connect a telephone cable to your computer See Setting up a dial up Internet connection in the Internet and Network Connections chapter of your on screen VAIO Computer User Guide 2 Click Start point to All Programs Accessories Communications and then click New Connection Wizard The New Connection Wizard appears VAIO User Guide Windows 2000 1 User guide table of...

Page 35: ...Setting Up A Dial Up Connection 35 3 Click Next 4 If it is not already selected click Connect to the Internet 5 Click Next 6 Follow the on screen instructions New Connection Wizard ...

Page 36: ...uter Using the power switch to turn off your computer may result in loss of data Follow the steps below to properly turn off your computer and avoid losing data To turn off your computer 1 Close all operations 2 Click Start on the Windows taskbar 3 Windows XP Click Turn Off Computer at the bottom of the Start menu to display the Turn off computer window and select Turn Off Windows 2000 Click Shut ...

Page 37: ...rompts warning you to save documents During a period of inactivity you can conserve battery life by using power saving modes See Conserving Power Management in the VAIO Computer User Guide for more information If you are unable to turn off the computer slide and hold the power switch until the computer turns off This operation may result in data loss ...

Page 38: ...VAIO Computer Quick Start 38 ...

Page 39: ...39 Expanding Your Computing Power This section helps you get started upgrading computer memory and locating information about preinstalled programs Upgrading Memory Locating Preinstalled Programs ...

Page 40: ...ed Programs Your computer comes with a variety of preinstalled audio video programs The following sources offer a list of preinstalled programs descriptions and information VAIO Computer Specifications Windows XP The on screen file details your computer s hardware specifications and lists preinstalled programs descriptions and support information See Locating Your VAIO Computer User Guide on page ...

Page 41: ...mputer You can also use this utility to create a Recovery Media Kit The Recovery Media Kit enables you to reclaim hard drive space and return your computer to normal operation About Recovery Options About the Recovery Media Kit Using the VAIO Recovery Wizard This program repairs or replaces software For any hardware problems contact a Sony authorized repair facility ...

Page 42: ...re Return your computer s operating system to a previous working state by performing a System Restore You can access this recovery option by starting the VAIO Recovery Wizard or by using the Windows XP System Restore Wizard Recover drive C Returns the drive C to its original factory installed settings All previous data and settings on drive C are deleted You can preserve data on other partitions s...

Page 43: ...rams start the VAIO Recovery Wizard from the Windows XP Start menu or from the Recovery Media Kit You can access this option by using Disc 1 from your Recovery Media Kit Perform a complete hard disk drive recovery Completely recover your computer s hard disk drive This option recovers drives C and D and the hidden recovery drive To perform a complete hard disk drive recovery start the VAIO Recover...

Page 44: ... DVDs DVD R or DVD R Your VAIO computer must be equipped with a DVD RW1 or DVD RW drive Up to 12 recordable CDs CD R Your VAIO computer must be equipped with a CD RW drive Before you begin creating the Recovery Media Kit prepare your computer for the process as follows Close all open programs Disconnect all network connections Disconnect all peripheral devices Do not interrupt the power Disable an...

Page 45: ... click the VAIO Recovery Wizard The VAIO Recovery Wizard appears 2 Read the on screen information Click Next 3 Select Create Recovery Media Kit Strongly Recommended and click Next You can start the VAIO Recovery Wizard by double clicking the VAIO Recovery Wizard icon in the Windows taskbar notification area The VAIO Recovery Wizard ...

Page 46: ... VAIO computer must be equipped with a DVD RW1 or DVD RW drive Up to 12 recordable CDs CD R Your VAIO computer must be equipped with a CD RW drive 5 Click Next Your computer s optical drive tray opens automatically 6 Insert a blank disc into the drive and close the drive Click Next The CD creation process begins A window with a progress bar appears VAIO Recovery Wizard Selecting Create Recovery Me...

Page 47: ...tion To order the Recovery Media Kit 1 Go to the Sony Direct Accessories and Parts Center Web site at http servicesales sel sony com 2 Enter your computer s model number for example PCV XXX and click List Parts and accessories 3 Follow the online instructions to order the Recovery Media Kit The time required to create each CD or DVD may vary depending on your optical drive s recording speed If you...

Page 48: ... the available menu options To access the VAIO Recovery Wizard from the Recovery Media Kit 1 Press the power switch on the computer to turn on the power 2 Open the optical drive and place the Startup Recovery Disc in the optical drive 3 Close the drive 4 Turn off your computer 5 Wait for approximately 30 seconds and then turn on the computer 6 When prompted insert the Recovery Disk 1 into the opti...

Page 49: ...hen you see the VAIO logo appear on the computer s screen briefly press the F10 key 4 Click Next 5 Choose one of the available menu options Using the VAIO Recovery Wizard To use Windows System Restore from the VAIO Recovery Wizard 1 Start the VAIO Recovery Wizard and click Next 2 Select Proceed with System Recovery and click Next 3 Select Windows System Restore and click Next 4 Follow the on scree...

Page 50: ...e C 1 Start the VAIO Recovery Wizard and click Next 2 Select Proceed with System Recovery and click Next If using the Recovery Media Kit skip this step 3 Select C Drive Recovery and click Next VAIO Recovery Wizard Selecting Windows System Restore ...

Page 51: ...hard disk drive 1 Start the VAIO Recovery Wizard and click Next 2 Select Proceed with System Recovery and click Next If you are using the Recovery Media Kit skip step 2 3 Select Custom Recovery for Advanced Users and click Next 4 Select C and D Drive Recovery and click Next If you are using the Recovery Media Kit you have two choices for this recovery option Keep the Recovery Drive Recommended VAI...

Page 52: ... recovery When it is finished click Next 7 Click Finish and the computer restarts To recover software applications 1 Start the VAIO Recovery Wizard and click Next 2 Select Proceed with System Recovery and click Next If using the Recovery Media Kit skip this step VAIO Recovery Wizard Selecting the C and D Drive Recovery option Computers that come equipped with Giga Pocket software do not allow you ...

Page 53: ...ct the check box for each software program you want to recover Click Next You may need to use the scrollbar to view all available software programs If you select the Application Recovery option you cannot return to the system recovery portion of the VAIO Recovery Wizard without restarting your computer VAIO Recovery Wizard Selecting Application Recovery ...

Page 54: ...ge When the selected software has been recovered the Application Recovery Complete window appears 7 If you want to recover additional software click Back The Application Recovery window appears with a listing of the available software titles 8 Click Finish Your computer restarts VAIO Recovery Wizard Selecting applications If the recovered software does not function properly or you see an installat...

Page 55: ...te Recovery and click Next 10 You may see installation wizards messages and prompts Follow the instructions provided in each wizard and respond to each prompt or message Your computer may restart 11 When the optical drive ejects remove the disc Close the drive and click Next Your computer may restart several times Additional Information Certain software such as DVgate Plus software automatically s...

Page 56: ...VAIO Computer Quick Start 64 ...

Page 57: ...57 Caring for Your Computer This section provides information on how to safely use your Sony computer Storing Your Computer Using Cables and Connections Cleaning Your Computer Handling the LCD Screen ...

Page 58: ...t 8 inches 20 cm behind the back of the computer If the computer is brought directly from a cold location to a warm one moisture may condense inside your computer In this case allow at least one hour before turning on your computer If any problems occur unplug your computer and contact your Sony Service Center The computer uses high frequency radio signals and may interfere with radio or TV recept...

Page 59: ...as this can damage the screen Use a soft dry cloth to wipe the LCD screen or canned compressed air Always disconnect the power cord before cleaning the computer Handling the LCD Screen Direct sunlight can damage the LCD Be careful when using the computer near a window Do not scratch the LCD or exert pressure on it This can cause a malfunction Using the computer in low temperature conditions may pr...

Page 60: ...VAIO Computer Quick Start 60 ...

Page 61: ...computer For more troubleshooting topics refer to the VAIO Computer User Guide Many problems have simple solutions so refer to these sources before you contact Sony Computing Support http www sony com pcsupport Troubleshooting Your Computer Windows XP Troubleshooting Your Computer Windows 2000 Support Options ...

Page 62: ... the AC adapter and remove the battery Wait one minute Reattach the AC adapter and reinsert the battery Turn on the power Condensation may cause the computer to malfunction If this occurs do not use the computer for at least one hour If the computer still does not turn on follow these steps 1 Unplug the power cord and remove the battery 2 Use a thin straight object such as a paper clip to press th...

Page 63: ...loppy disk drive if applicable If a non bootable floppy disk is in the drive 1 Remove the floppy disk 2 Restart the computer and confirm that the Microsoft Windows operating system starts properly If Windows still does not start follow these steps to initialize the BIOS 1 If there is a disk in the floppy disk drive then remove it 2 Turn off the computer 3 Remove any peripheral devices connected to...

Page 64: ... Manager dialog box appears click Turn Off from the Shut Down menu If your computer still does not turn off press and hold the power button or slide and hold the power switch until the computer turns off If your computer stops responding while playing a CD or DVD press the Ctrl Alt Delete keys simultaneously You can turn off the computer from the Windows Task Manager Remove the AC adapter and batt...

Page 65: ... at a high speed to cool the CPU By lowering the CPU speed you also lower the speed and noise level of the computer s fan If your computer comes with the PowerPanel utility1 use it to lower the CPU speed If your computer does not come with the PowerPanel utility use the power schemes to lower the CPU speed To lower the CPU fan speed using the PowerPanel utility 1 On the Windows taskbar right click...

Page 66: ...ly 5 Click OK Why does the System Properties dialog box display a slower CPU speed than the maximum This is normal Because your computer s CPU utilizes a type of CPU speed controlling technology for power conservation purposes System Properties may display the CPU s current speed instead of the maximum speed Why don t my changes appear on the computer screen LCD You may need to refresh the compute...

Page 67: ...th your display for details Disconnect the AC adapter and remove the battery Wait one minute Reattach the AC adapter and reinsert the battery Turn on the power Condensation may cause the computer to malfunction If this occurs do not use the computer for at least one hour If the computer still does not turn on follow these steps 1 Unplug the power cord and remove the battery 2 For models with a res...

Page 68: ...isk drive if applicable If a non bootable floppy disk is in the drive 1 Remove the floppy disk 2 Restart the computer and confirm that the Microsoft Windows operating system starts properly If Windows still does not start follow these steps to initialize the BIOS 1 If there is a disk in the floppy disk drive then remove it 2 Turn off the computer 3 Remove any peripheral devices connected to the co...

Page 69: ...Windows Security dialog box appears click Shut Down and select Shut Down again from the Shut Down Windows window If your computer still does not turn off press and hold the power button or slide and hold the power switch until the computer shuts down If your computer stops responding while playing a CD or DVD press the Ctrl Alt Delete keys simultaneously You can turn off the computer from the Wind...

Page 70: ...Delete keys simultaneously The Windows Security dialog box appears 2 Press the Right Arrow key to select Shut Down 3 Press Enter 4 Press R to select restart 5 Press Enter 4 If this procedure does not work press and hold the power button or slide and hold the power switch until the computer shuts down Why don t my changes appear on the computer screen LCD You may need to refresh the computer screen...

Page 71: ... Microsoft Windows operating system For operating system support you can visit Microsoft customer support at http support microsoft com directory 4 VAIO Support Agent You can find VAIO Support Agent by clicking Start and All Programs Programs for Windows 2000 and VAIO Support and VAIO Support Agent Using advanced diagnostic technology Sony s VAIO Support Agent runs scheduled protections of your pr...

Page 72: ...VAIO Computer Quick Start 72 ...

Page 73: ...n 59 online support 71 specifications 16 specifications online 33 storage 58 troubleshooting 62 67 turning off 36 turning on 26 unpacking 16 updates 33 34 connecting dial up 34 controls 19 brightness 29 creating Recovery Media Kit 45 D DC IN port 20 dial up connection 34 E Electronic Flyer 33 34 Energy Star 5 Ethernet port 21 removing protective tab 22 F F10 recovery 49 faxes laws governing 11 H h...

Page 74: ...one jack 20 modem jack 21 laws governing 11 Monitor VGA port 20 N network connector 21 num lock 19 O online support 71 online user guide 32 ordering Recovery Media Kit 47 output devices 9 P partition recovery 51 PC Card slot 20 phone laws governing 11 ports battery 20 DC IN 20 i LINK 20 USB 20 21 VGA monitor 20 power indicator light 19 power source 26 power switch 29 programs locating 40 recoverin...

Page 75: ...19 specifications 16 specifications online 33 starting Recovery Wizard 48 starting computer 26 startup problems 37 support Sony 61 switch power 19 T technical support 61 telephone line jack 21 touchpad 19 using 29 troubleshooting 62 67 startup 37 turning off computer 36 turning on computer 26 TV interference 9 U UNLOCK LOCK latch 23 unpacking the computer 16 updates 33 34 USB port 20 21 user guide...

Page 76: ...http www sony com vaio Printed in USA 2003 Sony Electronics Inc 4 676 768 01 ...

Reviews: