background image

Camera Features and Functions

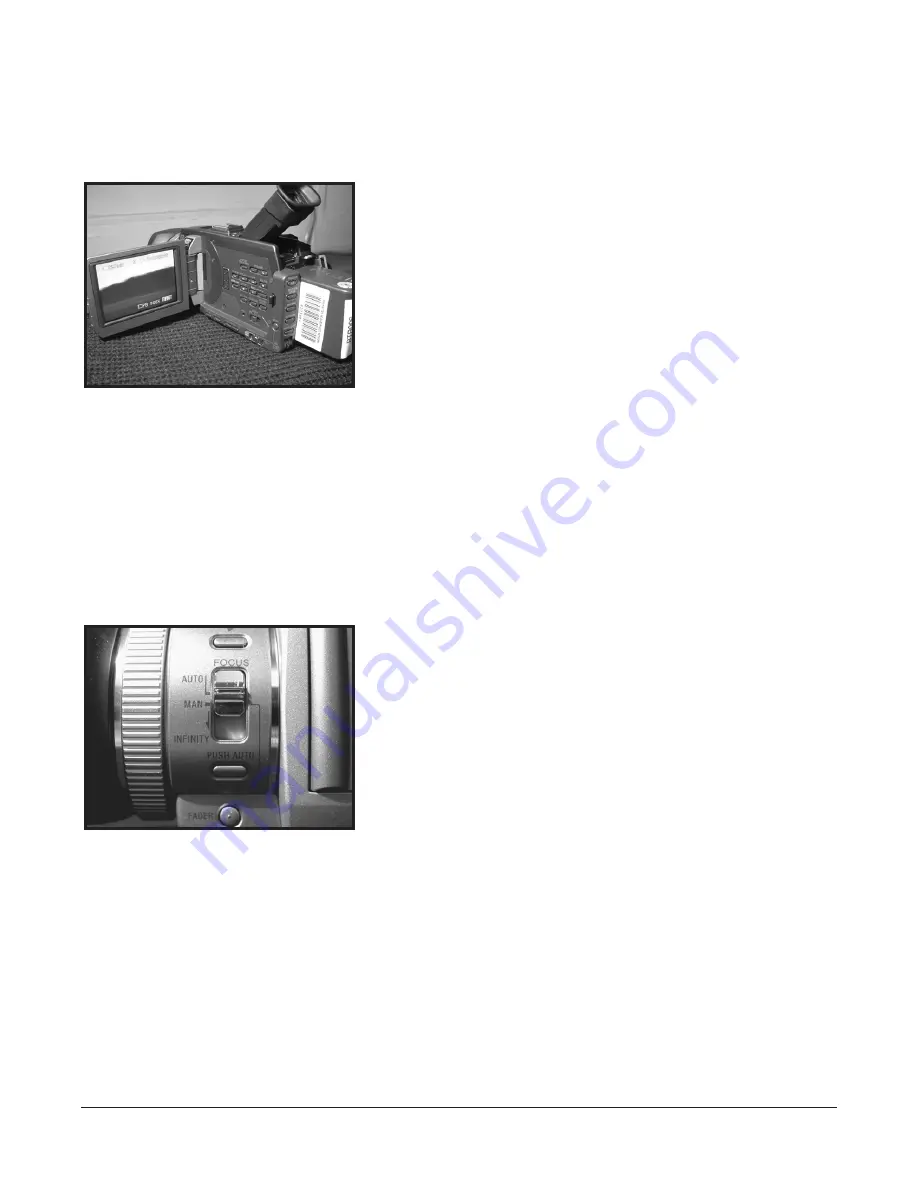
THE LCD SCREEN

Take care of the LCD screen...

1. Do not touch the surface of the screen unless using the provided stylus.

2. Do not lift the camera by the viewfinder or screen.

3. Exposing the screen to sunlight for extended periods may damage it.

AUTO/MANUAL FOCUS

The TROUBLE with auto focus ... is that it doesn't work well under the following conditions:

*

When the subject is not in the center of the picture (particularly when there are moving objects)

*

In low light conditions or if there is a bright light behind the subject (e.g. a window)

*

When the subject is bright (e.g. a car with its head lamps on)

*

When the subject is of low contrast - walls, the sky

*

If the subject is made up of fine repetitive patterns

*

If the subject is behind vertical bars or a chain link fence

*

When another subject passes between the camera and the point of interest

SONY PDX10 Handbook page 6

1. With the FOCUS switch set to AUTO the camera will

automatically focus for you.
2. Set the switch to MANUAL to take control of focusing and

a little hand appears in the viewfinder. (see page 10 for more)
3. The PUSH AUTO button below will automatically focus

the camera on whatever is in the center of the picture. When

you release the button it will revert to the manual mode.
4. When the camera is in INFINITY mode you will see a little

mountain appear.  INFINITY gives you the greatest range of

focus and is generally used for landscapes or when shooting

distant objects. 

1. Once you pull out the LCD screen the viewfinder is auto-

matically switched off.
2. However, the Viewfinder and LCD will be on together when

the screen is turned through 180 degrees.
3. Once the LCD screen is re-housed into the side of the cam-

era the viewfinder becomes operational.
4. When screen is turned through 180 degrees (to be in in

front of camera without a camera person) it drops into "mirror

mode".
5. Using the LCD screen will drain your batteries much faster

than the viewfinder. If you need to be conservative with your

batteries power then you use the viewfinder.

Summary of Contents for PDX10 - DVCAM

Page 1: ...nity Media Grantees 2005 Manhattan Neighborhood Network Writer Designer and Editor Contributing Editors Director of Production Revised for PDX10 Version 1 Ann Theis Ivettza Sanchez Jay Dedman Cyrille Phipp Community Media Dept June 2005 ...

Page 2: ... Playback 9 Microphone 9 Additional Information All About Microphones 10 Recording Onto Digital Tape 11 Time Code Pre Post Roll and Edit Search 12 Batteries and Charging 13 Tripod vs Handheld 14 Camera Composition 15 Camera Angles 17 Camera Movements 18 Interviewing Techniques 19 Sample Treatment 20 Production Stages Planning 21 The Logging and EDL Processes 23 Logging Sheet 24 Appendixes A All Ab...

Page 3: ...e power supply 4 Connect to AC wall outlet SONY PDX10 Handbook page 3 1 Lift the viewfinder 2 Slide the battery in a downward motion until you hear it click into place 1 Locate the lens cap in front of the camera 2 Squeeze gently on the tabs on either side of the lens cap and pull off 3 Secure cap to the hand strap on the side of the camera 4 When finished taping place lens cap back over lens 1 Li...

Page 4: ...lide the OPEN EJECT button in the direction of the arrow to open the tape compartment 2 Insert the tape straight as far as possible into the cassette compartment with the window facing out and the write protect tab facing up 3 First close the inner cassette compartment where it says PUSH 4 After cassette compartment goes down completely close the lid until it clicks ...

Page 5: ...h to VCR The camera should beep and the transport controls illuminate you can use the player recorder to review your tapes by operating the STOP REWIND PLAY FAST FORWARD and PAUSE buttons 2 OFF CHG is the power off position and used to save bat tery You should also use this position when charging a battery 3 Press in the small green button and then rotate the power switch to CAMERA You should now ...

Page 6: ... set to AUTO the camera will automatically focus for you 2 Set the switch to MANUAL to take control of focusing and a little hand appears in the viewfinder see page 10 for more 3 The PUSH AUTO button below will automatically focus the camera on whatever is in the center of the picture When you release the button it will revert to the manual mode 4 When the camera is in INFINITY mode you will see a...

Page 7: ...ot enough Sound level only show you how high or low the sound is not the quality of it Check for clear full sound free of buzzing cut outs and other unwanted noises To search for the next recording point 1 Set the POWER switch is set to STANDBY 2 Open the LCD and locate the Edit search and buttons button to go forward and to go backward 3 Hold down the EDIT SEARCH in STANDBY The recorded portion i...

Page 8: ...ng symbol stops 5 You should notice the white of the card adjust its color temperature to match the light source 6 If needed make other manual adjustments and set the AUTO LOCK HOLD to HOLD Adjusting the shutter speed allows you to adjust the video to make fast action clearer or objects in the dark more visible 1 Press the SHUTTER SPEED button in the rear of the camera 2 Turn the SEL Push EXEC dia...

Page 9: ...urn to camera To view what you have recorded 1 Set the POWER switch button to VCR 2 Open the LCD and press the Rewind Play Fast forward or Stop buttons on the side of the camera If functions like a normal VCR 3 When finished be sure to return the tape back to the position to continue recording 4 Return the POWER switch to OFF or CAMERA The PDX10 comes with two XLR microphone connectors In normal o...

Page 10: ...coil of wire up and down across a magnet creating an electric current This type of microphone does not require a battery or any other power source Condenser mics Condenser mics are constructed from two very thin metal plates one movable and one fixed These plates form a capacitor a capacitor is an electrical device capable of storing an electrical charge When air vibrations make the plates move sm...

Page 11: ...of the microphone Hypercardioid Variations on the cardioid patterns that pick up in a very focused area in front of the microphone 90 90 180 180 180 90 90 0 0 0 90 90 Hyper cardioid Omni directional Cardioid or Uni directional Lavalier Condenser Mic Used for Interviews 635A Handheld Dynamic Mic Used for Street Interviews or Music RE11 Dynamic Mic Best for use in a Mic Stand for interview singing m...

Page 12: ...aying down a sync pulse a generic electronic mark for each frame of video When playing back this type of recording the machine reading the tape counts each mark for each frame of video This allows the machine to keep a total running time when you start at the beginning of a tape with the counter set to zero If you eject the tape or hit reset the machine will lose count In playing back TIME CODE is...

Page 13: ...o OFF CHG Taking care of the batteries Batteries work best between 32 F and 90 F so try to keep them in a warm place when working in cold conditions Keep batteries away from intense heat 140 F Protect from vibration do not drop them Do not immerse in water expose them to heavy rain steam or high humidity If they do get wet remove any excess water and allow to dry naturally Do not put batteries in ...

Page 14: ... The disadvantage is that it will take you a little longer to set up the equipment but your shots will look better for extra effort TIPS ON USING THE TRIPOD Make sure the legs of the tripod are spread out as far as they will go This makes it as stable as possible However for safety you can use a tripod as a monopod by bringing all the legs up together This way no one will trip over it but be sure ...

Page 15: ...ERIOR eg the outside of a building or a landscape 2 Long Shot LS This category includes the FULL SHOT showing the entire human body with the head near the top of the frame and the feet near the bottom 3 Medium Shots MS Contains a figure from the waist up and is normally used for dialogue scenes or to show some detail of action TWO SHOT two figures from the waist up and the THREE SHOT 3 fig ures fr...

Page 16: ...e in the off center placement of your subjects Imagine your picture area divided into thirds both horizontally and verti cally The intersections of these imaginary lines suggest four options for placing the center of interest for good composition and balance with in the picture Head Room Poor head room left gives viewers the impression of relative weakness compared with the strength of less head r...

Page 17: ...e is used to suggest Point of View shots ie when the camera becomes the eyes of one particular character seeing what they see 1 The Bird s Eye view This shows a scene from directly overhead a very unnatural and strange angle Familiar objects viewed from this angle might seem totally unrecognizable at first umbrellas in a crowd dancers legs This shot does however put the audience in a godlike posit...

Page 18: ...pan 3 Dolly Shots Sometimes called TRUCKING or TRACKING shots The camera is placed on a moving vehicle and moves alongside the action generally following a moving figure or object A dolly shot may be a good way of portraying movement the journey of a character for instance or for moving from a long shot to a close up gradually focusing the audience on a particular object or character 4 Hand held s...

Page 19: ... the questions in the edited piece As for the video place the camera on a tripod at the eye level of the subject The interviewer should be seated next to the camera so the subject looks toward the camera but not directly into the camera When setting up the camera and composing the shot look for a visually interesting location that pro vides depth and a sense of space Avoid white walls and objects ...

Page 20: ...ying and running around the playground Close up of the many different types of food being cooked Macro shots of the various plant and animal life Medium shots of the various families and neighbors enjoying the festivities Pan across bikers horse riders and joggers Extreme Close up on hand pushing dominoes around Close ups of decorations Tilt up from the ground filled with drummers and dancers to t...

Page 21: ...ant them to elaborate on your questions but also keep them focused on the topic Make arrangements for the interviews remember when setting up interview time to account for setting up and breaking down equipment Contact crew to inform them of the date Think of the type of music that would help add another dimension to your story Production Shooting the Project Organize all need equipment camera tap...

Page 22: ...EDL will be transcripts of your inter views shot descriptions CD audio and graphics This process enables you the editor to find the struc ture and tone of your project The purpose of the EDL is to collect and arrange all program elements to effectively communicate your message The EDL also makes the digitizing process more efficient Determine and place the concepts in the order that is most logica...

Page 23: ...ther like a jig saw puzzle This will be your EDL Edit Decision List Now you have your EDL An EDL is a list of the clips of the video audio and time code you will use when transferring your footage to the computer to edit your project Sample Edit Decision List What you ll be doing in the editing stage Digitizing your footage Editing the project audio and video Adding music Adding titles and credits...

Page 24: ...SONY PDX10 Handbook page 24 ...

Page 25: ...of light As you d expect it is hotter than a light bulb The temp on the surface of the sun is 5800 K and at its core it reaches millions of degrees However the light that it produces passes through its own atmosphere and the earth s atmosphere before it reaches earth s surface So daylight consists of a mixture of the light that comes directly from the Sun with the indirect light that comes from di...

Page 26: ...idly while the camera is calculating the correct white balance 5 When the symbol stops flashing the white balance is complete 6 If the symbol continues to flash slowly try again try again in auto iris mode or go to auto white balance mode WHITE BALANCE TROUBLE SHOOTING HELP The camera won t white balance manually There are several possible reasons why your camera won t white balance 1 Are the surr...

Page 27: ...e when working in mixed light or your pictures could end up with a strange color cast which you won t find out about until it is too late Take a white card and position it so that it is lit with the same mix of light that your subject will be lit by Carry a few pieces of half blue gel You can place this over tungsten light in order to convert it to daylight Now you don t have mixed light anymore L...

Page 28: ...MAN GAIN set to SEPARATE for two mics LINKED for one mic You have now selected manual sound To adjust the sound levels Press the AUDIO LEVEL button at the rear of the camera The viewfinder LCD will show the recording levels You can adjust the incoming sound levels using the SEL PUSH EXEC dial Use the headphones the headphone own volume level can be adjusted using the controls on the edge of the LC...

Page 29: ... 2 Manual Set Auto Shtr Off Setup 0 3 Camera Set D Zoom Off 16 9 Wide Off Steady Shot On Frame Rec Off Int Rec Off 4 LCD VF Set LCD Color Middle VF B L BRT Normal Guideframe Off 5 Tape Set Rec Mode DV SP Audio Mode FS48K Remain Auto Mic NR Off Audio Set 6 Others World Time 0 Hr Beep OFF Commander On Display LCD Date Rec Off Rec Lamp On SONY PDX10 Handbook page 29 ...

Page 30: ...n to select the mode options Turn the dial to the return option to get out of the menu options MIXING TAPE MANUFACTURERS Loitering round the various camera forums one important thing we ve learned about DV tapes is not to mix your manufacturers Different tape manufacturers use different tape lubricants By swapping and changing tapes residues start to mix and stick to your record heads the result i...

Reviews: