11
Getting Started
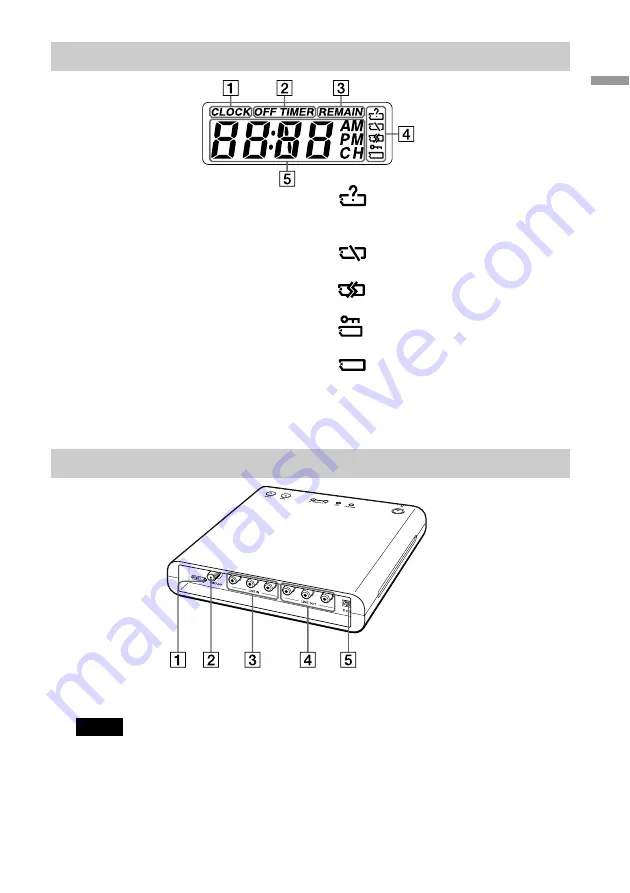
Front panel display
1
Reset
Push to reset the Video Recorder.
Notes
• When you reset, do not push the Reset button
using a sharp pointed object. Use the stylus or
similar object.
• When you reset, the Video Recorder returns to
the default setting. Perform initial settings
again following the procedure described in
“Step 5: Setting the Clock” on page 20 and
“Setting the tuner and channel” on page 22.
: The “Memory Stick” media is not
formatted properly for use with
this Video Recorder.
: “Memory Stick” media is not
inserted.
: The “Memory Stick” media is not
being read correctly.
: The “Memory Stick” media is
write protected.
: “Memory Stick” media is
inserted.
5
Displays the time and AM/PM, or
the current channel.
Rear panel
2
VHF/UHF IN jack
3
LINE IN (VIDEO/AUDIO L/R) jacks
Connect to auxiliary equipment (VCR,
satellite receiver, etc.).
4
LINE OUT (VIDEO/AUDIO L/R)
jacks
Connect to a TV.
5
DC IN connector
1
CLOCK
Lights up when displaying the current
time.
2
OFF TIMER
Lights up when OFF TIMER
recording is activated.
3
REMAIN
Lights up when displaying the
remaining time of a recording.
4
Displays the “Memory Stick”
media status.
The “Memory Stick” media status
symbols and meanings are as follows:
Summary of Contents for PEGA-VR100K
Page 1: ...Video Recorder Operating Instructions 2003 Sony Corporation PEGA VR100K 4 679 184 11 1 ...
Page 50: ......
Page 51: ......


