background image

41

Operations

Playing Back Recordings

You can play a TV program recorded by this Video Recorder using 

Movie

Player

 on your CLIÉ handheld.

Follow the procedure below to operate.

For details on 

Movie Player

, refer to “Movie Player” in the “CLIÉ

Application Manual” installed on your computer.

Note

The version of 

Movie Player

 supplied with the following CLIÉ handheld models cannot

play programs recorded by this Video Recorder:

PEG-NX60/NX70V/NX73V/NX80V/NZ90/TG50

You must install the upgrade software from the supplied Installation CD-ROM for

 Movie

Player

 for the above models of CLIÉ handheld to be compatible.

For the latest information, check our official Sony CLIÉ website (URL on back page).

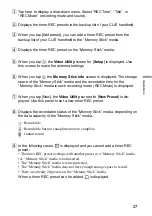
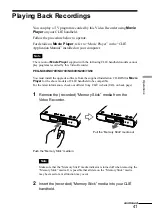
1

Remove the (recorded) “Memory Stick” media from the
Video Recorder.

Note

Make sure that the “Memory Stick” media indicator is turned off when removing the
“Memory Stick” media. It is possible that all data on the “Memory Stick” media
may be erased or a malfunction may occur.

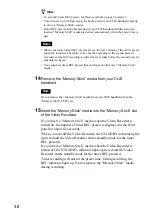
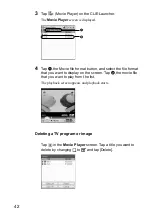
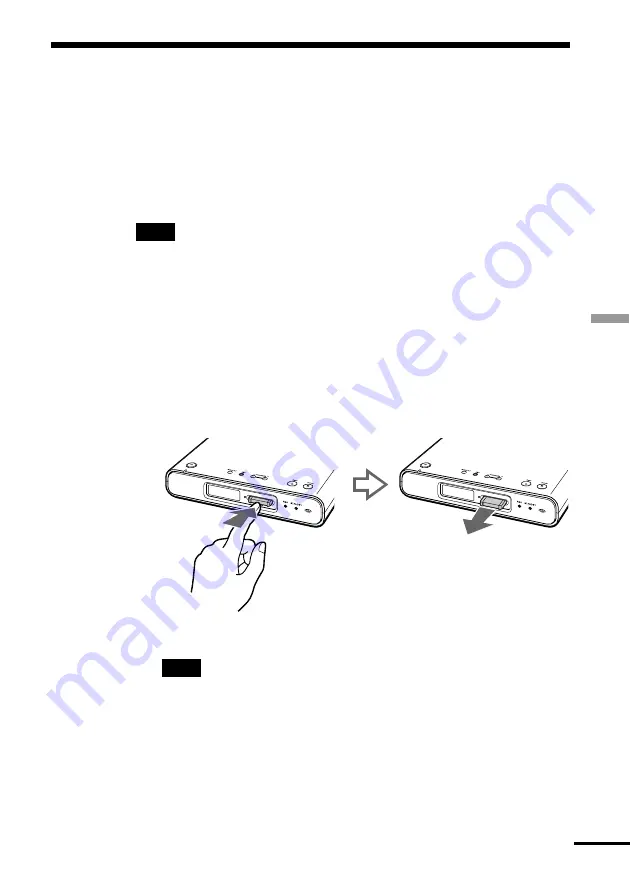
2

Insert the (recorded) “Memory Stick” media into your CLIÉ
handheld.

continued

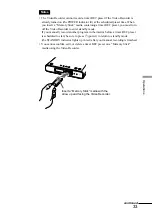
Push the “Memory Stick” media in

Pull the “Memory Stick” media out

Summary of Contents for PEGA-VR100K

Page 1: ...Video Recorder Operating Instructions 2003 Sony Corporation PEGA VR100K 4 679 184 11 1 ...

Page 2: ...o communications However there is no guarantee that interference will not occur in a particular installation If this equipment does cause harmful interference to radio or television reception which can be determined by turning the equipment off and on the user is encouraged to try to correct the interference by one or more of the following measures Reorient or relocate the receiving antenna Increa...

Page 3: ...UT OF THE USE OF THIS PRODUCT ITS HARDWARE AND OR ITS SOFTWARE Notes The illustrations in this manual may differ from the actual hardware or software Explanations in this manual assume that you are familiar with basic operations of Windows For how to use your computer and operating system please refer to their respective manuals Program 2003 Sony Corporation All rights reserved Documentation 2003 ...

Page 4: ...pyrights Television programs films video tapes discs and other materials may be copyrighted Unauthorized recording of such material may be contrary to the provisions of copyright laws Also use of this Video Recorder with cable television transmission may require authorization from the cable television transmitter and or program owner This product incorporates copyright protection technology that i...

Page 5: ...When a cart is used use caution when moving the cart apparatus combination to avoid injury from tip over 13 Unplug this apparatus during lightning storms or when unused for long periods of time 14 Refer all servicing to qualified service personal Servicing is required when the apparatus has been damaged in any way such a power supply cord or plug is damaged liquid has been spilled or objects have ...

Page 6: ...C Power Adapter 18 Step 4 Turning the Video Recorder on and off 20 Step 5 Setting the Clock 20 Step 6 Performing the Setup Using Your CLIÉTM Handheld 21 Installing the software on your CLIÉ handheld 21 Setting the tuner and channel 22 Operations Setting a Timer REC Preset 26 Guide to the Video Utility screen 26 Setting a timer REC preset 28 Editing deleting a timer REC preset 35 Checking the stora...

Page 7: ...k media into your CLIÉ handheld 2 Set the timer REC preset on your CLIÉ handheld 3 Insert a Memory Stick media into the Video Recorder The timer REC preset on your CLIÉ handheld is automatically set on the Video Recorder 4 Record a TV program 5 Play the program using a Movie Player software such as Movie Player on your CLIÉ handheld A Timer REC Preset is a scheduled preset recording of a program s...

Page 8: ...old the Video Recorder with your hand to keep it steady z Hints The Video Recorder has LINE IN jacks for recording pictures from other equipment Although the Video Recorder contains a TV tuner you may want to record pictures using the tuner section of other equipment such as a satellite receiver CATV etc in which case connect the other equipment to the Video Recorder For the latest information on ...

Page 9: ...corder If any item is missing contact the Sony Customer Information Service Center or the Sony dealer where you bought this Video Recorder Video Recorder 1 Stand 1 AC power adapter 1 including AC cord Installation CD ROM 1 Operating Instructions this manual Warranty Antenna cable 75 ohm coaxial cable with F type connectors 1 Audio video cable 1 ...

Page 10: ...de Use this button also to activate certain other settings 5 CHANNEL Selects the channel or line input 6 z REC Starts recording 7 x STOP Stops recording 8 Front panel display 9 Memory Stick media indicator Lights up in orange when recording onto a Memory Stick media 0 Memory Stick slot Insert a Memory Stick media qa REC indicator Lights up in red when recording starts qs STANDBY indicator Lights u...

Page 11: ...er Memory Stick media is not inserted The Memory Stick media is not being read correctly The Memory Stick media is write protected Memory Stick media is inserted 5 Displays the time and AM PM or the current channel Rear panel 2 VHF UHF IN jack 3 LINE IN VIDEO AUDIO L R jacks Connect to auxiliary equipment VCR satellite receiver etc 4 LINE OUT VIDEO AUDIO L R jacks Connect to a TV 5 DC IN connector...

Page 12: ...ecting the AC Power Adapter page 18 Connecting the AC power adapter to a wall outlet Step 4 Turning the Video Recorder on and off page 20 Turning on and off the Video Recorder Step 5 Setting the Clock page 20 Setting the clock of the Video Recorder Step 6 Performing the Setup Using Your CLIÉTM Handheld page 21 Installing Video Utility from the supplied Installation CD ROM and setting the tuner and...

Page 13: ... 3 For a cable box page 15 Note to CATV system installer This reminder is provided to call the CATV system installer s attention to Article 820 40 of the NEC that provides guidelines for proper grounding and in particular specifies that the cable ground shall be connected to the grounding system of the building as close to the point of cable entry as is practical Note Use the supplied antenna cabl...

Page 14: ...e separate cables for VHF and UHF antennas use a VHF UHF band mixer not supplied to connect the antenna to the Video Recorder Hookup 2 Connecting to a TV or VCR Use this hookup if the signal source coming from your wall is already connected to your TV VCR via a single antenna socket 1 Use an antenna cable not supplied to connect the signal source coming from your wall to the single input jack of t...

Page 15: ...om your wall to the single input jack of the splitter not supplied 2 Use an antenna cable not supplied to connect one of the splitter s two output jacks to the VHF UHF IN jack on your TV VHF UHF IN When connecting a TV and VCR Antenna cable supplied Splitter not supplied Antenna cable not supplied Antenna cable not supplied Signal source For details on the connections above refer to the operating ...

Page 16: ...e the supplied antenna cable to connect the RF OUT on your cable box to the VHF UHF IN jack on the Video Recorder RF IN OUT Antenna cable supplied Splitter not supplied Antenna cable not supplied Antenna cable not supplied Signal source Wall Antenna cable not supplied TV Video Recorder Cable box To VHF UHF IN To RF IN ...

Page 17: ...d pins to the appropriate jacks on the equipment Connecting to a TV with the Audio Video Cable Output a signal to the TV When you connect to a TV you can do the following Watch a TV program via the Video Recorder s VHF UHF IN jack Confirm a recording TV program Connect LINE OUT on the Video Recorder to INPUT on your TV with the audio video cable supplied Note You cannot use this Video Recorder to ...

Page 18: ...etc Connect the Video Recorder to the other equipment with the audio video cable supplied When you want to input a signal from the other equipment connect LINE IN on the Video Recorder to OUTPUT on the other equipment Note You cannot record programs containing a copy protection signal or a Copy Once signal You can record copy free programs To LINE IN Video Recorder Audio video cable supplied To OU...

Page 19: ...he Video Recorder for the first time For details on setting the clock refer to Step 5 Setting the Clock on page 20 When installing the Video Recorder vertically You can install the Video Recorder vertically when you attach the supplied stand to either side of the Video Recorder When you attach the stand lay the Video Recorder down on one side and slide the stand into the slot on the other side of ...

Page 20: ...turns on and the POWER indicator blinks momentarily and then stays lit in green The Video Recorder cannot be operated while the POWER indicator is blinking 2 Press and hold SET on the Video Recorder The clock setting mode is activated The setting for year appears 3 Press CHANNEL to select the year then press SET The year is set The setting for month appears 4 Press CHANNEL to select the month then...

Page 21: ...nstalling it is necessary to connect your CLIÉ handheld to your computer using a cradle or a USB HotSync cable to perform the HotSync operation For details on how to connect your CLIÉ handheld to your computer refer to the Handbook of CLIÉ handheld 1 Insert the supplied Installation CD ROM into the CD ROM drive of your computer The Install CD ROM window is displayed z Hint If the installer does no...

Page 22: ... a HotSync operation refer to Read This First Operating Instructions in the supplied instruction manual of CLIÉ handheld Note When you update the system for playing movies click CLIÉ Software from the categories displayed on the left side of the Install CD ROM window then click Install for Movie Player Software Update Program and follow the on screen instructions to install it Setting the tuner an...

Page 23: ...r the first time a welcome message appears on the screen From the next time whenever you need to make tuner and channel settings tap at the bottom of the Video Utility screen and display the Video Utility screen for Setup 3 Tap Next The Video Utility screen for Setup is displayed 4 Select Cable or Air broadcast signal in the list box next to Antenna continued ...

Page 24: ...en is displayed 6 Tap a channel you want to receive by changing to in the Available channels screen Note Unselected channels will not appear in the front panel display of the Video Recorder nor as channel options in the Video Utility screen Make sure to put a checkmark before every channel that you want to use 7 Tap OK The Video Utility screen for Setup is displayed 8 Tap OK The tuner and channel ...

Page 25: ...edia containing the tuner and channel settings the Video Recorder automatically reads them and adjusts the appropriate settings When the Video Recorder is finished the Memory Stick media indicator turns off Notes Do not remove the Memory Stick media from the Video Recorder when the Memory Stick media indicator is lit It is possible that all data on the Memory Stick media may be erased or a malfunc...

Page 26: ...tick media Note The Video Recorder performs timer recordings using timer REC preset settings specified on a Memory Stick media To record insert the Memory Stick media containing the timer REC preset information into the Video Recorder Guide to the Video Utility screen When you tap Video Util on the CLIE Launcher the Video Utility screen is displayed 1 2 3 4 6 7 9 8 5 ...

Page 27: ...cordable time for the Memory Stick media in each recording mode REC Mode is displayed 7 When you tap New the Video Utility screen for New Preset is dis played Use this panel to set a new timer REC preset 8 Displays the recordable status of the Memory Stick media depending on the data capacity of the Memory Stick media Recordable Recordable but not enough memory to complete Cannot record 9 In the f...

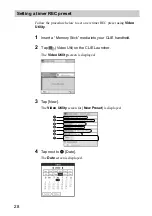
Page 28: ... Date The Date screen is displayed Setting a timer REC preset Follow the procedure below to set a new timer REC preset using Video Utility 1 Insert a Memory Stick media into your CLIÉ handheld 2 Tap Video Util on the CLIE Launcher The Video Utility screen is displayed 1 2 3 4 5 6 7 ...

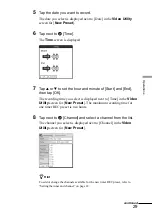
Page 29: ...K The recording time you select is displayed next to Time in the Video Utility screen for New Preset The maximum recording time for one timer REC preset is two hours 8 Tap next to 3 Channel and select a channel from the list The channel you select is displayed next to Channel in the Video Utility screen for New Preset z Hint To add or change the channels available for the new timer REC preset refe...

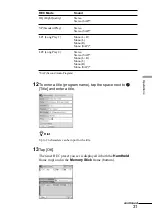
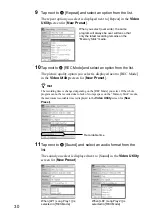
Page 30: ...een for New Preset 9 Tap next to 4 Repeat and select an option from the list The repeat option you select is displayed next to Repeat in the Video Utility screen for New Preset 10Tap next to 5 REC Mode and select an option from the list The picture quality option you select is displayed next to REC Mode in the Video Utility screen for New Preset Recordable time When you select over write the same ...

Page 31: ...o R Mono SAP Stereo Stereo SAP Mono L R Mono L Mono R Mono SAP SAP Second Audio Program continued 12To enter a title program name tap the space next to 7 Title and enter a title z Hint Up to 26 characters can be input for the title 13Tap OK The timer REC preset you set is displayed in both the Handheld frame top and in the Memory Stick frame bottom ...

Page 32: ...Memory Stick media 14Remove the Memory Stick media from your CLIÉ handheld Note Do not remove the Memory Stick media from your CLIÉ handheld when the Memory Stick LED is lit 15Insert the Memory Stick media into the Memory Stick slot of the Video Recorder If you insert a Memory Stick media when the Video Recorder is turned on the number of timer REC presets is displayed in the front panel for about...

Page 33: ...en you insert a Memory Stick media containing a timer REC preset you must turn off the Video Recorder to enter standby mode If you manually record another program in the interim before a timer REC preset is scheduled to start be sure to press 1 power to return to standby mode the STANDBY indicator lights up in red after your manual recording is finished You cannot confirm edit or delete a timer RE...

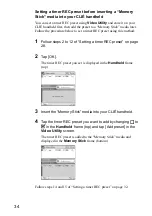
Page 34: ...ethod 1 Follow steps 2 to 12 of Setting a timer REC preset on page 28 2 Tap OK The timer REC preset you set is displayed in the Handheld frame top 3 Insert the Memory Stick media into your CLIÉ handheld 4 Tap the timer REC preset you want to add by changing to in the Handheld frame top and tap Add preset in the Video Utility screen The timer REC preset is added to the Memory Stick media and displa...

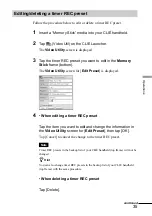
Page 35: ...he Video Utility screen for Edit Preset is displayed 4 When editing a timer REC preset Tap the item you want to edit and change the information in the Video Utility screen for Edit Preset then tap OK Tap Cancel to cancel the change to the timer REC preset Note Timer REC presets in the backup list of your CLIÉ handheld top frame will not be changed z Hint You can also change timer REC presets in th...

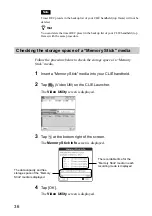
Page 36: ...dure below to check the storage space of a Memory Stick media 1 Insert a Memory Stick media into your CLIÉ handheld 2 Tap Video Util on the CLIE Launcher The Video Utility screen is displayed 3 Tap at the bottom right of the screen The Memory Stick Info screen is displayed 4 Tap OK The Video Utility screen is displayed The recordable time for the Memory Stick media in each recording mode is displa...

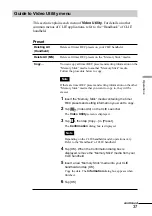
Page 37: ... timer REC presets and setting information on the other Memory Stick media that you want to copy to they will be erased 1 Insert the Memory Stick media containing the timer REC presets and setting information you want to copy 2 Tap Video Util on the CLIE Launcher The Video Utility screen is displayed 3 Tap then tap Copy in Preset The Confirmation dialog box is displayed Note Depending on the CLIÉ ...

Page 38: ...38 Options Setup Error Log About Video Utility Changes the settings for Antenna and Channels Displays error information of Memory Stick media Displays the software version of Video Utility ...

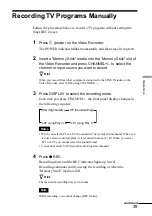
Page 39: ...o the LINE IN jacks on the Video Recorder select LINE using CHANNEL 3 Press DISPLAY to select the recording mode Each time you press CHANNEL the front panel display changes in the following sequence Notes When you select LP1 or LP2 the sound will be recorded in monaural When you record a stereo sound program it is recorded in mono L R When you select LP1 or LP2 you cannot select the sound format Y...

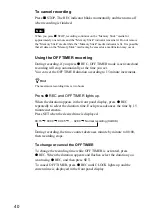
Page 40: ...n set the OFF TIMER duration according to 15 minute increments z Hint The maximum recording time is two hours Press z REC and OFF TIMER lights up When the duration appears in the front panel display press z REC repeatedly to select the duration time Each press advances the time by 15 minute increments Press SET when the desired time is displayed During recording the time counter decreases minute b...

Page 41: ...0V NZ90 TG50 You must install the upgrade software from the supplied Installation CD ROM for Movie Player for the above models of CLIÉ handheld to be compatible For the latest information check our official Sony CLIÉ website URL on back page 1 Remove the recorded Memory Stick media from the Video Recorder Note Make sure that the Memory Stick media indicator is turned off when removing the Memory S...

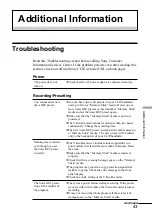
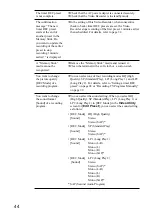
Page 42: ...mat button and select the file format that you want to display on the screen Tap 2 the movie file that you want to play from the list The playback screen appears and playback starts Deleting a TV program or image Tap in the Movie Player screen Tap a title you want to delete by changing to and tap Delete 1 2 ...

Page 43: ... that the Memory Stick media is not write protected c The Video Recorder cannot record more than two hours continuously Change the recording time c The new timer REC preset overlaps with another preset in a Memory Stick media The new preset will be added only to the backup list of your CLIÉ handheld c The Video Recorder s internal clock stopped due to a power failure that lasted for more than 30 m...

Page 44: ...st preset 1 minute earlier than scheduled For details refer to page 32 c Remove the Memory Stick media and reinsert it c Clean the terminal with a soft cloth or a cotton swab c You can select one of four recording modes HQ High Quality SP Standard Play LP1 Long Play 1 and LP2 Long Play 2 For details refer to Setting a timer REC preset on page 28 or Recording TV Programs Manually on page 39 c You c...

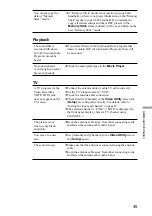
Page 45: ...d c Set Antenna and Channels in the Video Utility screen for Setup again c Make sure that the antenna is connected using the antenna cable c Keep the antenna cable away from other connecting cords and fasten the antenna cable with a band Playback The sound that is recorded with stereo or SAP Second Audio Program cannot be heard No sound is heard even though you select Stereo in Sound c If you sele...

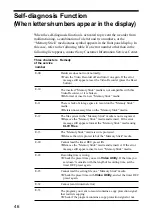
Page 46: ... lack of storage space to record on the Memory Stick media c Delete unnecessary files on the Memory Stick media The file system in the Memory Stick media is not recognized c Remove the Memory Stick media and reinsert If the error message still appears format the Memory Stick media using CLIE Files The Memory Stick media is write protected c Release the write protect tab of the Memory Stick media C...

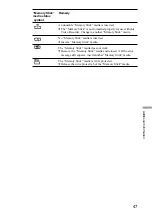
Page 47: ...s Video Recorder Change to another Memory Stick media No Memory Stick media is inserted c Insert a Memory Stick media The Memory Stick media does not work c Remove the Memory Stick media and reinsert it If the error message still appears insert another Memory Stick media The Memory Stick media is write protected c Release the write protect tab of the Memory Stick media ...

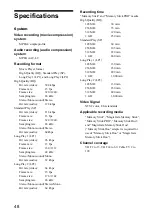
Page 48: ...d Mono Bit rate audio 32 kbps Long Play 2 LP2 Bit rate video 64 kbps Frame rate 15 fps Frame size 176 144 Sampling rate 24 kHz Stereo Mono sound Stereo Mono Bit rate audio 64 kbps Recording time Memory Stick and Memory Stick PRO media High Quality HQ 128 MB 30 min 256 MB 55 min 512 MB 120 min 1 GB 250 min Standard Play SP 128 MB 60 min 256 MB 105 min 512 MB 220 min 1 GB 460 min Long Play 1 LP1 128...

Page 49: ... 2 V dedicated connector The supplied AC cord is for AC 120 V General Power consumption 8 5 W Power consumption during standby 0 2 W Clock Quartz locked 12 hour indication Power back up Up to 30 minutes at a time Operating temperature 5 C to 35 C 41 F to 95 F Storage temperature 20 C to 60 C 4 F to 140 F Dimensions approx Approx 160 30 161 3 mm Approx 6 3 8 1 3 16 6 3 8 inches projecting parts not...

Page 50: ......

Page 51: ......
Page 52: ...d on 100 recycled paper using VOC Volatile Organic Compound free vegetable oil based ink For the latest information on support and accessories check our official Sony CLIÉ website http www ita sel sony com support clie access ...

Reviews: