Setup Menu Operations
56
Se
tt
ings
The Setup menu allowing you to perform various
settings that are needed for recording and playing,
appears on the viewfinder screen by pressing the
MENU button. (You can display the Setup menu
on the external video monitor or sub display.)
Menu controls
To turn the menu mode to use the setup menus on/
off.
SEL/SET dial (MENU dial)
When you turn the dial, the cursor moves up or
down, permitting you to select menu items or
setting values.
Press the MENU dial to select the highlighted
item.
CANCEL/BACK button
To return to the previous menu. An uncompleted
change is canceled.
Up/Down/Left/Right buttons, SET button
When you press the up/down/left/right buttons on
the sub display (VIEW-2), the cursor moves in
the corresponding direction, permitting you to
select menu items or setting values.
Press the SET button to enter the highlighted
item.
Note
In the focus magnifier mode
, the setup menu
cannot be used.
Setting the Setup menus
Turn the MENU dial to set the cursor to the item
of the menu you wish to set, then press the MENU
dial to select that item.
• The menu item selection area can show 9 lines
at maximum. When all the selectable items
cannot be displayed at one time, you can scroll
the display up or down by moving the cursor.
• For items having a wide range of available
values (example: –99 to +99), the available
value area is not displayed. The current setting
is highlighted instead, indicating that the setting
is ready for change.
• When you select “Execute” for an execution
item, the corresponding function is executed.
• When you select an item that you must confirm
before execution, the menu display temporarily
disappears, and a confirmation message is
displayed. Follow the instructions of the
message, and specify whether to execute or
cancel.
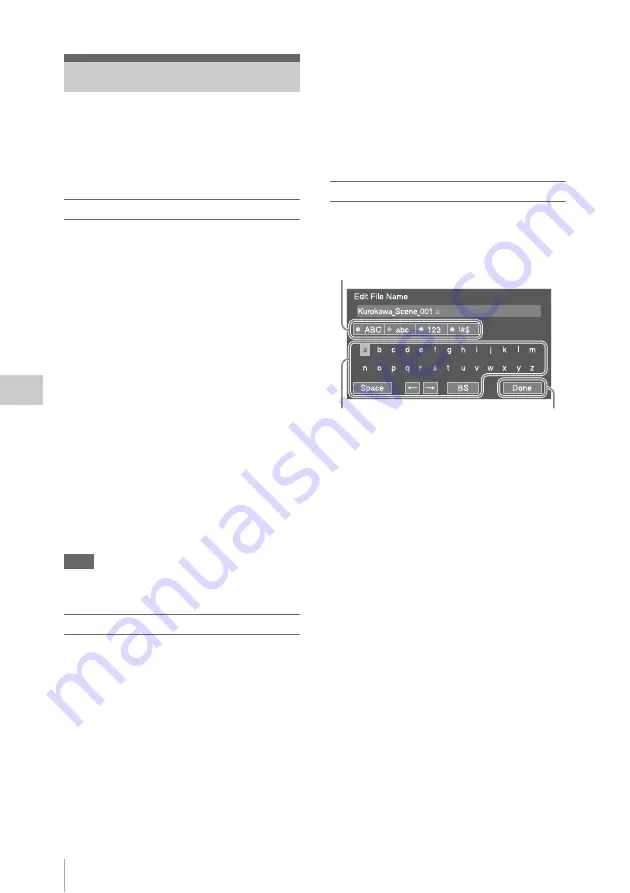
Entering a character string
When you select an item for which a character
string, such as a filename, is to be specified, the
character input screen appears.
1
Select character type by turning the
MENU dial, then press the MENU dial
to enter.
ABC: Uppercase alphabetical
abc: Lowercase alphabetical
123: Numerical
!#$: Special
2
Select a character from the selected
character type.
The cursor moves to the next column.
Space: Inputs space on the position of the
cursor.
T
/
t
: Moves the cursor.
BS: Deletes a character on the left of the
cursor.
3
Select “Done” after inputting
characters.
The input characters are entered and the
character input screen disappears.
Setup Menu Operations
1
2
3
Summary of Contents for PMW-F5
Page 134: ......


