12
3
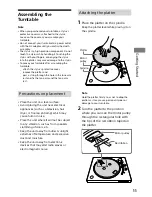
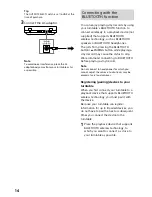
Peel off the adhesive tape, pull and
hold the red ribbon, and then hook
the drive belt around the motor
pulley.
Note
• Be careful to not let the drive belt twist. If the
drive belt is twisted while placing it around
the motor pulley, the speed will become
unstable and the platter will stop after it
begins rotating. If this happens, place the
drive belt around the motor pulley again.
• When placing the drive belt around the
platter, do not stretch the drive belt roughly.
Doing so degrades the drive belt, which
causes the sound's pitch to fluctuate and be
too high.
• If the drive belt comes off of the platter's
inner circle while you are placing the drive
belt around it, temporarily remove the
platter. Turn the platter over and wind the
drive belt around the circumference of the
inner circle. Then, start again from the
beginning of the procedure.
• Be sure to remove the red ribbon after you
place the drive belt around the motor pulley.
The red ribbon is intended to help you with
this work. Placing the drive belt around the
motor pulley is still possible without the red
ribbon. The red ribbon is no longer needed
once you have attached the platter.
4
Place the mat for the platter onto
the platter.
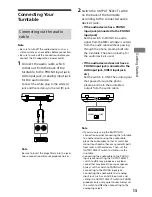
Attaching the dust cover
1
Insert the supplied dust cover
hinges to the hinge pockets on the
dust cover.
Hinge pockets
Dust cover hinges
2
Align the attached hinges with the
hinge pockets on the rear of your
turntable and push in the dust
cover.
Tip
To remove the dust cover from the turntable,
fully open the dust cover, grasp both sides
near the bottom of the cover, and then gently
pull it out in the upward direction.


