11
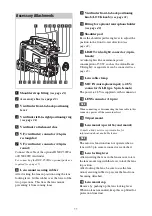
a
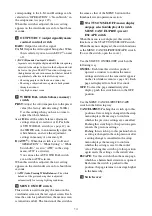
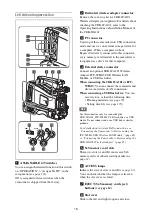
Shoulder strap fitting
b
c
Viewfinder front-to-back positioning
lever
d
Viewfinder left-to-right positioning ring
e
Viewfinder attachment shoe
f
VF (viewfinder) connector (26-pin,
rectangular)
g
VF (viewfinder) connector (20-pin,
round)
Connect the cable of the optional DXF-C50WA
or DXF-20W viewfinder.
For connecting the DXF-C50WA, optional parts are
required (see page 35).
h
Lens mount securing rubber
After locking the lens in position using the lens
locking lever, fit this rubber over the lower of the
two projections. This fixes the lens mount,
preventing it from coming loose.
i
Viewfinder front-to-back positioning
knob (LOCK knob)
j
Fitting for optional microphone holder
k
Shoulder pad
Raise the shoulder pad fixing lever to adjust the
position in the front-to-rear direction
l
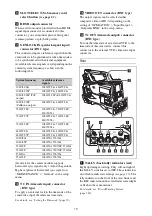
LIGHT (video light) connector (2-pin,
female)
A video light with a maximum power
consumption of 50 W, such as the Anton Bauer
Ultralight 2 or equivalent can be connected
m
Lens cable clamp
n
MIC IN (microphone input) (+48 V)
connector (XLR type, 5-pin, female)
The power (+48 V) is supplied via this connector.
o
LENS connector (12-pin)
Note
When connecting or disconnecting the lens cable to this
connector, power off the camcorder first.
p
Tripod mount
q
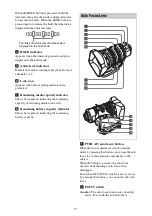
Lens mount (special bayonet mount)
Consult a Sony service representative for
information about available lenses.
Note
The auto iris function does not operate when a
lens with 7-pin camera connector is attached.
r
Lens locking lever
After inserting the lens in the lens mount, rotate
the lens mount ring with this lever to lock the lens
in position.
After locking the lens, be sure to use the lens
mount securing rubber to prevent the lens from
becoming detached.
s
Lens mount cap
Remove by pushing up the lens locking lever.
When no lens is mounted, keep this cap fitted for
protection from dust.
Accessory Attachments
Summary of Contents for PXW-X320
Page 223: ......


