background image

US

ES

3-296-710-

11

(2)

DVD Recorder

RDR-GX360

Operating Instructions 

Manual de instrucciones 

© 2008 Sony Corporation

Summary of Contents for RDR-GX360

Page 1: ...US ES 3 296 710 11 2 DVD Recorder RDR GX360 Operating Instructions Manual de instrucciones 2008 Sony Corporation ...

Page 2: ...owing measures Reorient or relocate the receiving antenna Increase the separation between the equipment and receiver Connect the equipment into an outlet on a circuit different from that to which the receiver is connected Consult the dealer or an experienced radio TV technician for help Precautions On safety Should any solid object or liquid fall into the cabinet unplug the recorder and have it ch...

Page 3: ...s 3 Heed all warnings 4 Follow all instructions 5 Do not use this apparatus near water 6 Clean only with dry cloth 7 Do not block any ventilation openings Install in accordance with the manufacturer s instructions 8 Do not install near any heat sources such as radiators heat registers stoves or other apparatus including amplifiers that produce heat 9 Do not defeat the safety purpose of the polariz...

Page 4: ...may not match the graphics displayed on your TV screen The explanations regarding discs in this manual refer to discs created on this recorder The explanations do not apply to discs that are created on other recorders and played back on this recorder Icons such as listed at the top of each explanation indicate what kind of media can be used with the function being explained For details about usabl...

Page 5: ...5US ...

Page 6: ...34 Playback Options 35 Playing a Title From the Title List 38 Searching for a Title Chapter Track etc 39 Displaying the Playing Time and Play Information 40 Playing MP3 Audio Tracks and JPEG Image Files on the Disc 41 Playing From a Connected USB Device 45 Recording 47 Before Recording 47 Recording From Connected Equipment Without the Timer 49 Timer Recording From Connected Equipment 51 Changing o...

Page 7: ... Connected Digital Still Camera 75 Settings and Adjustments 78 Using the Setup Displays 78 Clock Setting Clock Set 79 Video Settings Video 80 Audio Settings Audio 82 Recording Set Top Box Control for HDMI Settings Features 84 Language Parental Control Settings Factory Settings Options 86 Easy Setup Resetting the Recorder 88 Additional Information 89 Troubleshooting 89 Notes About This Recorder 94 ...

Page 8: ...op box controller to have the recorder change the channel of your cable box or satellite receiver page 13 Quick access to recorded titles Title List Display the Title List to view all titles on a disc and select a title for playback or editing 103 LINE 2 IN DV IN ONE TOUCH DUBBING REC VIDEO L MONO AUDIO R CH 103 Title List 10 10 AM LINE 1 08 00 PM May 02 2008 T No 1 4 01 02 03 04 Title Length Edit...

Page 9: ...mage files or MP3 audio files You can enjoy viewing JPEG images on your TV screen First take pictures with a digital camera and save them in JPEG format to a DATA CD CD RW CD R or DATA DVD DVD RW DVD RW DVD R DVD R on a PC Then play the disc on this recorder page 41 You can also play MP3 audio files on this recorder page 41 A list of recordable and playable discs is on page 30 Original Playlist RE...

Page 10: ...to play or edit B Timer Used to set a new timer recording as well as change or cancel the timer recordings you set C Edit Used to create or edit a Playlist unfinalized DVD RWs VR mode DVD Rs VR mode only D Dubbing Used to dub from a DV D8 format tape or a USB device to a disc E Disc Setting Used to rename protect format or finalize a disc or erase all titles on the disc Also displays the disc info...

Page 11: ...ons differ depending on the media type Press M m to select an option press to select the desired item and press ENTER Example When you press OPTIONS while a DVD VIDEO is playing To return to the previous display Press O RETURN Notes The OPTIONS menu settings cannot be changed during DVD recording The System Menu does not appear when recording on a DVD Title List Original 10 10 AM No Title Length E...

Page 12: ...s way you will be able to record TV programs You cannot record on this recorder if you have a cable box or satellite receiver without audio video outputs cable with no cable box antenna only no cable TV In the cases above contact your cable service or satellite service company to see if they can provide you with a compatible cable box or satellite receiver Using the cable box satellite receiver co...

Page 13: ... box controller near the remote sensor on the cable box satellite receiver To use an S video cord for enjoying higher quality images Connect the LINE 1 IN S VIDEO jack using an S video cord not supplied instead of the yellow video plug of the audio video cord Leave the audio plugs connected to the AUDIO L R jacks When using this connection be sure to set Line1 Input to S Video in the Video setup p...

Page 14: ...on the front panel In this case select Line2 for Connections of Set Top Box Control in the Features setup page 85 Notes Do not connect to the S VIDEO and yellow VIDEO jacks at the same time Synchro Recording does not work with some tuners For details see the tuner s operating instructions ...

Page 15: ...aying wide screen images Some recorded images may not fit your TV screen To change the picture size see page 80 Note Do not connect your TV s audio output jacks to the LINE IN AUDIO L R jacks at the same time This will cause unwanted noise to come from your TV s speakers AUDIO INPUT R L VIDEO Signal flow TV or projector red white yellow Audio video cord supplied red white yellow DVD recorder to LI...

Page 16: ...e Control for HDMI function with an HDMI cord not supplied operation is simplified as below One Touch Play page 38 System Power Off When you turn the TV off by using the 1 button on the TV s remote the components compatible with the Control for HDMI function turn off automatically To prepare for the BRAVIA Sync features Set Control for HDMI to On in the Features setup page 85 For details on TV set...

Page 17: ...t signals you must use this connection and then set Progressive of Video to On in the Setup display page 81 The PROGRESSIVE indicator lights up when the recorder outputs progressive signals When using this connection be sure to connect the audio cord to the LINE OUT AUDIO L R jacks COMPONENT VIDEO IN PB PR Y AUDIO L R INPUT Signal flow TV or projector red white green Component video cord not suppl...

Page 18: ...ou to listen to sound through your AV amplifier receiver AUDIO INPUT L R B A Signal flow AV amplifier receiver red white Audio cord not supplied white red DVD recorder to AUDIO OUT L R to DIGITAL AUDIO OUT COAXIAL Coaxial digital cord not supplied Speakers Rear L Front L Center to coaxial digital input Speakers Rear R Front R Subwoofer AV amplifier receiver with a decoder ...

Page 19: ...5 1ch or DTS 5 1ch After you have completed the connection make the appropriate settings under the Audio setup page 82 Otherwise no sound or a loud noise will come from your speakers 1 Manufactured under license from Dolby Laboratories Dolby and the double D symbol are trademarks of Dolby Laboratories 2 Manufactured under license under U S Patent 5 451 942 other U S and worldwide patents issued pe...

Page 20: ...ote interferes your other Sony DVD recorder or player change the command mode number for this recorder page 22 Use the batteries correctly to avoid possible leakage and corrosion Do not touch the liquid with bare hands should leakage occur Observe the following Do not use a new battery with an old battery or batteries of different manufacturers Do not attempt to recharge the batteries If you do no...

Page 21: ... one code number is listed try entering them one at a time until you find the one that works with your TV Press To TV 1 Turn your TV on or off TV VOL Adjust the volume of your TV TV CH Select the channel on your TV 1 1 2 2 3 3 4 4 5 5 6 6 7 7 8 8 0 0 9 9 TV 1 TV VOL TV INPUT TV CH TV DIGITAL ANALOG Number buttons TV INPUT Switch your TV s input source TV DIGITAL ANALOG Select the broadcast on a So...

Page 22: ...ns and press ENTER 5 Select Command Mode and press ENTER 6 Select a command mode DVD 1 DVD 2 or DVD 3 and press ENTER Sampo 12 Samsung 03 04 12 20 Sanyo 11 14 Scott 12 Sears 07 10 11 Sharp 03 05 18 Sylvania 08 12 Teknika 03 08 14 Toshiba 07 18 Wards 03 04 12 Yorx 12 Zenith 14 15 Manufacturer Code number 1 1 2 2 3 3 4 4 5 5 6 6 7 7 8 8 0 0 9 9 SYSTEM MENU M m ENTER O RETURN 10 10 AM Clock Set Video...

Page 23: ...de for the recorder appears in the front panel display Step 7 Easy Setup Follow the steps below to make the minimum number of basic adjustments for using the recorder Settings are made in the following order m m m m 1 Turn on the TV 2 Press 1 The recorder turns on Command Mode Code number DVD1 number button 1 DVD2 number button 2 DVD3 number button 3 If the command mode for the recorder has not be...

Page 24: ...display for clock setting appears 9 Press M m to set the month and press Set the day year hour minutes and AM PM in the same way then press ENTER The day of the week is set automatically The setup display for selecting the picture size of the connected TV appears 10Select the setting that matches your TV type 16 9 For wide screen TVs or TVs with a wide screen mode 4 3 Letter Box For 4 3 screen TVs...

Page 25: ...iver window 4 Press the number buttons and check that the channel changes on the cable box satellite receiver window If you cannot get the recorder to control your cable box satellite receiver Check the settings at Set Top Box Control in the Features setup page 85 Check the connection and place the set top box controller near the cable box satellite receiver page 12 If your cable box or satellite ...

Page 26: ...26US 2 Affix it so that the set top box controller is near the remote control sensor on your cable box satellite receiver LINE 2 IN DV IN ONE TOUCH DUBBING REC VIDEO L MONO AUDIO R ...

Page 27: ... the DV IN or USB jack on the front panel see page 68 or 71 Connecting to the LINE 2 IN jacks on the front panel Connect a VCR or similar device to the LINE 2 IN jacks of this recorder You can connect a second DVD player and record DVDs z Hints When the connected equipment outputs only monaural sound connect an audio cord to the white LINE IN AUDIO L mono jack To record from connected equipment se...

Page 28: ...this recorder to another equipment s input jack with the other equipment s output jack connected to the input jack of this recorder Noise feedback may result If you pass the recorder signals via the VCR you may not receive a clear image on your TV screen Be sure to connect your VCR to the DVD recorder and your TV in the order shown below To watch video tapes watch the tapes through a second line i...

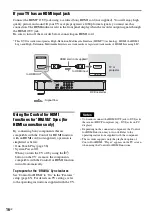
Page 29: ...Hookups and Settings 29US ...

Page 30: ...inalizing DVD RW Automatically formatted Playable on DVD RW compatible players automatically finalized DVD RW VR mode Format in VR mode 2 page 48 Playable only on VR mode compatible players finalization unnecessary page 66 Video mode Format in Video mode 2 page 48 Playable on most DVD players finalization necessary page 66 7 DVD R Automatically formatted Playable on DVD R compatible players finali...

Page 31: ...apters does not free up disc space 6 When using DVD R DL Double Layer discs see the instructions supplied with the discs 7 For DVD RWs Video mode DVD Rs Video mode and DVD Rs the Auto Finalize function is available page 67 Recording Features Editing Features Rewrite page 64 Auto Chapter page 50 Change Title Name page 61 Erase Title Chapter page 58 A B Erase page 59 Divide Title page 60 Playlist pa...

Page 32: ...SC such as PAL or SECAM A disc recorded in AVCHD format Disc Type Disc Logo Icon used in this manual Characteristics DVD VIDEO Discs such as movies that can be purchased or rented DVD RAM DVD RAMs recorded by another recording device 12 cm discs without cartridges or removable from their cartridges can be played VIDEO CD VIDEO CDs or CD Rs CD RWs in VIDEO CD format with PBC function CD Music CDs o...

Page 33: ... to the Compact Disc CD standard Recently various music discs encoded with copyright protection technologies are being marketed by some record companies Please be aware that among those discs there are some that do not conform to the CD standard and may not be playable by this product Note on DVD RWs DVD Rs DVD RWs DVD Rs or CD RWs CD Rs recorded on other equipment Some DVD RWs DVD Rs DVD RWs DVD ...

Page 34: ...DVD RW DVD RW DVD R DVD R and DVD RAM you can select the title from the Title List menu page 38 When using a DVD RAM with a cartridge remove the disc from the cartridge Note To play a disc recorded with other equipment on this recorder finalize the disc on the recording equipment first Using the DVD s Menu When you play a DVD VIDEO or a finalized DVD RW DVD RW Video mode DVD R or DVD R Video mode ...

Page 35: ...ions supplied with the disc for details REPLAY ADVANCE Replays or briefly fast forwards a scene when pressed during playback Goes to the previous or next frame when pressed during pause mode PREV NEXT Goes to the beginning of the current or next title chapter scene track and starts playback when pressed during playback Goes to the beginning of the previous title chapter scene track when PREV is pr...

Page 36: ...rnal 5 1 channel decoder system must be connected to the digital jack of the recorder Notes on playing DVDs with a DTS soundtrack DTS audio signals are output only through the DIGITAL AUDIO OUT COAXIAL HDMI OUT jack When you play a DVD with DTS soundtracks set Digital Out DTS to On of Audio in the Setup display page 82 If you connect the recorder to audio equipment without a DTS decoder do not set...

Page 37: ...s cleared when you open the disc tray you play another title you switch the Title List menu to original or Playlist DVD RW VR mode DVD R VR mode DVD RAM only you edit the title after stopping playback you make a recording Playing restricted DVDs Parental Control If you play a restricted DVD a message appears asking whether you want to override the restriction 1 Select OK and press ENTER The displa...

Page 38: ...ack The function works only when the recorder is turned on Playing a Title From the Title List The Title List menu displays the program titles on the disc 1 Place a disc on the disc tray 2 Press TITLE LIST Example DVD RW VR mode A Disc type Displays a disc type Also displays the title type original or Playlist for DVD RWs VR mode DVD Rs VR mode and DVD RAMs B Movie thumbnail image C Title informat...

Page 39: ...Letters that cannot be displayed are replaced with Searching for a Title Chapter Track etc You can search a DVD by title or chapter and VIDEO CD by track or scene As titles and tracks are assigned individual numbers on the disc select the title or track by entering its number You can also search for a scene using the time code 1 Press OPTIONS during playback The OPTIONS menu appears 2 Select a sea...

Page 40: ... check disc information such as playing time recording mode and remaining disc space Press DISPLAY The information display appears Each time you press the button the display changes as follows Disc information date and time m Disc information only m No display A Playing status B Playing time C Recording mode D Remaining disc space in stop mode Remaining time of the current title during playback 1 ...

Page 41: ...n play MP3 audio tracks on DATA CDs or DATA DVDs 1 Place a DATA CD DATA DVD on the disc tray When you insert a DATA CD DATA DVD containing MP3 audio tracks and JPEG image files the display for selecting a media type appears When you select Mix you can enjoy a slide show with sound page 43 RW VR VCDVD SAP SYNCHRO PROGRESSIVE REC STEREO D RW VR VCDVD SAP SYNCHRO PROGRESSIVE REC STEREO D RW VR VCDVD ...

Page 42: ... a DATA CD DATA DVD containing MP3 audio tracks and JPEG image files the display for selecting a media type appears When you select Mix you can enjoy a slide show with sound page 43 If you insert a DATA CD DATA DVD containing only JPEG image files the Photo display appears Go to step 3 2 Select Photo and press ENTER The Photo display appears 3 Select a folder and press ENTER To display the previou...

Page 43: ...t rotate or zoom during slide show If you select in the rotated image display the images in the Photo display will not be rotated Enjoying a slide show with sound When a disc contains both MP3 audio tracks and JPEG image files you can enjoy a slide show with sound 1 Insert a DATA CD DATA DVD containing both the MP3 audio tracks and JPEG image files The display for selecting a media type appears 2 ...

Page 44: ... file format Only one session of a multi session DATA DVD can be played back Only alphabet and numbers can be used for album or track names Anything else is displayed as an asterisk The recorder will play any data with the extension MP3 even if they are not in MP3 format Playing such data may generate a loud noise which could damage your speaker system The recorder does not conform to audio tracks...

Page 45: ... files page 42 for details To play movie files select Movie The contents of the HDD camcorder are listed Example When Movie is selected 5 Select an album folder and press ENTER The movie file list appears 6 Select a movie file and press ENTER Playback starts To stop playback Press x STOP To pause playback Press X PAUSE To restart playback press H PLAY or X PAUSE To return to the previous display P...

Page 46: ...movie files that have been edited on a PC Do not disconnect a USB device while reading or playing files Some files may take time to appear In particular it may take some time to read many files or large size files but this is not a malfunction Do not turn off the power while reading or playing files USB cables exclusive for supplying power cannot be used Connect the camcorder or digital still came...

Page 47: ...p priority select HQ high quality If recording time is your priority SLP can be a possible choice Press REC MODE repeatedly to switch the recording modes Recording mode and recording time The following table is an approximate guide for the recording time on a single DVD 4 7 GB z Hint The approximate recording time for DVD R DL Double Layer discs is as follows HQ 1 hour 48 minutes HSP 2 hours 42 mi...

Page 48: ...ing stops when a copy guard signal is detected 1 Not recordable on non CPRM compatible DVDs that are commonly available 2 The recorded disc can be played only on CPRM compatible equipment page 30 Formatting a new disc New unformatted discs are automatically formatted when first inserted in the recorder For DVD RWs DVD Rs you can select a recording format VR mode or Video mode according to your nee...

Page 49: ...e cable box satellite receiver control select the channel by pressing CH on this recorder s remote The recorder s input is switched to the connected input LINE1 or LINE2 You can also use the number buttons When not using the cable box satellite receiver control select the connected input LINE1 or LINE2 by pressing INPUT and then select the channel on the cable box satellite receiver s side 5 Press...

Page 50: ...der returns to normal recording mode To stop recording Press x STOP twice Note that it may take a few seconds for the recorder to stop recording Checking the disc status while recording You can check the recording information such as recording time or disc type Press DISPLAY during recording The information display appears Press the button repeatedly to change the display page 40 A Disc type B Rec...

Page 51: ...g a new disc on page 48 3 Press TIMER 4 Select an item using and adjust using M m A Date Sets the date using M To record the same program every day or the same day every week press m The item changes as follows Today y Sun Sat Sunday to Saturday y Mon Sat Monday to Saturday y Mon Fri Monday to Friday y Sun every Sunday y Mon every Monday y y Sat every Saturday y 1 month later y y Today B Start Set...

Page 52: ...u has priority If the end time of one setting and the start time of another timer setting is the same the beginning of the program that starts later will be cut To change or cancel timer recording See Changing or Canceling Timer Settings Timer List on page 53 To use the Rec Mode Adjust function If the remaining disc space is not enough for the current recording the recorder automatically adjusts t...

Page 53: ... to the previous display Press O RETURN Notes Even when correctly set the program may not be recorded if another recording is underway or other prioritized timer setting overlaps For priority see page 52 RW R RWVR RWVideo RVR RVideo 1 1 2 2 3 3 4 4 5 5 6 6 7 7 8 8 0 0 9 9 SYSTEM MENU M m ENTER O RETURN 01 04 15 09 00PM 10 00PM Line1 04 05 06 03 02 04 30 09 15PM 09 45PM Line1 10 10 AM SP SP Timer L...

Page 54: ...VIDEO AUDIO jacks on the rear of the recorder page 13 When the connected equipment turns on the recorder starts recording a program from the LINE 1 IN jacks Note To play a disc recorded with this recorder on other equipment finalize the disc page 66 1 Insert a recordable disc 2 Select the line input audio Set Line Audio Input of Audio setup to Stereo or Main Sub in the Setup display page 84 RW R R...

Page 55: ... program about ten seconds after the first program has finished If the end time of one setting and the start time of another timer setting is the same the beginning of the program that starts later will be cut Notes The recorder starts recording only after detecting the video signal from the connected equipment The beginning of the program may not be recorded regardless of whether or not the recor...

Page 56: ... connecting to the LINE 2 IN jacks on the front panel select LINE2 3 Press REC MODE repeatedly to select the recording mode The display changes on the TV screen as follows For details about the recording mode see page 47 4 Select the line input audio Set Line Audio Input of Audio setup to Stereo or Main Sub in the Setup display page 84 5 Insert the source tape into the connected equipment and set ...

Page 57: ... you have two options for a DVD RW VR mode and DVD R VR mode editing either the original recording called the original or the playback information created from the original called a Playlist Since each is different in nature and offers different merits read the following and select the one that better suits your needs To edit original titles Edits made to the original titles are final If you plan ...

Page 58: ...tle This section explains the basic edit functions Note that editing is irreversible To edit a DVD RW VR mode or DVD R VR mode without changing the original recordings create a Playlist title page 62 1 Press TITLE LIST When editing a DVD RW VR mode or DVD R VR mode press ORIGINAL PLAYLIST to switch to the Title List Original if necessary 2 Select a title and press ENTER The sub menu appears RWVR R...

Page 59: ...an original title used in a Playlist that Playlist is also erased Erasing a chapter Chapter Erase You can select a chapter within a title and erase it Note that erasing chapters from original titles cannot be undone 1 Press TITLE LIST Press ORIGINAL PLAYLIST to switch to the Title List Original if necessary 2 Select a title and press ENTER The sub menu appears 3 Select Chapter Erase and press ENTE...

Page 60: ...terrupted at the point where you erase a section of a title Sections shorter than five seconds may not be erased The start and end points of a title may be different from what you have set If you erase an original title used in a Playlist that Playlist is also erased Dividing a title into two Divide Title You can divide a title into two Note that dividing original titles cannot be undone 1 Press T...

Page 61: ...g the Name of a Title You can enter a title name of up to 32 characters Since the displayed number of characters is limited their appearance in menus such as Title List may be different When the display for entering characters appears follow the steps below 1 Press TITLE LIST When editing a DVD RW VR mode or DVD R VR mode press ORIGINAL PLAYLIST to switch to the Title List Original if necessary 2 ...

Page 62: ...thout renaming the title press O RETURN 6 Select Finish and press ENTER z Hint You can also rename a disc page 64 Follow steps 4 to 6 above when the Disc Name display appears Creating a Playlist Playlist titles allow you to edit without changing the original recordings see Edit options for DVD RWs VR mode DVD Rs VR mode on page 57 You can create a Playlist title by combining up to 99 sections scen...

Page 63: ...ying a Playlist title 1 Press TITLE LIST 2 Press ORIGINAL PLAYLIST to switch to the Playlist Title List 3 Select a Playlist title and press ENTER The sub menu appears 4 Select Play and press ENTER z Hint When a Playlist title is created the start and end points will become chapter marks and each scene will become a chapter Notes The picture may pause when an edited scene is played The start and en...

Page 64: ...ting Renaming Protecting a Disc The Disc Setting display allows you to check the disc information or change the disc name Depending on the disc type you can also format or set protection 1 Press SYSTEM MENU while the recorder is in stop mode 2 Select Disc Setting and press ENTER The Disc Setting display appears 3 Select an option and press ENTER A Disc Name Allows you to rename a disc For details ...

Page 65: ...except protected titles Select OK when asked for confirmation For DVD RWs VR mode DVD Rs VR mode Playlist titles created with protected titles are also erased To return to the previous display Press O RETURN z Hints You can set protection for individual titles page 58 By reformatting you can change the recording format on DVD RWs or record again on DVD RWs Video mode that have been finalized Notes...

Page 66: ...cially if the recording time is short After finalizing you cannot edit or record on the disc If you want to edit or record on it again unfinalize or reformat the disc page 64 Note however that reformatting a disc erases all its contents Finalizing is necessary in order to play on equipment other than this recorder After finalizing you cannot edit or record on the disc If you want to edit or record...

Page 67: ...recorded on another recorder Using the Auto Finalize function If the recording exceeds 30 of the disc capacity the recorder automatically finalizes DVD RWs Video mode DVD Rs Video mode and DVD Rs when you eject the disc by pressing Z OPEN CLOSE immediately after you stop recording by pressing x STOP when all the timer recordings are finished if the disc becomes full during recording To turn on thi...

Page 68: ...cannot use the DV IN jack when your DV camcorder does not work with this recorder Connect the camcorder to the LINE IN jack and follow the instructions of Recording From a VCR or Similar Device on page 56 the input signal is not in DVC SD format Do not connect a MICROMV format DV camcorder even if it has an i LINK jack the input signal is in HDV 1080i format the images on the tape contain copy pro...

Page 69: ...dly to select DV 4 Press REC MODE repeatedly to select the recording mode 5 Set the DV D8 Audio Input setting in the Audio setup page 84 Select the desired audio if multiple audio channels are recorded on the tape 6 Press ONE TOUCH DUBBING on the recorder The recorder rewinds the tape in the DV camcorder and then starts recording the tape contents from the beginning When playback of the tape stops...

Page 70: ... the tape and stop or pause playback Press to select m x X y H or M on the TV screen and press ENTER to find the point and stop or pause with x or X 6 Press to select z on the TV screen and press ENTER Dubbing starts To stop recording Select x on the TV screen and press ENTER Note that it may take a few seconds for the recorder to stop recording To turn off the display for DV D8 dubbing Press INPU...

Page 71: ...ing power cannot be used Connect the camcorder or digital still camera directly to the recorder not via a USB hub or other USB device Do not connect the DV IN jack at the same time Connecting to the USB jack You can connect a USB device DVD camcorder HDD camcorder digital still camera etc to the USB jack on the recorder Also refer to the instruction manual supplied with the connected USB device be...

Page 72: ...r example select COMPUTER when USB SELECT appears on the camcorder s screen Check the USB indicator lights up in the front panel display 3 Press ONE TOUCH DUBBING on the recorder The display asks for confirmation Note that you cannot stop dubbing halfway 4 Select Start and press ENTER The disc tray opens 5 Place a recordable disc and press Z OPEN CLOSE to close the disc tray The progress bar displ...

Page 73: ... recordable DVD RW DVD RW Video mode DVD R Video mode or DVD R How titles and chapters are created The dubbed contents on the disc become one title and the title is then divided into chapters at either 5 or 15 minute intervals according to the DVD Auto Chapter setting of Features in the Setup display Note To play the dubbed disc on other DVD equipment finalize the disc page 66 If you set Auto Fina...

Page 74: ... want to dub You can select up to 9 files 9 Press OPTIONS The display asks for confirmation To return to the previous display select Cancel To cancel all selections select Clear All and return to step 8 10Select Start and press ENTER Playback starts from the first selected movie file and dubbing starts To stop dubbing Press x STOP Note that it may take a few seconds for the recorder to stop dubbin...

Page 75: ...ther in a single disc Copying JPEG Image Files From a Connected Digital Still Camera You can simply copy all albums containing JPEG image files from a digital still camera or HDD camcorder onto a DVD RW Video mode DVD R Video mode You can also select the albums using the on screen menu See Copying the selected albums on page 76 Notes Use unused or blank discs for copying You cannot use a disc cont...

Page 76: ...ff the connected device while copying as a malfunction may result While copying timer recordings are unavailable If the timer is set while copying the timer setting is canceled You cannot record video titles on a disc pre recorded with photos If a timer recording is due to start replace with a recordable disc Up to seven layers of folders stored in the device can be copied The folders are copied i...

Page 77: ...you want to copy 8 Press OPTIONS The display asks for confirmation To return to the previous display select Cancel To cancel all selections select Clear All and return to step 7 9 Select Start and press ENTER Copying starts To stop copying Press ENTER to cancel Note that it may take some time for the recorder to stop copying To copy more albums on the same disc Press SYSTEM MENU and repeat from st...

Page 78: ...4 Select the item you want to set up and press ENTER Available options for the item appear Example TV Type M m ENTER 1 1 2 2 3 3 4 4 5 5 6 6 7 7 8 8 0 0 9 9 SYSTEM MENU O RETURN 10 10 AM Title List Original Press ENTER Title Menu for DVD Title List Setup Disc Setting Edit Title List Timer Dubbing 10 10 AM Clock Set Video Audio Features Options Easy Setup Setup Disc Setting Edit Title List Timer Du...

Page 79: ... 3 Select Clock Set and press ENTER The clock setting display appears 4 Press M m to set the month and press Set the day year hour minutes and AM PM in sequence Press to select the item to be set then press M m to set the item The day of the week is set automatically 5 Press ENTER to start the clock 10 10 AM Create the password Create the password Setup Disc Setting Edit Title List Timer Dubbing V...

Page 80: ...tting is effective only when you connect a HDMI equipped TV to the HDMI OUT jack Video HDMI Selects the type of output from the HDMI OUT jack The setting is effective only when you connect a HDMI equipped TV to the HDMI OUT jack 16 9 Select this when connecting to a wide screen TV or TV with a wide mode function 4 3 Letter Box Select this when connecting to a 4 3 screen TV Displays a wide picture ...

Page 81: ...his case set Progressive to Off When you connect your TV using an HDMI cable the Progressive setting is set to On Line1 Input Selects the type of video input signal for the LINE 1 IN jacks The picture does not appear if this setting does not match the connected jack On Raises the standard black level Select this when the picture appears too dark Off Sets the black level of the output signal to the...

Page 82: ...ignals D PCM signals will be automatically output even if Dolby Digital is selected DTS DVD VIDEOs only Selects whether or not to output DTS signals Note If you connect equipment not compatible with DTS signals no signal will be output regardless of the DTS setting Audio 10 10 AM Digital Out Downmix Audio DRC Audio HDMI Scan Audio Surround DV D8 Audio Input Line Audio Input Dolby Surround Standard...

Page 83: ...ct PCM Scan Audio DVDs only Note Sound will be interrupted during Scan Audio Surround Turns on the surround function to create virtual rear speakers from a stereo TV or two separate front speakers page 19 Notes When the playback signal does not contain a signal for the surround speakers the surround effects will be difficult to hear When you select one of the surround modes turn off the surround s...

Page 84: ...uto Chapter Automatically divides a recording a title into chapters by inserting chapter markings at specified intervals The markings are inserted while the recording is being made Note Actual intervals may differ depending on the size of the recording The selected setting should be regarded as an approximate chapter interval Stereo 1 Records original sound only Normally select this when dubbing a...

Page 85: ...cturer of the cable box or satellite receiver Control for HDMI Language Follow Notes Turn off any display before turning on this function The OSD language for the recorder keeps if the TV s language cannot be supported VR Automatically formats the disc in VR mode Video Automatically formats the disc in Video mode On Automatically finalizes a DVD R Video mode DVD RW Video mode DVD R after recording...

Page 86: ...or Audio that is not recorded on the DVD VIDEO one of the recorded languages will be automatically selected Parental DVD VIDEOs only Playback of some DVD VIDEOs can be limited according to a predetermined level such as the age of the users Scenes may be blocked or replaced with different scenes 1 After step 3 above select Parental and press ENTER If you have not entered a password the display for ...

Page 87: ...e of the supplied remote to the setting made here For details see If you have a Sony DVD player or more than one Sony DVD recorder on page 22 Factory Setting Allows you to return the setup settings to their default settings Note that all of your previous settings will be lost 1 After step 3 on page 86 select Factory Setting and press ENTER 2 Select Start and press ENTER The setup settings return t...

Page 88: ...r is in stop mode 2 Select Setup and press ENTER 3 Select Easy Setup and press ENTER 4 Select Start and press ENTER 5 Follow the instructions for Easy Setup page 23 from step 5 10 10 AM Easy Setup Follow the guide to make initial settings Before you start Check that you have made all necessary connections Start Cancel ...

Page 89: ...als the image may be affected when you set the recorder to progressive format In this case set Progressive to Off in the Video setup page 81 There is no picture or the picture noise appears when connected to the DV IN jack Try the following 1Turn the recorder off and on again 2Turn the connected equipment off and on again 3Disconnect and then connect the i LINK cable again There is no picture or t...

Page 90: ...form to the audio signal format Sound is noisy When playing a CD with DTS soundtracks noise will come from the LINE OUT AUDIO L R or AUDIO OUT L R jacks page 36 The sound volume is low The sound volume is low on some DVDs The sound volume may improve if you set Audio DRC in the Audio setup to Wide Range page 83 An alternate audio track cannot be recorded or played If you have connected an AV ampli...

Page 91: ...iles Photo is selected page 41 The JPEG image file cannot be played The DATA CD is not recorded in a JPEG format that conforms to ISO9660 Level 1 Level 2 The JPEG image file does not have the extension JPG or JPEG The data is not formatted in JPEG even though it has the extension JPG or JPEG The length or width of the image is more than 4 720 dots When playing a disc containing MP3 audio tracks Mu...

Page 92: ... disc when the disc is inserted Display Menus or displays do not appear on the screen While the recorder is reading disc information the System Menu OPTIONS menu or information display will not appear Display language on the screen switches automatically When Language Follow is set to On in the Features setup page 85 the display language on the screen automatically switches according to the langua...

Page 93: ... recorder off for a while then re connect the power cord and press 1 on the recorder CHILD LOCK appears in the front panel display The recorder is locked Cancel the Child Lock page 37 Control by AV mouse is not possible Some satellite receivers may not support AV mouse The Set Top Box Control function does not work Turn on the recorder The Control for HDMI function does not work When HDMI does not...

Page 94: ...is repaired repaired parts may be collected for reuse or recycling purposes Notes about the discs To keep the disc clean handle the disc by its edge Do not touch the surface Dust fingerprints or scratches on the disc may cause it to malfunction Do not expose the disc to direct sunlight or heat sources such as hot air ducts or leave it in a car parked in direct sunlight as the temperature may rise ...

Page 95: ...Standard output 327 mVrms Load impedance 47 kilohms Output impedance less than 10 kilohms DIGITAL AUDIO OUT COAXIAL phono jack Output signal 0 5 Vp p 75 ohms COMPONENT VIDEO OUT Y PB PR Phono jack Y 1 0 Vp p PB PR 0 7 Vp p 75 ohms SET TOP BOX CONTROL Mini jack HDMI OUT HDMI 19 pin Standard Connector USB USB jack Type A For connecting camcorders or digital still cameras General Power requirements 1...

Page 96: ...transport bus proposed by SONY and is a trademark approved by many corporations IEEE 1394 is an international standard standardized by the Institute of Electrical and Electronics Engineers i LINK baud rate i LINK s maximum baud rate varies according to the equipment Three maximum baud rates are defined S100 approx 100 Mbps S200 approx 200 Mbps S400 approx 400 Mbps The baud rate is listed under Spe...

Page 97: ... names A 1 on standby switch 23 B Disc tray 34 49 C Front panel display 41 D remote sensor 20 E Z open close button 34 49 F z REC record button 49 G previous next buttons 35 H N play button 34 X pause button 35 49 x stop button 34 49 I ONE TOUCH DUBBING button 69 72 73 75 J USB jack 71 K DV IN jack 68 L LINE 2 IN VIDEO AUDIO L MONO R jacks 27 LINE 2 IN DV IN ONE TOUCH DUBBING REC VIDEO L MONO AUDI...

Page 98: ...n 41 Q AUDIO button 1 35 SUBTITLE button 35 R SYSTEM MENU button 10 TITLE LIST button 38 58 TIMER button 51 S ORIGINAL PLAYLIST button 38 58 T OPTIONS button 39 U H PLAY button 1 34 V m M search buttons 35 W x STOP button 34 49 X REC MODE button 49 69 Y SYNCHRO REC button 54 Z TV buttons 1 on standby switch 21 INPUT button 21 CH channel button 1 21 VOL volume button 21 DIGITAL ANALOG button 21 1 N...

Page 99: ...t title chapter track index number Recording time recording mode Clock Channel G PROGRESSIVE indicator 17 81 H SYNCHRO REC indicator 54 Rear panel A AUDIO OUT L R jacks 18 B HDMI OUT jack 16 C SET TOP BOX CONTROL jack 13 D LINE 1 IN S VIDEO VIDEO AUDIO L R jacks 13 E LINE OUT VIDEO AUDIO L R jacks 15 17 F DIGITAL AUDIO OUT COAXIAL jack 18 G COMPONENT VIDEO OUT Y PB PR jacks 17 RW VR VCDVD SYNCHRO ...

Page 100: ...Language ARA Arabic BUL Bulgarian CHI Chinese CRO Croatian CZE Czech DAN Danish DEU German ENG English ESP Spanish FIN Finnish FRA French GRE Greek HUN Hungarian IDN Indonesian IND Hindi ISL Icelandic ITA Italian IWR Hebrew JPN Japanese KOR Korean MAL Malay NLD Dutch NOR Norwegian POL Polish POR Portuguese RUS Russian SVE Swedish THA Thai TUR Turkish VIE Vietnamese ZAF Afrikaans Abbreviation Langu...

Page 101: ...he 0770 Arbatron 0014 0011 0003 0476 Archer 0153 0022 0207 0039 0797 0237 0260 ASE 1080 Auna 1269 BBT 0267 BCC 0276 Belcor 0056 0022 Bell Howell 0014 Bell Atlantic 0641 Bell South 0899 Bestlink 0303 Betavue 0022 British Telecom 0003 BVS 0641 Cable Healthcare 0769 0058 Cable Star 0056 Cabletenna 0022 0039 Cableview 0022 Century 0153 0618 0008 0315 Citation 0017 Citizen 0153 0315 0078 0242 Clearmast...

Page 102: ...ang Yu 0024 Leon 0069 0015 LG 0040 0144 Linsay 0440 Macom 0033 Cable box brand Code number Maestro 0812 Magnavox 0797 0027 0032 0334 0069 Millennium 0618 0153 Memorex 0000 Mitsubishi 0003 Motorola 0476 0276 1476 0810 1376 1254 0400 1106 Movie Time 0156 0078 0063 0203 MS 0069 0015 1018 0303 MultiVision 0012 Myrio 1117 NET 0274 Next Level 0764 1316 1315 1314 Nexus 0770 Northcoast 0671 0314 Nova Visi...

Page 103: ...gnal 0040 0015 0011 0035 Signature 0011 SkyCable 0112 Skygiant 1091 SL Marx 0040 Cable box brand Code number Sony 1006 Spectradyne 0769 0058 Spectravision 0058 Sprucer 0021 0307 0010 0144 Standard Components 0203 0096 0155 Starcom 0003 0015 0047 0014 0098 0305 Stargate 0015 0040 0770 0865 0797 0305 0014 Starquest 0015 StarSight 0542 0422 Stealth 0274 Stellar One 0807 Storm 1018 0637 Suena Madritel...

Page 104: ...and Code number Satellite receiver brand Code number AlphaStar 0772 Atlantic Telephone 1333 Bell ExpressVu 0775 Century 0856 Chaparral 0216 Crossdigital 1109 DirecTV 0749 0566 0392 1749 0099 1109 1076 1442 1856 0247 1142 1639 0724 0639 0819 Dish Network System 0775 1005 1170 Dishpro 0775 1005 Echostar 0775 1170 1005 Expressvu 0775 Galaxis 0863 GE 0566 General Instrument 0361 0869 0627 GOI 0775 Gra...

Page 105: ...roscan 0392 0566 QNS 1367 RadioShack 0869 RCA 0566 0392 0143 0855 Samsung 1109 1276 Sky 0856 0099 1856 Sony 0639 1639 Star Choice 0869 Star Trak 0869 0772 Thomson 0566 0392 Tivo 1142 1442 Toshiba 0790 0749 1749 1285 UEC 1333 1358 Uniden 0724 0722 Video Cipher II Plus 0361 Zenith 0856 1856 Satellite receiver brand Code number ...

Page 106: ...g chapters 50 D Digital Out 82 Disc Finalize 65 66 Disc Format 65 Disc Information 65 Disc Menu 86 Disc Name 64 Disc Protect 65 Disc Setting 64 66 Disc types 30 Display front panel display 99 Setup Display 78 Divide Title 60 Dolby Digital 82 Downmix 83 DTS 36 82 Dubbing 68 71 DV D8 Audio Input 69 84 DV D8 Dubbing 70 DV D8 Simple Dubbing 70 DVD Auto Chapter 84 DVD Backup 73 DVD VIDEO 32 DVD R 30 DV...

Page 107: ...format 30 recording mode 47 Recording mode 47 Recording time 47 50 Region code 33 Remaining time 40 Remote 20 98 REPLAY 35 Resetting 88 Resume Play 37 Rotate 43 S Satellite receiver 13 Satellite receiver brand code 104 Scan Audio 37 83 Searching for Chapter 39 for Title 39 for Track 39 Time Search 39 Set top box control 12 24 85 Set top box controller 12 25 Settings 78 Setup Display 78 Slide show ...

Page 108: ...able receptor vía satélite sintonizador 3 Paso 3 Conexión al televisor 6 Paso 4 Conexión del cable de alimentación 9 Paso 5 Preparación del mando a distancia 9 Paso 6 Configuración fácil 10 Funcionamiento básico Reproducción 13 Reproducción de discos 13 Opciones de reproducción 14 Reproducción de un título de la Lista títulos 16 Grabación 17 Antes de grabar 17 Grabación desde un equipo conectado q...

Page 109: ...as de televisión No es posible grabar en esta grabadora si tiene un decodificador de cable o un receptor vía satélite sin salidas de audio video cable sin decodificador de cable sólo antena sin cable de televisión En los casos mencionados anteriormente póngase en contacto con la empresa suministradora para consultar si podrían proporcionarle un decodificador de cable o un receptor vía satélite com...

Page 110: ...e de entrada de la grabadora LINE1 con la toma de entrada que está conectada al decodificador de cable o receptor vía satélite LINE 1 IN Coloque el controlador del decodificador cerca del sensor remoto del decodificador de cable receptor vía satélite ANT IN R L AUDIO OUT S VIDEO OUT VIDEO OUT TO TV Controlador del decodificador suministrado Decodificador de cable receptor vía satélite Cable de ant...

Page 111: ...uministrado en lugar de la clavija amarilla video del cable de audio video Deje las clavijas de audio conectadas a las tomas AUDIO L R Cuando utilice esta conexión presione SYSTEM MENU y ajuste Entrada línea 1 en Video S en la configuración de Video después de haber completado Configuración fácil página 10 Nota No conecte las tomas de S VIDEO y VIDEO amarillas al mismo tiempo ...

Page 112: ...eo componente consulte la página 7 o 8 Nota No conecte las tomas de salida de audio del televisor a las tomas LINE IN AUDIO L R a la vez De lo contrario se producirá ruido no deseado en los altavoces del televisor AUDIO INPUT R L VIDEO Flujo de señales Televisor o proyector rojo blanco amarillo Cable de audio video suministrado rojo blanco amarillo grabadora de DVD a LINE OUT VIDEO AUDIO L R ...

Page 113: ...s de la toma de salida HDMI OUT Asegúrese de apagar la grabadora antes de conectar un cable HDMI Esta grabadora de DVD incorpora la tecnología de High Definition Multimedia Interface HDMI HDMI el logotipo de HDMI y High Definition Multimedia Interface son marcas comerciales o marcas comerciales registradas de HDMI Licensing LLC Nota No es posible conectar la toma de salida HDMI OUT a tomas DVI que...

Page 114: ...de una fiel reproducción del color y de imágenes de alta calidad Si utiliza esta conexión asegúrese de conectar el cable de audio a las tomas LINE OUT AUDIO L R COMPONENT VIDEO IN PB PR Y AUDIO L R INPUT Flujo de señales Televisor o proyector rojo blanco verde Cable de video componente no suministrado rojo azul rojo verde azul a COMPONENT VIDEO OUT Cable de audio video suministrado blanco rojo a L...

Page 115: ...osibles daños por fugas y corrosión No toque el líquido directamente con las manos si se produjera alguna fuga Respete las indicaciones siguientes No utilice una pila nueva con otra usada ni pilas de distintos fabricantes No intente cargar las pilas Si no tiene intención de utilizar el mando a distancia durante un periodo de tiempo prolongado extraiga las pilas Si se produce una fuga de las pilas ...

Page 116: ...fácil 4 Presione ENTER Aparece la pantalla de configuración que le permite seleccionar el idioma utilizado en las indicaciones en pantalla 5 Seleccione un idioma y presione ENTER Aparecerá la pantalla de configuración para el control del decodificador de cable receptor vía satélite 6 Seleccione si se utiliza o no el control del decodificador de cable receptor vía satélite a continuación presione E...

Page 117: ...icas con franjas en las secciones superior e inferior de la pantalla 4 3 Explo pan para televisores de pantalla 4 3 Muestra automáticamente imágenes panorámicas que ocupan toda la pantalla y corta las secciones que no caben 11Presione ENTER 12Presione ENTER cuando aparezca Finalizar La Configuración fácil ha finalizado Se han realizado todas las conexiones y operaciones de configuración Si utiliza...

Page 118: ...os ajustes página 10 Compruebe la conexión y coloque el controlador del decodificador cerca del decodificador de cable receptor vía satélite página 3 Si el decodificador de cable receptor vía satélite sigue sin funcionar correctamente con la grabadora póngase en contacto con la empresa suministradora para que le proporcionen un decodificador de cable o receptor vía satélite compatible Arreglar el ...

Page 119: ...ticamente en función del disco Al reproducir un DVD RW DVD RW DVD R DVD R y DVD RAM podrá seleccionar el título del menú Lista títulos página 16 Cuando utilice un DVD RAM con un cartucho extraiga el disco del mismo Nota Para reproducir un disco grabado con otro equipo en esta grabadora primero finalice el disco en el equipo de grabación Utilización del menú del DVD Cuando reproduzca un DVD VIDEO o...

Page 120: ...elecciona un ángulo cuando se presiona varias veces Si se grabaron varios ángulos multiángulo de una escena en el disco aparece en la pantalla del televisor durante unos pocos segundos Consulte las instrucciones suministradas con el disco para obtener más información REPLAY ADVANCE Vuelve a reproducir o avanza rápidamente una escena si se presiona durante la reproducción Se desplaza al fotograma a...

Page 121: ... búsqueda cambia cada vez que presiona el botón retroceso rápido avance rápido FR1 T t FF1 1 FR2 2 T T t t FF2 2 FR3 3 T T T t t t FF3 3 Todos los discos 1 FF1 con sonido Explorar audio está disponible para DVD con pistas de sonido Dolby Digital 2 FR2 y FF2 no están disponibles para MP3 3 FR3 y FF3 sólo están disponibles para DVD y VIDEO CD lento Reproduce a cámara lenta cuando se presiona en el m...

Page 122: ...D R Modo VR Es posible cambiar la lista de títulos para que se muestre un título original o una Playlist Presione ORIGINAL PLAYLIST varias veces mientras se muestra el menú Lista títulos para seleccionar Lista títulos Original o Playlist Para quitar la lista de títulos Presione TITLE LIST z Observación También es posible cambiar la lista de títulos de DVD RAM para mostrar un original o Playlist No...

Page 123: ...ras y 28 minutos Notas En modos de grabación distintos a HQ la grabadora comprime los datos de audio video antes de la grabación Dado que las escenas de movimientos rápidos o la existencia de ruido en la imagen requieren que las tasas de compresión disminuyan el tamaño de los datos grabados aumenta y el tiempo de grabación disponible se acorta En la grabación de estas imágenes se recomienda un mod...

Page 124: ...n la grabadora a través del decodificador de cable receptor vía satélite conectado 1 Encienda la grabadora y el decodificador de cable receptor vía satélite 2 Presione Z OPEN CLOSE y coloque un disco grabable en la bandeja de discos 3 Presione Z OPEN CLOSE para cerrar la bandeja de discos Espere hasta que LOAD desaparezca de la pantalla del panel frontal Señales de control de copias Discos grababl...

Page 125: ...grabación Para hacer una pausa en la grabación Presione X PAUSE Para reiniciar la grabación presione X PAUSE de nuevo Notas Es posible que la grabación no se inicie inmediatamente después de presionar z REC No se puede cambiar el modo de grabación mientras graba o durante una pausa de grabación Si se produce un corte en el suministro eléctrico se eliminará el programa que se está grabando No es po...

Page 126: ... Lun Sáb de lunes a sábado y Lun Vie de lunes a viernes y Dom todos los domingos y Lun todos los lunes y y Sáb todos los sábados y 1 mes más tarde y y Hoy B Inicio establece la hora de inicio C Fin establece la hora de finalización D Can selecciona el canal o la fuente de entrada Cuando utilice el control de decodificador de cable receptor vía satélite seleccione el canal Cuando no utilice el cont...

Page 127: ...TOP dos veces Tenga en cuenta que la grabadora demora algunos segundos en detener la grabación Para utilizar la función Ajustar modo grab Si el espacio restante en el disco no es suficiente para realizar la grabación actual la grabadora ajustará el modo de grabación automáticamente Seleccione AUTO en Modo al ajustar el temporizador Notas Aunque lo ajuste correctamente es posible que el programa no...

Page 128: ...Sony Corporation Printed in China AK68 01519A ...

Reviews: